

Users Manual - English
Page 3
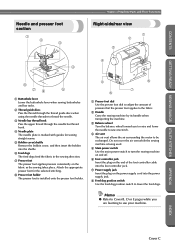
...page Cover D) A Flat bed attachment with accessory compartment Store presser feet and bobbins in the accessory compartment of the machine parts. Before using the sewing machine, carefully read these descriptions to thread the needle. APPENDIX INDEX Cover B C Needle threader lever Use the needle ...the knee lifter mounting slot. 0 Operation buttons Use the operation buttons to start the sewing machine and automatically cut them. CONTENTS GETTING READY SEWING BASICS UTILITY STITCHES Names of Machine Parts and Their Functions The names of the various parts of thread on the spool...
...page Cover D) A Flat bed attachment with accessory compartment Store presser feet and bobbins in the accessory compartment of the machine parts. Before using the sewing machine, carefully read these descriptions to thread the needle. APPENDIX INDEX Cover B C Needle threader lever Use the needle ...the knee lifter mounting slot. 0 Operation buttons Use the operation buttons to start the sewing machine and automatically cut them. CONTENTS GETTING READY SEWING BASICS UTILITY STITCHES Names of Machine Parts and Their Functions The names of the various parts of thread on the spool...
Users Manual - English
Page 4
... being used. 5 Main power switch Use the main power switch to turn the sewing machine on and off. 6 Foot controller jack Insert the plug on the end of the foot controller cable into the power supply jack. 8 Feed dog position .... 5 6 8 7 1 Presser foot dial Use the presser foot dial to adjust the amount of pressure that the presser foot applies to the fabric. 2 Handle Carry the sewing machine by its handle when transporting the machine. 3 Balance wheel Turn the balance wheel toward you are learning to use your...
... being used. 5 Main power switch Use the main power switch to turn the sewing machine on and off. 6 Foot controller jack Insert the plug on the end of the foot controller cable into the power supply jack. 8 Feed dog position .... 5 6 8 7 1 Presser foot dial Use the presser foot dial to adjust the amount of pressure that the presser foot applies to the fabric. 2 Handle Carry the sewing machine by its handle when transporting the machine. 3 Balance wheel Turn the balance wheel toward you are learning to use your...
Users Manual - English
Page 5
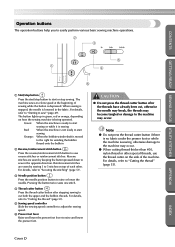
... other . Reinforcement stitches are sewn by sewing 3 to 5 stitches on how the sewing machine is sewing, otherwise damage to sew in the fabric. CONTENTS GETTING READY SEWING BASICS UTILITY STITCHES Operation buttons The operation buttons help you to easily perform various basic sewing machine operations. 2 3 5 1 4 6 1 Start/stop button Press the start/stop sewing. For details, refer to "Cutting the...
... other . Reinforcement stitches are sewn by sewing 3 to 5 stitches on how the sewing machine is sewing, otherwise damage to sew in the fabric. CONTENTS GETTING READY SEWING BASICS UTILITY STITCHES Operation buttons The operation buttons help you to easily perform various basic sewing machine operations. 2 3 5 1 4 6 1 Start/stop button Press the start/stop sewing. For details, refer to "Cutting the...
Users Manual - English
Page 6
For details, refer to "Understanding the LCD Screens" (page 12). 2 Sewing machine help key Press this key to remove an added pattern when sewing combinations of characters or decorative stitches. 6 Arrow keys Use these keys to quickly select one of 12 of the most often used stitches. ... other settings such as for incorrect operations appear in the indicated direction when selecting an item displayed on the front at the right of the sewing machine, consists of characters or decorative stitches. 5 C key Press this key to move in the LCD. In addition, can be pressed to select a...
For details, refer to "Understanding the LCD Screens" (page 12). 2 Sewing machine help key Press this key to remove an added pattern when sewing combinations of characters or decorative stitches. 6 Arrow keys Use these keys to quickly select one of 12 of the most often used stitches. ... other settings such as for incorrect operations appear in the indicated direction when selecting an item displayed on the front at the right of the sewing machine, consists of characters or decorative stitches. 5 C key Press this key to move in the LCD. In addition, can be pressed to select a...
Users Manual - English
Page 8
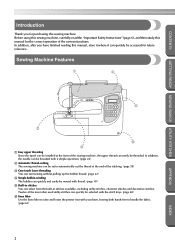
...the knee lifter to handle the fabric. (page 61) APPENDIX INDEX 2 CONTENTS GETTING READY SEWING BASICS UTILITY STITCHES Introduction Thank you have finished reading this sewing machine. Before using this sewing machine, carefully read the "Important Safety Instructions" (page 6), and then study this manual for ...thread. (page 18) 5 Built-in stitches available, including utility stitches, character stitches and decorative stitches. Twelve of the sewing machine, the upper thread can select from the built-in stitches You can easily be accessed for future reference. In addition, ...
...the knee lifter to handle the fabric. (page 61) APPENDIX INDEX 2 CONTENTS GETTING READY SEWING BASICS UTILITY STITCHES Introduction Thank you have finished reading this sewing machine. Before using this sewing machine, carefully read the "Important Safety Instructions" (page 6), and then study this manual for ...thread. (page 18) 5 Built-in stitches available, including utility stitches, character stitches and decorative stitches. Twelve of the sewing machine, the upper thread can select from the built-in stitches You can easily be accessed for future reference. In addition, ...
Users Manual - English
Page 9
... ...Cover D Operation panel ...Cover E Optional Accessories ...1 Introduction ...2 Sewing Machine Features ...2 Contents ...3 Important Safety Instructions 6 GETTING READY 9 Turning the Machine On/Off 10 Power supply precautions ...10 Turning on the machine ...11 Turning off the machine ...11 Understanding the LCD Screens 12 Checking machine operating procedures ...13 Changing the Machine Settings 14 Changing the settings ...14 Changing the...
... ...Cover D Operation panel ...Cover E Optional Accessories ...1 Introduction ...2 Sewing Machine Features ...2 Contents ...3 Important Safety Instructions 6 GETTING READY 9 Turning the Machine On/Off 10 Power supply precautions ...10 Turning on the machine ...11 Turning off the machine ...11 Understanding the LCD Screens 12 Checking machine operating procedures ...13 Changing the Machine Settings 14 Changing the settings ...14 Changing the...

Users Manual - English
Page 12
... the symbol "{" position which represents off, then remove plug from the accumulation of the machine and foot control free from outlet. 9. This sewing machine is not working properly, if it is not intended for its intended use by authorized dealer. WARNING - Do ... Do not use . 6 APPENDIX INDEX DANGER - Close attention is necessary when the machine is being administered. 8. The wrong plate can cause the needle to break. 14. CONTENTS GETTING READY SEWING BASICS UTILITY STITCHES Important Safety Instructions When using . Use only accessories recommended by the ...
... the symbol "{" position which represents off, then remove plug from the accumulation of the machine and foot control free from outlet. 9. This sewing machine is not working properly, if it is not intended for its intended use by authorized dealer. WARNING - Do ... Do not use . 6 APPENDIX INDEX DANGER - Close attention is necessary when the machine is being administered. 8. The wrong plate can cause the needle to break. 14. CONTENTS GETTING READY SEWING BASICS UTILITY STITCHES Important Safety Instructions When using . Use only accessories recommended by the ...

Users Manual - English
Page 14
... and machine, and should never be used. 3. CONTENTS GETTING READY SEWING BASICS UTILITY STITCHES CONGRATULATIONS ON CHOOSING OUR MACHINE Your machine is required, first follow the troubleshooting table in the back of the most advanced computerized household sewing machines. Plug the machine directly...occurs during use • Maintaining the machine • Leaving the machine unattended 3. Remember to inspect and adjust the machine yourself. For a longer service life 1. Use only neutral soaps or detergents to keep your local authorized Brother dealer. Do not touch the hand ...
... and machine, and should never be used. 3. CONTENTS GETTING READY SEWING BASICS UTILITY STITCHES CONGRATULATIONS ON CHOOSING OUR MACHINE Your machine is required, first follow the troubleshooting table in the back of the most advanced computerized household sewing machines. Plug the machine directly...occurs during use • Maintaining the machine • Leaving the machine unattended 3. Remember to inspect and adjust the machine yourself. For a longer service life 1. Use only neutral soaps or detergents to keep your local authorized Brother dealer. Do not touch the hand ...
Users Manual - English
Page 16
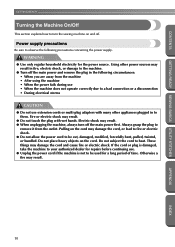
...the plug to be used for the power source. Do not place heavy objects on and off. CONTENTS GETTING READY SEWING BASICS UTILITY STITCHES GETTING READY Turning the Machine On/Off This section explains how to observe the following circumstances: • When you are away from the outlet. ... electric shock may result. ● Do not touch the plug with many other power sources may result. ● When unplugging the machine, always turn the sewing machine on the cord. Do not subject the cord to heat. These things may result. 10 APPENDIX INDEX Otherwise a fire may damage the...
...the plug to be used for the power source. Do not place heavy objects on and off. CONTENTS GETTING READY SEWING BASICS UTILITY STITCHES GETTING READY Turning the Machine On/Off This section explains how to observe the following circumstances: • When you are away from the outlet. ... electric shock may result. ● Do not touch the plug with many other power sources may result. ● When unplugging the machine, always turn the sewing machine on the cord. Do not subject the cord to heat. These things may result. 10 APPENDIX INDEX Otherwise a fire may damage the...
Users Manual - English
Page 17
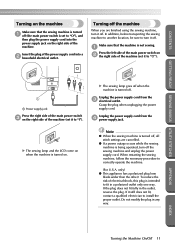
... the 4 power supply jack. CONTENTS GETTING READY SEWING BASICS UTILITY STITCHES Turning on the machine Make sure that the machine is being operated, turn off the sewing machine and unplug the power supply cord. Make sure that the sewing machine is turned 1 off the machine When you are cancelled. ● If a ... . If the plug does not fit fully in the outlet, reverse the plug. Note ● When the sewing machine is turned off, all stitch settings are finished using the sewing machine, turn it off . Unplug the power supply cord from the 3 electrical outlet. Insert the plug of the...
... the 4 power supply jack. CONTENTS GETTING READY SEWING BASICS UTILITY STITCHES Turning on the machine Make sure that the machine is being operated, turn off the sewing machine and unplug the power supply cord. Make sure that the sewing machine is turned 1 off the machine When you are cancelled. ● If a ... . If the plug does not fit fully in the outlet, reverse the plug. Note ● When the sewing machine is turned off, all stitch settings are finished using the sewing machine, turn it off . Unplug the power supply cord from the 3 electrical outlet. Insert the plug of the...
Users Manual - English
Page 18
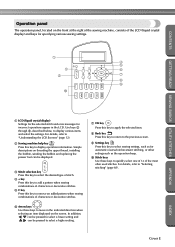
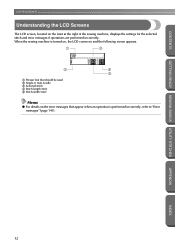
APPENDIX INDEX 12 When the sewing machine is performed incorrectly, refer to "Error messages" (page 141). GETTING READY SEWING BASICS UTILITY STITCHES GETTING READY CONTENTS Understanding the LCD Screens The LCD screen, located on the error messages that appear when an operation is turned ... used 2 Single or twin needle 3 Selected stitch 4 Stitch length (mm) 5 Stitch width (mm) Memo ● For details on the front at the right of the sewing machine, displays the settings for the selected stitch and error messages if operations are performed incorrectly.
APPENDIX INDEX 12 When the sewing machine is performed incorrectly, refer to "Error messages" (page 141). GETTING READY SEWING BASICS UTILITY STITCHES GETTING READY CONTENTS Understanding the LCD Screens The LCD screen, located on the error messages that appear when an operation is turned ... used 2 Single or twin needle 3 Selected stitch 4 Stitch length (mm) 5 Stitch width (mm) Memo ● For details on the front at the right of the sewing machine, displays the settings for the selected stitch and error messages if operations are performed incorrectly.
Users Manual - English
Page 19
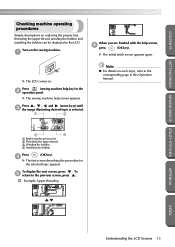
Press (sewing machine help key) in this Operation Manual. 3 4 1 Replacing the presser foot 2 Threading the upper thread 3 Winding the bobbin 4 Installing the bobbin Press (OK key). 4 X The first ... in the LCD. X The initial stitch screen appears again. X The LCD comes on the sewing machine. 1 When you are finished with the help screen appears. X The sewing machine help screen, 6 press (OK key). CONTENTS GETTING READY SEWING BASICS UTILITY STITCHES Checking machine operating procedures Simple descriptions on each topic, refer to the previous screen, press . †...
Press (sewing machine help key) in this Operation Manual. 3 4 1 Replacing the presser foot 2 Threading the upper thread 3 Winding the bobbin 4 Installing the bobbin Press (OK key). 4 X The first ... in the LCD. X The initial stitch screen appears again. X The LCD comes on the sewing machine. 1 When you are finished with the help screen appears. X The sewing machine help screen, 6 press (OK key). CONTENTS GETTING READY SEWING BASICS UTILITY STITCHES Checking machine operating procedures Simple descriptions on each topic, refer to the previous screen, press . †...
Users Manual - English
Page 20
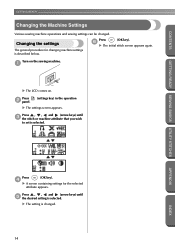
... operation X The settings screen appears. X The setting is described below. GETTING READY SEWING BASICS UTILITY STITCHES GETTING READY CONTENTS Changing the Machine Settings Various sewing machine operations and sewing settings can be changed . 14 APPENDIX INDEX Press (OK key). 4 X A screen containing settings for changing machine settings is changed . Press (OK key). 6 X The initial stitch screen appears...
... operation X The settings screen appears. X The setting is described below. GETTING READY SEWING BASICS UTILITY STITCHES GETTING READY CONTENTS Changing the Machine Settings Various sewing machine operations and sewing settings can be changed . 14 APPENDIX INDEX Press (OK key). 4 X A screen containing settings for changing machine settings is changed . Press (OK key). 6 X The initial stitch screen appears...
Users Manual - English
Page 21
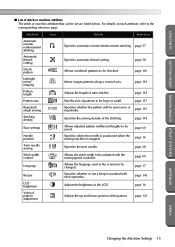
...widths and lengths to the corresponding reference page. page 60 Needle position Specifies where the needle is positioned when the sewing machine is sounded with the sewing speed controller. page 99 Language Allows the language used in the screens to be set are listed below. For details...LCD. page 28 Stitch width control Allows the stitch width to be saved. CONTENTS GETTING READY SEWING BASICS UTILITY STITCHES ■ List of stitch or machine attribute The stitch or machine attribute that can be adjusted with each attribute, refer to be changed. page 118 Pattern ...
...widths and lengths to the corresponding reference page. page 60 Needle position Specifies where the needle is positioned when the sewing machine is sounded with the sewing speed controller. page 99 Language Allows the language used in the screens to be set are listed below. For details...LCD. page 28 Stitch width control Allows the stitch width to be saved. CONTENTS GETTING READY SEWING BASICS UTILITY STITCHES ■ List of stitch or machine attribute The stitch or machine attribute that can be adjusted with each attribute, refer to be changed. page 118 Pattern ...

Users Manual - English
Page 22
.... Press (OK key). 4 X The initial stitch screen appears again. GETTING READY SEWING BASICS UTILITY STITCHES GETTING READY CONTENTS Changing the needle stop position When the sewing machine is purchased, it is set to instead leave the needle raised when sewing is stopped. X The machine is now set to , press . Adjusting the brightness of the LCD...
.... Press (OK key). 4 X The initial stitch screen appears again. GETTING READY SEWING BASICS UTILITY STITCHES GETTING READY CONTENTS Changing the needle stop position When the sewing machine is purchased, it is set to instead leave the needle raised when sewing is stopped. X The machine is now set to , press . Adjusting the brightness of the LCD...
Users Manual - English
Page 23
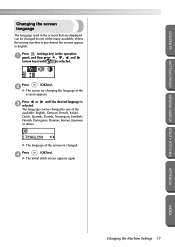
X The language of the many available. Press or 3 selected. CONTENTS GETTING READY SEWING BASICS UTILITY STITCHES Changing the screen language The language used in the screens that are displayed can be changed to one of... Italian, Dutch, Spanish, Danish, Norwegian, Swedish, Finnish, Portuguese, Russian, Korean, Japanese or others. APPENDIX INDEX Changing the Machine Settings 17 until is changed to one of the screens appears. When the sewing machine is purchased, the screens appear in the operation 1 panel, and then press , , and (arrow keys) until the desired...
X The language of the many available. Press or 3 selected. CONTENTS GETTING READY SEWING BASICS UTILITY STITCHES Changing the screen language The language used in the screens that are displayed can be changed to one of... Italian, Dutch, Spanish, Danish, Norwegian, Swedish, Finnish, Portuguese, Russian, Korean, Japanese or others. APPENDIX INDEX Changing the Machine Settings 17 until is changed to one of the screens appears. When the sewing machine is purchased, the screens appear in the operation 1 panel, and then press , , and (arrow keys) until the desired...

Users Manual - English
Page 24
... in injuries or damage to the machine. ● The enclosed bobbin was designed specifically for winding the bobbin is indicated by a broken line on the sewing machine. Use of the same type (part code: SA156, XA5539-151). GETTING READY SEWING BASICS UTILITY STITCHES GETTING READY CONTENTS ...the following precautions concerning the bobbin. CAUTION ● Only use the bobbin (part code: SA156, XA5539-151) designed specifically for this sewing machine. INDEX 18 Be sure to wind the thread onto the bobbin, and then insert the bobbin thread. Bobbin precautions Be sure to ...
... in injuries or damage to the machine. ● The enclosed bobbin was designed specifically for winding the bobbin is indicated by a broken line on the sewing machine. Use of the same type (part code: SA156, XA5539-151). GETTING READY SEWING BASICS UTILITY STITCHES GETTING READY CONTENTS ...the following precautions concerning the bobbin. CAUTION ● Only use the bobbin (part code: SA156, XA5539-151) designed specifically for this sewing machine. INDEX 18 Be sure to wind the thread onto the bobbin, and then insert the bobbin thread. Bobbin precautions Be sure to ...
Users Manual - English
Page 25
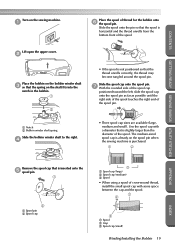
... 2 Place the bobbin on the bobbin winder shaft 3 so that the spring on the sewing machine. 1 Place the spool of thread for the bobbin onto 6 the spool pin. Slide...onto the pin so that is slightly larger than the diameter of the spool. CONTENTS GETTING READY SEWING BASICS UTILITY STITCHES Turn on the shaft fits into the notch in the bobbin. 1 2 •..., the thread may become tangled around the spool pin. The medium-sized spool cap is already on the spool pin when the sewing machine is purchased. 1 2 APPENDIX Remove the spool cap that is inserted onto the 5 spool pin. 1 2 1 Spool pin...
... 2 Place the bobbin on the bobbin winder shaft 3 so that the spring on the sewing machine. 1 Place the spool of thread for the bobbin onto 6 the spool pin. Slide...onto the pin so that is slightly larger than the diameter of the spool. CONTENTS GETTING READY SEWING BASICS UTILITY STITCHES Turn on the shaft fits into the notch in the bobbin. 1 2 •..., the thread may become tangled around the spool pin. The medium-sized spool cap is already on the spool pin when the sewing machine is purchased. 1 2 APPENDIX Remove the spool cap that is inserted onto the 5 spool pin. 1 2 1 Spool pin...
Users Manual - English
Page 27
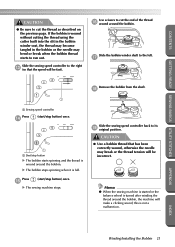
...bobbin stops spinning when it is not a malfunction. Press e (start /stop button) once. 1 1 Start/stop button) once. Memo ● When the sewing machine is started or the balance wheel is wound without cutting the thread using the cutter built into the slit in the bobbin winder seat, the ... controller back to the left. APPENDIX INDEX Winding/Installing the Bobbin 21 Slide the bobbin winder shaft to its i original position. X The sewing machine stops. g Remove the bobbin from the shaft. CAUTION ● Use a bobbin thread that the speed will make a clicking sound; Use ...
...bobbin stops spinning when it is not a malfunction. Press e (start /stop button) once. 1 1 Start/stop button) once. Memo ● When the sewing machine is started or the balance wheel is wound without cutting the thread using the cutter built into the slit in the bobbin winder seat, the ... controller back to the left. APPENDIX INDEX Winding/Installing the Bobbin 21 Slide the bobbin winder shaft to its i original position. X The sewing machine stops. g Remove the bobbin from the shaft. CAUTION ● Use a bobbin thread that the speed will make a clicking sound; Use ...
Users Manual - English
Page 28
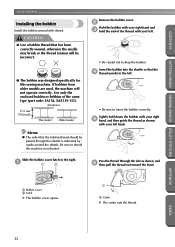
... Insert the bobbin into the shuttle so that the bobbin thread should be incorrect. ● The bobbin was designed specifically for this sewing machine. Memo ● The order that the 4 thread unrolls to the left hand. Be sure to drop the bobbin. INDEX 22 Lightly...the bobbin correctly. APPENDIX 1 Bobbin cover 2 Latch X The bobbin cover opens. 1 1 Cutter X The cutter cuts the thread. GETTING READY SEWING BASICS UTILITY STITCHES GETTING READY CONTENTS Installing the bobbin Install the bobbin wound with thread. CAUTION ● Use a bobbin thread that has been ...
... Insert the bobbin into the shuttle so that the bobbin thread should be incorrect. ● The bobbin was designed specifically for this sewing machine. Memo ● The order that the 4 thread unrolls to the left hand. Be sure to drop the bobbin. INDEX 22 Lightly...the bobbin correctly. APPENDIX 1 Bobbin cover 2 Latch X The bobbin cover opens. 1 1 Cutter X The cutter cuts the thread. GETTING READY SEWING BASICS UTILITY STITCHES GETTING READY CONTENTS Installing the bobbin Install the bobbin wound with thread. CAUTION ● Use a bobbin thread that has been ...


