

Accessory Catalog
Page 34
... results, use the Brother Bobbin Thread designed specifically for your fabric properly with a stabilizer. Consult your instruction manual for advice on how to hoop your machine. Here is a...is 4000D, 2500D, 1500D, 1200 series, PC and ULT series machines and the PE-400D and Innov-is also recommended for details.) www.brother.com Designed for high speed embroidery stitching,...500D. Make sure you just the right color for Brother® Embroidery Machines, but compatible with other sewing and embroidery machine brands. Pacesetter embroidery thread is completed. Out metallic ...
... results, use the Brother Bobbin Thread designed specifically for your fabric properly with a stabilizer. Consult your instruction manual for advice on how to hoop your machine. Here is a...is 4000D, 2500D, 1500D, 1200 series, PC and ULT series machines and the PE-400D and Innov-is also recommended for details.) www.brother.com Designed for high speed embroidery stitching,...500D. Make sure you just the right color for Brother® Embroidery Machines, but compatible with other sewing and embroidery machine brands. Pacesetter embroidery thread is completed. Out metallic ...
Users Manual - English
Page 2
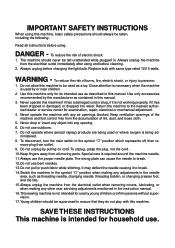
... never be used as contained in the instruction manual. 16.This sewing machine is used or where oxygen is intended for its intended use bent needles. 13.Do not pull or push fabric while stitching. WARNING - Do not ...unplug by the manufacturer as a toy. To reduce the risk of burns, fire, electric shock, or injury to persons: 1. Use this manual. 3. Use only accessories...
... never be used as contained in the instruction manual. 16.This sewing machine is used or where oxygen is intended for its intended use bent needles. 13.Do not pull or push fabric while stitching. WARNING - Do not ...unplug by the manufacturer as a toy. To reduce the risk of burns, fire, electric shock, or injury to persons: 1. Use this manual. 3. Use only accessories...
Users Manual - English
Page 4
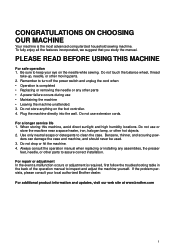
... humidity locations. Do not store anything on the needle while sewing. Plug the machine directly into the wall. Benzene, thinner, and scouring pow- For additional product information and updates, visit our web site at www.brother.com 1 Do not use extension cords. If the problem .... 2. ders can damage the case and machine, and should never be used. 3. Do not drop or hit the machine. 4. To fully enjoy all the features incorporated, we suggest that you study the manual. CONGRATULATIONS ON CHOOSING OUR MACHINE Your machine is required, first follow the troubleshooting table...
... humidity locations. Do not store anything on the needle while sewing. Plug the machine directly into the wall. Benzene, thinner, and scouring pow- For additional product information and updates, visit our web site at www.brother.com 1 Do not use extension cords. If the problem .... 2. ders can damage the case and machine, and should never be used. 3. Do not drop or hit the machine. 4. To fully enjoy all the features incorporated, we suggest that you study the manual. CONGRATULATIONS ON CHOOSING OUR MACHINE Your machine is required, first follow the troubleshooting table...
Users Manual - English
Page 10
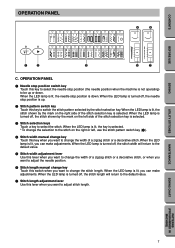
...you want to the stitch on the right or left, use the stitch pattern switch key (2). 4 Stitch width manual change the stitch length. UTILITY STITCHES MAINTENANCE SEWING CHART PATTERNS (PROGRAMMED IN MACHINE) 7 When the LED lamp is turned off , the stitch width will return to the default value. 7 ...34 35 36 37 38 39 40 1 2 3 5 7 C. When the LED lamp is lit, the needle stop position (the needle position when the machine is down . OPERATION PANEL 1 Needle stop position is selected. 3 Stitch selection keys Touch a key to be up . 2 Stitch pattern switch key Touch this...
...you want to the stitch on the right or left, use the stitch pattern switch key (2). 4 Stitch width manual change the stitch length. UTILITY STITCHES MAINTENANCE SEWING CHART PATTERNS (PROGRAMMED IN MACHINE) 7 When the LED lamp is turned off , the stitch width will return to the default value. 7 ...34 35 36 37 38 39 40 1 2 3 5 7 C. When the LED lamp is lit, the needle stop position (the needle position when the machine is down . OPERATION PANEL 1 Needle stop position is selected. 3 Stitch selection keys Touch a key to be up . 2 Stitch pattern switch key Touch this...
Users Manual - English
Page 14
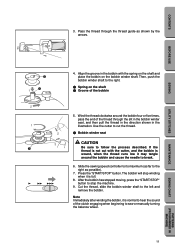
... shaft 2 Groove of the clutch engaging when beginning to the right. 1 Spring on the bobbin winder shaft. The bobbin will stop the machine. 9. Pass the thread through the slit in the bobbin winder seat, and then pull the thread in the direction shown in the bobbin ... winder seat CAUTION Be sure to stop winding when it is full. 8. Then, push the bobbin winder shaft to sew or manually turning the balance wheel. 11 SEWING CHART PATTERNS (PROGRAMMED IN MACHINE) Note Immediately after winding the bobbin, it is normal to hear the sound of the bobbin 5. CONTENTS 3. Press ...
... shaft 2 Groove of the clutch engaging when beginning to the right. 1 Spring on the bobbin winder shaft. The bobbin will stop the machine. 9. Pass the thread through the slit in the bobbin winder seat, and then pull the thread in the direction shown in the bobbin ... winder seat CAUTION Be sure to stop winding when it is full. 8. Then, push the bobbin winder shaft to sew or manually turning the balance wheel. 11 SEWING CHART PATTERNS (PROGRAMMED IN MACHINE) Note Immediately after winding the bobbin, it is normal to hear the sound of the bobbin 5. CONTENTS 3. Press ...
Users Manual - English
Page 16
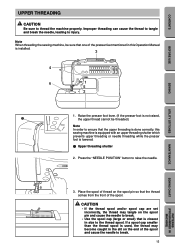
Raise the presser foot lever. (If the presser foot is lowered. 1 Upper threading shutter 2. Note When threading the sewing machine, be sure that the upper threading is done correctly, this Operation Manual is used, the thread may tangle on the spool pin so that is closest in size to break. • Use... the spool cap (large or small) that the thread comes from the front of the presser feet mentioned in this sewing machine is equipped with an...
Raise the presser foot lever. (If the presser foot is lowered. 1 Upper threading shutter 2. Note When threading the sewing machine, be sure that the upper threading is done correctly, this Operation Manual is used, the thread may tangle on the spool pin so that is closest in size to break. • Use... the spool cap (large or small) that the thread comes from the front of the presser feet mentioned in this sewing machine is equipped with an...
Users Manual - English
Page 18
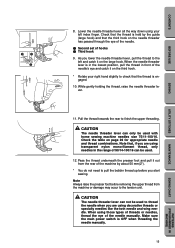
...that the thread is in the lowest position, pull the thread in the range of 90/14-100/16 can only be used with home sewing machine needles size 75/11-100/16. CAUTION The needle threader lever can be used. 12. As you lower the needle threader lever, pull.... 11. Lower the needle threader lever all the way down using transparent nylon mono-filament thread, only needles in front of the needle manually. Note that the thread is OFF when threading the needle manually. 15 PATTERNS (PROGRAMMED IN MACHINE) SEWING CHART MAINTENANCE UTILITY STITCHES SEWING BEFORE USE CONTENTS
...that the thread is in the lowest position, pull the thread in the range of 90/14-100/16 can only be used with home sewing machine needles size 75/11-100/16. CAUTION The needle threader lever can be used. 12. As you lower the needle threader lever, pull.... 11. Lower the needle threader lever all the way down using transparent nylon mono-filament thread, only needles in front of the needle manually. Note that the thread is OFF when threading the needle manually. 15 PATTERNS (PROGRAMMED IN MACHINE) SEWING CHART MAINTENANCE UTILITY STITCHES SEWING BEFORE USE CONTENTS
Users Manual - English
Page 22
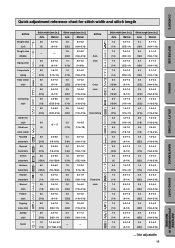
... Scallop 19 stitch 20 Eyelet Stitch width [mm (in.)] Auto Manual 0.0 0.0-7.0 (0) (0-1/4) - - 3.5 (1/8) 5.0 (3/16) 0.0 (0) 5.0 (3/16) 3.5 (1/8) 5.0 (3/16) 0.0-7.0 (0-1/4) 1.5-7.0 (1/16-1/4) 0.0-7.0 (0-1/4) 0.0-7.0 (0-1/4) 2.5-5.0 (3/32-3/16) 2.5-5.0 (3/32-3/16) Stitch length [mm (in .)] Auto Manual 0.4 0.1-1.0 (1/64) (1/64-1/16) 0.4 0.1-1.0 (1/64) ...(3/32) (1/64-3/16) 2.5 0.2-4.0 (3/32) (1/64-3/16) -: Not adjustable 19 MAINTENANCE SEWING CHART PATTERNS (PROGRAMMED IN MACHINE) STITCH 21 22 Satin stitch 23 24 25 Cross stitch 26 27 28 Hemstitching 29 30 ...
... Scallop 19 stitch 20 Eyelet Stitch width [mm (in.)] Auto Manual 0.0 0.0-7.0 (0) (0-1/4) - - 3.5 (1/8) 5.0 (3/16) 0.0 (0) 5.0 (3/16) 3.5 (1/8) 5.0 (3/16) 0.0-7.0 (0-1/4) 1.5-7.0 (1/16-1/4) 0.0-7.0 (0-1/4) 0.0-7.0 (0-1/4) 2.5-5.0 (3/32-3/16) 2.5-5.0 (3/32-3/16) Stitch length [mm (in .)] Auto Manual 0.4 0.1-1.0 (1/64) (1/64-1/16) 0.4 0.1-1.0 (1/64) ...(3/32) (1/64-3/16) 2.5 0.2-4.0 (3/32) (1/64-3/16) -: Not adjustable 19 MAINTENANCE SEWING CHART PATTERNS (PROGRAMMED IN MACHINE) STITCH 21 22 Satin stitch 23 24 25 Cross stitch 26 27 28 Hemstitching 29 30 ...
Users Manual - English
Page 33
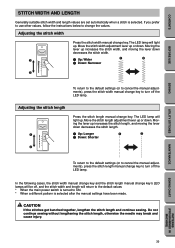
... pattern is selected. CONTENTS BEFORE USE SEWING UTILITY STITCHES STITCH WIDTH AND LENGTH Generally suitable stitch width and length values are set automatically when a stitch is selected after the manual settings have been made. If you ...sewing without lengthening the stitch length, otherwise the needle may break and cause injury. CAUTION If the stitches get bunched together, lengthen the stitch length and continue sewing. Adjusting the stitch width Press the stitch width manual change key to change key. Moving the lever up . MAINTENANCE SEWING CHART PATTERNS (PROGRAMMED IN MACHINE...
... pattern is selected. CONTENTS BEFORE USE SEWING UTILITY STITCHES STITCH WIDTH AND LENGTH Generally suitable stitch width and length values are set automatically when a stitch is selected after the manual settings have been made. If you ...sewing without lengthening the stitch length, otherwise the needle may break and cause injury. CAUTION If the stitches get bunched together, lengthen the stitch length and continue sewing. Adjusting the stitch width Press the stitch width manual change key to change key. Moving the lever up . MAINTENANCE SEWING CHART PATTERNS (PROGRAMMED IN MACHINE...
Users Manual - English
Page 38
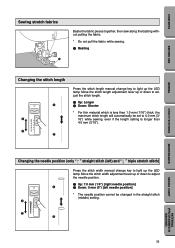
...2 2 PATTERNS (PROGRAMMED IN MACHINE) 35 Move the stitch width adjustment lever up or down to adjust the needle position. 1 Up: 7.0 mm (1/4") [right needle position] 1 2 Down: 0 mm (0") [left ) and " 5 " triple stretch stitch) Press the stitch width manual change key to light up ...the LED lamp. Move the stitch length adjustment lever up or down to light up the LED lamp. SEWING UTILITY STITCHES MAINTENANCE SEWING CHART Changing the needle position (only " 1 " straight stitch (left...
...2 2 PATTERNS (PROGRAMMED IN MACHINE) 35 Move the stitch width adjustment lever up or down to adjust the needle position. 1 Up: 7.0 mm (1/4") [right needle position] 1 2 Down: 0 mm (0") [left ) and " 5 " triple stretch stitch) Press the stitch width manual change key to light up ...the LED lamp. Move the stitch length adjustment lever up or down to light up the LED lamp. SEWING UTILITY STITCHES MAINTENANCE SEWING CHART Changing the needle position (only " 1 " straight stitch (left...
Users Manual - English
Page 44
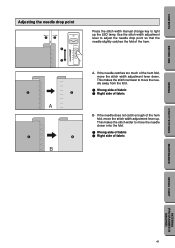
... the needle drop point 12 1 2 A B Press the stitch width manual change key to move the needle closer onto the fold. 1 Wrong side of fabric 2 Right side of fabric UTILITY STITCHES MAINTENANCE SEWING CHART PATTERNS (PROGRAMMED IN MACHINE) 41 A- This makes the stitch wider to light up . Use the stitch width adjustment lever to...
... the needle drop point 12 1 2 A B Press the stitch width manual change key to move the needle closer onto the fold. 1 Wrong side of fabric 2 Right side of fabric UTILITY STITCHES MAINTENANCE SEWING CHART PATTERNS (PROGRAMMED IN MACHINE) 41 A- This makes the stitch wider to light up . Use the stitch width adjustment lever to...
Users Manual - English
Page 49
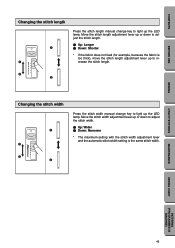
...thick), move the stitch length adjustment lever up to increase the stitch length. 2 2 Changing the stitch width 1 1 Press the stitch width manual change key to light up the LED lamp. Move the stitch width adjustment lever up or down to adjust the stitch length. 1 Up: ...2 Down: Shorter * If the fabric does not feed (for example, because the fabric is the same stitch width. 2 2 UTILITY STITCHES MAINTENANCE SEWING CHART PATTERNS (PROGRAMMED IN MACHINE) 46 CONTENTS BEFORE USE SEWING Changing the stitch length 1 1 Press the stitch length manual change key to light up the LED lamp.
...thick), move the stitch length adjustment lever up to increase the stitch length. 2 2 Changing the stitch width 1 1 Press the stitch width manual change key to light up the LED lamp. Move the stitch width adjustment lever up or down to adjust the stitch length. 1 Up: ...2 Down: Shorter * If the fabric does not feed (for example, because the fabric is the same stitch width. 2 2 UTILITY STITCHES MAINTENANCE SEWING CHART PATTERNS (PROGRAMMED IN MACHINE) 46 CONTENTS BEFORE USE SEWING Changing the stitch length 1 1 Press the stitch length manual change key to light up the LED lamp.
Users Manual - English
Page 50
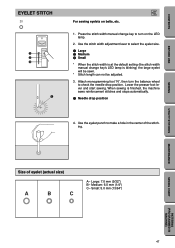
... to turn the balance wheel to check the needle drop position. Medium: 6.0 mm (1/4") C- Press the stitch width manual change key's LED lamp is finished, the machine sews reinforcement stitches and stops automatically. 1 Needle drop position 4. When sewing is blinking) the large eyelet will be sewn. * Stitch length can not be adjusted. 3. Size of the...
... to turn the balance wheel to check the needle drop position. Medium: 6.0 mm (1/4") C- Press the stitch width manual change key's LED lamp is finished, the machine sews reinforcement stitches and stops automatically. 1 Needle drop position 4. When sewing is blinking) the large eyelet will be sewn. * Stitch length can not be adjusted. 3. Size of the...
Users Manual - English
Page 55
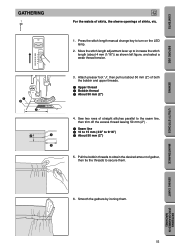
...(2") 4. Smooth the gathers by ironing them . 6. Press the stitch length manual change key to increase the stitch length (about 50 mm (2") of gather, then tie the threads to secure them . Sew two rows of shirts, etc. 1. CONTENTS BEFORE USE SEWING GATHERING 1 1 2 3 J For the waists of skirts, the sleeve openings... off the excess thread leaving 50 mm (2") . 1 Seam line 2 10 to 15 mm (3/8" to 9/16") 3 About 50 mm (2") 5. UTILITY STITCHES MAINTENANCE SEWING CHART PATTERNS (PROGRAMMED IN MACHINE) 52 Move the stitch length adjustment lever up to turn on the LED lamp. 2.
...(2") 4. Smooth the gathers by ironing them . 6. Press the stitch length manual change key to increase the stitch length (about 50 mm (2") of gather, then tie the threads to secure them . Sew two rows of shirts, etc. 1. CONTENTS BEFORE USE SEWING GATHERING 1 1 2 3 J For the waists of skirts, the sleeve openings... off the excess thread leaving 50 mm (2") . 1 Seam line 2 10 to 15 mm (3/8" to 9/16") 3 About 50 mm (2") 5. UTILITY STITCHES MAINTENANCE SEWING CHART PATTERNS (PROGRAMMED IN MACHINE) 52 Move the stitch length adjustment lever up to turn on the LED lamp. 2.
Users Manual - English
Page 62
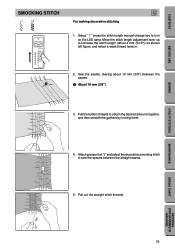
... STITCH 17 18 J For making decorative stitching 1 1. UTILITY STITCHES MAINTENANCE SEWING CHART PATTERNS (PROGRAMMED IN MACHINE) 59 Pull the bobbin threads to turn on the LED lamp. Attach presser foot "J" and select the decorative smocking stitch to increase... between the straight seams. J 5. Pull out the straight stitch threads. Select " " press the stitch length manual change key to obtain the desired amount of gather, and then smooth the gathers by ironing them. 4. Sew the seams, leaving about 4 mm (3/16")) as shown left figure, and select a weak thread tension. 2....
... STITCH 17 18 J For making decorative stitching 1 1. UTILITY STITCHES MAINTENANCE SEWING CHART PATTERNS (PROGRAMMED IN MACHINE) 59 Pull the bobbin threads to turn on the LED lamp. Attach presser foot "J" and select the decorative smocking stitch to increase... between the straight seams. J 5. Pull out the straight stitch threads. Select " " press the stitch length manual change key to obtain the desired amount of gather, and then smooth the gathers by ironing them. 4. Sew the seams, leaving about 4 mm (3/16")) as shown left figure, and select a weak thread tension. 2....
Users Manual - English
Page 65
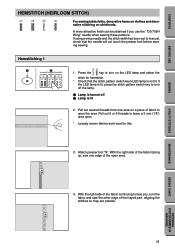
...to manual, check that the stitch pattern switch key's LED lamp is not lit. Attach presser foot "N". With the right side of the fabric facing up, sew one area on shirtfronts. UTILITY STITCHES MAINTENANCE SEWING CHART PATTERNS (PROGRAMMED IN MACHINE) 62 CONTENTS BEFORE USE SEWING ...HEMSTITCH (HEIRLOOM STITCH) 27 28 29 30 For sewing tablecloths, decorative hems on clothes and decorative stitching...
...to manual, check that the stitch pattern switch key's LED lamp is not lit. Attach presser foot "N". With the right side of the fabric facing up, sew one area on shirtfronts. UTILITY STITCHES MAINTENANCE SEWING CHART PATTERNS (PROGRAMMED IN MACHINE) 62 CONTENTS BEFORE USE SEWING ...HEMSTITCH (HEIRLOOM STITCH) 27 28 29 30 For sewing tablecloths, decorative hems on clothes and decorative stitching...
Users Manual - English
Page 67
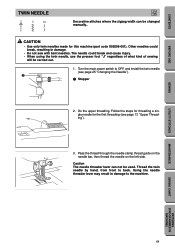
...5 needle bar, then thread the needle on the left side. 6 Caution The needle threader lever can be changed manually.. UTILITY STITCHES MAINTENANCE SEWING CHART PATTERNS (PROGRAMMED IN MACHINE) 64 The needle could break, resulting in damage to OFF, and install the twin needle (see page 13 ..."Upper Threading"). 3. Follow the steps for threading a single needle for this machine (part code X59296-001). CONTENTS BEFORE USE SEWING TWIN NEEDLE 2 3 19 J Decorative stitches where the zigzag width can not be used. Other needles could break and...
...5 needle bar, then thread the needle on the left side. 6 Caution The needle threader lever can be changed manually.. UTILITY STITCHES MAINTENANCE SEWING CHART PATTERNS (PROGRAMMED IN MACHINE) 64 The needle could break, resulting in damage to OFF, and install the twin needle (see page 13 ..."Upper Threading"). 3. Follow the steps for threading a single needle for this machine (part code X59296-001). CONTENTS BEFORE USE SEWING TWIN NEEDLE 2 3 19 J Decorative stitches where the zigzag width can not be used. Other needles could break and...


