
Users Manual - English
Page 11
... Design exampled ...126 APPENDIX ...127 Stitch Settings ...128 Utility stitches ...128 Other stitches ...133 Maintenance ...135 Cleaning the machine surface ...135 Cleaning the shuttle ...135 Troubleshooting ...137 Error messages ...141 Nothing appears in the LCD ...142 Operation beep ...142 Cancelling the operation beep ...143 Removing the upper cover ...143 Index ...144...
... Design exampled ...126 APPENDIX ...127 Stitch Settings ...128 Utility stitches ...128 Other stitches ...133 Maintenance ...135 Cleaning the machine surface ...135 Cleaning the shuttle ...135 Troubleshooting ...137 Error messages ...141 Nothing appears in the LCD ...142 Operation beep ...142 Cancelling the operation beep ...143 Removing the upper cover ...143 Index ...144...
Users Manual - English
Page 14
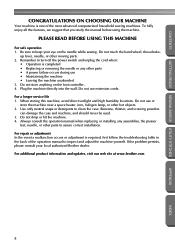
...to inspect and adjust the machine yourself. For repair or adjustment In the event a malfunction occurs or adjustment is required, first follow the troubleshooting table in the back of the most advanced computerized household sewing machines. up lever, needle, or other hot objects. 2. Do not use... space heater, iron, halogen lamp, or other moving parts. 2. Do not drop or hit the machine. 4. Remember to keep your local authorized Brother dealer. Benzene, thinner, and scouring powders can damage the case and machine, and should never be used. 3. PLEASE READ BEFORE USING THIS MACHINE...
...to inspect and adjust the machine yourself. For repair or adjustment In the event a malfunction occurs or adjustment is required, first follow the troubleshooting table in the back of the most advanced computerized household sewing machines. up lever, needle, or other hot objects. 2. Do not use... space heater, iron, halogen lamp, or other moving parts. 2. Do not drop or hit the machine. 4. Remember to keep your local authorized Brother dealer. Benzene, thinner, and scouring powders can damage the case and machine, and should never be used. 3. PLEASE READ BEFORE USING THIS MACHINE...
Users Manual - English
Page 133
CONTENTS GETTING READY SEWING BASICS UTILITY STITCHES 4 APPENDIX The various maintenance and troubleshooting procedures are described in this chapter. Stitch Settings ...128 Maintenance ...135 Troubleshooting 137 Index ...144 APPENDIX INDEX
CONTENTS GETTING READY SEWING BASICS UTILITY STITCHES 4 APPENDIX The various maintenance and troubleshooting procedures are described in this chapter. Stitch Settings ...128 Maintenance ...135 Troubleshooting 137 Index ...144 APPENDIX INDEX
Users Manual - English
Page 143
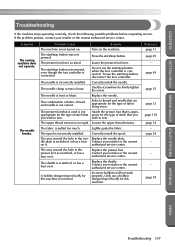
... combination of fabric being sewn. The area around the hole in the nee- page 18 APPENDIX INDEX Troubleshooting 137 Press the start /stop button, disconnect the foot controller. CONTENTS GETTING READY SEWING BASICS UTILITY STITCHES Troubleshooting If the machine stops operating correctly, check the following possible problems before requesting service. dle plate...
... combination of fabric being sewn. The area around the hole in the nee- page 18 APPENDIX INDEX Troubleshooting 137 Press the start /stop button, disconnect the foot controller. CONTENTS GETTING READY SEWING BASICS UTILITY STITCHES Troubleshooting If the machine stops operating correctly, check the following possible problems before requesting service. dle plate...

Users Manual - English
Page 145
... used is too coarse. Adjust the tension of the upper thread. page 18 page 27 page 35 page 128 page 54 page 135 APPENDIX INDEX Troubleshooting 139 The spool is not correct. The needle is incorrectly installed. The upper thread was not threaded correctly. The needle is incorrectly installed. Correctly install...
... used is too coarse. Adjust the tension of the upper thread. page 18 page 27 page 35 page 128 page 54 page 135 APPENDIX INDEX Troubleshooting 139 The spool is not correct. The needle is incorrectly installed. The upper thread was not threaded correctly. The needle is incorrectly installed. Correctly install...
Users Manual - English
Page 147
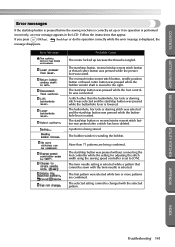
... two or more patterns are being stored. The first pattern was pressed after a stitch has been deleted. The start/stop button was connected. APPENDIX INDEX Troubleshooting 141 Error Message Probable Cause The motor locked up or if an operation is performed incorrectly, an error message appears in the LCD. The start...
... two or more patterns are being stored. The first pattern was pressed after a stitch has been deleted. The start/stop button was connected. APPENDIX INDEX Troubleshooting 141 Error Message Probable Cause The motor locked up or if an operation is performed incorrectly, an error message appears in the LCD. The start...

Users Manual - English
Page 149
... cover of the sewing machine was removed, re-attach it to , press . X The screen for changing the beep setting appears. Press 6 (OK key). APPENDIX INDEX Troubleshooting 143 CONTENTS GETTING READY SEWING BASICS UTILITY STITCHES Cancelling the operation beep When the sewing machine is purchased, it will not beep. Turn on .
... cover of the sewing machine was removed, re-attach it to , press . X The screen for changing the beep setting appears. Press 6 (OK key). APPENDIX INDEX Troubleshooting 143 CONTENTS GETTING READY SEWING BASICS UTILITY STITCHES Cancelling the operation beep When the sewing machine is purchased, it will not beep. Turn on .
Users Manual - English
Page 151
... guide plate Cover B, 20, 26 thread tension 54 thread tension dial Cover B, 54 thread that quickly unwinds 31 trial sewing 62 triple stretch stitch 100 troubleshooting 137 twin needle Cover A, 28, 35 U upper cover Cover B, 19, 25 upper thread 24 upper thread tension 54 Index 145 INDEX APPENDIX GETTING READY SEWING...
... guide plate Cover B, 20, 26 thread tension 54 thread tension dial Cover B, 54 thread that quickly unwinds 31 trial sewing 62 triple stretch stitch 100 troubleshooting 137 twin needle Cover A, 28, 35 U upper cover Cover B, 19, 25 upper thread 24 upper thread tension 54 Index 145 INDEX APPENDIX GETTING READY SEWING...


