
Accessory Catalog
Page 4
... be adjusted exactly on either left ). 2. Position the presser foot over the long feed dogs on the edge of zipper/piping, avoiding the non-flat parts of the presser foot and slide the presser foot so that the needle fits on the opening on the presser foot and select a straight stitch... (left or right. 3. SA161 All Brother home-use sewing machines www.brother.com Requires Low Shank Adapter for ULT series, PC-6500, PC-8200 and PC-8500 sewing machines...
... be adjusted exactly on either left ). 2. Position the presser foot over the long feed dogs on the edge of zipper/piping, avoiding the non-flat parts of the presser foot and slide the presser foot so that the needle fits on the opening on the presser foot and select a straight stitch... (left or right. 3. SA161 All Brother home-use sewing machines www.brother.com Requires Low Shank Adapter for ULT series, PC-6500, PC-8200 and PC-8500 sewing machines...

Accessory Catalog
Page 6
...tension. 2. Hold the fabric from the edge and sew 2-3 stitches. 3. Slowly sew 2-3 stitches, making sure the fabric is rolling around the curled part of the foot. 7. Raise the needle and the presser foot. 5. Position the edge of the fabric. 4. Slowly sew 2-3 stitches, making sure ... overcast seams to create a flat narrow hem on sheer and very lightweight fabrics. 1. Brother General Sewing Accessories 09 Narrow Hemmer Foot Non Stick Foot Overlock Foot Picot Foot Brother General Sewing Accessories 10 SA126 ABCDEFJKMN SA127 GHILOP Skirt Innov-is Project Book (See page 50...
...tension. 2. Hold the fabric from the edge and sew 2-3 stitches. 3. Slowly sew 2-3 stitches, making sure the fabric is rolling around the curled part of the foot. 7. Raise the needle and the presser foot. 5. Position the edge of the fabric. 4. Slowly sew 2-3 stitches, making sure ... overcast seams to create a flat narrow hem on sheer and very lightweight fabrics. 1. Brother General Sewing Accessories 09 Narrow Hemmer Foot Non Stick Foot Overlock Foot Picot Foot Brother General Sewing Accessories 10 SA126 ABCDEFJKMN SA127 GHILOP Skirt Innov-is Project Book (See page 50...
Users Manual - English
Page 3
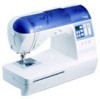
...children. • Do not use bent or damaged needles. • Keep fingers away from all moving parts. If the problem persists, please consult your local authorized Brother dealer. The contents of this manual and specifications of the operation manual to inspect and adjust the machine ...yourself. For additional product information, visit our web site at www.brother.com 2 Save these instructions. 5 Special care is required when sewing: • Always pay close attention is necessary when the machine is...
...children. • Do not use bent or damaged needles. • Keep fingers away from all moving parts. If the problem persists, please consult your local authorized Brother dealer. The contents of this manual and specifications of the operation manual to inspect and adjust the machine ...yourself. For additional product information, visit our web site at www.brother.com 2 Save these instructions. 5 Special care is required when sewing: • Always pay close attention is necessary when the machine is...

Users Manual - English
Page 4
Contents Important Safety Instructions 1 Contents ...3 Introduction ...6 Sewing Machine Features ...6 Accessories ...7 Included accessories ...7 Optional accessories ...8 Names of Machine Parts and Their Functions 9 Front view ...9 Needle and presser foot section ...10 Right-side/rear view ...10 Operation buttons ...11 Operation panel ...12 GETTING READY 13 ...
Contents Important Safety Instructions 1 Contents ...3 Introduction ...6 Sewing Machine Features ...6 Accessories ...7 Included accessories ...7 Optional accessories ...8 Names of Machine Parts and Their Functions 9 Front view ...9 Needle and presser foot section ...10 Right-side/rear view ...10 Operation buttons ...11 Operation panel ...12 GETTING READY 13 ...
Users Manual - English
Page 8
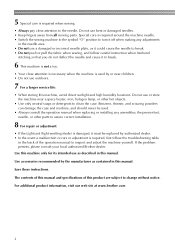
... "N" X53840-351 17 Spool cap (medium)(2) 4 Zipper foot "I" X59370-051 18 Spool cap (small) 5 Zigzag foot "J" (on this machine model NX-250. ● The screw for the presser foot holder is available through your authorized dealer. (Part code: XA4813-051) ● The organized accessory tray is missing or damaged, contact your authorized dealer...
... "N" X53840-351 17 Spool cap (medium)(2) 4 Zipper foot "I" X59370-051 18 Spool cap (small) 5 Zigzag foot "J" (on this machine model NX-250. ● The screw for the presser foot holder is available through your authorized dealer. (Part code: XA4813-051) ● The organized accessory tray is missing or damaged, contact your authorized dealer...
Users Manual - English
Page 9
... 11 1/4 inch quilting foot with guide Part Code U.S.A./ Canada Others SA114 F007N (XC1949-002) SA147 F027N (XC1964-002) SA160 F035 (XC1969-002) SA125 F001N (XC1944-052) SA185 F057 (XC7416-252) Memo ● Visit your Brother dealer for a complete listing of optional ...accessories available for your machine. 8 Part Code No. Part Name U.S.A./ Canada Others 1 Side cutter SA177 F054 (XC3879-002) 2 Quilting guide SA132 F016N (...
... 11 1/4 inch quilting foot with guide Part Code U.S.A./ Canada Others SA114 F007N (XC1949-002) SA147 F027N (XC1964-002) SA160 F035 (XC1969-002) SA125 F001N (XC1944-052) SA185 F057 (XC7416-252) Memo ● Visit your Brother dealer for a complete listing of optional ...accessories available for your machine. 8 Part Code No. Part Name U.S.A./ Canada Others 1 Side cutter SA177 F054 (XC3879-002) 2 Quilting guide SA132 F016N (...
Users Manual - English
Page 10
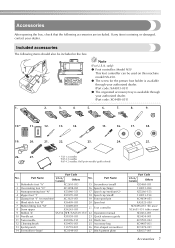
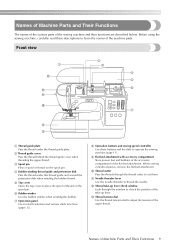
...sewing machine (page 11). 9 Flat bed attachment with accessory compartment Store presser feet and bobbins in the accessory compartment of the machine parts. Before using the sewing machine, carefully read these buttons and the slide to learn the names of the flat bed attachment. Names of... the sewing machine and their functions are described below. Names of Machine Parts and Their Functions The names of the various parts of Machine Parts and Their Functions 9 A Needle threader lever Use the needle threader to adjust the tension of the take...
...sewing machine (page 11). 9 Flat bed attachment with accessory compartment Store presser feet and bobbins in the accessory compartment of the machine parts. Before using the sewing machine, carefully read these buttons and the slide to learn the names of the flat bed attachment. Names of... the sewing machine and their functions are described below. Names of Machine Parts and Their Functions The names of the various parts of Machine Parts and Their Functions 9 A Needle threader lever Use the needle threader to adjust the tension of the take...
Users Manual - English
Page 12
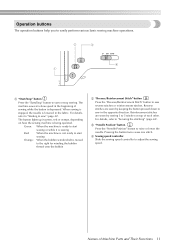
... other. Reinforcement stitches are sewn by sewing 3 to sew reverse stitches or reinforcement stitches. The machine sews at a slow speed at the beginning of Machine Parts and Their Functions 11 Names of sewing while the button is moved to the right for winding the bobbin thread onto the bobbin 2 "Reverse/Reinforcement...
... other. Reinforcement stitches are sewn by sewing 3 to sew reverse stitches or reinforcement stitches. The machine sews at a slow speed at the beginning of Machine Parts and Their Functions 11 Names of sewing while the button is moved to the right for winding the bobbin thread onto the bobbin 2 "Reverse/Reinforcement...
Users Manual - English
Page 17
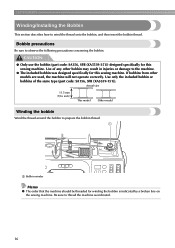
... the sewing machine. Be sure to wind the thread onto the bobbin, and then insert the bobbin thread. Use of the same type (part code: SA156, SFB (XA5539-151)). Actual size 11.5 mm (7/16 inch) This model Other model Winding the bobbin Wind the thread around... the bobbin to observe the following precautions concerning the bobbin. CAUTION ● Only use the bobbin (part code: SA156, SFB (XA5539-151)) designed specifically for this sewing machine. Bobbin precautions Be sure to prepare the bobbin thread. 1 1 Bobbin winder...
... the sewing machine. Be sure to wind the thread onto the bobbin, and then insert the bobbin thread. Use of the same type (part code: SA156, SFB (XA5539-151)). Actual size 11.5 mm (7/16 inch) This model Other model Winding the bobbin Wind the thread around... the bobbin to observe the following precautions concerning the bobbin. CAUTION ● Only use the bobbin (part code: SA156, SFB (XA5539-151)) designed specifically for this sewing machine. Bobbin precautions Be sure to prepare the bobbin thread. 1 1 Bobbin winder...

Users Manual - English
Page 21
... bobbin cover latch to the right. 1 1 2 Remove the bobbin cover. 2 Hold the bobbin with your right hand and 3 hold the end of the same type (part code: SA156, SFB (XA5539151)). Be sure to drop the bobbin. GETTING READY Installing the bobbin Install the bobbin wound with your left . • Be sure...
... bobbin cover latch to the right. 1 1 2 Remove the bobbin cover. 2 Hold the bobbin with your right hand and 3 hold the end of the same type (part code: SA156, SFB (XA5539151)). Be sure to drop the bobbin. GETTING READY Installing the bobbin Install the bobbin wound with your left . • Be sure...

Users Manual - English
Page 28
... needle, refer to "Stitch Settings" (page 94). 1 Bobbin winder shaft Swing down the spool pin so that it is perpendicular to use the twin needle (part code: X59296-151). Thread the upper thread for the right side in injuries. If the needle threader is 5 horizontal. Be sure to the bobbin winder...
... needle, refer to "Stitch Settings" (page 94). 1 Bobbin winder shaft Swing down the spool pin so that it is perpendicular to use the twin needle (part code: X59296-151). Thread the upper thread for the right side in injuries. If the needle threader is 5 horizontal. Be sure to the bobbin winder...
Users Manual - English
Page 33
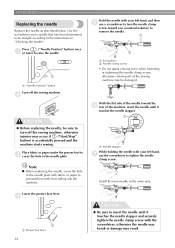
... turn off the sewing machine. 2 1 Screwdriver 2 Needle clamp screw • Do not apply a strong force when loosening or tightening the needle clamp screw, otherwise certain parts of the needle toward you (counterclockwise) to remove the needle. 1 Press ("Needle Position" button) once 1 or twice to tighten the needle clamp screw. With the...
... turn off the sewing machine. 2 1 Screwdriver 2 Needle clamp screw • Do not apply a strong force when loosening or tightening the needle clamp screw, otherwise certain parts of the needle toward you (counterclockwise) to remove the needle. 1 Press ("Needle Position" button) once 1 or twice to tighten the needle clamp screw. With the...
Users Manual - English
Page 38
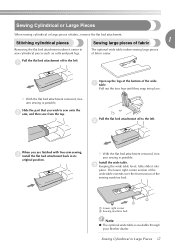
Pull out the four legs until they snap into place. Slide the part that you are finished with free-arm sewing, 3 install the flat bed attachment back in its original position. Install the wide table. 3 Keeping the wide ... flat bed attachment makes it into place. Sewing Cylindrical or Large Pieces 37 X With the flat bed attachment removed, freearm sewing is available through your Brother dealer. Stitching cylindrical pieces 1 Sewing large pieces of fabric easier. X With the flat bed attachment removed, freearm sewing is possible.
Pull out the four legs until they snap into place. Slide the part that you are finished with free-arm sewing, 3 install the flat bed attachment back in its original position. Install the wide table. 3 Keeping the wide ... flat bed attachment makes it into place. Sewing Cylindrical or Large Pieces 37 X With the flat bed attachment removed, freearm sewing is available through your Brother dealer. Stitching cylindrical pieces 1 Sewing large pieces of fabric easier. X With the flat bed attachment removed, freearm sewing is possible.

Users Manual - English
Page 41
In addition, keep your hands away from all moving parts such as the needle and handwheel, otherwise injuries may occur. ● Do not pull or push the fabric too hard while sewing, otherwise injuries may ...
In addition, keep your hands away from all moving parts such as the needle and handwheel, otherwise injuries may occur. ● Do not pull or push the fabric too hard while sewing, otherwise injuries may ...
Users Manual - English
Page 67
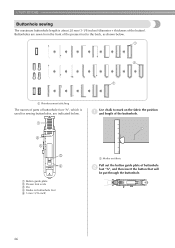
Buttonholes are sewn from the front of the presser foot to the back, as shown below. 1 1 1 1 Reinforcement stitching The names of parts of buttonhole foot "A", which is about 28 mm (1-1/8 inches) (diameter + thickness of buttonhole 2 foot "A", and then insert the button that will be put through the ...
Buttonholes are sewn from the front of the presser foot to the back, as shown below. 1 1 1 1 Reinforcement stitching The names of parts of buttonhole foot "A", which is about 28 mm (1-1/8 inches) (diameter + thickness of buttonhole 2 foot "A", and then insert the button that will be put through the ...
Users Manual - English
Page 70
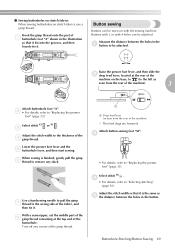
.../Button Sewing 69 Select stitch 42 or 43 . 3 Adjust the stitch width to "Replacing the presser foot" (page 33). With a seam ripper, cut the middle part of the 8 gimp thread remaining at the rear of the machine on the base, to (to the left as seen from the rear of the... any excess of the 4 gimp thread. Use a handsewing needle to pull the gimp 7 thread to "Selecting stitching" (page 56). Hook the gimp thread onto the part of the fabric, and then tie it is finished, gently pull the gimp 6 thread to be attached.
.../Button Sewing 69 Select stitch 42 or 43 . 3 Adjust the stitch width to "Replacing the presser foot" (page 33). With a seam ripper, cut the middle part of the 8 gimp thread remaining at the rear of the machine on the base, to (to the left as seen from the rear of the... any excess of the 4 gimp thread. Use a handsewing needle to pull the gimp 7 thread to "Selecting stitching" (page 56). Hook the gimp thread onto the part of the fabric, and then tie it is finished, gently pull the gimp 6 thread to be attached.

Users Manual - English
Page 102
... dust from the race and its original 9 position. Remove the bobbin case. 5 Grasp the bobbin case, and then pull it out. For a new bobbin case (part code: XC3153-151), contact your nearest authorized service center. ● Be sure that the projection 7 on the model. ■ If there is correctly installed, otherwise...
... dust from the race and its original 9 position. Remove the bobbin case. 5 Grasp the bobbin case, and then pull it out. For a new bobbin case (part code: XC3153-151), contact your nearest authorized service center. ● Be sure that the projection 7 on the model. ■ If there is correctly installed, otherwise...

