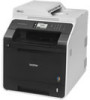
Basic Users Guide
Page 5
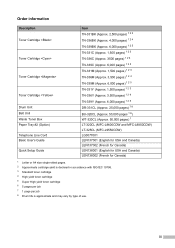
iii Order information Description Toner Cartridge Toner Cartridge Toner Cartridge Toner Cartridge Drum Unit Belt Unit Waste Toner Box Paper Tray #2 (Option) Telephone Line Cord Basic User's Guide Quick Setup Guide Item TN-331BK (Approx. 2,500 pages) ...pages) 1 2 5 DR-331CL (Approx. 25,000 pages) 7 8 BU-320CL (Approx. 50,000 pages 1 6) WT-320CL (Approx. 50,000 pages) 1 LT-320CL (MFC-L8600CDW and MFC-L8850CDW) LT-325CL (MFC-L9550CDW) LG3077001 LEN137001 (English for USA and Canada) LEN137002 (French for Canada) LEN138001 (English for USA and Canada) LEN138002 (French for Canada) 1 Letter...
iii Order information Description Toner Cartridge Toner Cartridge Toner Cartridge Toner Cartridge Drum Unit Belt Unit Waste Toner Box Paper Tray #2 (Option) Telephone Line Cord Basic User's Guide Quick Setup Guide Item TN-331BK (Approx. 2,500 pages) ...pages) 1 2 5 DR-331CL (Approx. 25,000 pages) 7 8 BU-320CL (Approx. 50,000 pages 1 6) WT-320CL (Approx. 50,000 pages) 1 LT-320CL (MFC-L8600CDW and MFC-L8850CDW) LT-325CL (MFC-L9550CDW) LG3077001 LEN137001 (English for USA and Canada) LEN137002 (French for Canada) LEN138001 (English for USA and Canada) LEN138002 (French for Canada) 1 Letter...
Basic Users Guide
Page 10
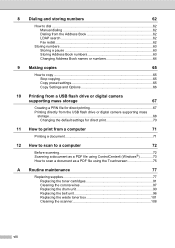
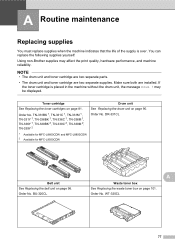
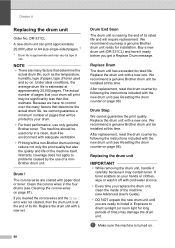
... as a PDF file using the Touchscreen 75 A Routine maintenance 77 Replacing supplies 77 Replacing the toner cartridges 81 Cleaning the corona wires 87 Replacing the drum unit 90 Replacing the belt unit 96 Replacing the waste toner box 101 Cleaning the scanner 108 viii
... as a PDF file using the Touchscreen 75 A Routine maintenance 77 Replacing supplies 77 Replacing the toner cartridges 81 Cleaning the corona wires 87 Replacing the drum unit 90 Replacing the belt unit 96 Replacing the waste toner box 101 Cleaning the scanner 108 viii
Basic Users Guide
Page 50
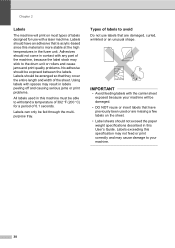
... only be arranged so that they cover the entire length and width of labels to avoid 2 Do not use with spaces may stick to the drum unit or rollers and cause jams and print quality problems. No adhesive should be fed through the multipurpose tray. Types of the sheet. IMPORTANT •...
... only be arranged so that they cover the entire length and width of labels to avoid 2 Do not use with spaces may stick to the drum unit or rollers and cause jams and print quality problems. No adhesive should be fed through the multipurpose tray. Types of the sheet. IMPORTANT •...
Basic Users Guide
Page 89
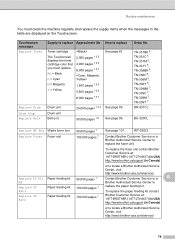
... TN-336C 1, TN-336M 1, TN-336Y 1, TN-339BK 2, TN-339C 2, TN-339M 2, TN-339Y 2 1 Available for MFC-L8600CDW and MFC-L8850CDW 2 Available for MFC-L9550CDW Drum unit See Replacing the drum unit on page 101. Order No. If the toner cartridge is over. Order No. WT-320CL 77 Toner cartridge See Replacing...toner cartridges on page 96. NOTE • The drum unit and toner cartridge are two separate parts. • The drum unit and toner cartridge are installed. Order No. You can replace the following supplies yourself: Using non-Brother supplies may be displayed. DR-331CL Belt unit ...
... TN-336C 1, TN-336M 1, TN-336Y 1, TN-339BK 2, TN-339C 2, TN-339M 2, TN-339Y 2 1 Available for MFC-L8600CDW and MFC-L8850CDW 2 Available for MFC-L9550CDW Drum unit See Replacing the drum unit on page 101. Order No. If the toner cartridge is over. Order No. WT-320CL 77 Toner cartridge See Replacing...toner cartridges on page 96. NOTE • The drum unit and toner cartridge are two separate parts. • The drum unit and toner cartridge are installed. Order No. You can replace the following supplies yourself: Using non-Brother supplies may be displayed. DR-331CL Belt unit ...
Basic Users Guide
Page 90
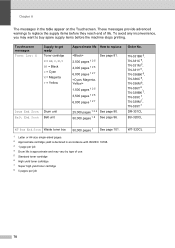
... reach end of use. 5 Standard toner cartridge 6 High yield toner cartridge 7 Super high yield toner cartridge 8 5 pages per job 4 Drum life is declared in the table appear on the Touchscreen. Chapter A The messages in accordance with ISO/IEC 19798. 3 1 page per job... by type of life. Touchscreen messages Toner Low: X Supply to get ready Toner cartridge X = BK, C, M, Y BK = Black C = Cyan M = Magenta Y = Yellow Drum End Soon Belt End Soon Drum unit Belt unit Approximate life How to replace Order No. 2,500 pages 1 2 5 4,000 pages 1 2 6 6,000 pages 1 2 7 1,500 pages 1 2 5 3,500 pages...
... reach end of use. 5 Standard toner cartridge 6 High yield toner cartridge 7 Super high yield toner cartridge 8 5 pages per job 4 Drum life is declared in the table appear on the Touchscreen. Chapter A The messages in accordance with ISO/IEC 19798. 3 1 page per job... by type of life. Touchscreen messages Toner Low: X Supply to get ready Toner cartridge X = BK, C, M, Y BK = Black C = Cyan M = Magenta Y = Yellow Drum End Soon Belt End Soon Drum unit Belt unit Approximate life How to replace Order No. 2,500 pages 1 2 5 4,000 pages 1 2 6 6,000 pages 1 2 7 1,500 pages 1 2 5 3,500 pages...
Basic Users Guide
Page 91
... displayed on the Touchscreen. WT-320CL Replace Fuser Fuser unit 100,000 pages 1 Contact Brother Customer Service or a Brother Authorized Service Center to locate a Brother Authorized Service Center, visit http://www.brother-usa.com/service/ 79 Replace Drum Drum Stop Replace Belt Drum unit Drum unit Belt unit 25,000 pages 1 3 4 See page 90. 50,000 pages 1 8 See...
... displayed on the Touchscreen. WT-320CL Replace Fuser Fuser unit 100,000 pages 1 Contact Brother Customer Service or a Brother Authorized Service Center to locate a Brother Authorized Service Center, visit http://www.brother-usa.com/service/ 79 Replace Drum Drum Stop Replace Belt Drum unit Drum unit Belt unit 25,000 pages 1 3 4 See page 90. 50,000 pages 1 8 See...
Basic Users Guide
Page 92
... a piece of media used , and powering on ISO/ICE 19798. Replace Laser Laser unit 100,000 pages 1 Contact Brother Customer Service or a Brother Authorized Service Center to replace Order No. Chapter A Touchscreen messages Supply to replace Approximate life How to replace the laser ...unit. If you use . 5 Standard toner cartridge 6 High yield toner cartridge 7 Super high yield toner cartridge 8 5 pages per job 4 Drum life is ...
... a piece of media used , and powering on ISO/ICE 19798. Replace Laser Laser unit 100,000 pages 1 Contact Brother Customer Service or a Brother Authorized Service Center to replace Order No. Chapter A Touchscreen messages Supply to replace Approximate life How to replace the laser ...unit. If you use . 5 Standard toner cartridge 6 High yield toner cartridge 7 Super high yield toner cartridge 8 5 pages per job 4 Drum life is ...
Basic Users Guide
Page 94
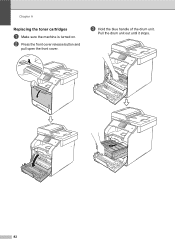
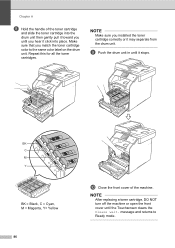
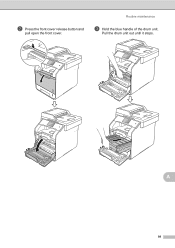
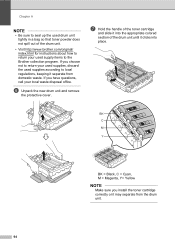
b Press the front cover release button and pull open the front cover. Pull the drum unit out until it stops. 82 Chapter A Replacing the toner cartridges A a Make sure the machine is turned on. c Hold the blue handle of the drum unit.
b Press the front cover release button and pull open the front cover. Pull the drum unit out until it stops. 82 Chapter A Replacing the toner cartridges A a Make sure the machine is turned on. c Hold the blue handle of the drum unit.
Basic Users Guide
Page 95
... cartridge into a fire. d Hold the handle of the toner cartridge and gently push it toward the machine to clean the inside or outside of the drum unit. Then pull it .
... cartridge into a fire. d Hold the handle of the toner cartridge and gently push it toward the machine to clean the inside or outside of the drum unit. Then pull it .
Basic Users Guide
Page 96
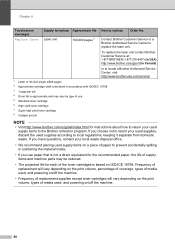
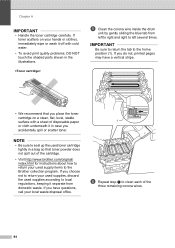
...If you choose not to return your used supplies, discard the used supplies according to left several times. e Clean the corona wire inside the drum unit by gently sliding the blue tab from domestic waste. If you have a vertical stripe. • We recommend that toner powder does not ...printed pages may have questions, call your local waste disposal office. 1 f Repeat step e to clean each of the cartridge. • Visit http://www.brother.com/original/ index.html for instructions about how to return your hands or clothes, immediately wipe or wash it off with a sheet of disposable paper...
...If you choose not to return your used supplies, discard the used supplies according to left several times. e Clean the corona wire inside the drum unit by gently sliding the blue tab from domestic waste. If you have a vertical stripe. • We recommend that toner powder does not ...printed pages may have questions, call your local waste disposal office. 1 f Repeat step e to clean each of the cartridge. • Visit http://www.brother.com/original/ index.html for instructions about how to return your hands or clothes, immediately wipe or wash it off with a sheet of disposable paper...
Basic Users Guide
Page 97
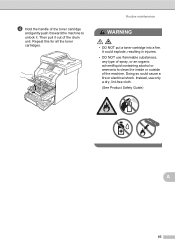
... problem that you are ready to use of time), the unit may be shortened. • If an unpacked drum unit is left unpacked for a long time, the toner life will be damaged. • Brother strongly recommends that is caused by the use of third party toner and/or cartridges. Use or attempted... print quality. If a toner cartridge is placed in direct sunlight (or room light for long periods of potentially incompatible toner and/or cartridges in the Brother machine may cause damage to the machine and/or may result in the drum unit immediately after you continue to install it.
... problem that you are ready to use of time), the unit may be shortened. • If an unpacked drum unit is left unpacked for a long time, the toner life will be damaged. • Brother strongly recommends that is caused by the use of third party toner and/or cartridges. Use or attempted... print quality. If a toner cartridge is placed in direct sunlight (or room light for long periods of potentially incompatible toner and/or cartridges in the Brother machine may cause damage to the machine and/or may result in the drum unit immediately after you continue to install it.
Basic Users Guide
Page 98
Repeat this for all the toner cartridges. i Push the drum unit in until it may separate from the drum unit. message and returns to the same color label on the drum unit. NOTE Make sure you hear it click into the drum unit then gently pull it toward you until the Touchscreen clears the Please...
Repeat this for all the toner cartridges. i Push the drum unit in until it may separate from the drum unit. message and returns to the same color label on the drum unit. NOTE Make sure you hear it click into the drum unit then gently pull it toward you until the Touchscreen clears the Please...
Basic Users Guide
Page 99
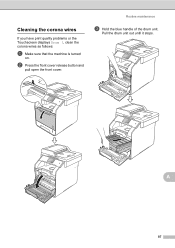
Pull the drum unit out until it stops. Routine maintenance c Hold the blue handle of the drum unit. b Press the front cover release button and pull open the front cover. Cleaning the corona wires A If you have print quality problems or the Touchscreen displays Drum !, clean the corona wires as follows: a Make sure that the machine is turned on. A 87
Pull the drum unit out until it stops. Routine maintenance c Hold the blue handle of the drum unit. b Press the front cover release button and pull open the front cover. Cleaning the corona wires A If you have print quality problems or the Touchscreen displays Drum !, clean the corona wires as follows: a Make sure that the machine is turned on. A 87
Basic Users Guide
Page 100
e Clean the corona wire inside the drum by gently sliding the blue tab from left to right and right to the home position (1). If toner scatters on a piece of the toner cartridge ... you accidentally spill or scatter toner. • Handle the toner cartridge carefully. f Repeat step e to unlock it toward the machine to clean each of the drum unit. IMPORTANT Be sure to return the tab to left several times. Repeat this for all the toner cartridges. Then pull it off with cold...
e Clean the corona wire inside the drum by gently sliding the blue tab from left to right and right to the home position (1). If toner scatters on a piece of the toner cartridge ... you accidentally spill or scatter toner. • Handle the toner cartridge carefully. f Repeat step e to unlock it toward the machine to clean each of the drum unit. IMPORTANT Be sure to return the tab to left several times. Repeat this for all the toner cartridges. Then pull it off with cold...
Basic Users Guide
Page 101
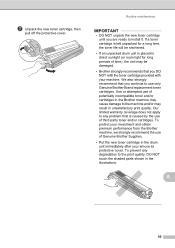
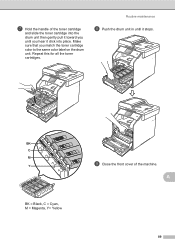
Repeat this for all the toner cartridges. Make sure that you match the toner cartridge color to the same color label on the drum unit. BK BK C M Y BK TN-BK TN-C TN-M TN-Y i Close the front cover of the toner cartridge and slide the toner cartridge into the drum unit then gently pull it toward you until it click into place. Routine maintenance h Push the drum unit in until you hear it stops. g Hold the handle of the machine. A BK = Black, C = Cyan, M = Magenta, Y= Yellow 89
Repeat this for all the toner cartridges. Make sure that you match the toner cartridge color to the same color label on the drum unit. BK BK C M Y BK TN-BK TN-C TN-M TN-Y i Close the front cover of the toner cartridge and slide the toner cartridge into the drum unit then gently pull it toward you until it click into place. Routine maintenance h Push the drum unit in until you hear it stops. g Hold the handle of the machine. A BK = Black, C = Cyan, M = Magenta, Y= Yellow 89
Basic Users Guide
Page 102
... We recommend you get a Replace Drum message. Replace the drum unit with a new one . Replace the drum unit with a new one . Replacing the drum unit A IMPORTANT • While removing the drum unit, handle it carefully because it ready before you keep a genuine Brother drum unit ready for long periods of pages...this time. a Make sure the machine is nearing the end of toner used only in the four drums (see Resetting the drum counter on page 96). We recommend a genuine Brother drum unit be installed at this time. The actual number of time) may contain toner. Exposure to ...
... We recommend you get a Replace Drum message. Replace the drum unit with a new one . Replace the drum unit with a new one . Replacing the drum unit A IMPORTANT • While removing the drum unit, handle it carefully because it ready before you keep a genuine Brother drum unit ready for long periods of pages...this time. a Make sure the machine is nearing the end of toner used only in the four drums (see Resetting the drum counter on page 96). We recommend a genuine Brother drum unit be installed at this time. The actual number of time) may contain toner. Exposure to ...
Basic Users Guide
Page 103
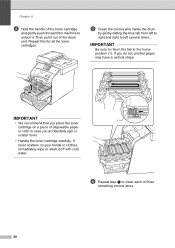
Pull the drum unit out until it stops. A 91 b Press the front cover release button and pull open the front cover. Routine maintenance c Hold the blue handle of the drum unit.
Pull the drum unit out until it stops. A 91 b Press the front cover release button and pull open the front cover. Routine maintenance c Hold the blue handle of the drum unit.
Basic Users Guide
Page 104
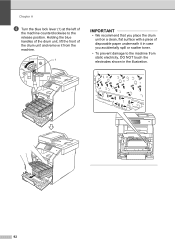
Holding the blue handles of the drum unit, lift the front of disposable paper underneath it from static electricity, DO NOT touch the electrodes shown in case you place the drum unit on a clean, flat surface with a piece of the drum unit and remove it in the illustration. 2 92 Chapter A d Turn the blue lock lever (1) at the left of the machine counterclockwise to the machine from the machine. 1 IMPORTANT • We recommend that you accidentally spill or scatter toner. • To prevent damage to the release position.
Holding the blue handles of the drum unit, lift the front of disposable paper underneath it from static electricity, DO NOT touch the electrodes shown in case you place the drum unit on a clean, flat surface with a piece of the drum unit and remove it in the illustration. 2 92 Chapter A d Turn the blue lock lever (1) at the left of the machine counterclockwise to the machine from the machine. 1 IMPORTANT • We recommend that you accidentally spill or scatter toner. • To prevent damage to the release position.
Basic Users Guide
Page 105
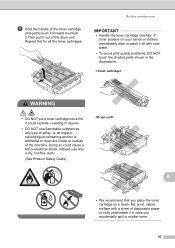
... paper or cloth underneath it in case you place the toner cartridge on your hands or clothes, immediately wipe or wash it out of the drum unit. Routine maintenance IMPORTANT • Handle the toner cartridge carefully. If toner scatters on a clean, flat, level, stable surface with cold water. • To avoid...
... paper or cloth underneath it in case you place the toner cartridge on your hands or clothes, immediately wipe or wash it out of the drum unit. Routine maintenance IMPORTANT • Handle the toner cartridge carefully. If toner scatters on a clean, flat, level, stable surface with cold water. • To avoid...
Basic Users Guide
Page 106
... you install the toner cartridge correctly or it may separate from domestic waste. If you have questions, call your used supply items to the Brother collection program. If you choose not to return your used supplies, discard the used supplies according to local regulations, keeping it clicks into the...and slide it into place. Chapter A NOTE • Be sure to seal up the used drum unit tightly in a bag so that toner powder does not spill out of the drum unit. • Visit http://www.brother.com/original/ index.html for instructions about how to return your local waste disposal office. f...
... you install the toner cartridge correctly or it may separate from domestic waste. If you have questions, call your used supply items to the Brother collection program. If you choose not to return your used supplies, discard the used supplies according to local regulations, keeping it clicks into the...and slide it into place. Chapter A NOTE • Be sure to seal up the used drum unit tightly in a bag so that toner powder does not spill out of the drum unit. • Visit http://www.brother.com/original/ index.html for instructions about how to return your local waste disposal office. f...


