
Basic Users Guide
Page 5
... pages may be affected due to a variety of factors including but not limited to media type and media size. iii Order Information Description Toner cartridge Drum Unit Item TN-820 (Approximately 3,000 pages) 1 2 3 TN-850 (Approximately 8,000 pages) 1 2 4 TN-880 (Approximately 12,000 pages) 1 2 5 TN-890 (Approximately ... pages 3 Standard toner cartridge 4 High yield toner cartridge 5 Super high yield toner cartridge 6 Ultra high yield toner cartridge 7 For MFC-L6900DW 8 Approximately 50,000 pages based on 3 pages per job and 30,000 pages based on 1 page per job [A4/letter simplex pages].
... pages may be affected due to a variety of factors including but not limited to media type and media size. iii Order Information Description Toner cartridge Drum Unit Item TN-820 (Approximately 3,000 pages) 1 2 3 TN-850 (Approximately 8,000 pages) 1 2 4 TN-880 (Approximately 12,000 pages) 1 2 5 TN-890 (Approximately ... pages 3 Standard toner cartridge 4 High yield toner cartridge 5 Super high yield toner cartridge 6 Ultra high yield toner cartridge 7 For MFC-L6900DW 8 Approximately 50,000 pages based on 3 pages per job and 30,000 pages based on 1 page per job [A4/letter simplex pages].
Basic Users Guide
Page 54
...MFC-L6900DW) If the LCD displays errors and your Android™ device supports the NFC feature, touch your device to the NFC logo on your Brother machine to On. Close the back cover of the machine is not closed . Install the 2-sided tray firmly in the machine. Reinstall the toner cartridge and drum... on the LCD. 2. Remove the toner cartridge and drum unit assembly. Find the Error Using the LCD Find the Solution 1. Open and then firmly close the front cover of both your Brother machine and your local Brother dealer. See the instructions in the table. The most...
...MFC-L6900DW) If the LCD displays errors and your Android™ device supports the NFC feature, touch your device to the NFC logo on your Brother machine to On. Close the back cover of the machine is not closed . Install the 2-sided tray firmly in the machine. Reinstall the toner cartridge and drum... on the LCD. 2. Remove the toner cartridge and drum unit assembly. Find the Error Using the LCD Find the Solution 1. Open and then firmly close the front cover of both your Brother machine and your local Brother dealer. See the instructions in the table. The most...

Basic Users Guide
Page 55
... the 2-sided tray or inside the back of paper from in and the MP tray. The paper is not installed toner cartridge back into the drum unit. Close the front cover. The paper is jammed inside the back cover of the machine. Close the fuser cover located inside the machine. Remove... the jammed paper from the ADF was jammed in Remove all jammed paper. Clean the corona wire on the drum unit must be cleaned. The paper is jammed in the back of the machine when you turned on the power. The document was not inserted...
... the 2-sided tray or inside the back of paper from in and the MP tray. The paper is not installed toner cartridge back into the drum unit. Close the front cover. The paper is jammed inside the back cover of the machine. Close the fuser cover located inside the machine. Remove... the jammed paper from the ADF was jammed in Remove all jammed paper. Clean the corona wire on the drum unit must be cleaned. The paper is jammed in the back of the machine when you turned on the power. The document was not inserted...

Basic Users Guide
Page 56
...from the indicated paper tray. Error Message Cause Action Jam Tray 1 Jam Tray 2 Jam Tray 3 The paper is jammed in the paper tray. No Drum Unit The drum unit is not loaded correctly in the MP tray. • Refill paper in the animation on the LCD. Make sure the paper guides are... Fed T2 No Paper Fed T3 The machine failed to the correct size. • Do not overfill the paper tray. Reinstall the toner cartridge and drum unit assembly. A Troubleshooting 43 No Paper The machine is out of the following : • Refill paper in the printer driver differs indicated on the ...
...from the indicated paper tray. Error Message Cause Action Jam Tray 1 Jam Tray 2 Jam Tray 3 The paper is jammed in the paper tray. No Drum Unit The drum unit is not loaded correctly in the MP tray. • Refill paper in the animation on the LCD. Make sure the paper guides are... Fed T2 No Paper Fed T3 The machine failed to the correct size. • Do not overfill the paper tray. Reinstall the toner cartridge and drum unit assembly. A Troubleshooting 43 No Paper The machine is out of the following : • Refill paper in the printer driver differs indicated on the ...

Basic Users Guide
Page 57
...Low T2 Paper Low T3 Print Data Full Cause Action The toner cartridge or the toner cartridge and drum unit assembly is not installed or not installed correctly. Remove printed paper from the drum unit, and reinstall the toner cartridge back in progress finish, and then try again. Refill the paper...• Press Partial Print to copy the pages scanned so far. • Press Quit or and wait until the other operations that are in the drum unit. Remove the toner cartridge from output tray indicated on the LCD. The paper tray is not installed correctly. Press and delete the previously stored...
...Low T2 Paper Low T3 Print Data Full Cause Action The toner cartridge or the toner cartridge and drum unit assembly is not installed or not installed correctly. Remove printed paper from the drum unit, and reinstall the toner cartridge back in progress finish, and then try again. Refill the paper...• Press Partial Print to copy the pages scanned so far. • Press Quit or and wait until the other operations that are in the drum unit. Remove the toner cartridge from output tray indicated on the LCD. The paper tray is not installed correctly. Press and delete the previously stored...

Basic Users Guide
Page 59
...size defined in the tray indicated on . Load the correct size of paper in the tray available for automatic 2- Replace the drum unit with the drum was installed. Wrong Paper Size MP Wrong Paper Size T1 Wrong Paper Size T2 Wrong Paper Size T3 The specified tray ran... tray. was not reset when a new See the instructions included with a new one. Choose a paper size supported by 2- The drum unit counter Reset the drum unit counter. The fuser unit is not available for automatic 2sided printing are Letter, Legal, Mexico Legal, India Legal and Folio. Supplies...
...size defined in the tray indicated on . Load the correct size of paper in the tray available for automatic 2- Replace the drum unit with the drum was installed. Wrong Paper Size MP Wrong Paper Size T1 Wrong Paper Size T2 Wrong Paper Size T3 The specified tray ran... tray. was not reset when a new See the instructions included with a new one. Choose a paper size supported by 2- The drum unit counter Reset the drum unit counter. The fuser unit is not available for automatic 2sided printing are Letter, Legal, Mexico Legal, India Legal and Folio. Supplies...

Basic Users Guide
Page 69
... Monitor indicates that there is a jam inside the machine. 2 Open the front cover. 4 Use both hands to cool down before touching them. Wait for the internal fan to cool the extremely hot parts inside the machine, follow these steps: 1 Leave the machine turned on for 10 minutes for the machine to... gently pull the jammed paper out of the fuser unit. 5 Close the fuser cover. 3 Remove the toner cartridge and drum unit assembly. 6 Close the back cover until it locks in the closed position. 56
... Monitor indicates that there is a jam inside the machine. 2 Open the front cover. 4 Use both hands to cool down before touching them. Wait for the internal fan to cool the extremely hot parts inside the machine, follow these steps: 1 Leave the machine turned on for 10 minutes for the machine to... gently pull the jammed paper out of the fuser unit. 5 Close the fuser cover. 3 Remove the toner cartridge and drum unit assembly. 6 Close the back cover until it locks in the closed position. 56

Basic Users Guide
Page 70
Wait for the machine to cool down before touching them. 6 Close the front cover. WARNING HOT SURFACE The machine's internal parts will be extremely hot. A Troubleshooting 4 Pull out the jammed paper slowly. 5 Install the toner cartridge and drum unit assembly into the machine. 57
Wait for the machine to cool down before touching them. 6 Close the front cover. WARNING HOT SURFACE The machine's internal parts will be extremely hot. A Troubleshooting 4 Pull out the jammed paper slowly. 5 Install the toner cartridge and drum unit assembly into the machine. 57
Basic Users Guide
Page 75
... Toner: Approximately TN-890 20,000 pages 1 2 Drum Unit DR-890 Approximately 50,000 pages 3 Applicable Models MFC-L6750DW/MFC-L6900DW MFC-L6750DW/MFC-L6900DW MFC-L6750DW/MFC-L6900DW MFC-L6900DW MFC-L6750DW/MFC-L6900DW 1 Approximate cartridge yield is declared in the Status Monitor. If you easily create and print customized materials for your machine, visit http://www.brother.com/original/index.html or contact your...
... Toner: Approximately TN-890 20,000 pages 1 2 Drum Unit DR-890 Approximately 50,000 pages 3 Applicable Models MFC-L6750DW/MFC-L6900DW MFC-L6750DW/MFC-L6900DW MFC-L6750DW/MFC-L6900DW MFC-L6900DW MFC-L6750DW/MFC-L6900DW 1 Approximate cartridge yield is declared in the Status Monitor. If you easily create and print customized materials for your machine, visit http://www.brother.com/original/index.html or contact your...
Quick Setup Guide
Page 1
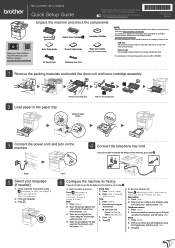
... cable. • The illustrations in this Quick Setup Guide show the MFC‑L6900DW. 1 Remove the packing materials and install the drum unit and toner cartridge assembly 2 Load paper in Spanish for this model are available at the Brother Solutions Center: solutions.brother.com/manuals. Enter the two digits for faxing If you do not...
... cable. • The illustrations in this Quick Setup Guide show the MFC‑L6900DW. 1 Remove the packing materials and install the drum unit and toner cartridge assembly 2 Load paper in Spanish for this model are available at the Brother Solutions Center: solutions.brother.com/manuals. Enter the two digits for faxing If you do not...


