Basic Users Guide
Page 13
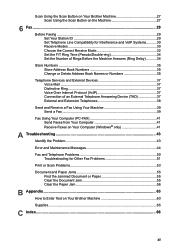
Scan Using the Scan Button on Your Brother Machine 27 Scan Using the Scan Button on the Machine 27 6 Fax ...29 Before Faxing ...29 Set Your Station ID 29 Set Telephone Line Compatibility ... and Maintenance Messages 44 Fax and Telephone Problems 50 Troubleshooting for Other Fax Problems 51 Print or Scan Problems 53 Document and Paper Jams 55 Find the Jammed Document or Paper 55 Clear the Document Jam 55 Clear the Paper Jam 56 B Appendix ...63 How to Enter Text on Your Brother Machine 63 Supplies...65 C Index ...66 xi
Scan Using the Scan Button on Your Brother Machine 27 Scan Using the Scan Button on the Machine 27 6 Fax ...29 Before Faxing ...29 Set Your Station ID 29 Set Telephone Line Compatibility ... and Maintenance Messages 44 Fax and Telephone Problems 50 Troubleshooting for Other Fax Problems 51 Print or Scan Problems 53 Document and Paper Jams 55 Find the Jammed Document or Paper 55 Clear the Document Jam 55 Clear the Paper Jam 56 B Appendix ...63 How to Enter Text on Your Brother Machine 63 Supplies...65 C Index ...66 xi
Basic Users Guide
Page 22
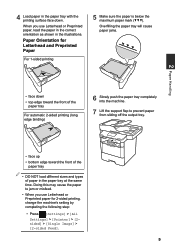
... step: • Press [Settings] > [All Settings] > [Printer] > [2sided] > [Single Image] > [2-sided Feed]. 9 Overfilling the paper tray will cause paper jams. 2 Paper Handling • face down • top edge toward the front of the paper tray For automatic 2-sided printing (long edge binding) 6 Slowly push the paper tray completely into the machine. 7 Lift the support flap to...
... step: • Press [Settings] > [All Settings] > [Printer] > [2sided] > [Single Image] > [2-sided Feed]. 9 Overfilling the paper tray will cause paper jams. 2 Paper Handling • face down • top edge toward the front of the paper tray For automatic 2-sided printing (long edge binding) 6 Slowly push the paper tray completely into the machine. 7 Lift the support flap to...

Basic Users Guide
Page 26
... your machine. IMPORTANT Some types of paper listed above, they may cause a paper jam or damage your machine. • If you use bond paper, paper with letterheads using low temperature dyes or thermography • that is multipart or carbonless • that is designed for inkjet printing If you use any Brother warranty or service agreement. 13...
... your machine. IMPORTANT Some types of paper listed above, they may cause a paper jam or damage your machine. • If you use bond paper, paper with letterheads using low temperature dyes or thermography • that is multipart or carbonless • that is designed for inkjet printing If you use any Brother warranty or service agreement. 13...

Basic Users Guide
Page 29
Doing this may cause a jam. • DO NOT exceed the maximum paper mark when you are using. Print on Envelopes, Thick Paper or Labels When the back cover (face up output tray) is pulled down, the machine has a straight paper path from the MP tray on the right side has a lever, press it gently. 4 ... and onto the face up output tray. Doing this may cause a jam. 3 On the front of the paper that you load paper in the MP tray. Use the MP tray and output method for printing on thick paper or envelopes. • Load the paper or envelope into the MP tray with the printing surface face...
Doing this may cause a jam. • DO NOT exceed the maximum paper mark when you are using. Print on Envelopes, Thick Paper or Labels When the back cover (face up output tray) is pulled down, the machine has a straight paper path from the MP tray on the right side has a lever, press it gently. 4 ... and onto the face up output tray. Doing this may cause a jam. 3 On the front of the paper that you load paper in the MP tray. Use the MP tray and output method for printing on thick paper or envelopes. • Load the paper or envelope into the MP tray with the printing surface face...

Basic Users Guide
Page 58
...the fuser cover located inside back cover to pull out all jammed paper from the ADF unit. The ADF cover is jammed in and the MP tray. Close the ADF cover. Remove the jammed paper from in Remove all jammed paper. correctly. the back cover. Close the front cover. Clean ...tray or inside the back cover of the machine. The paper is not completely closed or paper was jammed in Open the fuser cover and remove all jammed paper. Close the fuser cover. 45 A Troubleshooting Jam 2-sided Jam Inside Jam MP Tray Jam Rear See the Online User's Guide: Clean the Corona Wire...
...the fuser cover located inside back cover to pull out all jammed paper from the ADF unit. The ADF cover is jammed in and the MP tray. Close the ADF cover. Remove the jammed paper from in Remove all jammed paper. correctly. the back cover. Close the front cover. Clean ...tray or inside the back cover of the machine. The paper is not completely closed or paper was jammed in Open the fuser cover and remove all jammed paper. Close the fuser cover. 45 A Troubleshooting Jam 2-sided Jam Inside Jam MP Tray Jam Rear See the Online User's Guide: Clean the Corona Wire...
Basic Users Guide
Page 59
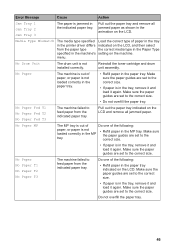
.... Error Message Cause Action Jam Tray 1 Jam Tray 2 Jam Tray 3 The paper is jammed in the animation on the LCD. Pull out the paper tray and remove all jammed paper. Make sure the paper guides are set to feed paper from the indicated paper tray. No Paper The machine is out of the following : paper, or paper is in the paper tray indicated on the...
.... Error Message Cause Action Jam Tray 1 Jam Tray 2 Jam Tray 3 The paper is jammed in the animation on the LCD. Pull out the paper tray and remove all jammed paper. Make sure the paper guides are set to feed paper from the indicated paper tray. No Paper The machine is out of the following : paper, or paper is in the paper tray indicated on the...
Basic Users Guide
Page 68
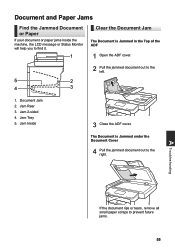
Document and Paper Jams Find the Jammed Document or Paper If your document or paper jams inside the machine, the LCD message or Status Monitor will help you to prevent future jams. 55 Clear the Document Jam The Document is Jammed under the Document Cover 4 Pull the jammed document out to the left. 1. Jam Rear 3. Jam Tray 5. Document Jam 2. The Document is Jammed in the...
Document and Paper Jams Find the Jammed Document or Paper If your document or paper jams inside the machine, the LCD message or Status Monitor will help you to prevent future jams. 55 Clear the Document Jam The Document is Jammed under the Document Cover 4 Pull the jammed document out to the left. 1. Jam Rear 3. Jam Tray 5. Document Jam 2. The Document is Jammed in the...
Basic Users Guide
Page 69
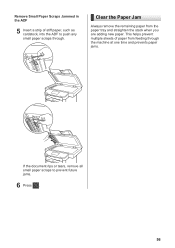
This helps prevent multiple sheets of stiff paper, such as cardstock, into the ADF to push any small paper scraps through the machine at one time and prevents paper jams. If the document rips or tears, remove all small paper scraps to prevent future jams. 6 Press . 56 Remove Small Paper Scraps Jammed in the ADF 5 Insert a strip of paper from the paper tray and straighten the stack when you are adding new paper. Clear the Paper Jam Always remove the remaining paper from feeding through .
This helps prevent multiple sheets of stiff paper, such as cardstock, into the ADF to push any small paper scraps through the machine at one time and prevents paper jams. If the document rips or tears, remove all small paper scraps to prevent future jams. 6 Press . 56 Remove Small Paper Scraps Jammed in the ADF 5 Insert a strip of paper from the paper tray and straighten the stack when you are adding new paper. Clear the Paper Jam Always remove the remaining paper from feeding through .
Basic Users Guide
Page 70
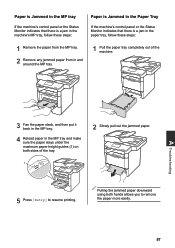
...2 Slowly pull out the jammed paper. 5 Press [Retry] to remove the paper more easily. 57 Paper is Jammed in the MP tray If the machine's control panel or the Status Monitor indicates that there is a jam in the machine's MP tray, follow these steps: Paper is Jammed in the Paper Tray If the machine's ...panel or the Status Monitor indicates that there is a jam in the paper tray, follow these steps: 1 Remove the paper from the MP tray. 2 Remove any jammed paper from in the MP tray and make sure the paper stays under the maximum paper height guides (1) on both hands allows you to resume ...
...2 Slowly pull out the jammed paper. 5 Press [Retry] to remove the paper more easily. 57 Paper is Jammed in the MP tray If the machine's control panel or the Status Monitor indicates that there is a jam in the machine's MP tray, follow these steps: Paper is Jammed in the Paper Tray If the machine's ...panel or the Status Monitor indicates that there is a jam in the paper tray, follow these steps: 1 Remove the paper from the MP tray. 2 Remove any jammed paper from in the MP tray and make sure the paper stays under the maximum paper height guides (1) on both hands allows you to resume ...

Basic Users Guide
Page 71
...sides toward you to fit the paper size. Paper is Jammed in the Back of the Machine If the machine's control panel or the Status Monitor indicates that there is below the maximum paper mark (b b b). 1 Leave the machine turned on for 10 minutes for the internal fan to cool the extremely hot... parts inside the machine. 2 Open the back cover. 5 Put the paper tray firmly back in the back (Rear) of paper to prevent further jams, and slide the paper guides to ...
...sides toward you to fit the paper size. Paper is Jammed in the Back of the Machine If the machine's control panel or the Status Monitor indicates that there is below the maximum paper mark (b b b). 1 Leave the machine turned on for 10 minutes for the internal fan to cool the extremely hot... parts inside the machine. 2 Open the back cover. 5 Put the paper tray firmly back in the back (Rear) of paper to prevent further jams, and slide the paper guides to ...

Basic Users Guide
Page 72
... in the closed position. 59 Paper is Jammed inside the Machine If the machine's control panel or the Status Monitor indicates that there is a jam inside the machine. 2 Open the front cover. 4 Use both hands to cool down before touching them. Wait for the internal fan to cool the extremely hot... parts inside the machine, follow these steps: 1 Leave the machine turned on for 10 minutes for the machine to gently pull the jammed paper out of the fuser unit. 5 Close the fuser cover. 3...
... in the closed position. 59 Paper is Jammed inside the Machine If the machine's control panel or the Status Monitor indicates that there is a jam inside the machine. 2 Open the front cover. 4 Use both hands to cool down before touching them. Wait for the internal fan to cool the extremely hot... parts inside the machine, follow these steps: 1 Leave the machine turned on for 10 minutes for the machine to gently pull the jammed paper out of the fuser unit. 5 Close the fuser cover. 3...

Basic Users Guide
Page 73
Wait for the machine to cool down before touching them. 6 Close the front cover. 4 Pull out the jammed paper slowly. 5 Install the toner cartridge and drum unit assembly into the machine. 60 WARNING HOT SURFACE The machine's internal parts will be extremely hot.
Wait for the machine to cool down before touching them. 6 Close the front cover. 4 Pull out the jammed paper slowly. 5 Install the toner cartridge and drum unit assembly into the machine. 60 WARNING HOT SURFACE The machine's internal parts will be extremely hot.
Basic Users Guide
Page 74
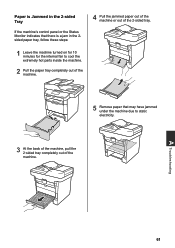
...Monitor indicates that there is a jam in the 2sided paper tray, follow these steps: 1 Leave the machine turned on for 10 minutes for the internal fan to cool the extremely hot parts inside the machine. 2 Pull the paper tray completely out of the machine. 4 Pull the jammed paper out of the machine or out... of the 2‑sided tray. 5 Remove paper that may have jammed under the machine due to static ...
...Monitor indicates that there is a jam in the 2sided paper tray, follow these steps: 1 Leave the machine turned on for 10 minutes for the internal fan to cool the extremely hot parts inside the machine. 2 Pull the paper tray completely out of the machine. 4 Pull the jammed paper out of the machine or out... of the 2‑sided tray. 5 Remove paper that may have jammed under the machine due to static ...
Basic Users Guide
Page 75
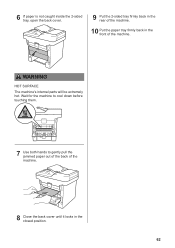
6 If paper is not caught inside the 2-sided tray, open the back cover. 9 Put the 2-sided tray firmly back in the rear of the machine. WARNING HOT SURFACE The machine's internal parts will be extremely hot. Wait for the machine to cool down before touching them. 7 Use both hands to gently pull the jammed paper out of the back of the machine. 8 Close the back cover until it locks in the front of the machine. 10 Put the paper tray firmly back in the closed position. 62
6 If paper is not caught inside the 2-sided tray, open the back cover. 9 Put the 2-sided tray firmly back in the rear of the machine. WARNING HOT SURFACE The machine's internal parts will be extremely hot. Wait for the machine to cool down before touching them. 7 Use both hands to gently pull the jammed paper out of the back of the machine. 8 Close the back cover until it locks in the front of the machine. 10 Put the paper tray firmly back in the closed position. 62

Basic Users Guide
Page 79
...Address Book changing 35 storing 35 using 39 ADF (Automatic Document Feeder 18, 22, 23, 27, 39 Automatic fax receive 30, 32 B Brother Brother numbers i Customer Service i FAQs (Frequently Asked Questions)..i product support i service centers i C Control Panel Overview 1 NFC (Near Field Communication... mode 30, 32 ring delay 34 station ID 29 telephone line compatibility 30 Fax receive 32 Fax, from computer 41 J Jams 55 document 55 paper 56 L Labels 12, 16 LCD (Liquid Crystal Display).......... 1, 3, 5 M Maintenance messages 44 Multi-purpose Tray 10, 16 N...
...Address Book changing 35 storing 35 using 39 ADF (Automatic Document Feeder 18, 22, 23, 27, 39 Automatic fax receive 30, 32 B Brother Brother numbers i Customer Service i FAQs (Frequently Asked Questions)..i product support i service centers i C Control Panel Overview 1 NFC (Near Field Communication... mode 30, 32 ring delay 34 station ID 29 telephone line compatibility 30 Fax receive 32 Fax, from computer 41 J Jams 55 document 55 paper 56 L Labels 12, 16 LCD (Liquid Crystal Display).......... 1, 3, 5 M Maintenance messages 44 Multi-purpose Tray 10, 16 N...
Basic Users Guide
Page 80
T TAD (Telephone Answering Device), external 30, 37 Troubleshooting 43 document and paper jams 55 error and maintenance messages ..44 fax and telephone problems ...........50 print or scan problems 53 V Voice Mail 32, 37 VoIP systems 30, 37 Volume 7 W Warranty is in the box Notice of disclaimer iv 67 C Index
T TAD (Telephone Answering Device), external 30, 37 Troubleshooting 43 document and paper jams 55 error and maintenance messages ..44 fax and telephone problems ...........50 print or scan problems 53 V Voice Mail 32, 37 VoIP systems 30, 37 Volume 7 W Warranty is in the box Notice of disclaimer iv 67 C Index


