
Basic Users Guide
Page 12
... 1 Control Panel Overview 1 Access Brother Utilities 8 Initial Setup...9 Set the Date and Time 9 Adjust the Ring Volume 9 Adjust the Beeper Volume 10 Adjust the Speaker Volume 10 2 Paper Handling 11 Load Paper ...11 Load and Print using the Paper Tray 11 Set the Check Size 12 Change the Paper Size 12 Change the Paper Type 13 Recommended Print Media 13 Using Special Paper 14 3 Print ...15 Print from Your Computer (Windows 15 Print a Document (Windows 15 Print on Both Sides of the Paper (Windows 15 Print More Than One Page on a Single Sheet of Paper...
... 1 Control Panel Overview 1 Access Brother Utilities 8 Initial Setup...9 Set the Date and Time 9 Adjust the Ring Volume 9 Adjust the Beeper Volume 10 Adjust the Speaker Volume 10 2 Paper Handling 11 Load Paper ...11 Load and Print using the Paper Tray 11 Set the Check Size 12 Change the Paper Size 12 Change the Paper Type 13 Recommended Print Media 13 Using Special Paper 14 3 Print ...15 Print from Your Computer (Windows 15 Print a Document (Windows 15 Print on Both Sides of the Paper (Windows 15 Print More Than One Page on a Single Sheet of Paper...
Basic Users Guide
Page 13
... a Fax Using Your Machine 42 Send a Fax ...42 Fax Using Your Computer (PC-FAX 44 Send Faxes from Your Computer 44 Receive Faxes on Your Computer (Windows® only 44 A Troubleshooting 46 Identify the Problem 46 Error and Maintenance Messages 47 Fax and Telephone Problems 52 Troubleshooting for Other Fax Problems 53 Print or Scan Problems 55 Document and Paper Jams 57 Find the Jammed Document or Paper 57 Clear the Document Jam 57 Clear the Paper Jam 58 B Appendix ...65 How to Enter Text on Your Brother Machine...
... a Fax Using Your Machine 42 Send a Fax ...42 Fax Using Your Computer (PC-FAX 44 Send Faxes from Your Computer 44 Receive Faxes on Your Computer (Windows® only 44 A Troubleshooting 46 Identify the Problem 46 Error and Maintenance Messages 47 Fax and Telephone Problems 52 Troubleshooting for Other Fax Problems 53 Print or Scan Problems 55 Document and Paper Jams 57 Find the Jammed Document or Paper 57 Clear the Document Jam 57 Clear the Paper Jam 58 B Appendix ...65 How to Enter Text on Your Brother Machine...
Basic Users Guide
Page 14
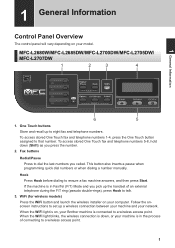
... a wireless access point. When the WiFi light blinks, the wireless connection is down (Shift) as you called. 1 General Information Control Panel Overview The control panel will vary depending on your computer. MFC-L2680W/MFC-L2685DW/MFC-L2700DW/MFC-L2705DW/ MFC-L2707DW 1 2 3 4 1 General Information 6 5 1. Follow the onscreen instructions to set up to dial the last numbers you press the number. 2. Fax buttons Redial/Pause Press to eight fax and telephone numbers. If the machine is in Fax/Tel (F/T) Mode...
... a wireless access point. When the WiFi light blinks, the wireless connection is down (Shift) as you called. 1 General Information Control Panel Overview The control panel will vary depending on your computer. MFC-L2680W/MFC-L2685DW/MFC-L2700DW/MFC-L2705DW/ MFC-L2707DW 1 2 3 4 1 General Information 6 5 1. Follow the onscreen instructions to set up to dial the last numbers you press the number. 2. Fax buttons Redial/Pause Press to eight fax and telephone numbers. If the machine is in Fax/Tel (F/T) Mode...
Basic Users Guide
Page 18
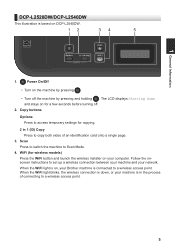
... on for a few seconds before turning off the machine by pressing and holding . Follow the onscreen instructions to set up a wireless connection between your machine and your machine is connected to Scan Mode. 4. Scan Press to switch the machine to a wireless access point. Power On/Off • Turn on , your computer. WiFi (for copying. 2 in the process of an identification card onto a single page. 3. The LCD displays Shutting Down and stays on DCP...
... on for a few seconds before turning off the machine by pressing and holding . Follow the onscreen instructions to set up a wireless connection between your machine and your machine is connected to Scan Mode. 4. Scan Press to switch the machine to a wireless access point. Power On/Off • Turn on , your computer. WiFi (for copying. 2 in the process of an identification card onto a single page. 3. The LCD displays Shutting Down and stays on DCP...

Basic Users Guide
Page 28
... printer driver window appears. 3 Click the 2-sided / Booklet drop-down list and select the 2-sided option. 4 Click the 2-sided Settings button. 5 Select an option from Your Computer (Windows®) Print a Document (Windows®) Print on Both Sides of the Paper (Windows®) 1 Select the print command in your application. 2 Select Brother MFC-XXXX series (where XXXX is the name of your print operation. 3 Print 3 Print Print from the 2-sided Type menu. 15 Related Models: DCP-L2520DW/DCP-L2540DW/MFC-L2685DW/ MFC-L2700DW/MFC-L2705DW/MFC...
... printer driver window appears. 3 Click the 2-sided / Booklet drop-down list and select the 2-sided option. 4 Click the 2-sided Settings button. 5 Select an option from Your Computer (Windows®) Print a Document (Windows®) Print on Both Sides of the Paper (Windows®) 1 Select the print command in your application. 2 Select Brother MFC-XXXX series (where XXXX is the name of your print operation. 3 Print 3 Print Print from the 2-sided Type menu. 15 Related Models: DCP-L2520DW/DCP-L2540DW/MFC-L2685DW/ MFC-L2700DW/MFC-L2705DW/MFC...
Basic Users Guide
Page 29
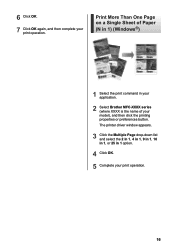
Print More Than One Page on a Single Sheet of Paper (N in 1) (Windows®) 1 Select the print command in 1 option. 4 Click OK. 5 Complete your model), and then click the printing properties or preferences button. The printer driver window appears. 3 Click the Multiple Page drop-down list and select the 2 in 1, 4 in 1, 9 in 1, 16 in 1, or 25 in your application. 2 Select Brother MFC-XXXX series (where XXXX is the name of your print operation. 16 6 Click OK. 7 Click OK again, and then complete your print operation.
Print More Than One Page on a Single Sheet of Paper (N in 1) (Windows®) 1 Select the print command in 1 option. 4 Click OK. 5 Complete your model), and then click the printing properties or preferences button. The printer driver window appears. 3 Click the Multiple Page drop-down list and select the 2 in 1, 4 in 1, 9 in 1, 16 in 1, or 25 in your application. 2 Select Brother MFC-XXXX series (where XXXX is the name of your print operation. 16 6 Click OK. 7 Click OK again, and then complete your print operation.

Basic Users Guide
Page 31
... application. 7 Select Brother MFC-XXXX series (where XXXX is the name of your paper size. 9 Click the Media Type drop-down list and select the type of paper or one sheet of paper you are using. 10 Click the First Page and Other Pages drop-down list and select your model), and then click the printing properties or preferences button. The printer driver window appears. 8 Click the Paper Size drop-down lists and select Manual. 18
... application. 7 Select Brother MFC-XXXX series (where XXXX is the name of your paper size. 9 Click the Media Type drop-down list and select the type of paper or one sheet of paper you are using. 10 Click the First Page and Other Pages drop-down list and select your model), and then click the printing properties or preferences button. The printer driver window appears. 8 Click the Paper Size drop-down lists and select Manual. 18
Basic Users Guide
Page 33
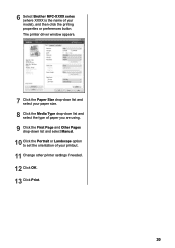
6 Select Brother MFC-XXXX series (where XXXX is the name of your model), and then click the printing properties or preferences button. The printer driver window appears. 7 Click the Paper Size drop-down list and select your paper size. 8 Click the Media Type drop-down list and select the type of paper you are using. 9 Click the First Page and Other Pages drop-down list and select Manual. 10 Click the Portrait or Landscape option to set the orientation of your printout. 11 Change other printer settings if needed. 12 Click OK. 13 Click Print. 20
6 Select Brother MFC-XXXX series (where XXXX is the name of your model), and then click the printing properties or preferences button. The printer driver window appears. 7 Click the Paper Size drop-down list and select your paper size. 8 Click the Media Type drop-down list and select the type of paper you are using. 9 Click the First Page and Other Pages drop-down list and select Manual. 10 Click the Portrait or Landscape option to set the orientation of your printout. 11 Change other printer settings if needed. 12 Click OK. 13 Click Print. 20
Basic Users Guide
Page 43
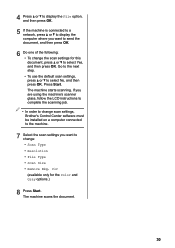
If you are using the machine's scanner glass, follow the LCD instructions to complete the scanning job. • In order to change scan settings, Brother's Control Center software must be installed on a computer connected to the machine. 7 Select the scan settings you want to select Yes, and then press OK. Clr (available only for this document, press a or b to change: • Scan Type • Resolution • File Type • Scan Size • Remove Bkg. Press Start. 4 Press...
If you are using the machine's scanner glass, follow the LCD instructions to complete the scanning job. • In order to change scan settings, Brother's Control Center software must be installed on a computer connected to the machine. 7 Select the scan settings you want to select Yes, and then press OK. Clr (available only for this document, press a or b to change: • Scan Type • Resolution • File Type • Scan Size • Remove Bkg. Press Start. 4 Press...
Basic Users Guide
Page 45
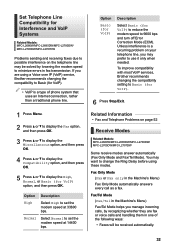
... phone line. Set Telephone Line Compatibility for Interference and VoIP Systems Related Models: MFC-L2680W/MFC-L2685DW/MFC-L2700DW/ MFC-L2705DW/MFC-L2707DW Problems sending and receiving faxes due to possible interference on the telephone line may be received automatically. 32 Option Basic (for VoIP) Description Select Basic (for VoIP) option, and then press OK. Fax Only Mode (Fax or Fax only in fax transmission. Fax/Tel Mode (Fax/Tel in the Machine's Menu) Fax/Tel Mode helps...
... phone line. Set Telephone Line Compatibility for Interference and VoIP Systems Related Models: MFC-L2680W/MFC-L2685DW/MFC-L2700DW/ MFC-L2705DW/MFC-L2707DW Problems sending and receiving faxes due to possible interference on the telephone line may be received automatically. 32 Option Basic (for VoIP) Description Select Basic (for VoIP) option, and then press OK. Fax Only Mode (Fax or Fax only in fax transmission. Fax/Tel Mode (Fax/Tel in the Machine's Menu) Fax/Tel Mode helps...
Basic Users Guide
Page 60
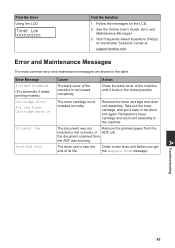
... common error and maintenance messages are shown in the closed completely. Error Message 2-sided Disabled (For automatic 2-sided printing models) Cartridge Error Put the Toner Cartridge back in Document Jam Drum End Soon Cause The back cover of the machine until it back in the machine. Take out the toner cartridge, and put it locks in the table. the document scanned from the inserted or fed correctly, or ADF unit. A Troubleshooting 47 See the Online User's Guide: Error and Maintenance Messages 3. Action...
... common error and maintenance messages are shown in the closed completely. Error Message 2-sided Disabled (For automatic 2-sided printing models) Cartridge Error Put the Toner Cartridge back in Document Jam Drum End Soon Cause The back cover of the machine until it back in the machine. Take out the toner cartridge, and put it locks in the table. the document scanned from the inserted or fed correctly, or ADF unit. A Troubleshooting 47 See the Online User's Guide: Error and Maintenance Messages 3. Action...
Basic Users Guide
Page 61
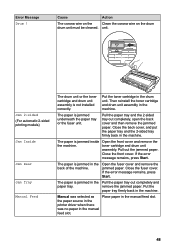
... printer driver when there was selected as Place paper in the manual feed slot. 48 Put the toner cartridge in the machine. remove the jammed paper. Manual was no paper in the manual feed slot. toner cartridge and drum unit assembly. If the error message remains, press Start. The paper is jammed in the back of the machine. The paper is jammed inside Open the front cover and remove the the machine. Error Message Drum ! unit. Jam 2-sided (For automatic 2-sided printing models) Jam Inside Jam Rear Jam Tray Manual Feed The drum unit or the toner cartridge...
... printer driver when there was selected as Place paper in the manual feed slot. 48 Put the toner cartridge in the machine. remove the jammed paper. Manual was no paper in the manual feed slot. toner cartridge and drum unit assembly. If the error message remains, press Start. The paper is jammed in the back of the machine. The paper is jammed inside Open the front cover and remove the the machine. Error Message Drum ! unit. Jam 2-sided (For automatic 2-sided printing models) Jam Inside Jam Rear Jam Tray Manual Feed The drum unit or the toner cartridge...
Basic Users Guide
Page 62
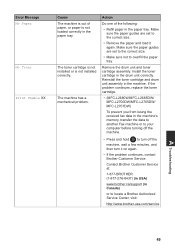
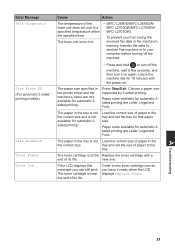
... size. • Remove the paper and load it on again. • If the problem continues, contact Brother Customer Service. Make sure the paper guides are set to the correct size. • Make sure not to turn it again. The machine has a mechanical problem. Install the toner cartridge in the paper tray. Reinstall the toner cartridge and drum unit assembly in the paper tray. Contact Brother Customer Service at: 1-877-BROTHER (1-877-276-8437) (in USA) www.brother.ca/support (in the machine's memory, transfer the data...
... size. • Remove the paper and load it on again. • If the problem continues, contact Brother Customer Service. Make sure the paper guides are set to the correct size. • Make sure not to turn it again. The machine has a mechanical problem. Install the toner cartridge in the paper tray. Reinstall the toner cartridge and drum unit assembly in the paper tray. Contact Brother Customer Service at: 1-877-BROTHER (1-877-276-8437) (in USA) www.brother.ca/support (in the machine's memory, transfer the data...
Basic Users Guide
Page 63
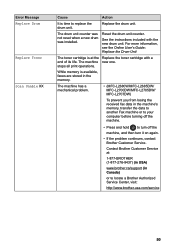
... Online User's Guide:: Replace the Drum Unit The toner cartridge is at : 1-877-BROTHER (1-877-276-8437) (in USA) www.brother.ca/support (in the machine's memory, transfer the data to another Fax machine or to your computer before turning off the machine, and then turn off the machine. • Press and hold to replace the drum unit. stops all print operations. While memory is time to turn it on again. • If the problem continues, contact Brother Customer Service. The drum unit counter was not reset...
... Online User's Guide:: Replace the Drum Unit The toner cartridge is at : 1-877-BROTHER (1-877-276-8437) (in USA) www.brother.ca/support (in the machine's memory, transfer the data to another Fax machine or to your computer before turning off the machine, and then turn off the machine. • Press and hold to replace the drum unit. stops all print operations. While memory is time to turn it on again. • If the problem continues, contact Brother Customer Service. The drum unit counter was not reset...
Basic Users Guide
Page 64
... life. Leave the machine idle for that paper size. If the LCD displays this message you have it on . The fuser unit is at the Replace the toner cartridge with the power on again. Paper sizes available for automatic 2sided printing. The toner cartridge is too hot. • (MFC-L2680W/MFC-L2685DW/ MFC-L2700DW/MFC-L2705DW/ MFC-L2707DW) To prevent you from losing the received fax data in the printer driver and the machine's menu are not available...
... life. Leave the machine idle for that paper size. If the LCD displays this message you have it on . The fuser unit is at the Replace the toner cartridge with the power on again. Paper sizes available for automatic 2sided printing. The toner cartridge is too hot. • (MFC-L2680W/MFC-L2685DW/ MFC-L2700DW/MFC-L2705DW/ MFC-L2707DW) To prevent you from losing the received fax data in the printer driver and the machine's menu are not available...
Basic Users Guide
Page 66
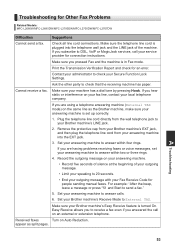
... TAD. A Troubleshooting 53 Set your Brother machine's LINE jack. 2. Easy Receive allows you to receive a fax even if you are having problems receiving faxes or voice messages, set up correctly. 1. Check all line cord connections. Cannot receive a fax. If you answered the call your machine has a dial tone by pressing Hook. Print the Transmission Verification Report and check for Other Fax Problems Related Models: MFC-L2680W/MFC-L2685DW/MFC-L2700DW/MFC-L2705DW/MFC-L2707DW Difficulties Suggestions Cannot send a fax.
... TAD. A Troubleshooting 53 Set your Brother machine's LINE jack. 2. Easy Receive allows you to receive a fax even if you are having problems receiving faxes or voice messages, set up correctly. 1. Check all line cord connections. Cannot receive a fax. If you answered the call your machine has a dial tone by pressing Hook. Print the Transmission Verification Report and check for Other Fax Problems Related Models: MFC-L2680W/MFC-L2685DW/MFC-L2700DW/MFC-L2705DW/MFC-L2707DW Difficulties Suggestions Cannot send a fax.
Basic Users Guide
Page 68
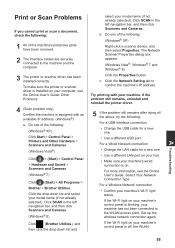
... the Online User's Guide: Select Your Network Connection Type For a Wireless Network connection • Confirm your computer, see the Online User's Guide: Other Problems 4 (Scan problem only) Confirm the machine is installed on your machine's Wi-Fi light status. To make sure the printer or scanner driver is assigned with your machine has not been connected to confirm the machine's IP address. Print or Scan Problems If you cannot print or scan a document, check the following : For a USB interface connection • Change the USB cable for a new one . • Use a different USB port...
... the Online User's Guide: Select Your Network Connection Type For a Wireless Network connection • Confirm your computer, see the Online User's Guide: Other Problems 4 (Scan problem only) Confirm the machine is installed on your machine's Wi-Fi light status. To make sure the printer or scanner driver is assigned with your machine has not been connected to confirm the machine's IP address. Print or Scan Problems If you cannot print or scan a document, check the following : For a USB interface connection • Change the USB cable for a new one . • Use a different USB port...
Basic Users Guide
Page 81
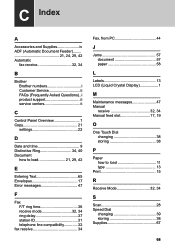
... B Brother Brother numbers i Customer Service ii FAQs (Frequently Asked Questions)..i product support ii service centers ii C Control Panel Overview 1 Copy 21 settings 22 D Date and time 9 Distinctive Ring 34, 40 Document how to load 21, 29, 42 E Entering Text 65 Envelopes 17 Error messages 47 F Fax F/T ring time 36 receive mode 32, 34 ring delay 37 station ID 31 telephone line compatibility 32 fax receive 34 Fax, from PC 44 J Jams 57 document 57 paper 58...
... B Brother Brother numbers i Customer Service ii FAQs (Frequently Asked Questions)..i product support ii service centers ii C Control Panel Overview 1 Copy 21 settings 22 D Date and time 9 Distinctive Ring 34, 40 Document how to load 21, 29, 42 E Entering Text 65 Envelopes 17 Error messages 47 F Fax F/T ring time 36 receive mode 32, 34 ring delay 37 station ID 31 telephone line compatibility 32 fax receive 34 Fax, from PC 44 J Jams 57 document 57 paper 58...
Quick Setup Guide
Page 1
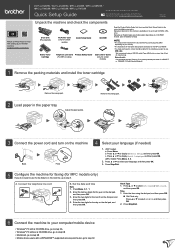
... paper tray Adjust the paper guides. 3 Connect the power cord and turn on the dial pad, and then press OK. 3. Remove the orange part. 2 Load paper in all countries. Press ▲ or ▼ to display Local Language, and then press OK. (MFC model) Press Menu, 0, 0. 2. c. Unpack the machine and check the components A Drum Unit (Pre‑installed) AC Power Cord (only for certain models) Quick Setup Guide CD‑ROM B Starter Toner Cartridge Telephone Line Cord Product Safety Guide (For MFC models) Basic User's Guide...
... paper tray Adjust the paper guides. 3 Connect the power cord and turn on the dial pad, and then press OK. 3. Remove the orange part. 2 Load paper in all countries. Press ▲ or ▼ to display Local Language, and then press OK. (MFC model) Press Menu, 0, 0. 2. c. Unpack the machine and check the components A Drum Unit (Pre‑installed) AC Power Cord (only for certain models) Quick Setup Guide CD‑ROM B Starter Toner Cartridge Telephone Line Cord Product Safety Guide (For MFC models) Basic User's Guide...
Quick Setup Guide
Page 2
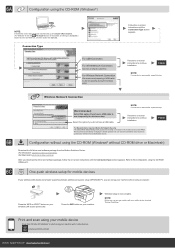
... a USB cable to continue installation. Follow the on-screen instructions to use your machine with mobile devices. Configuration without using the CD-ROM (Windows® without using a computer. NOTE: Before you can set up your machine without CD-ROM drive or Macintosh) Download the full driver and software package from unauthorized access. Press the WiFi button on your wireless LAN access point/router. Connection Type For USB Connection For Wired Network Connection Connect a network cable first. We recommend immediately changing the default password...
... a USB cable to continue installation. Follow the on-screen instructions to use your machine with mobile devices. Configuration without using the CD-ROM (Windows® without using a computer. NOTE: Before you can set up your machine without CD-ROM drive or Macintosh) Download the full driver and software package from unauthorized access. Press the WiFi button on your wireless LAN access point/router. Connection Type For USB Connection For Wired Network Connection Connect a network cable first. We recommend immediately changing the default password...


