
Basic Users Guide
Page 12
... 1 Control Panel Overview 1 Access Brother Utilities 8 Initial Setup...9 Set the Date and Time 9 Adjust the Ring Volume 9 Adjust the Beeper Volume 10 Adjust the Speaker Volume 10 2 Paper Handling 11 Load Paper ...11 Load and Print using the Paper Tray 11 Set the Check Size 12 Change the Paper Size 12 Change the Paper Type 13 Recommended Print Media 13 Using Special Paper 14 3 Print ...15 Print from Your Computer (Windows 15 Print a Document (Windows 15 Print on Both Sides of the Paper (Windows 15 Print More Than One Page on a Single Sheet of Paper...
... 1 Control Panel Overview 1 Access Brother Utilities 8 Initial Setup...9 Set the Date and Time 9 Adjust the Ring Volume 9 Adjust the Beeper Volume 10 Adjust the Speaker Volume 10 2 Paper Handling 11 Load Paper ...11 Load and Print using the Paper Tray 11 Set the Check Size 12 Change the Paper Size 12 Change the Paper Type 13 Recommended Print Media 13 Using Special Paper 14 3 Print ...15 Print from Your Computer (Windows 15 Print a Document (Windows 15 Print on Both Sides of the Paper (Windows 15 Print More Than One Page on a Single Sheet of Paper...
Basic Users Guide
Page 13
... a Fax Using Your Machine 42 Send a Fax ...42 Fax Using Your Computer (PC-FAX 44 Send Faxes from Your Computer 44 Receive Faxes on Your Computer (Windows® only 44 A Troubleshooting 46 Identify the Problem 46 Error and Maintenance Messages 47 Fax and Telephone Problems 52 Troubleshooting for Other Fax Problems 53 Print or Scan Problems 55 Document and Paper Jams 57 Find the Jammed Document or Paper 57 Clear the Document Jam 57 Clear the Paper Jam 58 B Appendix ...65 How to Enter Text on Your Brother Machine...
... a Fax Using Your Machine 42 Send a Fax ...42 Fax Using Your Computer (PC-FAX 44 Send Faxes from Your Computer 44 Receive Faxes on Your Computer (Windows® only 44 A Troubleshooting 46 Identify the Problem 46 Error and Maintenance Messages 47 Fax and Telephone Problems 52 Troubleshooting for Other Fax Problems 53 Print or Scan Problems 55 Document and Paper Jams 57 Find the Jammed Document or Paper 57 Clear the Document Jam 57 Clear the Paper Jam 58 B Appendix ...65 How to Enter Text on Your Brother Machine...
Basic Users Guide
Page 14
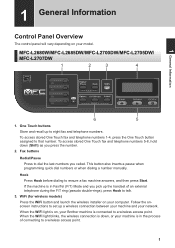
WiFi (for wireless models) Press the WiFi button and launch the wireless installer on your Brother machine is connected to a wireless access point. Follow the onscreen instructions to set up to talk. 3. When the WiFi light blinks, the wireless connection is down (Shift) as you called. If the machine is in Fax/Tel (F/T) Mode and you pick up the handset of connecting to dial the last numbers you press the number. 2. One Touch buttons Store and recall...
WiFi (for wireless models) Press the WiFi button and launch the wireless installer on your Brother machine is connected to a wireless access point. Follow the onscreen instructions to set up to talk. 3. When the WiFi light blinks, the wireless connection is down (Shift) as you called. If the machine is in Fax/Tel (F/T) Mode and you pick up the handset of connecting to dial the last numbers you press the number. 2. One Touch buttons Store and recall...
Basic Users Guide
Page 18
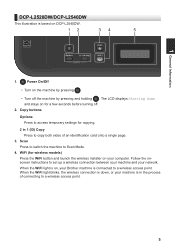
... machine to a wireless access point. When the WiFi light is on, your Brother machine is connected to Scan Mode. 4. Follow the onscreen instructions to a wireless access point. 5 When the WiFi light blinks, the wireless connection is down, or your machine is in 1 (ID) Copy Press to copy both sides of connecting to set up a wireless connection between your machine and your network. WiFi (for copying. 2 in the process of an identification card onto a single page. 3. Copy buttons Options Press to access temporary settings for wireless models) Press the WiFi button...
... machine to a wireless access point. When the WiFi light is on, your Brother machine is connected to Scan Mode. 4. Follow the onscreen instructions to a wireless access point. 5 When the WiFi light blinks, the wireless connection is down, or your machine is in 1 (ID) Copy Press to copy both sides of connecting to set up a wireless connection between your machine and your network. WiFi (for copying. 2 in the process of an identification card onto a single page. 3. Copy buttons Options Press to access temporary settings for wireless models) Press the WiFi button...

Basic Users Guide
Page 28
... 2-sided Type menu. 15 For more information, see the Online User's Guide: Print a Document • Select Letter, Legal, or Folio size paper when using the automatic 2‑sided printing option. 1 Select the print command in your model), and then click the printing properties or preferences button. The printer driver window appears. 3 Click the 2-sided / Booklet drop-down list and select the 2-sided option. 4 Click the 2-sided Settings button. 5 Select an option from Your Computer (Windows®) Print a Document (Windows®) Print...
... 2-sided Type menu. 15 For more information, see the Online User's Guide: Print a Document • Select Letter, Legal, or Folio size paper when using the automatic 2‑sided printing option. 1 Select the print command in your model), and then click the printing properties or preferences button. The printer driver window appears. 3 Click the 2-sided / Booklet drop-down list and select the 2-sided option. 4 Click the 2-sided Settings button. 5 Select an option from Your Computer (Windows®) Print a Document (Windows®) Print...
Basic Users Guide
Page 29
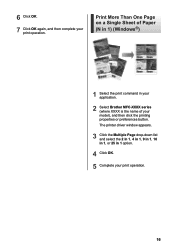
6 Click OK. 7 Click OK again, and then complete your model), and then click the printing properties or preferences button. Print More Than One Page on a Single Sheet of Paper (N in 1) (Windows®) 1 Select the print command in 1 option. 4 Click OK. 5 Complete your print operation. 16 The printer driver window appears. 3 Click the Multiple Page drop-down list and select the 2 in 1, 4 in 1, 9 in 1, 16 in 1, or 25 in your application. 2 Select Brother MFC-XXXX series (where XXXX is the name of your print operation.
6 Click OK. 7 Click OK again, and then complete your model), and then click the printing properties or preferences button. Print More Than One Page on a Single Sheet of Paper (N in 1) (Windows®) 1 Select the print command in 1 option. 4 Click OK. 5 Complete your print operation. 16 The printer driver window appears. 3 Click the Multiple Page drop-down list and select the 2 in 1, 4 in 1, 9 in 1, 16 in 1, or 25 in your application. 2 Select Brother MFC-XXXX series (where XXXX is the name of your print operation.

Basic Users Guide
Page 31
... printer settings if needed. 13 Click OK. 14 Click Print. 15 (For printing envelopes) When you have finished printing, return the two green levers back to their original positions. 6 Select the print command in your application. 7 Select Brother MFC-XXXX series (where XXXX is the name of your paper size. 9 Click the Media Type drop-down list and select the type of paper or one envelope firmly into the manual feed...
... printer settings if needed. 13 Click OK. 14 Click Print. 15 (For printing envelopes) When you have finished printing, return the two green levers back to their original positions. 6 Select the print command in your application. 7 Select Brother MFC-XXXX series (where XXXX is the name of your paper size. 9 Click the Media Type drop-down list and select the type of paper or one envelope firmly into the manual feed...
Basic Users Guide
Page 33
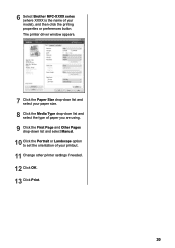
6 Select Brother MFC-XXXX series (where XXXX is the name of your model), and then click the printing properties or preferences button. The printer driver window appears. 7 Click the Paper Size drop-down list and select your paper size. 8 Click the Media Type drop-down list and select the type of paper you are using. 9 Click the First Page and Other Pages drop-down list and select Manual. 10 Click the Portrait or Landscape option to set the orientation of your printout. 11 Change other printer settings if needed. 12 Click OK. 13 Click Print. 20
6 Select Brother MFC-XXXX series (where XXXX is the name of your model), and then click the printing properties or preferences button. The printer driver window appears. 7 Click the Paper Size drop-down list and select your paper size. 8 Click the Media Type drop-down list and select the type of paper you are using. 9 Click the First Page and Other Pages drop-down list and select Manual. 10 Click the Portrait or Landscape option to set the orientation of your printout. 11 Change other printer settings if needed. 12 Click OK. 13 Click Print. 20
Basic Users Guide
Page 43
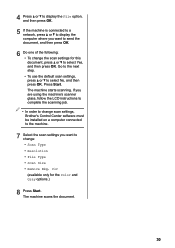
If you are using the machine's scanner glass, follow the LCD instructions to complete the scanning job. • In order to change scan settings, Brother's Control Center software must be installed on a computer connected to the machine. 7 Select the scan settings you want to change the scan settings for the Color and Gray options.) 8 Press Start. The machine starts scanning. Clr (available only for this document, press a or b to select Yes, and then press OK...
If you are using the machine's scanner glass, follow the LCD instructions to complete the scanning job. • In order to change scan settings, Brother's Control Center software must be installed on a computer connected to the machine. 7 Select the scan settings you want to change the scan settings for the Color and Gray options.) 8 Press Start. The machine starts scanning. Clr (available only for this document, press a or b to select Yes, and then press OK...
Basic Users Guide
Page 45
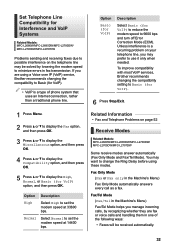
... and turn off Error Correction Mode (ECM). Related Information • Fax and Telephone Problems on page 52 Receive Modes Related Models: MFC-L2680W/MFC-L2685DW/MFC-L2700DW/ MFC-L2705DW/MFC-L2707DW Some receive modes answer automatically (Fax Only Mode and Fax/Tel Mode). You may want to change the Ring Delay before using a Voice over IP (VoIP) service, Brother recommends changing the compatibility to Basic (for VoIP). • VoIP is a recurring problem on your telephone line, you...
... and turn off Error Correction Mode (ECM). Related Information • Fax and Telephone Problems on page 52 Receive Modes Related Models: MFC-L2680W/MFC-L2685DW/MFC-L2700DW/ MFC-L2705DW/MFC-L2707DW Some receive modes answer automatically (Fax Only Mode and Fax/Tel Mode). You may want to change the Ring Delay before using a Voice over IP (VoIP) service, Brother recommends changing the compatibility to Basic (for VoIP). • VoIP is a recurring problem on your telephone line, you...
Basic Users Guide
Page 60
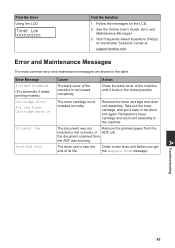
Remove the toner cartridge and drum unit assembly. the document scanned from the ADF was not Remove the jammed paper from the inserted or fed correctly, or ADF unit. The drum unit is near the end of the machine until it back in the drum unit again. See the Online User's Guide: Error and Maintenance Messages 3. Action Close the back cover of its life. The toner cartridge is not closed position. Error Message 2-sided Disabled (For automatic 2-sided printing models) Cartridge Error Put the Toner Cartridge back...
Remove the toner cartridge and drum unit assembly. the document scanned from the ADF was not Remove the jammed paper from the inserted or fed correctly, or ADF unit. The drum unit is near the end of the machine until it back in the drum unit again. See the Online User's Guide: Error and Maintenance Messages 3. Action Close the back cover of its life. The toner cartridge is not closed position. Error Message 2-sided Disabled (For automatic 2-sided printing models) Cartridge Error Put the Toner Cartridge back...
Basic Users Guide
Page 61
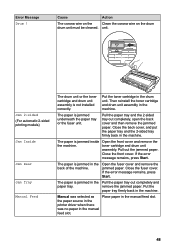
... and paper tray. Error Message Drum ! Jam 2-sided (For automatic 2-sided printing models) Jam Inside Jam Rear Jam Tray Manual Feed The drum unit or the toner cartridge and drum unit assembly is not installed correctly. Close the back cover, and put the paper tray and the 2-sided tray firmly back in the manual feed slot. 48 If the error message remains, press Start. Close the fuser cover. Pull the paper tray and the 2‑sided tray out completely, open the back cover and then remove the jammed paper. the paper source in the printer driver...
... and paper tray. Error Message Drum ! Jam 2-sided (For automatic 2-sided printing models) Jam Inside Jam Rear Jam Tray Manual Feed The drum unit or the toner cartridge and drum unit assembly is not installed correctly. Close the back cover, and put the paper tray and the 2-sided tray firmly back in the manual feed slot. 48 If the error message remains, press Start. Close the fuser cover. Pull the paper tray and the 2‑sided tray out completely, open the back cover and then remove the jammed paper. the paper source in the printer driver...
Basic Users Guide
Page 62
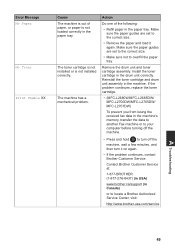
.... Remove the drum unit and toner cartridge assembly. The machine has a mechanical problem. Make sure the paper guides are set to the correct size. • Make sure not to turn off the machine. • Press and hold to overfill the paper tray. The toner cartridge is not installed or is not loaded correctly in the paper tray. Make sure the paper guides are set to locate a Brother Authorized Service Center, visit: http://www.brother-usa.com/service A Troubleshooting 49 Contact Brother Customer Service at: 1-877-BROTHER...
.... Remove the drum unit and toner cartridge assembly. The machine has a mechanical problem. Make sure the paper guides are set to the correct size. • Make sure not to turn off the machine. • Press and hold to overfill the paper tray. The toner cartridge is not installed or is not loaded correctly in the paper tray. Make sure the paper guides are set to locate a Brother Authorized Service Center, visit: http://www.brother-usa.com/service A Troubleshooting 49 Contact Brother Customer Service at: 1-877-BROTHER...
Basic Users Guide
Page 63
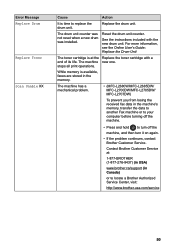
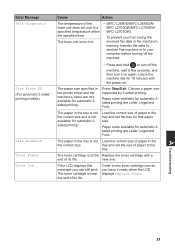
.../support (in the machine's memory, transfer the data to another Fax machine or to your computer before turning off the machine. • Press and hold to turn off the machine, and then turn it on again. • If the problem continues, contact Brother Customer Service. The machine new one. Replace the drum unit. The drum unit counter was not reset when a new drum was installed. Reset the drum unit counter. stops all print operations. Contact Brother Customer Service at the Replace the toner cartridge with the new drum unit. While memory is time to locate a Brother...
.../support (in the machine's memory, transfer the data to another Fax machine or to your computer before turning off the machine. • Press and hold to turn off the machine, and then turn it on again. • If the problem continues, contact Brother Customer Service. The machine new one. Replace the drum unit. The drum unit counter was not reset when a new drum was installed. Reset the drum unit counter. stops all print operations. Contact Brother Customer Service at the Replace the toner cartridge with the new drum unit. While memory is time to locate a Brother...
Basic Users Guide
Page 64
... that paper size. The paper size specified in the tray is at the Replace the toner cartridge with the power on again. The paper in the printer driver and the machine's menu are not available for automatic 2sided printing. The fuser unit is too hot. • (MFC-L2680W/MFC-L2685DW/ MFC-L2700DW/MFC-L2705DW/ MFC-L2707DW) To prevent you from losing the received fax data in the tray and set the size of paper to the tray. Load the correct size of...
... that paper size. The paper size specified in the tray is at the Replace the toner cartridge with the power on again. The paper in the printer driver and the machine's menu are not available for automatic 2sided printing. The fuser unit is too hot. • (MFC-L2680W/MFC-L2685DW/ MFC-L2700DW/MFC-L2705DW/ MFC-L2707DW) To prevent you from losing the received fax data in the tray and set the size of paper to the tray. Load the correct size of...
Basic Users Guide
Page 66
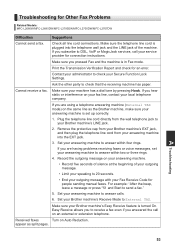
... messages, set up correctly. 1. Print the Transmission Verification Report and check for Other Fax Problems Related Models: MFC-L2680W/MFC-L2685DW/MFC-L2700DW/MFC-L2705DW/MFC-L2707DW Difficulties Suggestions Cannot send a fax. Cannot receive a fax. If you subscribe to DSL, VoIP or MagicJack services, call on Auto Reduction. A Troubleshooting 53 Make sure the telephone line cord is turned On. Contact your administrator to answer within four rings. Plug the telephone line cord directly from your Brother machine's LINE jack. 2. Make...
... messages, set up correctly. 1. Print the Transmission Verification Report and check for Other Fax Problems Related Models: MFC-L2680W/MFC-L2685DW/MFC-L2700DW/MFC-L2705DW/MFC-L2707DW Difficulties Suggestions Cannot send a fax. Cannot receive a fax. If you subscribe to DSL, VoIP or MagicJack services, call on Auto Reduction. A Troubleshooting 53 Make sure the telephone line cord is turned On. Contact your administrator to answer within four rings. Plug the telephone line cord directly from your Brother machine's LINE jack. 2. Make...
Basic Users Guide
Page 68
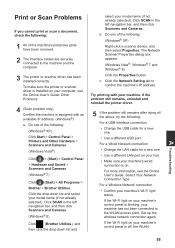
... of the machine's protective parts have been removed. 2 The interface cables are securely connected to the machine and the computer. 3 The printer or scanner driver has been installed correctly. For more information, see the Online User's Guide: Other Problems 4 (Scan problem only) Confirm the machine is off, the WLAN A Troubleshooting 55 Print or Scan Problems If you cannot print or scan a document, check the following : For a USB interface connection • Change the USB cable for a new one . • Use a different USB port. Click SCAN in...
... of the machine's protective parts have been removed. 2 The interface cables are securely connected to the machine and the computer. 3 The printer or scanner driver has been installed correctly. For more information, see the Online User's Guide: Other Problems 4 (Scan problem only) Confirm the machine is off, the WLAN A Troubleshooting 55 Print or Scan Problems If you cannot print or scan a document, check the following : For a USB interface connection • Change the USB cable for a new one . • Use a different USB port. Click SCAN in...
Basic Users Guide
Page 81
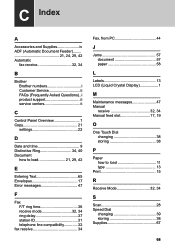
... B Brother Brother numbers i Customer Service ii FAQs (Frequently Asked Questions)..i product support ii service centers ii C Control Panel Overview 1 Copy 21 settings 22 D Date and time 9 Distinctive Ring 34, 40 Document how to load 21, 29, 42 E Entering Text 65 Envelopes 17 Error messages 47 F Fax F/T ring time 36 receive mode 32, 34 ring delay 37 station ID 31 telephone line compatibility 32 fax receive 34 Fax, from PC 44 J Jams 57 document 57 paper 58...
... B Brother Brother numbers i Customer Service ii FAQs (Frequently Asked Questions)..i product support ii service centers ii C Control Panel Overview 1 Copy 21 settings 22 D Date and time 9 Distinctive Ring 34, 40 Document how to load 21, 29, 42 E Entering Text 65 Envelopes 17 Error messages 47 F Fax F/T ring time 36 receive mode 32, 34 ring delay 37 station ID 31 telephone line compatibility 32 fax receive 34 Fax, from PC 44 J Jams 57 document 57 paper 58...
Quick Setup Guide
Page 1
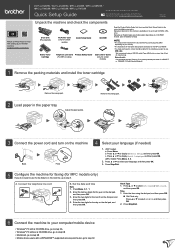
...™-supported access point/router, go to select AM or PM, and then press OK. 2. Time 1. Press Stop/Exit. 5 Configure the machine for faxing (for 10BASE‑T or 100BASE‑TX Fast Ethernet Network. 1 Remove the packing materials and install the toner cartridge A B B B A A Remove the orange part. DCP‑L2520DW / DCP‑L2540DW / MFC-L2680W / MFC-L2685DW / MFC‑L2700DW / MFC‑L2705DW / MFC-L2707DW Quick Setup Guide Not all countries. USB cable We recommend using...
...™-supported access point/router, go to select AM or PM, and then press OK. 2. Time 1. Press Stop/Exit. 5 Configure the machine for faxing (for 10BASE‑T or 100BASE‑TX Fast Ethernet Network. 1 Remove the packing materials and install the toner cartridge A B B B A A Remove the orange part. DCP‑L2520DW / DCP‑L2540DW / MFC-L2680W / MFC-L2685DW / MFC‑L2700DW / MFC‑L2705DW / MFC-L2707DW Quick Setup Guide Not all countries. USB cable We recommend using...
Quick Setup Guide
Page 2
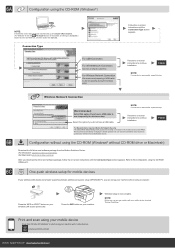
... driver and software package, follow the on your mobile device, download "Brother iPrint&Scan." Finish For Network Users: Important Notice for mobile devices If your wireless LAN access point/router supports automatic wireless (one-push) setup (WPS/AOSS™), you can use temporarily for wireless setup. Press the WiFi button on -screen instructions until the Connection Type screen appears. NOTE: Before you do not have a USB cable to use your machine with mobile devices. Print...
... driver and software package, follow the on your mobile device, download "Brother iPrint&Scan." Finish For Network Users: Important Notice for mobile devices If your wireless LAN access point/router supports automatic wireless (one-push) setup (WPS/AOSS™), you can use temporarily for wireless setup. Press the WiFi button on -screen instructions until the Connection Type screen appears. NOTE: Before you do not have a USB cable to use your machine with mobile devices. Print...


