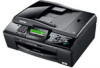
Software Users Manual - English
Page 3
...;11SE with OCR 54 3 ControlCenter3 55 Using ControlCenter3 ...55 Switching the user interface ...57 Turning the Auto Load feature off...57 SCAN...58 File Type...59 Auto Crop (For MFC-J615W and MFC-J630W 60 Image (example: Microsoft® Paint)...61 OCR (Word Processing program) ...63 E-mail ...64 ...File ...65 CUSTOM SCAN ...66 File Type...67 Auto Crop (For MFC-J615W and MFC-J630W 67 Customizing a user-defined button...68 PHOTOCAPTURE...73 Open PCC Folder (PCC: PhotoCapture Center 73 Copy From PCC ...74 Copy To Application ...
...;11SE with OCR 54 3 ControlCenter3 55 Using ControlCenter3 ...55 Switching the user interface ...57 Turning the Auto Load feature off...57 SCAN...58 File Type...59 Auto Crop (For MFC-J615W and MFC-J630W 60 Image (example: Microsoft® Paint)...61 OCR (Word Processing program) ...63 E-mail ...64 ...File ...65 CUSTOM SCAN ...66 File Type...67 Auto Crop (For MFC-J615W and MFC-J630W 67 Customizing a user-defined button...68 PHOTOCAPTURE...73 Open PCC Folder (PCC: PhotoCapture Center 73 Copy From PCC ...74 Copy To Application ...
Software Users Manual - English
Page 9
... control panel. 3 However, when the machine is left in the printer memory by pressing the Stop/Exit key on paper, it is important to read Loading paper in memory, or while scanning a document into the computer. Fax sending will not be stopped during PC printing. Clearing data from the memory 1 If...
... control panel. 3 However, when the machine is left in the printer memory by pressing the Stop/Exit key on paper, it is important to read Loading paper in memory, or while scanning a document into the computer. Fax sending will not be stopped during PC printing. Clearing data from the memory 1 If...
Software Users Manual - English
Page 11
Printing Turning off the Status Monitor If you can check the machine's status at any time by clicking Status Monitor from the Start menu on Startup to switch off , you want to clear the check mark. b Right-click again then click Exit. Note Even if the Status Monitor is off the Status Monitor, follow these steps: 1 1 a Right-click the Brother Status Monitor icon or window and click Load Status Monitor on your PC. 5
Printing Turning off the Status Monitor If you can check the machine's status at any time by clicking Status Monitor from the Start menu on Startup to switch off , you want to clear the check mark. b Right-click again then click Exit. Note Even if the Status Monitor is off the Status Monitor, follow these steps: 1 1 a Right-click the Brother Status Monitor icon or window and click Load Status Monitor on your PC. 5
Software Users Manual - English
Page 40
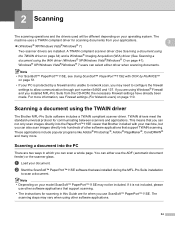
... driver on page 34) and a Windows® Imaging Acquisition (WIA) driver (See Scanning a document using other software applications that Brother included with OCR by a firewall and is not included, please use the ADF (automatic document feeder) or the scanner glass. This...Vista®/Windows® 7 users can either driver when scanning documents. a Load your applications. 2 (Windows® XP/Windows Vista®/Windows® 7) Two scanner drivers are using the TWAIN driver 2 The Brother MFL-Pro Suite software includes a TWAIN compliant scanner driver. If you are ...
... driver on page 34) and a Windows® Imaging Acquisition (WIA) driver (See Scanning a document using other software applications that Brother included with OCR by a firewall and is not included, please use the ADF (automatic document feeder) or the scanner glass. This...Vista®/Windows® 7 users can either driver when scanning documents. a Load your applications. 2 (Windows® XP/Windows Vista®/Windows® 7) Two scanner drivers are using the TWAIN driver 2 The Brother MFL-Pro Suite software includes a TWAIN compliant scanner driver. If you are ...
Software Users Manual - English
Page 43
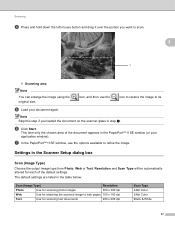
... for attaching the scanned image to refine the image. Scanning d Press and hold down the left mouse button and drag it over the portion you loaded the document on the scanner glass in the Scanner Setup dialog box 2 Scan (Image Type) 2 Choose the output image type from Photo, Web or Text... for each of the document appears in the PaperPort™11SE window (or your document again. Note Skip this step if you want to its e Load your application window). This time only the chosen area of the default settings. g In the PaperPort™11SE window, use the icon to restore the...
... for attaching the scanned image to refine the image. Scanning d Press and hold down the left mouse button and drag it over the portion you loaded the document on the scanner glass in the Scanner Setup dialog box 2 Scan (Image Type) 2 Choose the output image type from Photo, Web or Text... for each of the document appears in the PaperPort™11SE window (or your document again. Note Skip this step if you want to its e Load your application window). This time only the chosen area of the default settings. g In the PaperPort™11SE window, use the icon to restore the...
Software Users Manual - English
Page 47
....) Note If you can scan images directly into the PaperPort™11SE viewer that support WIA or TWAIN scanning. e Choose WIA:Brother MFC-XXXX or WIA:Brother MFC-XXXX LAN from other applications. f Check the Display scanner dialog box on the left side of a page after pre-scanning the...; 7 you must scan using the scanner glass (Flatbed). (See Pre-Scanning and cropping a portion using the scanner glass on page 44.) a Load your document. Scanning a document into any other software applications that was installed during the MFL-Pro Suite installation to scan a whole page. Note •...
....) Note If you can scan images directly into the PaperPort™11SE viewer that support WIA or TWAIN scanning. e Choose WIA:Brother MFC-XXXX or WIA:Brother MFC-XXXX LAN from other applications. f Check the Display scanner dialog box on the left side of a page after pre-scanning the...; 7 you must scan using the scanner glass (Flatbed). (See Pre-Scanning and cropping a portion using the scanner glass on page 44.) a Load your document. Scanning a document into any other software applications that was installed during the MFL-Pro Suite installation to scan a whole page. Note •...
Software Users Manual - English
Page 53
...) 2 Scanning a document into the PC 2 2 There are two ways to scan a whole page. e Click Import. Scanning Scanning a document using the scanner glass on page 49.) a Load your software application to scan the document. You can either use . c Do one of a page after pre-scanning the document, you want to use the...
...) 2 Scanning a document into the PC 2 2 There are two ways to scan a whole page. e Click Import. Scanning Scanning a document using the scanner glass on page 49.) a Load your software application to scan the document. You can either use . c Do one of a page after pre-scanning the document, you want to use the...

Software Users Manual - English
Page 63
b From the SKIN SELECT dialog, you start your preferred user interface. 3 Turning the Auto Load feature off 3 Once you can choose your PC: a Right-click the ControlCenter3 icon in the task tray The ControlCenter3 preference window appears. a To switch the ...
b From the SKIN SELECT dialog, you start your preferred user interface. 3 Turning the Auto Load feature off 3 Once you can choose your PC: a Right-click the ControlCenter3 icon in the task tray The ControlCenter3 preference window appears. a To switch the ...
Software Users Manual - English
Page 126
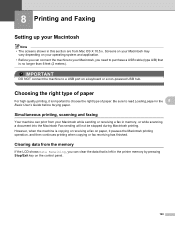
... longer than 6 feet (2 meters). Simultaneous printing, scanning and faxing 8 Your machine can print from Mac OS X 10.5.x. IMPORTANT DO NOT connect the machine to read Loading paper in memory, or while scanning a document into the Macintosh Fax sending will not be stopped during Macintosh printing. Clearing data from the memory 8 If...
... longer than 6 feet (2 meters). Simultaneous printing, scanning and faxing 8 Your machine can print from Mac OS X 10.5.x. IMPORTANT DO NOT connect the machine to read Loading paper in memory, or while scanning a document into the Macintosh Fax sending will not be stopped during Macintosh printing. Clearing data from the memory 8 If...

Software Users Manual - English
Page 145
...document feeder) or the Flatbed scanner glass. For more information on loading the documents, see Using the ADF (ADF models only) and Using the scanner glass in Macintosh HD/Library/Printers/Brother/Utilities/DeviceSelector or from a machine on the application you scan after... this Macintosh TWAIN Scanner driver with any applications that support TWAIN specifications. For each document you are using the TWAIN driver 9 The Brother machine software includes a TWAIN Scanner driver for choosing the default driver). 9 Scanning 9 Scanning a document using . 139 The scanner setup...
...document feeder) or the Flatbed scanner glass. For more information on loading the documents, see Using the ADF (ADF models only) and Using the scanner glass in Macintosh HD/Library/Printers/Brother/Utilities/DeviceSelector or from a machine on the application you scan after... this Macintosh TWAIN Scanner driver with any applications that support TWAIN specifications. For each document you are using the TWAIN driver 9 The Brother machine software includes a TWAIN Scanner driver for choosing the default driver). 9 Scanning 9 Scanning a document using . 139 The scanner setup...
Software Users Manual - English
Page 146
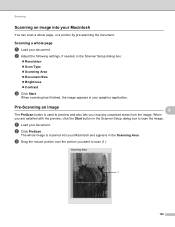
... needed, in the Scanner Setup dialog box to scan (1). 1 140 Pre-Scanning an image 9 9 The PreScan button is scanned into your graphics application. b Click PreScan. a Load your document. Scanning a whole page 9 a Load your document. The whole image is used to preview and also lets you want to scan the image.
... needed, in the Scanner Setup dialog box to scan (1). 1 140 Pre-Scanning an image 9 9 The PreScan button is scanned into your graphics application. b Click PreScan. a Load your document. Scanning a whole page 9 a Load your document. The whole image is used to preview and also lets you want to scan the image.
Software Users Manual - English
Page 147
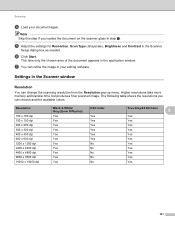
... the application window. e Adjust the settings for Resolution, Scan Type (Grayscale), Brightness and Contrast in step a. f Click Start. The following table shows the resolutions you loaded the document on the scanner glass in the Scanner Setup dialog box as needed. Resolution 100 x 100 dpi 150 x 150 dpi 200 x 200 dpi 300... Yes Yes No No No No No True Gray/24 Bit Color 9 Yes Yes Yes Yes Yes Yes Yes Yes Yes Yes Yes 141 Scanning d Load your editing software. Note Skip this step if you can choose and the available colors. This time only the chosen area of the document appears...
... the application window. e Adjust the settings for Resolution, Scan Type (Grayscale), Brightness and Contrast in step a. f Click Start. The following table shows the resolutions you loaded the document on the scanner glass in the Scanner Setup dialog box as needed. Resolution 100 x 100 dpi 150 x 150 dpi 200 x 200 dpi 300... Yes Yes No No No No No True Gray/24 Bit Color 9 Yes Yes Yes Yes Yes Yes Yes Yes Yes Yes Yes 141 Scanning d Load your editing software. Note Skip this step if you can choose and the available colors. This time only the chosen area of the document appears...
Software Users Manual - English
Page 186
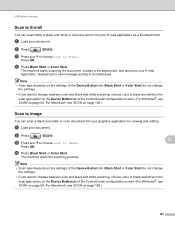
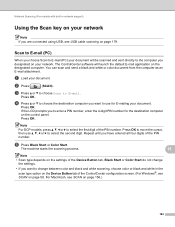
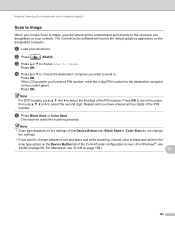
...b to choose Scan to Image 12 You can scan either a black and white or color document into your graphics application for viewing and editing. a Load your document. d Press Black Start or Color Start. USB cable scanning Scan to E-mail 12 You can scan a black and white or color document... Button tab of the ControlCenter configuration screen. (For Windows®, see SCAN on page 58. For Macintosh, see SCAN on page 156.) 180 a Load your document. For Macintosh, see SCAN on page 156.) Scan to Image. Press OK. The machine starts the scanning process. d Press Black Start ...
...b to choose Scan to Image 12 You can scan either a black and white or color document into your graphics application for viewing and editing. a Load your document. d Press Black Start or Color Start. USB cable scanning Scan to E-mail 12 You can scan a black and white or color document... Button tab of the ControlCenter configuration screen. (For Windows®, see SCAN on page 58. For Macintosh, see SCAN on page 156.) 180 a Load your document. For Macintosh, see SCAN on page 156.) Scan to Image. Press OK. The machine starts the scanning process. d Press Black Start ...
Software Users Manual - English
Page 187
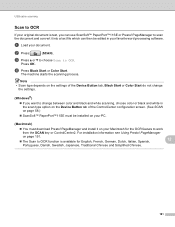
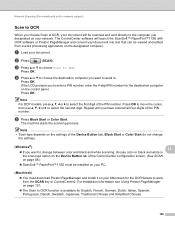
Press OK. PageManager on your PC. (Macintosh) • You must download Presto! a Load your original document is available for the OCR feature to work from the SCAN key or ControlCenter2. The machine starts the scanning process. For installation ...
Press OK. PageManager on your PC. (Macintosh) • You must download Presto! a Load your original document is available for the OCR feature to work from the SCAN key or ControlCenter2. The machine starts the scanning process. For installation ...

Software Users Manual - English
Page 188
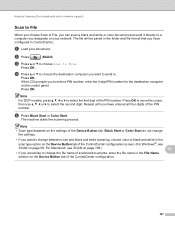
... documents, enter the file name in the Scan to File configuration screen of the ControlCenter configuration. 12 182 For Macintosh, see SCAN on page 156.) a Load your computer and save it as a file in the folder you have chosen in File Name section on the settings you choose. The file type...
... documents, enter the file name in the Scan to File configuration screen of the ControlCenter configuration. 12 182 For Macintosh, see SCAN on page 156.) a Load your computer and save it as a file in the folder you have chosen in File Name section on the settings you choose. The file type...
Software Users Manual - English
Page 190
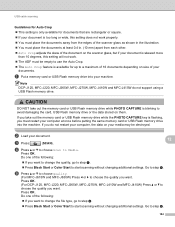
b Load your documents. Do one of the following : If you do not support using a ...step h. 184 a Put a memory card or USB Flash memory drive into the machine. e Press a or b to choose Quality. (For MFC-J615W and MFC-J630W) Press d or c to choose the quality you want to change the file type, go to step e. Press Black Start ... The ADF must be destroyed. Go to choose the quality you want . Press OK. Note DCP-J125, MFC-J220, MFC-J265W, MFC-J270W, MFC-J410W and MFC-J415W do not restart your computer, the data on your media may be empty to use the Auto Crop....
b Load your documents. Do one of the following : If you do not support using a ...step h. 184 a Put a memory card or USB Flash memory drive into the machine. e Press a or b to choose Quality. (For MFC-J615W and MFC-J630W) Press d or c to choose the quality you want to change the file type, go to step e. Press Black Start ... The ADF must be destroyed. Go to choose the quality you want . Press OK. Note DCP-J125, MFC-J220, MFC-J265W, MFC-J270W, MFC-J410W and MFC-J415W do not restart your computer, the data on your media may be empty to use the Auto Crop....
Software Users Manual - English
Page 200
... change between color and black and white scanning, choose color or black and white in network support) Using the Scan key on the control panel. a Load your network. Press OK. b Press (SCAN). Press OK to select the second digit. Repeat until you are connected using USB, see SCAN on your document...
... change between color and black and white scanning, choose color or black and white in network support) Using the Scan key on the control panel. a Load your network. Press OK. b Press (SCAN). Press OK to select the second digit. Repeat until you are connected using USB, see SCAN on your document...
Software Users Manual - English
Page 201
... the settings. • If you want to send to enter a PIN number, enter the 4-digit PIN number for the destination computer on the control panel. a Load your network. If the LCD prompts you to . e Press Black Start or Color Start. Press OK. Press OK to move the cursor, then use a, b, d or...
... the settings. • If you want to send to enter a PIN number, enter the 4-digit PIN number for the destination computer on the control panel. a Load your network. If the LCD prompts you to . e Press Black Start or Color Start. Press OK. Press OK to move the cursor, then use a, b, d or...
Software Users Manual - English
Page 202
Network Scanning (For models with OCR software or Presto! a Load your PC. (Macintosh) • You must download Presto! Press OK. If the LCD prompts you have entered all four digits of the PIN number. ...
Network Scanning (For models with OCR software or Presto! a Load your PC. (Macintosh) • You must download Presto! Press OK. If the LCD prompts you have entered all four digits of the PIN number. ...
Software Users Manual - English
Page 203
... to enter a PIN number, enter the 4-digit PIN number for the destination computer on the control panel. Press OK. e Press Black Start or Color Start. a Load your network. d Press a or b to choose the destination computer you to . b Press (SCAN). Note For DCP models, press a, b, d or c to select the second digit. Repeat...
... to enter a PIN number, enter the 4-digit PIN number for the destination computer on the control panel. Press OK. e Press Black Start or Color Start. a Load your network. d Press a or b to choose the destination computer you to . b Press (SCAN). Note For DCP models, press a, b, d or c to select the second digit. Repeat...


