Advanced Users Manual - English
Page 47
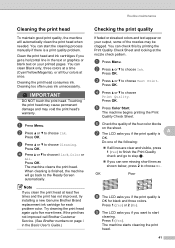
... Menu. d Press a or b to the Ready Screen automatically. The machine begins printing the Print Quality Check Sheet. Cleaning the print head consumes ink. Press OK. If the print has not improved call Brother Customer Service. (See Brother numbers on page i in the text or graphics or blank text on the sheet..... OK Poor h The LCD asks you can see missing short lines as shown below, press 2 to choose Cleaning. You can clean Black only, three colors at once. Press OK. g The LCD asks you get a horizontal line in the Basic User's Guide.) Checking the print quality A If...
... Menu. d Press a or b to the Ready Screen automatically. The machine begins printing the Print Quality Check Sheet. Cleaning the print head consumes ink. Press OK. If the print has not improved call Brother Customer Service. (See Brother numbers on page i in the text or graphics or blank text on the sheet..... OK Poor h The LCD asks you can see missing short lines as shown below, press 2 to choose Cleaning. You can clean Black only, three colors at once. Press OK. g The LCD asks you get a horizontal line in the Basic User's Guide.) Checking the print quality A If...
Advanced Users Manual - English
Page 48
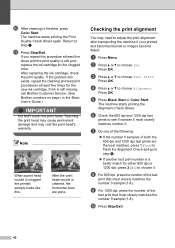
.... f Check the 600 dpi and 1200 dpi test prints to step f. j Press Stop/Exit. 42 j After cleaning is still missing, call Brother Customer Service. (See Brother numbers on page i in the Basic User's Guide.) IMPORTANT DO NOT touch the print head. Return to see if number 5 most closely matches... Alignment Check and go to choose it. a Press Menu. If the problem still exists, repeat the cleaning and test print procedures at least five times and the print quality is still poor, replace the ink cartridge for either 600 dpi or 1200 dpi, press 2 (No) to step j. If...
.... f Check the 600 dpi and 1200 dpi test prints to step f. j Press Stop/Exit. 42 j After cleaning is still missing, call Brother Customer Service. (See Brother numbers on page i in the Basic User's Guide.) IMPORTANT DO NOT touch the print head. Return to see if number 5 most closely matches... Alignment Check and go to choose it. a Press Menu. If the problem still exists, repeat the cleaning and test print procedures at least five times and the print quality is still poor, replace the ink cartridge for either 600 dpi or 1200 dpi, press 2 (No) to step j. If...
Basic Users Manual - English
Page 69
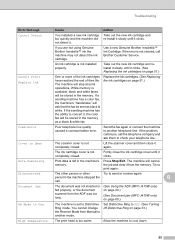
...'s "handshake" will ask that the fax be stored in the machine's memory. Data Remaining Print data is not cleared, call Brother Customer Service. Disconnected The other person or other Try to print again. Set Distinctive Ring to Off. (See Turning off Distinctive Ring on page 51.) Cannot..., or the document scanned from the ADF was too long. (See Using the ADF (MFC-J410W only) on page 20.) (See Document jam (MFC-J410W only) on page 51.) Comm.Error Poor telephone line quality caused a communication error. Allow the machine to check your telephone line. Press Stop/Exit....
...'s "handshake" will ask that the fax be stored in the machine's memory. Data Remaining Print data is not cleared, call Brother Customer Service. Disconnected The other person or other Try to print again. Set Distinctive Ring to Off. (See Turning off Distinctive Ring on page 51.) Cannot..., or the document scanned from the ADF was too long. (See Using the ADF (MFC-J410W only) on page 20.) (See Document jam (MFC-J410W only) on page 51.) Comm.Error Poor telephone line quality caused a communication error. Allow the machine to check your telephone line. Press Stop/Exit....

Basic Users Manual - English
Page 70
... during the different purging and flushing operations. The more than 45 days (infrequent use of non-Brother ink may cause frequent cleanings because non-Brother ink could cause poor print quality which is dependent on page i.) 56 These boxes acquire amounts of times a machine purges and ... cleans upon power up . Note Repairs resulting from your machine serviced. (See Brother numbers on the number of time to have your Brother machine. The use of non-Brother supplies may require replacement after sitting idle for cleaning are periodic maintenance items that ...
... during the different purging and flushing operations. The more than 45 days (infrequent use of non-Brother ink may cause frequent cleanings because non-Brother ink could cause poor print quality which is dependent on page i.) 56 These boxes acquire amounts of times a machine purges and ... cleans upon power up . Note Repairs resulting from your machine serviced. (See Brother numbers on the number of time to have your Brother machine. The use of non-Brother supplies may require replacement after sitting idle for cleaning are periodic maintenance items that ...
Basic Users Manual - English
Page 78
... cartridges are using Genuine Brother Innobella™ Ink. Clean the print head. (See Cleaning the print head in appendix A in the Basic tab of paper you are skewed. If you are printing a photo from your machine is dry. Printing (continued) Difficulty Suggestions Poor print quality. Make sure you are using . (See Printing for Windows® or Printing and Faxing for...
... cartridges are using Genuine Brother Innobella™ Ink. Clean the print head. (See Cleaning the print head in appendix A in the Basic tab of paper you are skewed. If you are printing a photo from your machine is dry. Printing (continued) Difficulty Suggestions Poor print quality. Make sure you are using . (See Printing for Windows® or Printing and Faxing for...
Quick Setup Guide - English
Page 7
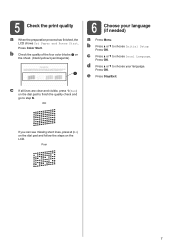
... step 6. Poor 7 Press OK. c Press a or b to choose Initial Setup. c If all lines are clear and visible, press 1 (Yes) on the LCD. OK If you can see missing short lines, press 2 (No) on the dial pad and follow the steps on the dial pad to finish the quality check and... (if needed) a Press Menu. Press OK. Press Color Start. e Press Stop/Exit. Press OK. b Check the quality of the four color blocks a on the sheet. (black/yellow/cyan/magenta) 1 6 Choose your language. 5 Check the print quality a When the preparation process has finished, the LCD shows Set Paper and Press Start.
... step 6. Poor 7 Press OK. c Press a or b to choose Initial Setup. c If all lines are clear and visible, press 1 (Yes) on the LCD. OK If you can see missing short lines, press 2 (No) on the dial pad and follow the steps on the dial pad to finish the quality check and... (if needed) a Press Menu. Press OK. Press Color Start. e Press Stop/Exit. Press OK. b Check the quality of the four color blocks a on the sheet. (black/yellow/cyan/magenta) 1 6 Choose your language. 5 Check the print quality a When the preparation process has finished, the LCD shows Set Paper and Press Start.


