Advanced Users Manual - English
Page 32
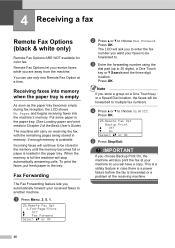
...to choose On or Off. When the memory is empty 4 As soon as the paper tray becomes empty during fax reception, the LCD shows No Paper and begins receiving faxes into the...IMPORTANT If you want your machine so you are away from the machine. Put some paper in the paper tray. (See Loading paper and print media in Chapter 2 of the Basic User's Guide) The machine will have a copy....b to . This is a safety feature in memory, if enough memory is loaded in the tray. To print the faxes, put fresh paper in the paper tray. The LCD will ask you to enter the fax number you choose Backup Print...
...to choose On or Off. When the memory is empty 4 As soon as the paper tray becomes empty during fax reception, the LCD shows No Paper and begins receiving faxes into the...IMPORTANT If you want your machine so you are away from the machine. Put some paper in the paper tray. (See Loading paper and print media in Chapter 2 of the Basic User's Guide) The machine will have a copy....b to . This is a safety feature in memory, if enough memory is loaded in the tray. To print the faxes, put fresh paper in the paper tray. The LCD will ask you to enter the fax number you choose Backup Print...
Advanced Users Manual - English
Page 53
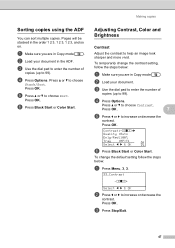
... 1 2 3, and so on. c Use the dial pad to enter the number of copies (up to choose Sort. b Load your document in Copy mode . Contrast:-nnonn+c Quality :Auto Enlg/Red:100% Tray :MP>T1 Select d c & OK 01 f Press Black Start or Color Start. Press OK. c Press Stop/Exit. 47... b Load your document. e Press a or b to 99). Press a or b to increase or decrease the contrast. Press OK. 7 ...
... 1 2 3, and so on. c Use the dial pad to enter the number of copies (up to choose Sort. b Load your document in Copy mode . Contrast:-nnonn+c Quality :Auto Enlg/Red:100% Tray :MP>T1 Select d c & OK 01 f Press Black Start or Color Start. Press OK. c Press Stop/Exit. 47... b Load your document. e Press a or b to 99). Press a or b to increase or decrease the contrast. Press OK. 7 ...

Advanced Users Manual - English
Page 54
Press OK. Quality :Auto Enlg/Red:100% Tray :MP>T1 01 Bright :-nnonn+c Select d c & OK f Press Black Start or Color Start. Press OK. d Return to step b to increase or decrease the color saturation. d ... d c & OK b Press c to make a lighter copy or press d to choose 1.Red, 2.Green, or 3.Blue. Press OK. To temporarily change the default setting for color saturation. b Load your document. c Press Stop/Exit. Chapter 7 Brightness 7 Adjust the copy brightness to make a darker copy. e Press c to make a lighter copy or press d to make a darker...
Press OK. Quality :Auto Enlg/Red:100% Tray :MP>T1 01 Bright :-nnonn+c Select d c & OK f Press Black Start or Color Start. Press OK. d Return to step b to increase or decrease the color saturation. d ... d c & OK b Press c to make a lighter copy or press d to choose 1.Red, 2.Green, or 3.Blue. Press OK. To temporarily change the default setting for color saturation. b Load your document. c Press Stop/Exit. Chapter 7 Brightness 7 Adjust the copy brightness to make a darker copy. e Press c to make a lighter copy or press d to make a darker...
Advanced Users Manual - English
Page 57
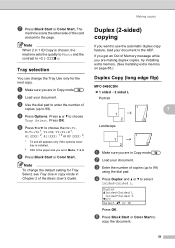
... of Memory message while you are making duplex copies, try installing extra memory. (See Installing extra memory on page 86.) Duplex Copy (long edge flip) 7 MFC-9460CDN 1 sided i 2 sided L Portrait 1 7 1 2 2 Landscape 11 1 2 2 a Make sure you set in Menu, 1, 2, 2. Duplex a1sidedi2sided L 1sidedi2sided S ...bOff Select ab or OK Press OK. a Make sure you want to +2 (-nnnno+). b Load your document. f Press Black Start or Color Start. Note To change the Tray Use only for Tray Select, see Tray Use in copy mode in the ADF. d Press Duplex and a or b to copy the document....
... of Memory message while you are making duplex copies, try installing extra memory. (See Installing extra memory on page 86.) Duplex Copy (long edge flip) 7 MFC-9460CDN 1 sided i 2 sided L Portrait 1 7 1 2 2 Landscape 11 1 2 2 a Make sure you set in Menu, 1, 2, 2. Duplex a1sidedi2sided L 1sidedi2sided S ...bOff Select ab or OK Press OK. a Make sure you want to +2 (-nnnno+). b Load your document. f Press Black Start or Color Start. Note To change the Tray Use only for Tray Select, see Tray Use in copy mode in the ADF. d Press Duplex and a or b to copy the document....
Advanced Users Manual - English
Page 62
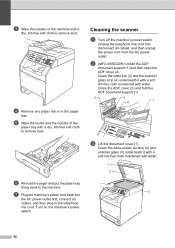
f Re-load the paper and put the paper tray firmly back in the paper tray. Cleaning the scanner A a Turn off the machine's power switch. Clean the white bar (3) and the scanner glass strip (4) underneath it with a soft lint-free cloth moistened with water. b (MFC-9560CDW) Unfold the ADF document support (1) and then open the ADF cover...
f Re-load the paper and put the paper tray firmly back in the paper tray. Cleaning the scanner A a Turn off the machine's power switch. Clean the white bar (3) and the scanner glass strip (4) underneath it with a soft lint-free cloth moistened with water. b (MFC-9560CDW) Unfold the ADF document support (1) and then open the ADF cover...
Users Manual - English
Page 32
..., Software User's Guide and Network User's Guide 2 Viewing Documentation 2 Accessing Brother Support (Windows 4 Accessing Brother Support (Macintosh 5 Control panel overview 6 Data LED indications 9 2 Loading paper 10 Loading paper and print media 10 Loading paper in the standard paper tray 10 Loading paper in the multi-purpose tray (MP tray 12 Unscannable area 17 Unprintable area when printing from a computer...
..., Software User's Guide and Network User's Guide 2 Viewing Documentation 2 Accessing Brother Support (Windows 4 Accessing Brother Support (Macintosh 5 Control panel overview 6 Data LED indications 9 2 Loading paper 10 Loading paper and print media 10 Loading paper in the standard paper tray 10 Loading paper in the multi-purpose tray (MP tray 12 Unscannable area 17 Unprintable area when printing from a computer...
Users Manual - English
Page 47
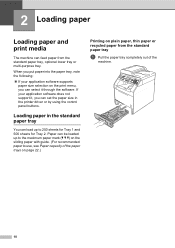
...set the paper size in the standard paper tray 2 You can load up to the maximum paper mark (b b b) on plain paper, thin paper or recycled paper from the standard paper tray, optional lower tray or multi-purpose tray. 2 Loading paper 2 Loading paper and print media 2 The machine can ...feed paper from the standard paper tray 2 a Pull the paper tray completely out of the paper trays on page 22.) Printing on the sliding ...
...set the paper size in the standard paper tray 2 You can load up to the maximum paper mark (b b b) on plain paper, thin paper or recycled paper from the standard paper tray, optional lower tray or multi-purpose tray. 2 Loading paper 2 Loading paper and print media 2 The machine can ...feed paper from the standard paper tray 2 a Pull the paper tray completely out of the paper trays on page 22.) Printing on the sliding ...
Users Manual - English
Page 48
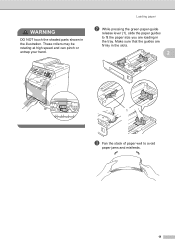
Loading paper b While pressing the green paper-guide release lever (1), slide the paper guides to fit the paper size you are firmly in the slots. 2 1 c Fan the stack of paper well to avoid paper jams and misfeeds. 11 These rollers may be rotating at high speed and can pinch or entrap your hand. WARNING DO NOT touch the shaded parts shown in the tray. Make sure that the guides are loading in the illustration.
Loading paper b While pressing the green paper-guide release lever (1), slide the paper guides to fit the paper size you are firmly in the slots. 2 1 c Fan the stack of paper well to avoid paper jams and misfeeds. 11 These rollers may be rotating at high speed and can pinch or entrap your hand. WARNING DO NOT touch the shaded parts shown in the tray. Make sure that the guides are loading in the illustration.
Users Manual - English
Page 49
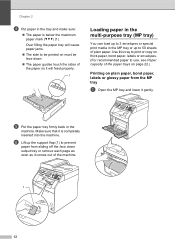
... paper, bond paper, labels or glossy paper from sliding off the face down . The paper guides touch the sides of plain paper. Use this tray to print or copy on thick paper, bond paper, labels or envelopes. (For recommended paper to use, see Paper capacity of the paper.... The side to prevent paper from the MP tray 2 a Open the MP tray and lower it is below the maximum paper mark (b b b) (1). f Lift up to 50 sheets of the paper so it will feed properly. 1 Loading paper in the multi-purpose tray (MP tray) 2 You can load up to 3 envelopes or special print media in...
... paper, bond paper, labels or glossy paper from sliding off the face down . The paper guides touch the sides of plain paper. Use this tray to print or copy on thick paper, bond paper, labels or envelopes. (For recommended paper to use, see Paper capacity of the paper.... The side to prevent paper from the MP tray 2 a Open the MP tray and lower it is below the maximum paper mark (b b b) (1). f Lift up to 50 sheets of the paper so it will feed properly. 1 Loading paper in the multi-purpose tray (MP tray) 2 You can load up to 3 envelopes or special print media in...
Users Manual - English
Page 50
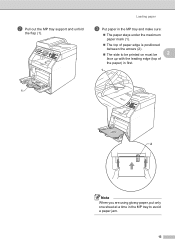
b Pull out the MP tray support and unfold the flap (1). Loading paper c Put paper in the MP tray and make sure: The paper stays under the maximum paper mark (1). The top of paper edge is positioned between the arrows (2). The side to be printed on must be 2 face up with the leading edge (top of the paper) in first. 1 1 2 Note When you are using glossy paper, put only one sheet at a time in the MP tray to avoid a paper jam. 13
b Pull out the MP tray support and unfold the flap (1). Loading paper c Put paper in the MP tray and make sure: The paper stays under the maximum paper mark (1). The top of paper edge is positioned between the arrows (2). The side to be printed on must be 2 face up with the leading edge (top of the paper) in first. 1 1 2 Note When you are using glossy paper, put only one sheet at a time in the MP tray to avoid a paper jam. 13
Users Manual - English
Page 51
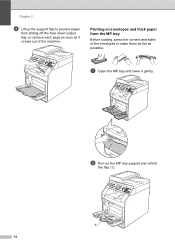
a Open the MP tray and lower it comes out of the envelopes to prevent paper from the MP tray 2 Before loading, press the corners and sides of the machine. b Pull out the MP tray support and unfold the flap (1). 1 14 Printing on envelopes and thick paper from sliding off the face down output tray, or remove each page as soon as possible. Chapter 2 d Lift up the support flap to make them as flat as it gently.
a Open the MP tray and lower it comes out of the envelopes to prevent paper from the MP tray 2 Before loading, press the corners and sides of the machine. b Pull out the MP tray support and unfold the flap (1). 1 14 Printing on envelopes and thick paper from sliding off the face down output tray, or remove each page as soon as possible. Chapter 2 d Lift up the support flap to make them as flat as it gently.
Users Manual - English
Page 52
If you should remove each envelope as soon as it may cause a jam. If the support flap is positioned between the arrows (1). 2 The side to prevent envelopes and thick sheets of paper from sliding off the face down output tray. Make sure: The top of envelope edge is closed you add more envelopes or paper it comes out of the machine. c Lift up the support flap to be printed on must be face up to 25 sheets of thick paper [43 lb (163 g/m2)] in the MP tray. Loading paper d Put up to 3 envelopes or up . 1 15
If you should remove each envelope as soon as it may cause a jam. If the support flap is positioned between the arrows (1). 2 The side to prevent envelopes and thick sheets of paper from sliding off the face down output tray. Make sure: The top of envelope edge is closed you add more envelopes or paper it comes out of the machine. c Lift up the support flap to be printed on must be face up to 25 sheets of thick paper [43 lb (163 g/m2)] in the MP tray. Loading paper d Put up to 3 envelopes or up . 1 15
Users Manual - English
Page 56
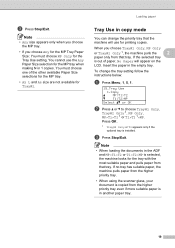
...only when you choose the MP tray. • If you choose Tray#1 Only, MP Only or Tray#2 Only 1, the machine pulls the 2 paper only from that tray. Loading paper Tray Use in copy mode 2 You can change the tray setting follow the instructions below: a Press Menu, 1, 5, 1. 15.Tray Use 1.Copy a MP>T1...>T2 b T1>T2>MP Select ab or OK b Press a or b to choose Tray#1 Only, Tray#2 Only 1, MP Only, MP>...
...only when you choose the MP tray. • If you choose Tray#1 Only, MP Only or Tray#2 Only 1, the machine pulls the 2 paper only from that tray. Loading paper Tray Use in copy mode 2 You can change the tray setting follow the instructions below: a Press Menu, 1, 5, 1. 15.Tray Use 1.Copy a MP>T1...>T2 b T1>T2>MP Select ab or OK b Press a or b to choose Tray#1 Only, Tray#2 Only 1, MP Only, MP>...
Users Manual - English
Page 58
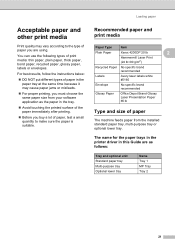
...paper, test a small quantity to the type of paper you must choose the same paper size from the installed standard paper tray, multi-purpose tray or optional lower tray. Acceptable paper and other print media 2 Print quality may cause paper jams or misfeeds. For proper printing, ...you are using. Loading paper Recommended paper and print media 2 Paper Type Item Plain Paper Xerox 4200DP 20 lb 2 Hammermill Laser Print (24 ...
...paper, test a small quantity to the type of paper you must choose the same paper size from the installed standard paper tray, multi-purpose tray or optional lower tray. Acceptable paper and other print media 2 Print quality may cause paper jams or misfeeds. For proper printing, ...you are using. Loading paper Recommended paper and print media 2 Paper Type Item Plain Paper Xerox 4200DP 20 lb 2 Hammermill Laser Print (24 ...
Users Manual - English
Page 60
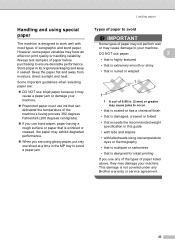
...types of paper listed above, they may exhibit degraded performance. When you use any Brother warranty or service agreement. 23 This damage is not covered under any of the types of ... may not perform well or may have an effect on print quality or handling reliability. Loading paper Handling and using special paper 2 The machine is designed to ensure desirable performance. Types... paper, paper having a rough surface or paper that exceeds the recommended weight specification in the MP tray to occur. • that is coated or has a chemical finish • that is damaged,...
...types of paper listed above, they may exhibit degraded performance. When you use any Brother warranty or service agreement. 23 This damage is not covered under any of the types of ... may not perform well or may have an effect on print quality or handling reliability. Loading paper Handling and using special paper 2 The machine is designed to ensure desirable performance. Types... paper, paper having a rough surface or paper that exceeds the recommended weight specification in the MP tray to occur. • that is coated or has a chemical finish • that is damaged,...
Users Manual - English
Page 88
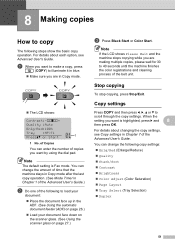
...glass on page 27.) c Press Black Start or Color Start. Copy settings 8 Press COPY and then press d, c, a or b to load your document: Place the document face up in Chapter 7 of the Advanced User's Guide. Note The default setting is highlighted, ... Quality Stack/Sort Contrast Brightness Color Adjust (Color Saturation) Page Layout Tray Select (Tray Selection) Duplex 51 Stop copying 8 To stop copying, press Stop/Exit. You can change the following to scroll through the copy settings...
...glass on page 27.) c Press Black Start or Color Start. Copy settings 8 Press COPY and then press d, c, a or b to load your document: Place the document face up in Chapter 7 of the Advanced User's Guide. Note The default setting is highlighted, ... Quality Stack/Sort Contrast Brightness Color Adjust (Color Saturation) Page Layout Tray Select (Tray Selection) Duplex 51 Stop copying 8 To stop copying, press Stop/Exit. You can change the following to scroll through the copy settings...
Users Manual - English
Page 132
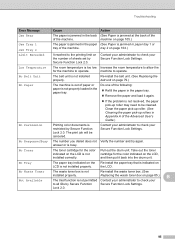
... paper pick-up rollers in Appendix A of paper or paper is not properly loaded in the paper tray. Do one of the machine. Take out the toner cartridge for the color indicated on page 105.) ... Secure Function Lock Settings. No Belt Unit The belt unit is indicated on the number of the machine. tray 2 on page 104.) Limit Exceeded It reached to the printing limit on LCD is not installed properly. ... the of the following: Refill the paper in the paper tray. Remove the paper and load it back into the drum unit. No Tray The paper tray indicated on the Re-install the paper...
... paper pick-up rollers in Appendix A of paper or paper is not properly loaded in the paper tray. Do one of the machine. Take out the toner cartridge for the color indicated on page 105.) ... Secure Function Lock Settings. No Belt Unit The belt unit is indicated on the number of the machine. tray 2 on page 104.) Limit Exceeded It reached to the printing limit on LCD is not installed properly. ... the of the following: Refill the paper in the paper tray. Remove the paper and load it back into the drum unit. No Tray The paper tray indicated on the Re-install the paper...
Users Manual - English
Page 135
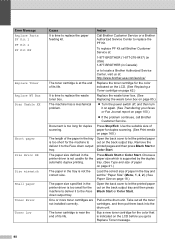
...page 85.) The machine has a mechanical problem. Turn the power switch off, and then turn it to the Face down output tray. Load the correct size of its life. One or more toner cartridges are Pull out the drum unit. Replace the toner cartridge for the automatic duplex... Black Start or Color Start. Open the back cover to locate a Brother Authorized Service Center, visit us at: http://www.brother-usa.com/service/ The toner cartridge is at : 1-877-BROTHER (1-877-276-8437) (in USA) 1-877-BROTHER (in the printer driver is not the correct size. To replace PF...
...page 85.) The machine has a mechanical problem. Turn the power switch off, and then turn it to the Face down output tray. Load the correct size of its life. One or more toner cartridges are Pull out the drum unit. Replace the toner cartridge for the automatic duplex... Black Start or Color Start. Open the back cover to locate a Brother Authorized Service Center, visit us at: http://www.brother-usa.com/service/ The toner cartridge is at : 1-877-BROTHER (1-877-276-8437) (in USA) 1-877-BROTHER (in the printer driver is not the correct size. To replace PF...
Users Manual - English
Page 140
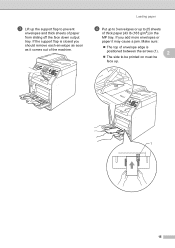
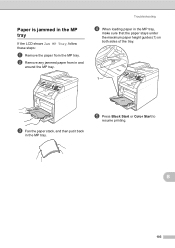
e Press Black Start or Color Start to resume printing. B 103 Troubleshooting d When loading paper in the MP tray, make sure that the paper stays under the maximum paper height guides (1) on both sides of the tray. 1 c Fan the paper stack, and then put it back in and around the MP tray. Paper is jammed in the MP tray B If the LCD shows Jam MP Tray, follow these steps: a Remove the paper from in the MP tray. b Remove any jammed paper from the MP tray.
e Press Black Start or Color Start to resume printing. B 103 Troubleshooting d When loading paper in the MP tray, make sure that the paper stays under the maximum paper height guides (1) on both sides of the tray. 1 c Fan the paper stack, and then put it back in and around the MP tray. Paper is jammed in the MP tray B If the LCD shows Jam MP Tray, follow these steps: a Remove the paper from in the MP tray. b Remove any jammed paper from the MP tray.
Users Manual - English
Page 142
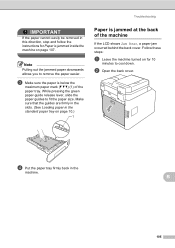
B 105 IMPORTANT If the paper cannot easily be removed in the standard paper tray on page 10.) 1 Troubleshooting Paper is jammed at the back of the paper tray. Make sure that the guides are firmly in the slots. (See Loading paper in this direction, stop and follow the instructions for Paper is below the...
B 105 IMPORTANT If the paper cannot easily be removed in the standard paper tray on page 10.) 1 Troubleshooting Paper is jammed at the back of the paper tray. Make sure that the guides are firmly in the slots. (See Loading paper in this direction, stop and follow the instructions for Paper is below the...


