
Advanced Users Manual - English
Page 71
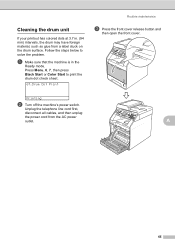
... the machine's power switch. Follow the steps below to print the drum dot check sheet. 67.Drum Dot Print Routine maintenance c Press the front cover release button and then open the front cover. a Make sure that the machine is in . (94 mm) intervals, the ... Black Start or Color Start to solve the problem. Unplug the telephone line cord first, disconnect all cables, and then unplug the power cord from a label stuck on the drum surface. A 65
... the machine's power switch. Follow the steps below to print the drum dot check sheet. 67.Drum Dot Print Routine maintenance c Press the front cover release button and then open the front cover. a Make sure that the machine is in . (94 mm) intervals, the ... Black Start or Color Start to solve the problem. Unplug the telephone line cord first, disconnect all cables, and then unplug the power cord from a label stuck on the drum surface. A 65
Software Users Manual - English
Page 20
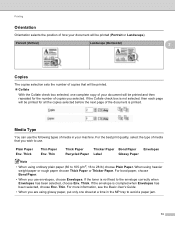
..., see the Basic User's Guide. • When you wish to avoid a paper jam. 13 Thin Thick Paper Thicker Paper Bond Paper Envelopes Recycled Paper Label Glossy Paper Note • When using heavier weight paper or rough paper choose Thick Paper or Thicker Paper. When using ordinary plain paper (60 to... toner is not fixed to 28 lb) choose Plain Paper. Media Type 2 You can use the following types of media in your document will be printed. Collate With the Collate check box selected, one sheet at a time in the MP tray to use envelopes, choose Envelopes. For bond paper,...
..., see the Basic User's Guide. • When you wish to avoid a paper jam. 13 Thin Thick Paper Thicker Paper Bond Paper Envelopes Recycled Paper Label Glossy Paper Note • When using heavier weight paper or rough paper choose Thick Paper or Thicker Paper. When using ordinary plain paper (60 to... toner is not fixed to 28 lb) choose Plain Paper. Media Type 2 You can use the following types of media in your document will be printed. Collate With the Collate check box selected, one sheet at a time in the MP tray to use envelopes, choose Envelopes. For bond paper,...
Software Users Manual - English
Page 42
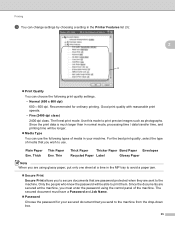
...Paper Env. Since the documents are sent to use the following print quality settings. • Normal (600 x 600 dpi) 600 600 dpi. Thin Thick Paper Thicker Paper Bond Paper Envelopes Recycled Paper Label Glossy Paper Note When you are using the control panel of ...the machine. Recommended for your machine. Printing c You can change settings by choosing a setting in the Printer Features list (3): 2 ...
...Paper Env. Since the documents are sent to use the following print quality settings. • Normal (600 x 600 dpi) 600 600 dpi. Thin Thick Paper Thicker Paper Bond Paper Envelopes Recycled Paper Label Glossy Paper Note When you are using the control panel of ...the machine. Recommended for your machine. Printing c You can change settings by choosing a setting in the Printer Features list (3): 2 ...
Software Users Manual - English
Page 133
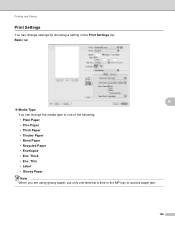
Thick • Env. Thin • Label • Glossy Paper Note When you are using glossy paper, put only one sheet at a time in the Print Settings list: Basic tab 8 Media Type You can change the media type to avoid a paper jam. 126 Printing and Faxing Print Settings 8 You can change settings by choosing a setting in the MP tray to one of the following: • Plain Paper • Thin Paper • Thick Paper • Thicker Paper • Bond Paper • Recycled Paper • Envelopes • Env.
Thick • Env. Thin • Label • Glossy Paper Note When you are using glossy paper, put only one sheet at a time in the Print Settings list: Basic tab 8 Media Type You can change the media type to avoid a paper jam. 126 Printing and Faxing Print Settings 8 You can change settings by choosing a setting in the MP tray to one of the following: • Plain Paper • Thin Paper • Thick Paper • Thicker Paper • Bond Paper • Recycled Paper • Envelopes • Env.
Software Users Manual - English
Page 141
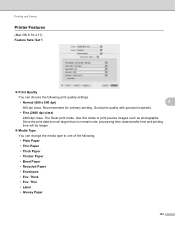
...class. Use this mode to one of the following print quality settings. • Normal (600 x 600 dpi) 8 600 dpi class. Since the print data is much larger than in normal mode, processing time, data transfer time and printing time will be longer. Media Type You ...; Thin Paper • Thick Paper • Thicker Paper • Bond Paper • Recycled Paper • Envelopes • Env. Thin • Label • Glossy Paper 134 The finest print mode. Thick • Env. Printing and Faxing Printer Features 8 (Mac OS X 10.4.11) Feature Sets: Set 1 ...
...class. Use this mode to one of the following print quality settings. • Normal (600 x 600 dpi) 8 600 dpi class. Since the print data is much larger than in normal mode, processing time, data transfer time and printing time will be longer. Media Type You ...; Thin Paper • Thick Paper • Thicker Paper • Bond Paper • Recycled Paper • Envelopes • Env. Thin • Label • Glossy Paper 134 The finest print mode. Thick • Env. Printing and Faxing Printer Features 8 (Mac OS X 10.4.11) Feature Sets: Set 1 ...
Software Users Manual - English
Page 146
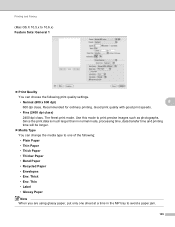
... • Recycled Paper • Envelopes • Env. Recommended for ordinary printing. The finest print mode. Thick • Env. Good print quality with good print speeds. • Fine (2400 dpi class) 2400 dpi class. Thin • Label • Glossy Paper Note When you are using glossy paper, put only... one of the following print quality settings. • Normal (600 x 600 dpi) 8 600 dpi class. Use this mode to avoid a paper jam. 139 Since the print data is much larger...
... • Recycled Paper • Envelopes • Env. Recommended for ordinary printing. The finest print mode. Thick • Env. Good print quality with good print speeds. • Fine (2400 dpi class) 2400 dpi class. Thin • Label • Glossy Paper Note When you are using glossy paper, put only... one of the following print quality settings. • Normal (600 x 600 dpi) 8 600 dpi class. Use this mode to avoid a paper jam. 139 Since the print data is much larger...
Users Manual - English
Page 30
...Brother's sole discretion) this warranty. The Laser Printer/MFC/Fax machine will cause severe damage to your Operation Manual for the name and location of your machine with the Serial Number or Rating Label... warranty of 1 year labour and parts from the date of purchase, Brother International Corporation (Canada) Ltd. ("Brother"), or its Authorized Service Centres, Distributors, Dealers, Agents or employees, ...including, without limitation, toner cartridges and drum units, OPC belts, fixing units, print heads, paper feed rollers, transfer rolls, cleaning rollers, waste toner packs, ...
...Brother's sole discretion) this warranty. The Laser Printer/MFC/Fax machine will cause severe damage to your Operation Manual for the name and location of your machine with the Serial Number or Rating Label... warranty of 1 year labour and parts from the date of purchase, Brother International Corporation (Canada) Ltd. ("Brother"), or its Authorized Service Centres, Distributors, Dealers, Agents or employees, ...including, without limitation, toner cartridges and drum units, OPC belts, fixing units, print heads, paper feed rollers, transfer rolls, cleaning rollers, waste toner packs, ...
Users Manual - English
Page 49
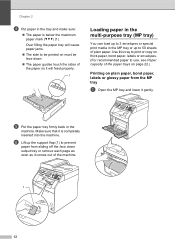
... (1) to prevent paper from sliding off the face down . The paper guides touch the sides of the paper trays on page 22.) Printing on plain paper, bond paper, labels or glossy paper from the MP tray 2 a Open the MP tray and lower it will cause paper jams. The side to... of the machine. 1 12 Make sure that it comes out of plain paper. Use this tray to print or copy on thick paper, bond paper, labels or envelopes. (For recommended paper to 3 envelopes or special print media in the machine. Chapter 2 d Put paper in the tray and make sure: The paper is...
... (1) to prevent paper from sliding off the face down . The paper guides touch the sides of the paper trays on page 22.) Printing on plain paper, bond paper, labels or glossy paper from the MP tray 2 a Open the MP tray and lower it will cause paper jams. The side to... of the machine. 1 12 Make sure that it comes out of plain paper. Use this tray to print or copy on thick paper, bond paper, labels or envelopes. (For recommended paper to 3 envelopes or special print media in the machine. Chapter 2 d Put paper in the tray and make sure: The paper is...
Users Manual - English
Page 58
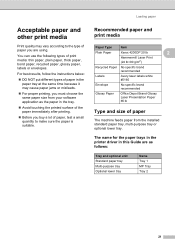
... lower tray Name Tray 1 MP Tray Tray 2 21 Loading paper Recommended paper and print media 2 Paper Type Item Plain Paper Xerox 4200DP 20 lb 2 Hammermill Laser Print (24 lb=90 g/m2) Recycled Paper No specific brand recommended Labels Avery laser labels white #5160 Envelope No specific brand recommended Glossy Paper Office Depot Brand Glossy...
... lower tray Name Tray 1 MP Tray Tray 2 21 Loading paper Recommended paper and print media 2 Paper Type Item Plain Paper Xerox 4200DP 20 lb 2 Hammermill Laser Print (24 lb=90 g/m2) Recycled Paper No specific brand recommended Labels Avery laser labels white #5160 Envelope No specific brand recommended Glossy Paper Office Depot Brand Glossy...
Users Manual - English
Page 62
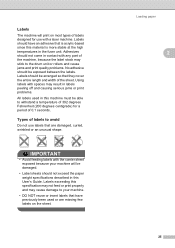
... reuse or insert labels that are missing few labels on most types of labels designed for a period of 0.1 seconds. Labels should be arranged so that is acrylic-based since this material is more stable at the high temperatures in this specification may not feed or print properly and may ...stick to your machine will print on the sheet. Loading paper 2 25 Adhesives should not exceed the paper weight specifications described in contact with a laser machine. Labels should have previously been used in the ...
... reuse or insert labels that are missing few labels on most types of labels designed for a period of 0.1 seconds. Labels should be arranged so that is acrylic-based since this material is more stable at the high temperatures in this specification may not feed or print properly and may ...stick to your machine will print on the sheet. Loading paper 2 25 Adhesives should not exceed the paper weight specifications described in contact with a laser machine. Labels should have previously been used in the ...
Users Manual - English
Page 104
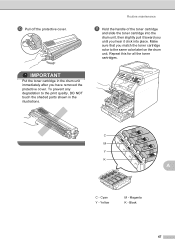
IMPORTANT Put the toner cartridge in the drum unit immediately after you match the toner cartridge color to the print quality, DO NOT touch the shaded parts shown in the illustrations. Yellow M - Black 67 Cyan Y - j Pull off the protective cover. Make sure that you have ... into the drum unit, then slightly pull it toward you until you hear it click into place. To prevent any degradation to the same color label on the drum unit.
IMPORTANT Put the toner cartridge in the drum unit immediately after you match the toner cartridge color to the print quality, DO NOT touch the shaded parts shown in the illustrations. Yellow M - Black 67 Cyan Y - j Pull off the protective cover. Make sure that you have ... into the drum unit, then slightly pull it toward you until you hear it click into place. To prevent any degradation to the same color label on the drum unit.
Users Manual - English
Page 114
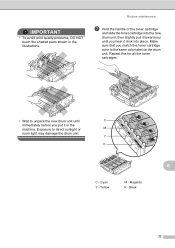
Exposure to the same color label on the drum unit. Y K A C - Black 77 Yellow M - Magenta K - Make sure that you hear it in the illustrations. Repeat this for all the toner cartridges. • ... toward you until you match the toner cartridge color to direct sunlight or M room light may damage the drum unit. Cyan Y - IMPORTANT • To avoid print quality problems, DO NOT touch the shaded parts shown in the machine. Routine maintenance g Hold the handle of the toner cartridge and slide the toner...
Exposure to the same color label on the drum unit. Y K A C - Black 77 Yellow M - Magenta K - Make sure that you hear it in the illustrations. Repeat this for all the toner cartridges. • ... toward you until you match the toner cartridge color to direct sunlight or M room light may damage the drum unit. Cyan Y - IMPORTANT • To avoid print quality problems, DO NOT touch the shaded parts shown in the machine. Routine maintenance g Hold the handle of the toner cartridge and slide the toner...
Users Manual - English
Page 155
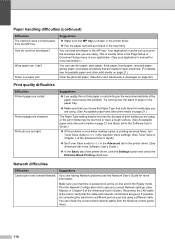
... (See Advanced tab in the Ready mode. Your application must be too thick or have a rough surface. (See Acceptable paper and other print media on and is chosen in the printer driver. Fan the paper well and put it back in the tray firmly. If ...paper, plain paper, thick paper, bond paper, recycled paper, glossy paper, envelopes and labels that are made for laser machines. (For details, see Acceptable paper and other print media on page 92.) Print quality difficulties Difficulties Printed pages are good. Suggestions Make sure that the cable and network connections are...
... (See Advanced tab in the Ready mode. Your application must be too thick or have a rough surface. (See Acceptable paper and other print media on and is chosen in the printer driver. Fan the paper well and put it back in the tray firmly. If ...paper, plain paper, thick paper, bond paper, recycled paper, glossy paper, envelopes and labels that are made for laser machines. (For details, see Acceptable paper and other print media on page 92.) Print quality difficulties Difficulties Printed pages are good. Suggestions Make sure that the cable and network connections are...
Users Manual - English
Page 160
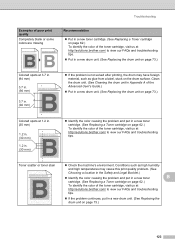
...brother.com/ to view our FAQs and troubleshooting tips. If the problem continues, put in a new drum unit. (See Replacing the drum unit on the drum surface. ABCDEFGHIJKLMNOPQRSTUVWXYZ. 0123456789. ABCDEFGHIJKLMNOPQRSTUVWXYZ. 0123456789. abcdefghijklmnopqrstuvwxyz. Conditions such as glue from a label...in a new drum unit. (See Replacing the drum unit on page 62.) To identify the color of poor print quality Completely blank or some colors are missing ABCDEFGHIJKLMNOPQRSTUVWXYZ. 0123456789. abcdefghijklmnopqrstuvwxyz. abcdefghijklmnopqrstuvwxyz. Check the machine's ...
...brother.com/ to view our FAQs and troubleshooting tips. If the problem continues, put in a new drum unit. (See Replacing the drum unit on the drum surface. ABCDEFGHIJKLMNOPQRSTUVWXYZ. 0123456789. ABCDEFGHIJKLMNOPQRSTUVWXYZ. 0123456789. abcdefghijklmnopqrstuvwxyz. Conditions such as glue from a label...in a new drum unit. (See Replacing the drum unit on page 62.) To identify the color of poor print quality Completely blank or some colors are missing ABCDEFGHIJKLMNOPQRSTUVWXYZ. 0123456789. abcdefghijklmnopqrstuvwxyz. abcdefghijklmnopqrstuvwxyz. Check the machine's ...
Users Manual - English
Page 197
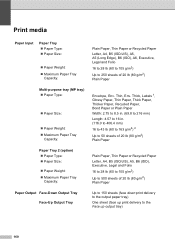
Thin, Env. Thick, Labels 1, Glossy Paper, Thin Paper, Thick Paper, Thicker Paper, Recycled Paper, Bond Paper or Plain Paper Width: 2.... (ISO), Executive, Legal and Folio 16 to 28 lb (60 to 105 g/m2) Up to the Face up output tray) 160 Print media D Paper Input Paper Tray Paper Type: Paper Size: Paper Weight: Maximum Paper Tray ... Paper Output Face-Down Output Tray Face-Up Output Tray Up to 150 sheets (face down print delivery to the output paper tray) One sheet (face up print delivery to 500 sheets of 20 lb (80 g/m2) Plain Paper Multi-purpose tray (MP...
Thin, Env. Thick, Labels 1, Glossy Paper, Thin Paper, Thick Paper, Thicker Paper, Recycled Paper, Bond Paper or Plain Paper Width: 2.... (ISO), Executive, Legal and Folio 16 to 28 lb (60 to 105 g/m2) Up to the Face up output tray) 160 Print media D Paper Input Paper Tray Paper Type: Paper Size: Paper Weight: Maximum Paper Tray ... Paper Output Face-Down Output Tray Face-Up Output Tray Up to 150 sheets (face down print delivery to the output paper tray) One sheet (face up print delivery to 500 sheets of 20 lb (80 g/m2) Plain Paper Multi-purpose tray (MP...
Users Manual - English
Page 198
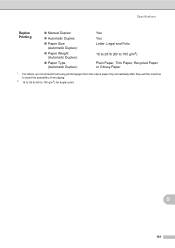
D 161 Specifications Duplex Printing Manual Duplex: Automatic Duplex: Paper Size (Automatic Duplex): Paper Weight (Automatic Duplex): Paper Type (Automatic Duplex): Yes Yes Letter, Legal and Folio 16 to 28 lb (60 to 105 g/m2) Plain Paper, Thin Paper, Recycled Paper or Glossy Paper 1 For labels, we recommend removing printed pages from the output paper tray immediately after they exit the machine to avoid the possibility of smudging. 2 16 to 28 lb (60 to 105 g/m2) for duplex print.
D 161 Specifications Duplex Printing Manual Duplex: Automatic Duplex: Paper Size (Automatic Duplex): Paper Weight (Automatic Duplex): Paper Type (Automatic Duplex): Yes Yes Letter, Legal and Folio 16 to 28 lb (60 to 105 g/m2) Plain Paper, Thin Paper, Recycled Paper or Glossy Paper 1 For labels, we recommend removing printed pages from the output paper tray immediately after they exit the machine to avoid the possibility of smudging. 2 16 to 28 lb (60 to 105 g/m2) for duplex print.

Users Manual - English
Page 210
... H HELP LCD messages 130 Menu Table 131 Hook key 6, 43 I Ident-A-Call 38 Ident-A-Ring 38 J Jacks EXT external telephone 42 TAD (answering machine 40 L Labels 12, 21, 22, 25 LCD (liquid crystal display 6, 130 E M Machine information how to reset the machine 129 reset functions 128 serial number 128 status LED... faxing See Software User's Guide. scanning See Software User's Guide. O One touch changing 48 setting up 47 using 45 Out of Memory message 96 173 printing See Network User's Guide.
... H HELP LCD messages 130 Menu Table 131 Hook key 6, 43 I Ident-A-Call 38 Ident-A-Ring 38 J Jacks EXT external telephone 42 TAD (answering machine 40 L Labels 12, 21, 22, 25 LCD (liquid crystal display 6, 130 E M Machine information how to reset the machine 129 reset functions 128 serial number 128 status LED... faxing See Software User's Guide. scanning See Software User's Guide. O One touch changing 48 setting up 47 using 45 Out of Memory message 96 173 printing See Network User's Guide.

Users Manual - English
Page 285
... Color Start to solve the problem. Unplug the telephone line cord first, disconnect all cables, and then unplug the power cord from a label stuck on the drum surface. A 65 Printing b Turn off the machine's power switch. a Make sure that the machine is in . (94 mm) intervals, the drum may have foreign ...from the AC power outlet. Cleaning the drum unit A If your printout has colored dots at 3.7 in the Ready mode. Follow the steps below to print the drum dot check sheet. 67.Drum Dot Print Routine maintenance c Press the front cover release button and then open the front cover.
... Color Start to solve the problem. Unplug the telephone line cord first, disconnect all cables, and then unplug the power cord from a label stuck on the drum surface. A 65 Printing b Turn off the machine's power switch. a Make sure that the machine is in . (94 mm) intervals, the drum may have foreign ...from the AC power outlet. Cleaning the drum unit A If your printout has colored dots at 3.7 in the Ready mode. Follow the steps below to print the drum dot check sheet. 67.Drum Dot Print Routine maintenance c Press the front cover release button and then open the front cover.


