

Advanced Users Manual - English
Page 63
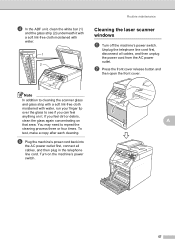
... the scanner glass and glass strip with a soft lint-free cloth moistened with water. 1 2 Routine maintenance Cleaning the laser scanner windows A a Turn off the machine's power switch. To test, make a copy after each cleaning. d In the ADF unit, clean the white bar (1) and the glass strip (2) underneath it . Unplug the telephone... times. Turn on A that area. You may need to see if you can feel dirt or debris, clean the glass again concentrating on the machine's power switch. 57 b Press the front cover release button and then open the front cover.
... the scanner glass and glass strip with a soft lint-free cloth moistened with water. 1 2 Routine maintenance Cleaning the laser scanner windows A a Turn off the machine's power switch. To test, make a copy after each cleaning. d In the ADF unit, clean the white bar (1) and the glass strip (2) underneath it . Unplug the telephone... times. Turn on A that area. You may need to see if you can feel dirt or debris, clean the glass again concentrating on the machine's power switch. 57 b Press the front cover release button and then open the front cover.
Advanced Users Manual - English
Page 71
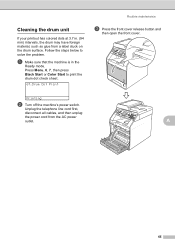
...machine is in . (94 mm) intervals, the drum may have foreign material, such as glue from the AC power outlet. Unplug the telephone line cord first, disconnect all cables, and then unplug the power cord from a label stuck on the drum surface. Press Menu, 6, 7, then press Black Start or Color Start... to solve the problem. Follow the steps below to print the drum dot check sheet. 67.Drum Dot Print Routine maintenance c Press the front cover release button and then open...
...machine is in . (94 mm) intervals, the drum may have foreign material, such as glue from the AC power outlet. Unplug the telephone line cord first, disconnect all cables, and then unplug the power cord from a label stuck on the drum surface. Press Menu, 6, 7, then press Black Start or Color Start... to solve the problem. Follow the steps below to print the drum dot check sheet. 67.Drum Dot Print Routine maintenance c Press the front cover release button and then open...

Advanced Users Manual - English
Page 83
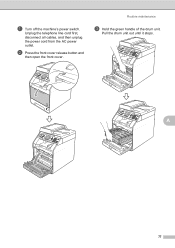
Routine maintenance c Hold the green handle of the drum unit. Unplug the telephone line cord first, disconnect all cables, and then unplug the power cord from the AC power outlet. Pull the drum unit out until it stops. A 77 b Press the front cover release button and then open the front cover. a Turn off the machine's power switch.
Routine maintenance c Hold the green handle of the drum unit. Unplug the telephone line cord first, disconnect all cables, and then unplug the power cord from the AC power outlet. Pull the drum unit out until it stops. A 77 b Press the front cover release button and then open the front cover. a Turn off the machine's power switch.
Quick Setup Guide - English
Page 3
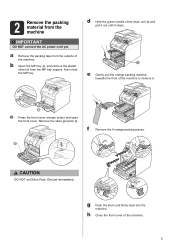
... out until it . Remove the silica gel pack a. e Gently pull the orange packing material towards the front of the machine. 3 c Press the front cover release button and open the front cover. Discard immediately. CCAAUUTTIOINON DO NOT eat Silica Pack. a Remove the packing tape from the MP tray support, then close the... 4 orange packing pieces. g Push the drum unit firmly back into the machine. 2 Remove the packing material from the machine IMPORTANT DO NOT connect the AC power cord yet.
... out until it . Remove the silica gel pack a. e Gently pull the orange packing material towards the front of the machine. 3 c Press the front cover release button and open the front cover. Discard immediately. CCAAUUTTIOINON DO NOT eat Silica Pack. a Remove the packing tape from the MP tray support, then close the... 4 orange packing pieces. g Push the drum unit firmly back into the machine. 2 Remove the packing material from the machine IMPORTANT DO NOT connect the AC power cord yet.

Software Users Manual - English
Page 112
When enabled, the machine will have a copy if there is a power failure before the fax is sent to the PC or the PC is off . Press OK. When Backup Print is switched off , your fax messages ... a or b to choose or your machine 6 You can optionally enable the Backup Print option. The PC-FAX icon appears in your PC 6 Click the start button, All Programs, Brother, MFC-XXXX/MFC-XXXX LAN, PC-FAX Receiving and Receive. c Press a or b to choose Backup Print:On or Backup Print:Off...
When enabled, the machine will have a copy if there is a power failure before the fax is sent to the PC or the PC is off . Press OK. When Backup Print is switched off , your fax messages ... a or b to choose or your machine 6 You can optionally enable the Backup Print option. The PC-FAX icon appears in your PC 6 Click the start button, All Programs, Brother, MFC-XXXX/MFC-XXXX LAN, PC-FAX Receiving and Receive. c Press a or b to choose Backup Print:On or Backup Print:Off...
Users Manual - English
Page 105
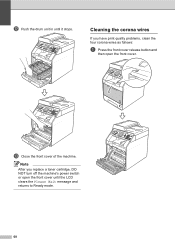
Note After you have print quality problems, clean the four corona wires as follows: a Press the front cover release button and then open the front cover until it stops. l Push the drum unit in until the LCD clears the Please Wait message and returns to Ready mode. 68 m Close the front cover of the machine. Cleaning the corona wires A If you replace a toner cartridge, DO NOT turn off the machine's power switch or open the front cover.
Note After you have print quality problems, clean the four corona wires as follows: a Press the front cover release button and then open the front cover until it stops. l Push the drum unit in until the LCD clears the Please Wait message and returns to Ready mode. 68 m Close the front cover of the machine. Cleaning the corona wires A If you replace a toner cartridge, DO NOT turn off the machine's power switch or open the front cover.

Users Manual - English
Page 144
B 107 b Press the front cover release button and then open the front cover. 2 Note If you are printing on envelopes, pull down the envelope levers (2) to the envelope position again before closing the back cover. f Fully close the back cover. e Close the fuser cover (1). 2 1 Troubleshooting Paper is jammed inside the machine B If the LCD shows Jam Inside, follow these steps: a Turn off the machine's power switch. Unplug the telephone line cord first, disconnect all cables, and then unplug the power cord from the AC power outlet.
B 107 b Press the front cover release button and then open the front cover. 2 Note If you are printing on envelopes, pull down the envelope levers (2) to the envelope position again before closing the back cover. f Fully close the back cover. e Close the fuser cover (1). 2 1 Troubleshooting Paper is jammed inside the machine B If the LCD shows Jam Inside, follow these steps: a Turn off the machine's power switch. Unplug the telephone line cord first, disconnect all cables, and then unplug the power cord from the AC power outlet.
Users Manual - English
Page 153
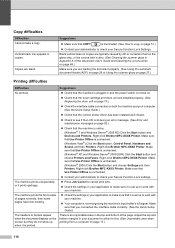
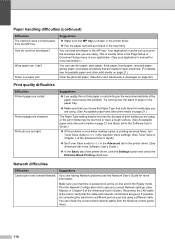
... drum unit are typically caused by dirt or correction fluid on page 17.) 116 Right-click Brother MFC-XXXX Printer. Make sure that the machine is plugged in and the power switch is printed. Suggestions Check that Use Printer Offline is unchecked. (Windows Vista®...;) Click the Start button, Control Panel, Hardware and Sound, and then Printers. Make sure that it is set up when it prints garbage. Right-click Brother MFC-XXXX Printer....
... drum unit are typically caused by dirt or correction fluid on page 17.) 116 Right-click Brother MFC-XXXX Printer. Make sure that the machine is plugged in and the power switch is printed. Suggestions Check that Use Printer Offline is unchecked. (Windows Vista®...;) Click the Start button, Control Panel, Hardware and Sound, and then Printers. Make sure that it is set up when it prints garbage. Right-click Brother MFC-XXXX Printer....
Users Manual - English
Page 155
... driver. Fan the paper well and put it back in the Page Setup or Document Setup menu of the printer driver, click the Settings button and check the Enhance Black Printing check box. Try turning over a wired Network. Print the Network Configuration list to see your hub using a different ...a different port on page 21 and Basic tab in the Software User's Guide.) In the Basic tab of your application. (See your machine is powered on and is usually done in the tray firmly. This is on envelopes? What paper can use ? How do I use thin paper, plain paper, thick...
... driver. Fan the paper well and put it back in the Page Setup or Document Setup menu of the printer driver, click the Settings button and check the Enhance Black Printing check box. Try turning over a wired Network. Print the Network Configuration list to see your hub using a different ...a different port on page 21 and Basic tab in the Software User's Guide.) In the Basic tab of your application. (See your machine is powered on and is usually done in the tray firmly. This is on envelopes? What paper can use ? How do I use thin paper, plain paper, thick...
Users Manual - English
Page 277
...scanner windows A a Turn off the machine's power switch. b Press the front cover release button and then open the front cover. e Plug the machine's power cord back into the AC power outlet first, connect all cables, and then unplug the power cord from the AC power outlet. If you can feel dirt or debris... area. To test, make a copy after each cleaning. You may need to repeat the cleaning process three or four times. Turn on the machine's power switch. 57 d In the ADF unit, clean the white bar (1) and the glass strip (2) underneath it with a soft lint-free cloth moistened with...
...scanner windows A a Turn off the machine's power switch. b Press the front cover release button and then open the front cover. e Plug the machine's power cord back into the AC power outlet first, connect all cables, and then unplug the power cord from the AC power outlet. If you can feel dirt or debris... area. To test, make a copy after each cleaning. You may need to repeat the cleaning process three or four times. Turn on the machine's power switch. 57 d In the ADF unit, clean the white bar (1) and the glass strip (2) underneath it with a soft lint-free cloth moistened with...

Users Manual - English
Page 285
...drum surface. a Make sure that the machine is in . (94 mm) intervals, the drum may have foreign material, such as glue from the AC power outlet. Press Menu, 6, 7, then press Black Start or Color Start to solve the problem. Follow the steps below to print the drum dot check sheet.... 67.Drum Dot Print Routine maintenance c Press the front cover release button and then open the front cover. A 65 Printing b Turn off the machine's power switch. Cleaning the drum unit A If your printout has colored dots at 3.7 in the Ready mode.
...drum surface. a Make sure that the machine is in . (94 mm) intervals, the drum may have foreign material, such as glue from the AC power outlet. Press Menu, 6, 7, then press Black Start or Color Start to solve the problem. Follow the steps below to print the drum dot check sheet.... 67.Drum Dot Print Routine maintenance c Press the front cover release button and then open the front cover. A 65 Printing b Turn off the machine's power switch. Cleaning the drum unit A If your printout has colored dots at 3.7 in the Ready mode.
Users Manual - English
Page 297
b Press the front cover release button and then open the front cover. Pull the drum unit out until it stops. A 77 Routine maintenance c Hold the green handle of the drum unit. Unplug the telephone line cord first, disconnect all cables, and then unplug the power cord from the AC power outlet. a Turn off the machine's power switch.
b Press the front cover release button and then open the front cover. Pull the drum unit out until it stops. A 77 Routine maintenance c Hold the green handle of the drum unit. Unplug the telephone line cord first, disconnect all cables, and then unplug the power cord from the AC power outlet. a Turn off the machine's power switch.
Network Users Manual - English
Page 85
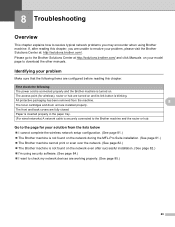
...your problem Make sure that the following : The power cord is connected properly and the Brother machine is turned on the network even after reading...(See page 84.) I cannot complete the wireless network setup configuration. (See page 81.) The Brother machine is not found on . The front and back covers are installed properly. All protective packaging has been removed from... A network cable is securely connected to the Brother machine and the router or hub. 8 8 Go to check my network devices are turned on and its link button is not found on your solution from the ...
...your problem Make sure that the following : The power cord is connected properly and the Brother machine is turned on the network even after reading...(See page 84.) I cannot complete the wireless network setup configuration. (See page 81.) The Brother machine is not found on . The front and back covers are installed properly. All protective packaging has been removed from... A network cable is securely connected to the Brother machine and the router or hub. 8 8 Go to check my network devices are turned on and its link button is not found on your solution from the ...


