
Users Manual - English
Page 162
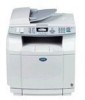
... message appears on the fusing unit; Do not put pressure on the LCD. C C - 37 it latches under the scanner unit. Troubleshooting and routine maintenance Replacing the transfer belt cleaner CAUTION Both ends of the transfer belt cleaner roller consist of the machine so that connect the bias element to ...connect them properly by looking at the old transfer belt cleaner before you install the transfer belt cleaner. Press 2 to reset the life counter. -OR- It could damage both the fusing unit and the machine. Be sure to check how to the power supply. ...
... message appears on the fusing unit; Do not put pressure on the LCD. C C - 37 it latches under the scanner unit. Troubleshooting and routine maintenance Replacing the transfer belt cleaner CAUTION Both ends of the transfer belt cleaner roller consist of the machine so that connect the bias element to ...connect them properly by looking at the old transfer belt cleaner before you install the transfer belt cleaner. Press 2 to reset the life counter. -OR- It could damage both the fusing unit and the machine. Be sure to check how to the power supply. ...
Software Users Manual - English
Page 14
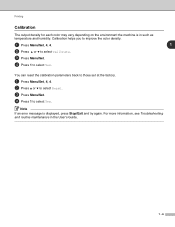
...; to select Reset. 3 Press Menu/Set. 4 Press 1 to select Yes. Printing Calibration The output density for each color may vary depending on the environment the machine is displayed, press Stop/Exit and try again. For more information, see Troubleshooting and routine maintenance in such as... temperature and humidity. Calibration helps you to improve the color density. 1 Press Menu/Set, 4, 4. 1 2 Press ▲ or ▼ to select Calibrate...
...; to select Reset. 3 Press Menu/Set. 4 Press 1 to select Yes. Printing Calibration The output density for each color may vary depending on the environment the machine is displayed, press Stop/Exit and try again. For more information, see Troubleshooting and routine maintenance in such as... temperature and humidity. Calibration helps you to improve the color density. 1 Press Menu/Set, 4, 4. 1 2 Press ▲ or ▼ to select Calibrate...
Software Users Manual - English
Page 93
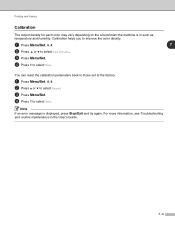
... vary depending on the environment the machine is displayed, press Stop/Exit and try again. Calibration helps you to improve the color density. 1 Press Menu/Set, 4, 4. 7 2 Press ▲ or ▼ to select Calibrate. 3 Press Menu/Set. 4 Press 1 to select Yes. Note ...in the User's Guide. 7 - 5 You can reset the calibration parameters back to those set at the factory. 1 Press Menu/Set, 4, 4. 2 Press ▲ or ▼ to select Reset 3 Press Menu/Set. 4 Press 1 to select Yes. For more information, see Troubleshooting and routine maintenance in such as temperature and humidity.
... vary depending on the environment the machine is displayed, press Stop/Exit and try again. Calibration helps you to improve the color density. 1 Press Menu/Set, 4, 4. 7 2 Press ▲ or ▼ to select Calibrate. 3 Press Menu/Set. 4 Press 1 to select Yes. Note ...in the User's Guide. 7 - 5 You can reset the calibration parameters back to those set at the factory. 1 Press Menu/Set, 4, 4. 2 Press ▲ or ▼ to select Reset 3 Press Menu/Set. 4 Press 1 to select Yes. For more information, see Troubleshooting and routine maintenance in such as temperature and humidity.


