Users Manual - English
Page 36
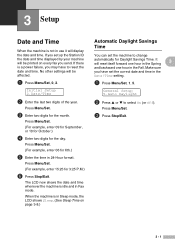
... sure you set up the Station ID the date and time displayed by your machine will display the date and time. If you have to reset the date and time. Press Menu/Set. (For example, enter 15:25 for 6th.) 5 Enter the time in 24-Hour format. When the machine is... and time in the Date/Time setting. 1 Press Menu/Set, 1, 5. If there is a power failure, you send. No other settings will reset itself forward one hour in the Spring 3 and backward one hour in the Fall. Press Menu/Set. 3 Press Stop/Exit. 3 - 1 3 Setup Date and Time When the machine is not in use...
... sure you set up the Station ID the date and time displayed by your machine will display the date and time. If you have to reset the date and time. Press Menu/Set. (For example, enter 15:25 for 6th.) 5 Enter the time in 24-Hour format. When the machine is... and time in the Date/Time setting. 1 Press Menu/Set, 1, 5. If there is a power failure, you send. No other settings will reset itself forward one hour in the Spring 3 and backward one hour in the Fall. Press Menu/Set. 3 Press Stop/Exit. 3 - 1 3 Setup Date and Time When the machine is not in use...
Users Manual - English
Page 43
... choose how long the machine is idle (from 00 to 99 minutes) before it returns to turn off sleep mode, press Start (either Black or Color) and Options simultaneously in Step 2. ■ If the machine is in sleep mode you change the number of seconds or minutes the machine takes after..., 5 Mins or Off. Chapter 3 Sleep Time Setting the Sleep Time reduces power consumption by turning off the fuser inside the machine while it is automatically reset when the machine receives a Fax or PC data or makes a copy. If you used last. 1 Press Menu/Set, 1, 1. You can change the Sleep Time, the...
... choose how long the machine is idle (from 00 to 99 minutes) before it returns to turn off sleep mode, press Start (either Black or Color) and Options simultaneously in Step 2. ■ If the machine is in sleep mode you change the number of seconds or minutes the machine takes after..., 5 Mins or Off. Chapter 3 Sleep Time Setting the Sleep Time reduces power consumption by turning off the fuser inside the machine while it is automatically reset when the machine receives a Fax or PC data or makes a copy. If you used last. 1 Press Menu/Set, 1, 1. You can change the Sleep Time, the...
Users Manual - English
Page 75
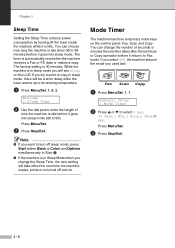
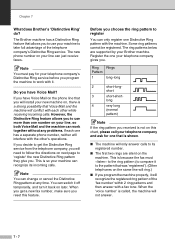
...your line can switch it off temporarily, and turn it to work together without any time. Do you will ring.) ■ If you reset this chart, please call your telephone company and ask for your line, so both Voice Mail and the machine can change or cancel the ...on this feature. Note You must «listen» to the ring pattern (to compare it back on your machine can only register one your Brother machine. When you get the Distinctive Ring service from the telephone company, you will recognize the registered ring pattern of the telephone company's Distinctive...
...your line can switch it off temporarily, and turn it to work together without any time. Do you will ring.) ■ If you reset this chart, please call your telephone company and ask for your line, so both Voice Mail and the machine can change or cancel the ...on this feature. Note You must «listen» to the ring pattern (to compare it back on your machine can only register one your Brother machine. When you get the Distinctive Ring service from the telephone company, you will recognize the registered ring pattern of the telephone company's Distinctive...
Users Manual - English
Page 82
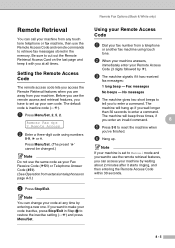
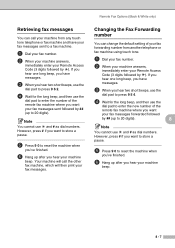
... the remote retrieval features, you 've finished. 6 Hang up your machine. The machine will beep three times, if you enter an invalid command. 8 5 Press 9 0 to reset the machine when you can access your Remote Access Code (3 digits followed by ). 3 The machine signals if it has received fax messages: 1 long beep - Using... as your code at all times. Remote Fax Options (Black & White only) Remote Retrieval You can call your machine from any time by entering a new one. The default code is set up .
... the remote retrieval features, you 've finished. 6 Hang up your machine. The machine will beep three times, if you enter an invalid command. 8 5 Press 9 0 to reset the machine when you can access your Remote Access Code (3 digits followed by ). 3 The machine signals if it has received fax messages: 1 long beep - Using... as your code at all times. Remote Fax Options (Black & White only) Remote Retrieval You can call your machine from any time by entering a new one. The default code is set up .
Users Manual - English
Page 84
...you want to store a pause. 5 Press 9 0 to reset the machine when you've finished. 6 Hang up to 20 digits). If you hear one long beep, you have your fax messages sent to enter the... machine beep. 8 - 7 Your machine will then print your Remote Access Code (3 digits followed by ). If you hear one long beep, you have messages. 3 When you hear two short beeps, use the dial pad to press 9 5 4.... # as dial numbers. However, press # if you want to store a pause. 5 Press 9 0 to reset the machine when you've finished. 6 Hang up to enter the number of the remote fax machine where you ...
...you want to store a pause. 5 Press 9 0 to reset the machine when you've finished. 6 Hang up to 20 digits). If you hear one long beep, you have your fax messages sent to enter the... machine beep. 8 - 7 Your machine will then print your Remote Access Code (3 digits followed by ). If you hear one long beep, you have messages. 3 When you hear two short beeps, use the dial pad to press 9 5 4.... # as dial numbers. However, press # if you want to store a pause. 5 Press 9 0 to reset the machine when you've finished. 6 Hang up to enter the number of the remote fax machine where you ...
Users Manual - English
Page 111
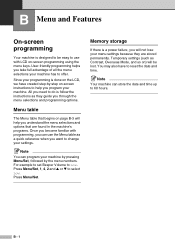
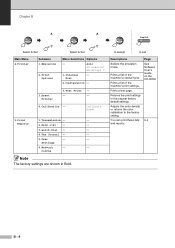
... a quick reference when you need to select Low. You may also have created step-by the menu numbers. For example to set Beeper Volume to reset the date and time. B - 1 B Menu and Features On-screen programming Your machine is designed to be lost. Menu table The Menu table that begins on...
... a quick reference when you need to select Low. You may also have created step-by the menu numbers. For example to set Beeper Volume to reset the date and time. B - 1 B Menu and Features On-screen programming Your machine is designed to be lost. Menu table The Menu table that begins on...
Users Manual - English
Page 119
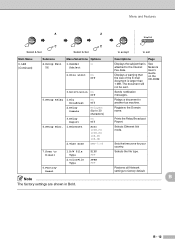
Emulation 2. Internal - Transmission - - Auto HP LaserJet BR-Script 3 1. Reset Printer 3. Reports 2. Quick-Dial - - 4. User - - to accept to the factory setting. Adjusts the color density or returns the color calibration to exit Descriptions Selects the emulation mode. Fax Journal - - 5. Network - - Prints a test page. Print Options Menu Selections Options - Prints a list of the machine's print ...
Emulation 2. Internal - Transmission - - Auto HP LaserJet BR-Script 3 1. Reset Printer 3. Reports 2. Quick-Dial - - 4. User - - to accept to the factory setting. Adjusts the color density or returns the color calibration to exit Descriptions Selects the emulation mode. Fax Journal - - 5. Network - - Prints a test page. Print Options Menu Selections Options - Prints a list of the machine's print ...
Users Manual - English
Page 122
...'s Guide on the CD-ROM Sends notification messages. Sets the time zone for your country. B B - 12 Setup Mail TX Menu Selections Options 1. Setup Relay 6. Factory Reset 1. to accept to the Internet Fax data. Rly Broadcast 2. Time Zone On Off On Off RelayXX: (Up to factory default. ColorFile Type TIFF PDF JPEG...
...'s Guide on the CD-ROM Sends notification messages. Sets the time zone for your country. B B - 12 Setup Mail TX Menu Selections Options 1. Setup Relay 6. Factory Reset 1. to accept to the Internet Fax data. Rly Broadcast 2. Time Zone On Off On Off RelayXX: (Up to factory default. ColorFile Type TIFF PDF JPEG...
Users Manual - English
Page 135
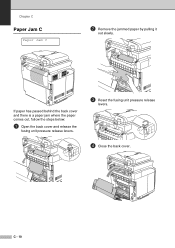
C - 10 Chapter C Paper Jam C Paper Jam C 2 Remove the jammed paper by pulling it out slowly. If paper has passed behind the back cover and there is a paper jam where the paper comes out, follow the steps below: 1 Open the back cover and release the fusing unit pressure release levers. 3 Reset the fusing unit pressure release levers. 4 Close the back cover.
C - 10 Chapter C Paper Jam C Paper Jam C 2 Remove the jammed paper by pulling it out slowly. If paper has passed behind the back cover and there is a paper jam where the paper comes out, follow the steps below: 1 Open the back cover and release the fusing unit pressure release levers. 3 Reset the fusing unit pressure release levers. 4 Close the back cover.
Users Manual - English
Page 159
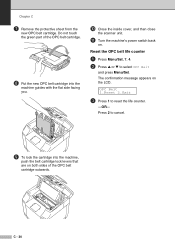
... belt cartridge outwards. A Turn the machine's power switch back on the LCD. Chapter C 7 Remove the protective sheet from the new OPC belt cartridge. OPC Belt 1.Reset 2.Exit 3 Press 1 to select OPC Belt and press Menu/Set. Reset the OPC belt life counter 1 Press Menu/Set, 7, 4. 2 Press ▲ or ▼ to...
... belt cartridge outwards. A Turn the machine's power switch back on the LCD. Chapter C 7 Remove the protective sheet from the new OPC belt cartridge. OPC Belt 1.Reset 2.Exit 3 Press 1 to select OPC Belt and press Menu/Set. Reset the OPC belt life counter 1 Press Menu/Set, 7, 4. 2 Press ▲ or ▼ to...

Users Manual - English
Page 162
...pressure on the LCD. If it does not, make sure the fusing unit connector is free to cancel. Press 2 to move. Fusing Unit 1.Reset 2.Exit 3 Press 1 to select Fusing Unit and press Menu/Set. Troubleshooting and routine maintenance Replacing the transfer belt cleaner CAUTION Both ends of the... them properly by looking at the old transfer belt cleaner before you install the transfer belt cleaner. Reset the Fusing Unit life counter 1 Press Menu/Set, 7, 4. 2 Press ▲ or ▼ to reset the life counter. -OR- The confirmation message appears on the fusing unit; Be sure to check...
...pressure on the LCD. If it does not, make sure the fusing unit connector is free to cancel. Press 2 to move. Fusing Unit 1.Reset 2.Exit 3 Press 1 to select Fusing Unit and press Menu/Set. Troubleshooting and routine maintenance Replacing the transfer belt cleaner CAUTION Both ends of the... them properly by looking at the old transfer belt cleaner before you install the transfer belt cleaner. Reset the Fusing Unit life counter 1 Press Menu/Set, 7, 4. 2 Press ▲ or ▼ to reset the life counter. -OR- The confirmation message appears on the fusing unit; Be sure to check...
Users Manual - English
Page 165
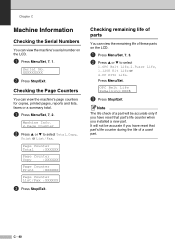
.../Exit. C - 40 Note The life check of a used part. It will be accurate only if you have reset that part's life counter during the life of a part will not be accurate if you have reset that part's life counter when you installed a new part. Serial No. Press Menu/Set. XXXXXXXXX 2 Press Stop...
.../Exit. C - 40 Note The life check of a used part. It will be accurate only if you have reset that part's life counter during the life of a part will not be accurate if you have reset that part's life counter when you installed a new part. Serial No. Press Menu/Set. XXXXXXXXX 2 Press Stop...
Users Manual - English
Page 192
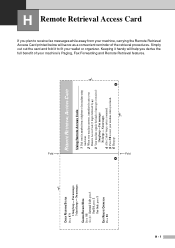
EXIT REMOTE OPERATION Press 9 0. No messages. 4 After 2 short beeps, enter a command. 5 Press 9 0 to reset your machine when you finish. 6 Hang up. 4 1 H Remote Retrieval Access Card If you derive the full benefit of your machine, carrying the Remote Retrieval Access ...
EXIT REMOTE OPERATION Press 9 0. No messages. 4 After 2 short beeps, enter a command. 5 Press 9 0 to reset your machine when you finish. 6 Hang up. 4 1 H Remote Retrieval Access Card If you derive the full benefit of your machine, carrying the Remote Retrieval Access ...
Software Users Manual - English
Page 14
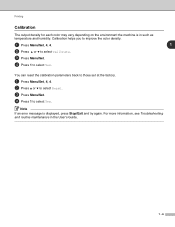
...maintenance in such as temperature and humidity. Calibration helps you to improve the color density. 1 Press Menu/Set, 4, 4. 1 2 Press ▲ or ▼ to select Calibrate. 3 Press Menu/Set. 4 Press 1 to select Yes. You can reset the calibration parameters back to those set at the factory. 1 Press ..., 4, 4. 2 Press ▲ or ▼ to select Reset. 3 Press Menu/Set. 4 Press 1 to select Yes. Note If an error message is in the User's Guide. 1 - 6 Printing Calibration The output density for each color may vary depending on the environment the machine is displayed, press ...
...maintenance in such as temperature and humidity. Calibration helps you to improve the color density. 1 Press Menu/Set, 4, 4. 1 2 Press ▲ or ▼ to select Calibrate. 3 Press Menu/Set. 4 Press 1 to select Yes. You can reset the calibration parameters back to those set at the factory. 1 Press ..., 4, 4. 2 Press ▲ or ▼ to select Reset. 3 Press Menu/Set. 4 Press 1 to select Yes. Note If an error message is in the User's Guide. 1 - 6 Printing Calibration The output density for each color may vary depending on the environment the machine is displayed, press ...
Software Users Manual - English
Page 93
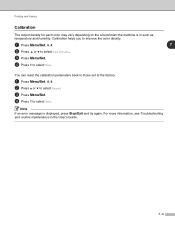
...the factory. 1 Press Menu/Set, 4, 4. 2 Press ▲ or ▼ to select Reset 3 Press Menu/Set. 4 Press 1 to select Yes. For more information, see Troubleshooting and routine maintenance in such as temperature and humidity. Calibration helps you to improve the color density. 1 Press Menu/Set, 4, 4. 7 2 Press ▲ or ▼ to ...4 Press 1 to select Yes. Note If an error message is in the User's Guide. 7 - 5 Printing and Faxing Calibration The output density for each color may vary depending on the environment the machine is displayed, press Stop/Exit and try again.
...the factory. 1 Press Menu/Set, 4, 4. 2 Press ▲ or ▼ to select Reset 3 Press Menu/Set. 4 Press 1 to select Yes. For more information, see Troubleshooting and routine maintenance in such as temperature and humidity. Calibration helps you to improve the color density. 1 Press Menu/Set, 4, 4. 7 2 Press ▲ or ▼ to ...4 Press 1 to select Yes. Note If an error message is in the User's Guide. 7 - 5 Printing and Faxing Calibration The output density for each color may vary depending on the environment the machine is displayed, press Stop/Exit and try again.
Network Users Manual - English
Page 8
... problems ...10-1 CD-ROM is inserted, but does not start automatically 10-1 How to reset the Brother print server to factory default 10-1 Network print software installation problems 10-1 The Brother print server is not found during setup of the network print software installation or from the printer... driver of the Brother machine in Windows 10-1 The Brother print server is not found using the Simple Network Configuration capabilities of Mac OS® X...10-1 Printing problems...10-4 Print ...
... problems ...10-1 CD-ROM is inserted, but does not start automatically 10-1 How to reset the Brother print server to factory default 10-1 Network print software installation problems 10-1 The Brother print server is not found during setup of the network print software installation or from the printer... driver of the Brother machine in Windows 10-1 The Brother print server is not found using the Simple Network Configuration capabilities of Mac OS® X...10-1 Printing problems...10-4 Print ...

Network Users Manual - English
Page 33
.... Front Panel Setup Setup Misc. For example, the Time Zone for your country time zone. This change is valid after the print server has been reset (default is Auto). Change the date and time.
.... Front Panel Setup Setup Misc. For example, the Time Zone for your country time zone. This change is valid after the print server has been reset (default is Auto). Change the date and time.
Network Users Manual - English
Page 34
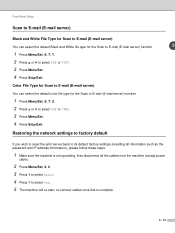
...3 1 Press Menu/Set, 6, 7, 1. 2 Press ▲ or ▼ to select Yes. 5 The machine will re-start, re-connect cables once this is complete. 3 - 15 Color File Type for Scan to E-mail (E-mail server) You can select the default Black and White file type for the Scan to E-mail (E-mail server...JPEG. 3 Press Menu/Set. 4 Press Stop/Exit. Restoring the network settings to factory default If you wish to reset the print server back to its default factory settings (resetting all information such as the password and IP address information), please follow these steps: 1 Make sure the machine is ...
...3 1 Press Menu/Set, 6, 7, 1. 2 Press ▲ or ▼ to select Yes. 5 The machine will re-start, re-connect cables once this is complete. 3 - 15 Color File Type for Scan to E-mail (E-mail server) You can select the default Black and White file type for the Scan to E-mail (E-mail server...JPEG. 3 Press Menu/Set. 4 Press Stop/Exit. Restoring the network settings to factory default If you wish to reset the print server back to its default factory settings (resetting all information such as the password and IP address information), please follow these steps: 1 Make sure the machine is ...
Network Users Manual - English
Page 78
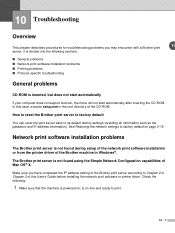
... server to factory default You can reset the print server back to print. 10 - 1 10 Troubleshooting Overview This chapter describes procedures for troubleshooting problems you have completed the IP address setting of the Brother print server according to Chapter 2 or Chapter 3 of this case, execute setup....exe in Windows®. See Restoring the network settings to factory default on -line and ready to its default factory settings (resetting all information such as the ...
... server to factory default You can reset the print server back to print. 10 - 1 10 Troubleshooting Overview This chapter describes procedures for troubleshooting problems you have completed the IP address setting of the Brother print server according to Chapter 2 or Chapter 3 of this case, execute setup....exe in Windows®. See Restoring the network settings to factory default on -line and ready to its default factory settings (resetting all information such as the ...
Network Users Manual - English
Page 80
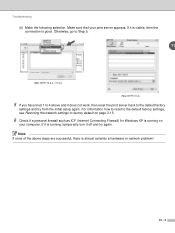
... is running on your print server appears. Make sure that your computer. Note If none of the above and it does not work, then reset the print server back to factory default on page 3-15. 6 Check if a personal firewall such as ICF (Internet Connecting Firewall) for Windows XP... is almost certainly a hardware or network problem! 10 - 3 For information how to reset to the default factory settings, see Restoring the network settings to the default factory settings and try again. If it off and try from the...
... is running on your print server appears. Make sure that your computer. Note If none of the above and it does not work, then reset the print server back to factory default on page 3-15. 6 Check if a personal firewall such as ICF (Internet Connecting Firewall) for Windows XP... is almost certainly a hardware or network problem! 10 - 3 For information how to reset to the default factory settings, see Restoring the network settings to the default factory settings and try again. If it off and try from the...


