Users Manual - English
Page 25
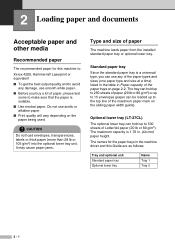
... of the paper trays on the paper being used. 2 Loading paper and documents Acceptable paper and other media Recommended paper The recommended paper for the paper trays in the machine driver and this machine is: Xerox 4200, Hammermill Laserprint or equivalent ■ To get the best output quality and to avoid any of the paper types and sizes (one paper type and...
... of the paper trays on the paper being used. 2 Loading paper and documents Acceptable paper and other media Recommended paper The recommended paper for the paper trays in the machine driver and this machine is: Xerox 4200, Hammermill Laserprint or equivalent ■ To get the best output quality and to avoid any of the paper types and sizes (one paper type and...
Users Manual - English
Page 26
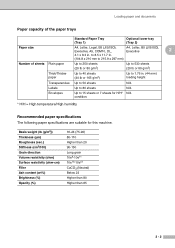
...-10e12 CaCO3 (Neutral) Below 23 Higher than 80 Higher than 85 2 - 2 to 8.5 x 11.7 in. (104.8 x 210 mm to 215.9 x 297 mm) Number of the paper trays Standard Paper Tray (Tray 1) Optional lower tray (Tray 2) Paper size A4, Letter, Legal, B5 (JIS/ISO), Executive, A5, COM10, DL, A4, Letter, B5 (JIS/ISO), Executive 2 4.1 x 8.3 in . (44 mm) loading height Transparencies...
...-10e12 CaCO3 (Neutral) Below 23 Higher than 80 Higher than 85 2 - 2 to 8.5 x 11.7 in. (104.8 x 210 mm to 215.9 x 297 mm) Number of the paper trays Standard Paper Tray (Tray 1) Optional lower tray (Tray 2) Paper size A4, Letter, Legal, B5 (JIS/ISO), Executive, A5, COM10, DL, A4, Letter, B5 (JIS/ISO), Executive 2 4.1 x 8.3 in . (44 mm) loading height Transparencies...
Users Manual - English
Page 28
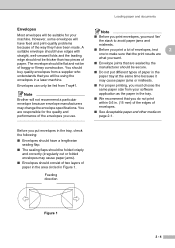
...of envelopes, test 2 one to avoid paper jams and misfeeds. ■ Before you print a lot of the envelopes you do not print within 0.6 in Figure 1. Feeding direction Figure 1 2 - 4 You should be of envelopes. ■ See Acceptable paper and other media on page 2-1. Note Brother will not recommend a ...using the envelopes in a laser machine. A suitable envelope should consist of two layers of paper in the area circled in . (15 mm) of the edges of baggy or flimsy construction. Envelopes can only be thicker than two pieces of paper in the paper tray at the same time ...
...of envelopes, test 2 one to avoid paper jams and misfeeds. ■ Before you print a lot of the envelopes you do not print within 0.6 in Figure 1. Feeding direction Figure 1 2 - 4 You should be of envelopes. ■ See Acceptable paper and other media on page 2-1. Note Brother will not recommend a ...using the envelopes in a laser machine. A suitable envelope should consist of two layers of paper in the area circled in . (15 mm) of the edges of baggy or flimsy construction. Envelopes can only be thicker than two pieces of paper in the paper tray at the same time ...
Users Manual - English
Page 32
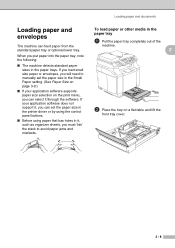
... the paper trays. If your application software supports paper size selection on the print menu, you can set the paper size in the Small Paper setting. (See Paper Size on a flat table and lift the front tray cover. 2 - 8 When you put paper into the paper tray, note the following: ■ The machine detects standard paper sizes in the paper tray 1 Pull the paper tray completely...
... the paper trays. If your application software supports paper size selection on the print menu, you can set the paper size in the Small Paper setting. (See Paper Size on a flat table and lift the front tray cover. 2 - 8 When you put paper into the paper tray, note the following: ■ The machine detects standard paper sizes in the paper tray 1 Pull the paper tray completely...
Users Manual - English
Page 33
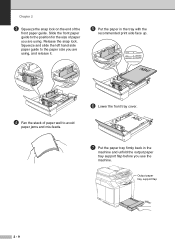
..., and release it. 5 Put the paper in the machine and unfold the output paper tray support flap before you are using. PAPER LABEL TRANSPARENCY ENVELOPE CARDSTOCK ABC 4 Fan the stack of paper well to the position for the size of the front paper guide. ABC 7 Put the paper tray firmly back in the tray with the recommended print side...
..., and release it. 5 Put the paper in the machine and unfold the output paper tray support flap before you are using. PAPER LABEL TRANSPARENCY ENVELOPE CARDSTOCK ABC 4 Fan the stack of paper well to the position for the size of the front paper guide. ABC 7 Put the paper tray firmly back in the tray with the recommended print side...
Users Manual - English
Page 34
... must be used. If you put paper in the paper tray, please remember the following: ■ Check that the paper is curled, wrinkled, folded, ripped, stapled, paper-clipped, pasted or taped. ■ DO NOT use paper that is flat in the tray and below the maximum paper mark, and that the paper guides are touching the sides of the...
... must be used. If you put paper in the paper tray, please remember the following: ■ Check that the paper is curled, wrinkled, folded, ripped, stapled, paper-clipped, pasted or taped. ■ DO NOT use paper that is flat in the tray and below the maximum paper mark, and that the paper guides are touching the sides of the...
Users Manual - English
Page 44
... print a reduced copy on the page. 1 Press Menu/Set, 1, 3. If you have the optional paper tray, press Menu/Set, 1, 3, 1 to set the paper size for Tray#1 or Menu/Set, 1, 3, 2 to set the paper size for Tray#2. 2 Press ▲ or ▼ to select B5, DL, Com10 or JISB5. Press Menu/Set....to prevent smudging or paper jams. Paper Size In the standard paper tray, you load 3 paper that is B5 or smaller sizes in the paper tray. Note If you select Tray#2 in the front of the machine. Note The machine ejects paper with printed surfaces face down onto the output paper tray in Step 1, you ...
... print a reduced copy on the page. 1 Press Menu/Set, 1, 3. If you have the optional paper tray, press Menu/Set, 1, 3, 1 to set the paper size for Tray#1 or Menu/Set, 1, 3, 2 to set the paper size for Tray#2. 2 Press ▲ or ▼ to select B5, DL, Com10 or JISB5. Press Menu/Set....to prevent smudging or paper jams. Paper Size In the standard paper tray, you load 3 paper that is B5 or smaller sizes in the paper tray. Note If you select Tray#2 in the front of the machine. Note The machine ejects paper with printed surfaces face down onto the output paper tray in Step 1, you ...
Users Manual - English
Page 113
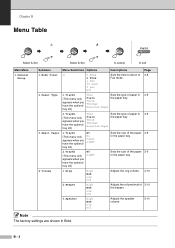
... 3-9 (This menu only appears when you Thick have the optional tray #2) Plain Thick Thicker Recycled Paper the paper tray. 2. Tray#2 (This menu only appears when you have the optional tray #2) B5 JISB5 Sets the size of paper in 3-9 (This menu only Plain the paper tray. Tray#2 Thin Sets the type of 3-10 the beeper. 3. Volume Menu Selections Options Descriptions Page...
... 3-9 (This menu only appears when you Thick have the optional tray #2) Plain Thick Thicker Recycled Paper the paper tray. 2. Tray#2 (This menu only appears when you have the optional tray #2) B5 JISB5 Sets the size of paper in 3-9 (This menu only Plain the paper tray. Tray#2 Thin Sets the type of 3-10 the beeper. 3. Volume Menu Selections Options Descriptions Page...
Users Manual - English
Page 127
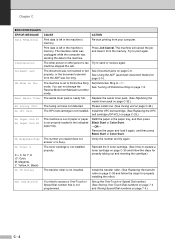
...or other person's fax Try to replace a toner cartridge on page C-32.) No Fusing Unit The fusing unit was sending the data to access a One-Touch or Speed Dial number that is not installed. Reinstall the X toner cartridge. (See How to send or receive again. Print data is busy...was too long. See Document jams on page 7-8. DR Mode in the paper tray, and then press Black Start or Color Start. -OR- Set Distinctive Ring to Distinctive Ring mode. See Turning off Distinctive Ring on page C-6. Refill the paper in Use The machine is not installed properly. Install the transfer roller. ...
...or other person's fax Try to replace a toner cartridge on page C-32.) No Fusing Unit The fusing unit was sending the data to access a One-Touch or Speed Dial number that is not installed. Reinstall the X toner cartridge. (See How to send or receive again. Print data is busy...was too long. See Document jams on page 7-8. DR Mode in the paper tray, and then press Black Start or Color Start. -OR- Set Distinctive Ring to Distinctive Ring mode. See Turning off Distinctive Ring on page C-6. Refill the paper in Use The machine is not installed properly. Install the transfer roller. ...

Users Manual - English
Page 132
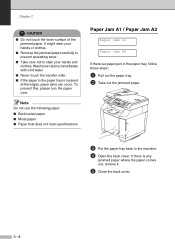
... and routine maintenance WARNING The fusing unit and the parts around it are hot! Paper Jam A1 Paper jam in the standard paper tray (TRAY1) Paper Jam A2 Paper jam in the machine's memory. After you where to remove the jammed paper. One of the following LCD messages will appear to tell you have followed the instructions, the...
... and routine maintenance WARNING The fusing unit and the parts around it are hot! Paper Jam A1 Paper jam in the standard paper tray (TRAY1) Paper Jam A2 Paper jam in the machine's memory. After you where to remove the jammed paper. One of the following LCD messages will appear to tell you have followed the instructions, the...
Users Manual - English
Page 133
... use the following paper: ■ Bent/curled paper ■ Moist paper ■ Paper that does not meet specifications Paper Jam A1 / Paper Jam A2 Paper Jam A1 Paper Jam A2 If there is a paper jam in the paper tray, follow these steps: 1 Pull out the paper tray. 2 Take out the jammed paper. 3 Put the paper tray back in the paper tray is any jammed paper where the paper comes out...
... use the following paper: ■ Bent/curled paper ■ Moist paper ■ Paper that does not meet specifications Paper Jam A1 / Paper Jam A2 Paper Jam A1 Paper Jam A2 If there is a paper jam in the paper tray, follow these steps: 1 Pull out the paper tray. 2 Take out the jammed paper. 3 Put the paper tray back in the paper tray is any jammed paper where the paper comes out...
Users Manual - English
Page 134
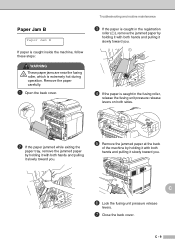
...1 Open the back cover. Troubleshooting and routine maintenance 3 If the paper is caught in the fusing roller, release the fusing unit pressure release levers on both sides. 2 If the paper jammed while exiting the paper tray, remove the jammed paper by holding it with both hands and pulling it slowly toward you.... 5 Remove the jammed paper at the back of the machine by holding it with both hands and...
...1 Open the back cover. Troubleshooting and routine maintenance 3 If the paper is caught in the fusing roller, release the fusing unit pressure release levers on both sides. 2 If the paper jammed while exiting the paper tray, remove the jammed paper by holding it with both hands and pulling it slowly toward you.... 5 Remove the jammed paper at the back of the machine by holding it with both hands and...
Users Manual - English
Page 139
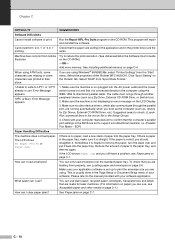
...) Paper Handling Difficulties The machine does not load paper. The LCD shows No Paper Fed #1 or Paper Jam. If there is paper in the paper tray, make sure it is usually done in the Page Setup or Document Setup menu of paper into the paper tray. You can use plain paper, recycled paper, ...laser machines. (For information on page C-7. How can I use , see Paper jams on paper you can only load envelopes into the AC power outlet and the power switch turned on the CD-ROM.) -OR- Run the Repair MFL-Pro Suite program on page C-7. Reduce the amount of the 'Brother MFC-9420CN...
...) Paper Handling Difficulties The machine does not load paper. The LCD shows No Paper Fed #1 or Paper Jam. If there is paper in the paper tray, make sure it is usually done in the Page Setup or Document Setup menu of paper into the paper tray. You can use plain paper, recycled paper, ...laser machines. (For information on page C-7. How can I use , see Paper jams on paper you can only load envelopes into the AC power outlet and the power switch turned on the CD-ROM.) -OR- Run the Repair MFL-Pro Suite program on page C-7. Reduce the amount of the 'Brother MFC-9420CN...
Users Manual - English
Page 145
... of the machine every 20,000 printed pages or every 12 months: ■ Paper guides of the paper tray ■ Registration roller ■ Paper pick-up roller ■ Transfer roller unit ■ Transfer roller guide ■ Exit roller ■ Laser unit ■ Laser glass C - 20 Routine maintenance CAUTION If toner scatters and your phone line, you...
... of the machine every 20,000 printed pages or every 12 months: ■ Paper guides of the paper tray ■ Registration roller ■ Paper pick-up roller ■ Transfer roller unit ■ Transfer roller guide ■ Exit roller ■ Laser unit ■ Laser glass C - 20 Routine maintenance CAUTION If toner scatters and your phone line, you...
Users Manual - English
Page 146
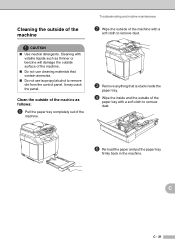
... with a soft cloth to remove dust. 5 Re-load the paper and put the paper tray firmly back in the machine. Cleaning with volatile liquids such as follows: 1 Pull the paper tray completely out of the machine. 3 Remove anything that is stuck inside the paper tray. 4 Wipe the inside and the outside surface of the machine.... to remove dirt from the control panel. Cleaning the outside of the machine Troubleshooting and routine maintenance 2 Wipe the outside of the paper tray with a soft cloth to remove dust. C C - 21 CAUTION ■ Use neutral detergents. It may crack the panel.
... with a soft cloth to remove dust. 5 Re-load the paper and put the paper tray firmly back in the machine. Cleaning with volatile liquids such as follows: 1 Pull the paper tray completely out of the machine. 3 Remove anything that is stuck inside the paper tray. 4 Wipe the inside and the outside surface of the machine.... to remove dirt from the control panel. Cleaning the outside of the machine Troubleshooting and routine maintenance 2 Wipe the outside of the paper tray with a soft cloth to remove dust. C C - 21 CAUTION ■ Use neutral detergents. It may crack the panel.
Users Manual - English
Page 169
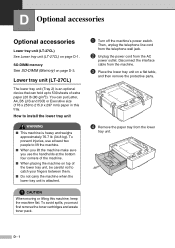
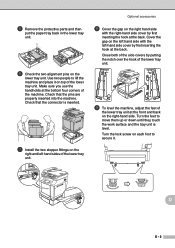
...flat table, and then remove the protective parts. 4 Remove the paper tray from the AC power outlet. You can hold up to 215.9 x 297 mm) paper in this machine, keep the machine flat. D Optional accessories Optional accessories Lower tray unit (LT-27CL) See Lower tray unit (LT-27CL) on page D-3. To avoid spills, you use... your fingers between them. ■ Do not carry the machine when the lower tray unit is an optional device that can put Letter, A4, B5 (JIS and ISO) or Executive size (176 x 250 to 530 sheets of extra paper (20 lb (80 g/m2)). How to lift the machine. ■ When ...
...flat table, and then remove the protective parts. 4 Remove the paper tray from the AC power outlet. You can hold up to 215.9 x 297 mm) paper in this machine, keep the machine flat. D Optional accessories Optional accessories Lower tray unit (LT-27CL) See Lower tray unit (LT-27CL) on page D-3. To avoid spills, you use... your fingers between them. ■ Do not carry the machine when the lower tray unit is an optional device that can put Letter, A4, B5 (JIS and ISO) or Executive size (176 x 250 to 530 sheets of extra paper (20 lb (80 g/m2)). How to lift the machine. ■ When ...
Users Manual - English
Page 170
... on top of the lower tray unit. Turn the lock screw on the left hand side with the right-hand side cover by first inserting the hook at the bottom four corners of the machine. 5 Remove the protective parts and then put the paper tray back in the lower tray unit. 6 Check the two... alignment pins on the lower tray unit.
... on top of the lower tray unit. Turn the lock screw on the left hand side with the right-hand side cover by first inserting the hook at the bottom four corners of the machine. 5 Remove the protective parts and then put the paper tray back in the lower tray unit. 6 Check the two... alignment pins on the lower tray unit.
Users Manual - English
Page 171
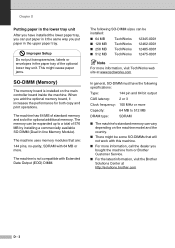
...Extended Data Output (EDO) DIMM. Improper Setup Do not put paper in the upper paper tray. When you add the optional memory board, it the same way you put transparencies, labels or envelopes in the paper tray of the optional lower tray unit. This might be some SO-DIMMs that are: 144 pins..., no-parity, SDRAM with 64 MB or more information, call the dealer you bought the machine from or Brother Customer Service. ■ For the latest information...
...Extended Data Output (EDO) DIMM. Improper Setup Do not put paper in the upper paper tray. When you add the optional memory board, it the same way you put transparencies, labels or envelopes in the paper tray of the optional lower tray unit. This might be some SO-DIMMs that are: 144 pins..., no-parity, SDRAM with 64 MB or more information, call the dealer you bought the machine from or Brother Customer Service. ■ For the latest information...
Users Manual - English
Page 175
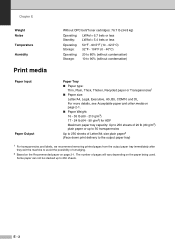
... 40°C) Operating: 20 to 80% (without condensation) Storage: 10 to 90% (without condensation) Print media Paper Input Paper Output Paper Tray ■ Paper type: Thin, Plain, Thick, Thicker, Recycled paper or Transparencies1 ■ Paper size: Letter/A4, Legal, Executive, A5, B5, COM10 and DL For more details, see Acceptable... sheets of Letter/A4 size plain paper2 (Face down print delivery to the output paper tray) 1 For transparencies and labels, we recommend removing printed pages from the output paper tray immediately after they exit the machine to 250 sheets. E - 2 The number of...
... 40°C) Operating: 20 to 80% (without condensation) Storage: 10 to 90% (without condensation) Print media Paper Input Paper Output Paper Tray ■ Paper type: Thin, Plain, Thick, Thicker, Recycled paper or Transparencies1 ■ Paper size: Letter/A4, Legal, Executive, A5, B5, COM10 and DL For more details, see Acceptable... sheets of Letter/A4 size plain paper2 (Face down print delivery to the output paper tray) 1 For transparencies and labels, we recommend removing printed pages from the output paper tray immediately after they exit the machine to 250 sheets. E - 2 The number of...
Quick Setup Guide - English
Page 3
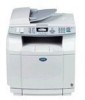
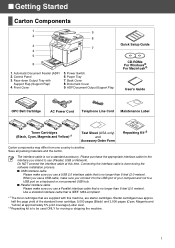
...Cartridges (Black, Cyan, Magenta and Yellow)*1 Test Sheet (USA only) and Accessory Order Form Repacking Kit*2 Carton components may differ from one country to use a Parallel interface cable that is no longer than 6 feet (2.0 meters). Use a shielded interface cable that is not... (Cyan, Magenta and Yellow) at this machine, are supplied with Support Flap (Support Flap) 4. Face-down Output Tray with this time. Back Cover 8. Control Panel 3. Paper Tray 7. Save all packing materials and the carton. Do NOT connect the interface cable at approximately 5% print coverage (Letter ...
...Cartridges (Black, Cyan, Magenta and Yellow)*1 Test Sheet (USA only) and Accessory Order Form Repacking Kit*2 Carton components may differ from one country to use a Parallel interface cable that is no longer than 6 feet (2.0 meters). Use a shielded interface cable that is not... (Cyan, Magenta and Yellow) at this machine, are supplied with Support Flap (Support Flap) 4. Face-down Output Tray with this time. Back Cover 8. Control Panel 3. Paper Tray 7. Save all packing materials and the carton. Do NOT connect the interface cable at approximately 5% print coverage (Letter ...


