Wi-Fi Direct Guide - English
Page 24
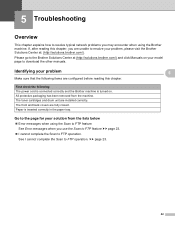
...network problems you are unable to resolve your problem, please visit the Brother Solutions Center at (http://solutions.brother.com/). 3 For additional information, please go to the Brother Solutions Center at (http://solutions.brother.com/) and click Manuals on . See Error messages when configuring Wi...back covers are installed correctly. The toner cartridges and drum unit are fully closed. uu page 23 I want to the page for your problem 3 Make sure that the following : The power cord is connected correctly and the Brother machine is inserted correctly in the ...
...network problems you are unable to resolve your problem, please visit the Brother Solutions Center at (http://solutions.brother.com/). 3 For additional information, please go to the Brother Solutions Center at (http://solutions.brother.com/) and click Manuals on . See Error messages when configuring Wi...back covers are installed correctly. The toner cartridges and drum unit are fully closed. uu page 23 I want to the page for your problem 3 Make sure that the following : The power cord is connected correctly and the Brother machine is inserted correctly in the ...

Network User's Guide - English
Page 151
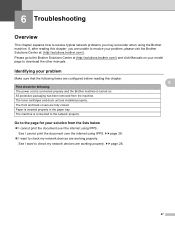
... network problems you are unable to resolve your problem, please visit the Brother Solutions Center at http://solutions.brother.com/ and click Manuals on the network during wireless setup? Please go to the Brother Solutions Center at : http://solutions.brother.com/. The toner cartridges and drum unit are working properly. (See page 149.) I cannot complete the...
... network problems you are unable to resolve your problem, please visit the Brother Solutions Center at http://solutions.brother.com/ and click Manuals on the network during wireless setup? Please go to the Brother Solutions Center at : http://solutions.brother.com/. The toner cartridges and drum unit are working properly. (See page 149.) I cannot complete the...
SSL Guide - English
Page 31
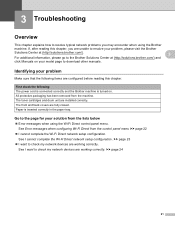
...model page to check my network devices are working properly. See I cannot print the document over the internet using the Brother machine. The toner cartridges and drum unit are fully closed. Identifying your problem Make sure that the following : The power cord is connected properly and the... Brother machine is inserted properly in the paper tray. See I want to check my network devices are unable to the network ...
...model page to check my network devices are working properly. See I cannot print the document over the internet using the Brother machine. The toner cartridges and drum unit are fully closed. Identifying your problem Make sure that the following : The power cord is connected properly and the... Brother machine is inserted properly in the paper tray. See I want to check my network devices are unable to the network ...
Scan to FTP Guide - English
Page 25
...the following : The power cord is connected correctly and the Brother machine is inserted correctly in the paper tray. 5 5 Go to FTP operation. Please go to the Brother Solutions Center at : (http://solutions.brother.com/). The front and back covers are configured before reading...protective packaging has been removed from the lists below 5 Error messages when using the Brother machine. uu page 23. 22 First check the following items are fully closed. The toner cartridges and drum unit are unable to FTP operation. 5 Troubleshooting 5 Overview 5 This chapter explains...
...the following : The power cord is connected correctly and the Brother machine is inserted correctly in the paper tray. 5 5 Go to FTP operation. Please go to the Brother Solutions Center at : (http://solutions.brother.com/). The front and back covers are configured before reading...protective packaging has been removed from the lists below 5 Error messages when using the Brother machine. uu page 23. 22 First check the following items are fully closed. The toner cartridges and drum unit are unable to FTP operation. 5 Troubleshooting 5 Overview 5 This chapter explains...

Scan to Network Guide - English
Page 27
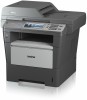
... your model page to download the other manuals. Please go to the Brother Solutions Center at : (http://solutions.brother.com/). 5 Troubleshooting 5 Overview 5 This chapter explains how to resolve typical network problems you are fully closed. If, after reading this chapter. The toner cartridges and drum unit are configured before reading this chapter, you may...
... your model page to download the other manuals. Please go to the Brother Solutions Center at : (http://solutions.brother.com/). 5 Troubleshooting 5 Overview 5 This chapter explains how to resolve typical network problems you are fully closed. If, after reading this chapter. The toner cartridges and drum unit are configured before reading this chapter, you may...
Basic User's Guide - English
Page 4
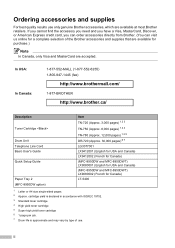
...: In Canada: 1-877-552-MALL (1-877-552-6255) 1-800-947-1445 (fax) http://www.brothermall.com/ 1-877-BROTHER http://www.brother.ca/ Description Toner Cartridge Drum Unit Telephone Line Cord Basic User's Guide Quick Setup Guide Paper Tray 2 (MFC-8950DW option) Item TN-720 (Approx. 3,000 pages) 1 2 3 TN-750 (Approx. 8,000 pages) 1 2 4 TN-780 (Approx. 12...
...: In Canada: 1-877-552-MALL (1-877-552-6255) 1-800-947-1445 (fax) http://www.brothermall.com/ 1-877-BROTHER http://www.brother.ca/ Description Toner Cartridge Drum Unit Telephone Line Cord Basic User's Guide Quick Setup Guide Paper Tray 2 (MFC-8950DW option) Item TN-720 (Approx. 3,000 pages) 1 2 3 TN-750 (Approx. 8,000 pages) 1 2 4 TN-780 (Approx. 12...
Basic User's Guide - English
Page 10
... settings 62 Before scanning 62 Scan button settings 62 Scanning using the Scan button 64 A Routine maintenance 65 Replacing the consumable items 65 Replacing the toner cartridge 67 Cleaning the corona wire 73 Replacing the drum unit 75 viii
... settings 62 Before scanning 62 Scan button settings 62 Scanning using the Scan button 64 A Routine maintenance 65 Replacing the consumable items 65 Replacing the toner cartridge 67 Cleaning the corona wire 73 Replacing the drum unit 75 viii
Basic User's Guide - English
Page 77
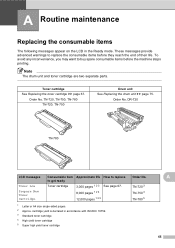
...A Routine maintenance A Replacing the consumable items A The following messages appear on the LCD in accordance with ISO/IEC 19752. 3 Standard toner cartridge 4 High yield toner cartridge 5 Super high yield toner cartridge Order No. Order No. TN-720, TN-750, TN-780 TN-720, TN-750 Drum unit See Replacing the drum unit uu... page 75. Note The drum unit and toner cartridge are two separate parts. cartridge yield is declared in the Ready mode. To avoid any inconvenience, you may want to replace 3,000 pages 1 2 3 See page...
...A Routine maintenance A Replacing the consumable items A The following messages appear on the LCD in accordance with ISO/IEC 19752. 3 Standard toner cartridge 4 High yield toner cartridge 5 Super high yield toner cartridge Order No. Order No. TN-720, TN-750, TN-780 TN-720, TN-750 Drum unit See Replacing the drum unit uu... page 75. Note The drum unit and toner cartridge are two separate parts. cartridge yield is declared in the Ready mode. To avoid any inconvenience, you may want to replace 3,000 pages 1 2 3 See page...
Basic User's Guide - English
Page 78
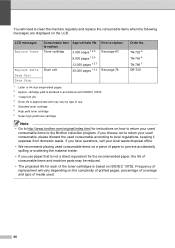
.... 3 1 page per job. 4 Drum life is based on ISO/IEC 19752. Frequency of replacement will need to the Brother collection program. LCD messages Replace Toner Replace Parts Drum Unit Drum Stop Consumable item to replace Toner cartridge Drum unit Approximate life 3,000 pages 1 2 5 8,000 pages 1 2 6 12,000 pages 1 2 7 30,000 pages...pages. 2 Approx. TN-720 5 TN-750 6 TN-780 7 DR-720 Note • Go to http://www.brother.com/original/index.html for each of the toner cartridges is approximate and may vary by type of use paper that is not a direct equivalent for the recommended paper, the life...
.... 3 1 page per job. 4 Drum life is based on ISO/IEC 19752. Frequency of replacement will need to the Brother collection program. LCD messages Replace Toner Replace Parts Drum Unit Drum Stop Consumable item to replace Toner cartridge Drum unit Approximate life 3,000 pages 1 2 5 8,000 pages 1 2 6 12,000 pages 1 2 7 30,000 pages...pages. 2 Approx. TN-720 5 TN-750 6 TN-780 7 DR-720 Note • Go to http://www.brother.com/original/index.html for each of the toner cartridges is approximate and may vary by type of use paper that is not a direct equivalent for the recommended paper, the life...
Basic User's Guide - English
Page 79
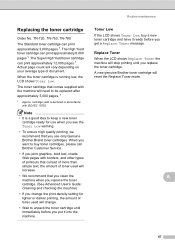
... to be replaced after approximately 3,000 pages. 1 1 Approx. The toner cartridge that you use only Genuine Brother Brand toner cartridges. A new genuine Brother toner cartridge will need to keep a new toner cartridge ready for lighter or darker printing, the amount of document. Routine maintenance Replacing the toner cartridge A Order No. The High Yield toner cartridge can print approximately 3,000 pages 1. Actual page count will...
... to be replaced after approximately 3,000 pages. 1 1 Approx. The toner cartridge that you use only Genuine Brother Brand toner cartridges. A new genuine Brother toner cartridge will need to keep a new toner cartridge ready for lighter or darker printing, the amount of document. Routine maintenance Replacing the toner cartridge A Order No. The High Yield toner cartridge can print approximately 3,000 pages 1. Actual page count will...
Basic User's Guide - English
Page 80
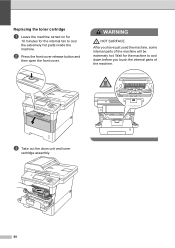
c Take out the drum unit and toner cartridge assembly. 68 Wait for the internal fan to cool down before you have just used the machine, some internal parts of the machine. WARNING HOT SURFACE After you touch the internal parts of the machine will be extremely hot. Replacing the toner cartridge A a Leave the machine turned on for 10 minutes for the machine to cool the extremely hot parts inside the machine. b Press the front cover release button and then open the front cover.
c Take out the drum unit and toner cartridge assembly. 68 Wait for the internal fan to cool down before you have just used the machine, some internal parts of the machine. WARNING HOT SURFACE After you touch the internal parts of the machine will be extremely hot. Replacing the toner cartridge A a Leave the machine turned on for 10 minutes for the machine to cool the extremely hot parts inside the machine. b Press the front cover release button and then open the front cover.
Basic User's Guide - English
Page 81
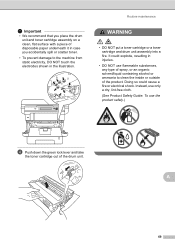
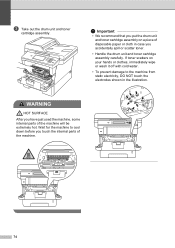
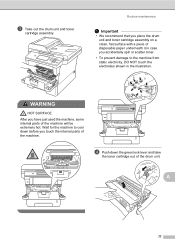
.../liquid containing alcohol or ammonia to the machine from static electricity, DO NOT touch the electrodes shown in case you place the drum unit and toner cartridge assembly on a clean, flat surface with a piece of the drum unit. Important • We recommend that you accidentally spill or scatter... electrical shock. Doing so could explode, resulting in injuries. • DO NOT use the product safely.) d Push down the green lock lever and take the toner cartridge out of disposable paper underneath it in the illustration. Routine maintenance WARNING • DO NOT put...
.../liquid containing alcohol or ammonia to the machine from static electricity, DO NOT touch the electrodes shown in case you place the drum unit and toner cartridge assembly on a clean, flat surface with a piece of the drum unit. Important • We recommend that you accidentally spill or scatter... electrical shock. Doing so could explode, resulting in injuries. • DO NOT use the product safely.) d Push down the green lock lever and take the toner cartridge out of disposable paper underneath it in the illustration. Routine maintenance WARNING • DO NOT put...
Basic User's Guide - English
Page 82
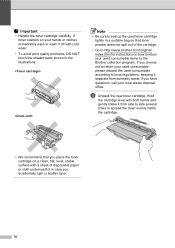
...NOT touch the shaded parts shown in case you accidentally spill or scatter toner. 70 Hold the cartridge level with a sheet of the cartridge. • Go to the Brother collection program. If you place the toner cartridge on how to return your local waste disposal office. Note • ...paper or cloth underneath it from domestic waste. Important • Handle the toner cartridge carefully. If you choose not to return your used consumable, please discard the used consumable items to http://www.brother.com/original/ index.html for instructions on a clean, flat, level, ...
...NOT touch the shaded parts shown in case you accidentally spill or scatter toner. 70 Hold the cartridge level with a sheet of the cartridge. • Go to the Brother collection program. If you place the toner cartridge on how to return your local waste disposal office. Note • ...paper or cloth underneath it from domestic waste. Important • Handle the toner cartridge carefully. If you choose not to return your used consumable, please discard the used consumable items to http://www.brother.com/original/ index.html for instructions on a clean, flat, level, ...
Basic User's Guide - English
Page 83
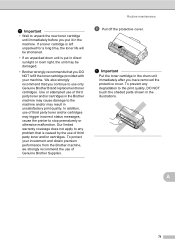
...In addition, use of third party toner and/or cartridges in unsatisfactory print quality. Important Put the toner cartridge in the drum unit immediately after you put in direct sunlight or room light, the unit may result in the Brother machine may cause damage to the machine... any degradation to any problem that you DO NOT refill the toner cartridge provided with your investment and obtain premium performance from the Brother machine, we strongly recommend the use only Genuine Brother Brand replacement toner cartridges. Our limited warranty coverage does not apply to the print quality...
...In addition, use of third party toner and/or cartridges in unsatisfactory print quality. Important Put the toner cartridge in the drum unit immediately after you put in direct sunlight or room light, the unit may result in the Brother machine may cause damage to the machine... any degradation to any problem that you DO NOT refill the toner cartridge provided with your investment and obtain premium performance from the Brother machine, we strongly recommend the use only Genuine Brother Brand replacement toner cartridges. Our limited warranty coverage does not apply to the print quality...
Basic User's Guide - English
Page 84
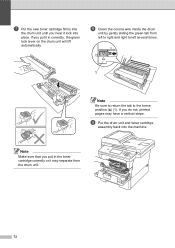
If you put it in the toner cartridge correctly or it lock into the machine. Note Make sure that you do not, printed pages may separate from left to right and right to ... the drum unit by gently sliding the green tab from the drum unit. 72 If you hear it may have a vertical stripe. g Put the new toner cartridge firmly into the drum unit until you put in correctly, the green lock lever on the drum unit will lift automatically. i Put the drum unit...
If you put it in the toner cartridge correctly or it lock into the machine. Note Make sure that you do not, printed pages may separate from left to right and right to ... the drum unit by gently sliding the green tab from the drum unit. 72 If you hear it may have a vertical stripe. g Put the new toner cartridge firmly into the drum unit until you put in correctly, the green lock lever on the drum unit will lift automatically. i Put the drum unit...
Basic User's Guide - English
Page 85
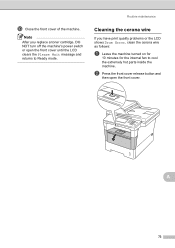
A 73 Routine maintenance Cleaning the corona wire A If you replace a toner cartridge, DO NOT turn off the machine's power switch or open the front cover. j Close the front cover of the machine. b Press the front cover release button and then open the front cover until the LCD clears the Please Wait message and returns to cool the extremely hot parts inside the machine. Note After you have print quality problems or the LCD shows Drum Error, clean the corona wire as follows: a Leave the machine turned on for 10 minutes for the internal fan to Ready mode.
A 73 Routine maintenance Cleaning the corona wire A If you replace a toner cartridge, DO NOT turn off the machine's power switch or open the front cover. j Close the front cover of the machine. b Press the front cover release button and then open the front cover until the LCD clears the Please Wait message and returns to cool the extremely hot parts inside the machine. Note After you have print quality problems or the LCD shows Drum Error, clean the corona wire as follows: a Leave the machine turned on for 10 minutes for the internal fan to Ready mode.
Basic User's Guide - English
Page 86
... We recommend that you put the drum unit and toner cartridge assembly on your hands or clothes, immediately wipe or wash it off with cold water. • To prevent damage to cool down before you have just used the machine, some internal parts of disposable paper or cloth in the illustration.... WARNING HOT SURFACE After you touch the internal parts of the machine. 74 c Take out the drum unit and toner cartridge assembly. Wait for the machine to the machine from static electricity, DO NOT touch the electrodes shown in case you ...
... We recommend that you put the drum unit and toner cartridge assembly on your hands or clothes, immediately wipe or wash it off with cold water. • To prevent damage to cool down before you have just used the machine, some internal parts of disposable paper or cloth in the illustration.... WARNING HOT SURFACE After you touch the internal parts of the machine. 74 c Take out the drum unit and toner cartridge assembly. Wait for the machine to the machine from static electricity, DO NOT touch the electrodes shown in case you ...
Basic User's Guide - English
Page 87
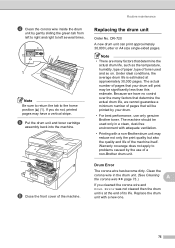
...drum will print may reduce not only the print quality but also the quality and life of the machine itself. e Put the drum unit and toner cartridge assembly back into the machine. Because we cannot guarantee a minimum number of the machine. Drum Error A The corona wire has become dirty. Routine... does not apply to the home position (a) (1). f Close the front cover of pages that your drum. • For best performance, use of a non-Brother drum unit. Under ideal conditions, the average drum life is at approximately 30,000 pages. The machine should be printed by the use only genuine...
...drum will print may reduce not only the print quality but also the quality and life of the machine itself. e Put the drum unit and toner cartridge assembly back into the machine. Because we cannot guarantee a minimum number of the machine. Drum Error A The corona wire has become dirty. Routine... does not apply to the home position (a) (1). f Close the front cover of pages that your drum. • For best performance, use of a non-Brother drum unit. Under ideal conditions, the average drum life is at approximately 30,000 pages. The machine should be printed by the use only genuine...
Basic User's Guide - English
Page 89
... you have just used the machine, some internal parts of the drum unit. WARNING HOT SURFACE After you touch the internal parts of disposable paper underneath it in the illustration. c Take out the drum unit and toner cartridge assembly. Routine maintenance Important • We recommend... that you place the drum unit and toner cartridge assembly on a clean, flat surface with...
... you have just used the machine, some internal parts of the drum unit. WARNING HOT SURFACE After you touch the internal parts of disposable paper underneath it in the illustration. c Take out the drum unit and toner cartridge assembly. Routine maintenance Important • We recommend... that you place the drum unit and toner cartridge assembly on a clean, flat surface with...
Basic User's Guide - English
Page 90
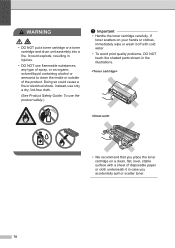
..., stable surface with a sheet of disposable paper or cloth underneath it in injuries. • DO NOT use the product safely.) Important • Handle the toner cartridge carefully. It could cause a fire or electrical shock. Instead, use only a dry, lint-free cloth. (See Product Safety Guide: To use flammable substances,... avoid print quality problems, DO NOT touch the shaded parts shown in the illustrations. • We recommend that you accidentally spill or scatter toner. 78 WARNING • DO NOT put a toner cartridge or a toner cartridge and drum unit assembly into a fire.
..., stable surface with a sheet of disposable paper or cloth underneath it in injuries. • DO NOT use the product safely.) Important • Handle the toner cartridge carefully. It could cause a fire or electrical shock. Instead, use only a dry, lint-free cloth. (See Product Safety Guide: To use flammable substances,... avoid print quality problems, DO NOT touch the shaded parts shown in the illustrations. • We recommend that you accidentally spill or scatter toner. 78 WARNING • DO NOT put a toner cartridge or a toner cartridge and drum unit assembly into a fire.


