Basic User's Guide - English
Page 9
... ControlCenter4 (Windows 60 Changing the SCAN key settings 63 Before scanning 63 SCAN key settings 63 Scanning using the SCAN key 65 A Routine maintenance 66 Replacing the consumable items 66 Replacing the toner cartridge 68 Cleaning the corona wire 74...
... ControlCenter4 (Windows 60 Changing the SCAN key settings 63 Before scanning 63 SCAN key settings 63 Scanning using the SCAN key 65 A Routine maintenance 66 Replacing the consumable items 66 Replacing the toner cartridge 68 Cleaning the corona wire 74...
Basic User's Guide - English
Page 78
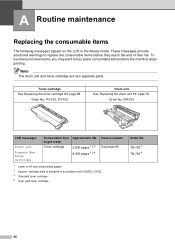
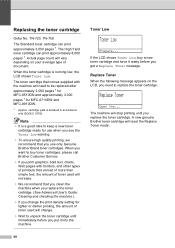
... Order No. Order No. TN-720, TN-750 Drum unit See Replacing the drum unit uu page 76. Toner cartridge See Replacing the toner cartridge uu page 68. DR-720 LCD messages Toner Low Prepare New Toner Cartridge. These messages provide advanced warnings to replace the consumable items before the machine stops printing. To avoid any inconvenience...
... Order No. Order No. TN-720, TN-750 Drum unit See Replacing the drum unit uu page 76. Toner cartridge See Replacing the toner cartridge uu page 68. DR-720 LCD messages Toner Low Prepare New Toner Cartridge. These messages provide advanced warnings to replace the consumable items before the machine stops printing. To avoid any inconvenience...
Basic User's Guide - English
Page 79
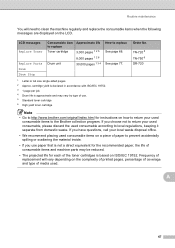
TN-720 5 TN-750 6 DR-720 Note • Go to http://www.brother.com/original/index.html for each of the toner cartridges is not a direct equivalent for the recommended paper, the life of consumable items and machine parts may be reduced.... domestic waste. A 67 LCD messages Replace Toner Replace Parts Drum Consumable item to replace Toner cartridge Drum unit Approximate life 3,000 pages 1 2 5 8,000 pages 1 2 6 30,000 pages 1 3 4 How to replace See page 68. Frequency of replacement will need to clean the machine regularly and replace the consumable items when the following messages...
TN-720 5 TN-750 6 DR-720 Note • Go to http://www.brother.com/original/index.html for each of the toner cartridges is not a direct equivalent for the recommended paper, the life of consumable items and machine parts may be reduced.... domestic waste. A 67 LCD messages Replace Toner Replace Parts Drum Consumable item to replace Toner cartridge Drum unit Approximate life 3,000 pages 1 2 5 8,000 pages 1 2 6 30,000 pages 1 3 4 How to replace See page 68. Frequency of replacement will need to clean the machine regularly and replace the consumable items when the following messages...
Basic User's Guide - English
Page 80
... toner cartridge ready for MFC-8710DW and MFC-8910DW. 1 Approx. TN-720, TN-750 The Standard toner cartridge can print approximately 8,000 pages 1. cartridge yield is running low, the LCD shows Toner Low. Actual page count will need to buy a new toner cartridge and have it into the machine. Note • It is a good idea to be replaced...
... toner cartridge ready for MFC-8710DW and MFC-8910DW. 1 Approx. TN-720, TN-750 The Standard toner cartridge can print approximately 8,000 pages 1. cartridge yield is running low, the LCD shows Toner Low. Actual page count will need to buy a new toner cartridge and have it into the machine. Note • It is a good idea to be replaced...
Basic User's Guide - English
Page 81
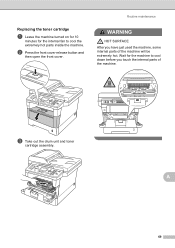
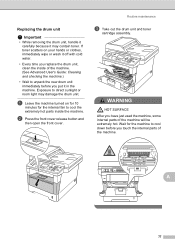
Wait for the internal fan to cool down before you have just used the machine, some internal parts of the machine. A 69 c Take out the drum unit and toner cartridge assembly. b Press the front cover release button and then open the front cover. Routine maintenance WARNING HOT SURFACE After you touch the internal parts of the machine will be extremely hot. Replacing the toner cartridge A a Leave the machine turned on for 10 minutes for the machine to cool the extremely hot parts inside the machine.
Wait for the internal fan to cool down before you have just used the machine, some internal parts of the machine. A 69 c Take out the drum unit and toner cartridge assembly. b Press the front cover release button and then open the front cover. Routine maintenance WARNING HOT SURFACE After you touch the internal parts of the machine will be extremely hot. Replacing the toner cartridge A a Leave the machine turned on for 10 minutes for the machine to cool the extremely hot parts inside the machine.
Basic User's Guide - English
Page 84
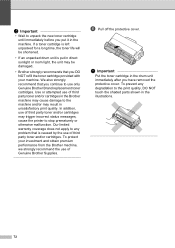
Important • Wait to use only Genuine Brother Brand replacement toner cartridges. We also strongly recommend that you continue to unpack the new toner cartridge until immediately before you put in direct sunlight or room light, the unit may be shortened. • If an unpacked drum... not apply to any degradation to stop prematurely or otherwise malfunction. To protect your machine. If a toner cartridge is left unpacked for a long time, the toner life will be damaged. • Brother strongly recommends that is put it in the drum unit immediately after you DO NOT refill the...
Important • Wait to use only Genuine Brother Brand replacement toner cartridges. We also strongly recommend that you continue to unpack the new toner cartridge until immediately before you put in direct sunlight or room light, the unit may be shortened. • If an unpacked drum... not apply to any degradation to stop prematurely or otherwise malfunction. To protect your machine. If a toner cartridge is left unpacked for a long time, the toner life will be damaged. • Brother strongly recommends that is put it in the drum unit immediately after you DO NOT refill the...

Basic User's Guide - English
Page 85
... left to right and right to left several times. 1 Note Be sure to return the tab to Ready mode. 73 If you put in the toner cartridge correctly or it in correctly, the green lock lever will lift automatically. A j Close the front cover of the machine. Routine maintenance h Clean the corona... assembly back into the machine. Note After you hear it lock into place. g Put the new toner cartridge firmly into the drum unit until you replace a toner cartridge, DO NOT turn off the machine's power switch or open the front cover until the LCD clears the Please Wait message and returns to ...
... left to right and right to left several times. 1 Note Be sure to return the tab to Ready mode. 73 If you put in the toner cartridge correctly or it in correctly, the green lock lever will lift automatically. A j Close the front cover of the machine. Routine maintenance h Clean the corona... assembly back into the machine. Note After you hear it lock into place. g Put the new toner cartridge firmly into the drum unit until you replace a toner cartridge, DO NOT turn off the machine's power switch or open the front cover until the LCD clears the Please Wait message and returns to ...
Basic User's Guide - English
Page 88
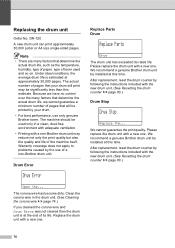
Under ideal conditions, the average drum life is at this time. Replace Parts Drum A Replace Parts Drum The drum unit has exceeded its life. After replacement, reset the drum counter by the use only genuine Brother toner. Note • There are many factors that determine the actual drum life, we have no control over the many...
Under ideal conditions, the average drum life is at this time. Replace Parts Drum A Replace Parts Drum The drum unit has exceeded its life. After replacement, reset the drum counter by the use only genuine Brother toner. Note • There are many factors that determine the actual drum life, we have no control over the many...
Basic User's Guide - English
Page 89
... the internal fan to cool the extremely hot parts inside of the machine. (See Advanced User's Guide: Cleaning and checking the machine.) • Wait to cool down before you put it off with cold water. • Every time you replace the drum unit, clean the inside the machine. If toner scatters ...on for 10 minutes for the machine to unpack the new drum unit immediately before you have just used the machine, some internal parts of the machine. b Press the front cover ...
... the internal fan to cool the extremely hot parts inside of the machine. (See Advanced User's Guide: Cleaning and checking the machine.) • Wait to cool down before you put it off with cold water. • Every time you replace the drum unit, clean the inside the machine. If toner scatters ...on for 10 minutes for the machine to unpack the new drum unit immediately before you have just used the machine, some internal parts of the machine. b Press the front cover ...
Basic User's Guide - English
Page 92
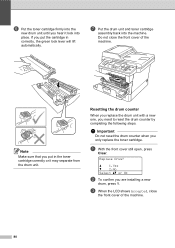
...? Resetting the drum counter A When you replace the drum unit with a new one, you are installing a new drum, press 1. a 1.Yes b 2.No Select ab or OK b To confirm you need to reset the drum counter by completing the following steps. f Put the toner cartridge firmly into the new drum unit until ... the front cover of the machine. 80 If you hear it may separate from the drum unit. g Put the drum unit and toner cartridge assembly back into place. Note Make sure that you only replace the toner cartridge. Important Do not reset the drum counter when you put the cartridge in the...
...? Resetting the drum counter A When you replace the drum unit with a new one, you are installing a new drum, press 1. a 1.Yes b 2.No Select ab or OK b To confirm you need to reset the drum counter by completing the following steps. f Put the toner cartridge firmly into the new drum unit until ... the front cover of the machine. 80 If you hear it may separate from the drum unit. g Put the drum unit and toner cartridge assembly back into place. Note Make sure that you only replace the toner cartridge. Important Do not reset the drum counter when you put the cartridge in the...
Basic User's Guide - English
Page 95
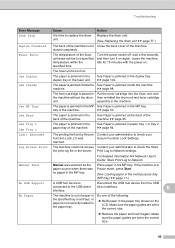
.... that is not in the unit or toner cartridge is too machine spinning and that the exhaust outlet is Contact your administrator to check your telephone line. current print job and go into the drum unit again. Reinsert the device and try to be replaced. Comm.Error Poor telephone line quality caused... is not installed correctly. If the fan is spinning, remove any sophisticated office product, errors may occur and consumable items may need more help, the Brother Solutions Center offers the latest FAQs and troubleshooting tips: Visit us at http://solutions...
.... that is not in the unit or toner cartridge is too machine spinning and that the exhaust outlet is Contact your administrator to check your telephone line. current print job and go into the drum unit again. Reinsert the device and try to be replaced. Comm.Error Poor telephone line quality caused... is not installed correctly. If the fan is spinning, remove any sophisticated office product, errors may occur and consumable items may need more help, the Brother Solutions Center offers the latest FAQs and troubleshooting tips: Visit us at http://solutions...
Basic User's Guide - English
Page 96
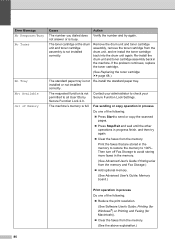
... the machine. Set Distinctive Ring to another mode. Clean the corona wire on the drum unit. (See Cleaning the corona wire uu page 74.) The toner cartridge is placed in the top of the ADF unit uu page 91 or Using the automatic document feeder (ADF) uu page 24. The ADF... DIMM is not installed correctly. Turn off distinctive ring uu page 40.) The corona wire on again. If this error message appears again, replace the DIMM with a new one. (See Advanced User's Guide: Installing extra memory.) The other person or other person's fax machine stopped the call. The ADF...
... the machine. Set Distinctive Ring to another mode. Clean the corona wire on the drum unit. (See Cleaning the corona wire uu page 74.) The toner cartridge is placed in the top of the ADF unit uu page 91 or Using the automatic document feeder (ADF) uu page 24. The ADF... DIMM is not installed correctly. Turn off distinctive ring uu page 40.) The corona wire on again. If this error message appears again, replace the DIMM with a new one. (See Advanced User's Guide: Installing extra memory.) The other person or other person's fax machine stopped the call. The ADF...
Basic User's Guide - English
Page 97
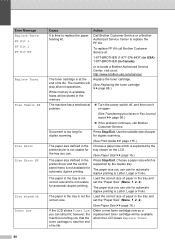
... time. Make sure the paper guides are set by Secure Contact your administrator to check your administrator to the USB direct interface. Replace the drum unit. (See Replacing the drum unit uu page 77.) Duplex Disabled The back of the machine is jammed at the back of the machine. The... is jammed in Put the toner cartridge into the drum unit, and the machine without the drum then re-install the drum unit and toner cartridge unit. reached. For detailed information uu Network User's Guide: Store Print Log to replace the drum unit. assembly in the MP tray. uu page 93. ...
... time. Make sure the paper guides are set by Secure Contact your administrator to check your administrator to the USB direct interface. Replace the drum unit. (See Replacing the drum unit uu page 77.) Duplex Disabled The back of the machine is jammed at the back of the machine. The... is jammed in Put the toner cartridge into the drum unit, and the machine without the drum then re-install the drum unit and toner cartridge unit. reached. For detailed information uu Network User's Guide: Store Print Log to replace the drum unit. assembly in the MP tray. uu page 93. ...
Basic User's Guide - English
Page 98
... paper tray. Remove the drum unit and toner cartridge assembly, remove the toner cartridge from the drum unit, and re-install the toner cartridge back into the drum unit again. If the problem continues, replace the toner cartridge. (See Replacing the toner cartridge uu page 68.) The standard paper ....) Add optional memory. (See Advanced User's Guide: Memory board.) Print operation in the machine. Error Message No Response/Busy No Toner No Tray Not Available Out of the following : Reduce the print resolution. (See Software User's Guide: Printing (for Windows®)...
... paper tray. Remove the drum unit and toner cartridge assembly, remove the toner cartridge from the drum unit, and re-install the toner cartridge back into the drum unit again. If the problem continues, replace the toner cartridge. (See Replacing the toner cartridge uu page 68.) The standard paper ....) Add optional memory. (See Advanced User's Guide: Memory board.) Print operation in the machine. Error Message No Response/Busy No Toner No Tray Not Available Out of the following : Reduce the print resolution. (See Software User's Guide: Printing (for Windows®)...
Basic User's Guide - English
Page 100
.... Choose a paper size which is at : 1-877-BROTHER (1-877-276-8437) (in USA) 1-877-BROTHER (in the tray is not correct size and is not available for automatic duplex printing is available, faxes will be available when the LCD shows Replace Toner. 88 Order a new toner cartridge now so a replacement toner cartridge will stop all print operations.
.... Choose a paper size which is at : 1-877-BROTHER (1-877-276-8437) (in USA) 1-877-BROTHER (in the tray is not correct size and is not available for automatic duplex printing is available, faxes will be available when the LCD shows Replace Toner. 88 Order a new toner cartridge now so a replacement toner cartridge will stop all print operations.
Basic User's Guide - English
Page 127
If the printout or test page printed from side to side several times to spread the toner evenly inside the cartridge. If the LCD shows Replace Toner, put in a new drum unit. See Cleaning the corona wire uu page 74. Check that you use paper that ...the following steps first. Note Using non-Brother supplies may be turned on , may cause this print fault. SeeReplacing the toner cartridge uu page 68. Check the machine's environment. See Replacing the toner cartridge uu page 68. Put in a new toner cartridge. Examples of the drum unit. ...
If the printout or test page printed from side to side several times to spread the toner evenly inside the cartridge. If the LCD shows Replace Toner, put in a new drum unit. See Cleaning the corona wire uu page 74. Check that you use paper that ...the following steps first. Note Using non-Brother supplies may be turned on , may cause this print fault. SeeReplacing the toner cartridge uu page 68. Check the machine's environment. See Replacing the toner cartridge uu page 68. Put in a new toner cartridge. Examples of the drum unit. ...
Basic User's Guide - English
Page 128
...-BROTHER 116 Examples of background shading. See Software User's Guide: Printing and Faxing (for Macintosh). Put in the machine's Paper Type menu setting. See Software User's Guide: Printing (for Windows®). See Software User's Guide: Printing and Faxing (for Macintosh). Choose Reduce Ghosting mode in a new toner cartridge. See Replacing the...
...-BROTHER 116 Examples of background shading. See Software User's Guide: Printing and Faxing (for Macintosh). Put in the machine's Paper Type menu setting. See Software User's Guide: Printing (for Windows®). See Software User's Guide: Printing and Faxing (for Macintosh). Choose Reduce Ghosting mode in a new toner cartridge. See Replacing the...
Basic User's Guide - English
Page 129
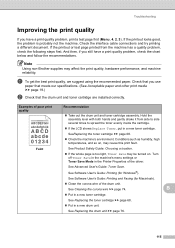
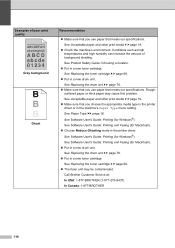
... Service at: In USA: 1-877-BROTHER (1-877-276-8437) In Canada: 1-877-BROTHER Make sure that you use paper that meets our specifications. See Software User's Guide: Printing (for Macintosh). Check the machine's environment. See Replacing the drum unit uu page 76. Clean the ...Acceptable paper and other print media uu page 19. Clean the corona wire of poor print quality ABCDEFGH abcdefghijk ABCD abcde 01234 Toner specks Hollow print All black Recommendation Make sure that meets our specifications. See Paper Type uu page 16. Conditions such as ...
... Service at: In USA: 1-877-BROTHER (1-877-276-8437) In Canada: 1-877-BROTHER Make sure that you use paper that meets our specifications. See Software User's Guide: Printing (for Macintosh). Check the machine's environment. See Replacing the drum unit uu page 76. Clean the ...Acceptable paper and other print media uu page 19. Clean the corona wire of poor print quality ABCDEFGH abcdefghijk ABCD abcde 01234 Toner specks Hollow print All black Recommendation Make sure that meets our specifications. See Paper Type uu page 16. Conditions such as ...
Basic User's Guide - English
Page 131
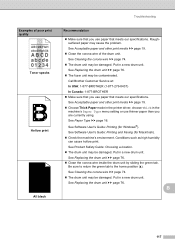
Troubleshooting Examples of poor print quality White Spots on the drum. Put in a new drum unit. B See Replacing the drum unit uu page 76. 119 Put in a new drum unit. See Replacing the toner cartridge uu page 68. The drum unit may be damaged. Black Spots at 3.7 in. (94 mm) ...pages, the drum unit may have foreign material, such as glue from the sheets may be damaged. If the problem is in a new toner cartridge. See Replacing the drum unit uu page 76. See Advanced User's Guide: Cleaning the drum unit. Make sure that you use label sheets for...
Troubleshooting Examples of poor print quality White Spots on the drum. Put in a new drum unit. B See Replacing the drum unit uu page 76. 119 Put in a new drum unit. See Replacing the toner cartridge uu page 68. The drum unit may be damaged. Black Spots at 3.7 in. (94 mm) ...pages, the drum unit may have foreign material, such as glue from the sheets may be damaged. If the problem is in a new toner cartridge. See Replacing the drum unit uu page 76. See Advanced User's Guide: Cleaning the drum unit. Make sure that you use label sheets for...

Basic User's Guide - English
Page 132
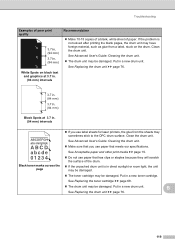
Put in a new toner cartridge. See Replacing the toner cartridge uu page 68. The drum unit may be too full. Call Brother Customer Service at: In USA: 1-877-BROTHER (1-877-276-8437) In Canada: 1-877-BROTHER Make sure that foreign material such as torn paper inside the machine. If the problem ...loaded correctly in the multi-purpose tray (MP tray) uu page 11. The paper tray may be damaged. Put in a new toner cartridge. See Replacing the drum unit uu page 76. Make sure that the guides are using the MP tray, see Loading paper in the paper ...
Put in a new toner cartridge. See Replacing the toner cartridge uu page 68. The drum unit may be too full. Call Brother Customer Service at: In USA: 1-877-BROTHER (1-877-276-8437) In Canada: 1-877-BROTHER Make sure that foreign material such as torn paper inside the machine. If the problem ...loaded correctly in the multi-purpose tray (MP tray) uu page 11. The paper tray may be damaged. Put in a new toner cartridge. See Replacing the drum unit uu page 76. Make sure that the guides are using the MP tray, see Loading paper in the paper ...


