Users Manual - English
Page 157
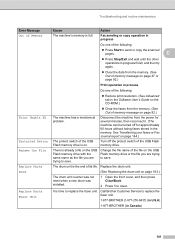
...drum unit counter was not reset when a new drum was installed. 1 Open the front cover, and then press Clear/Back. 2 Press 1 to save . See Transferring your faxes or Fax Journal report on page 144.) Protected Device The protect switch of the USB Flash memory drive is time to replace the fuser unit. 1-877-BROTHER...maintenance Error Message Cause Action Out of its life. Fax sending or copy operation in progress Do one of the following : „ Reduce print resolution. (See Advanced tab in process Do one of the following : „ Press Start to save . C „ Press Stop/Exit...
...drum unit counter was not reset when a new drum was installed. 1 Open the front cover, and then press Clear/Back. 2 Press 1 to save . See Transferring your faxes or Fax Journal report on page 144.) Protected Device The protect switch of the USB Flash memory drive is time to replace the fuser unit. 1-877-BROTHER...maintenance Error Message Cause Action Out of its life. Fax sending or copy operation in progress Do one of the following : „ Reduce print resolution. (See Advanced tab in process Do one of the following : „ Press Start to save . C „ Press Stop/Exit...

Users Manual - English
Page 182
... password and IP address infromation. 2 Address & Fax Address & Fax resets the following settings: „ Address Book (One-Touch Dial, Speed-Dial and Setup Groups) „ Programmed fax jobs... 3 All Settings You can see the remaining life of the used part. Brother strongly recommends you use this operation when you choose Network or All Settings. 166...reset the drum counter when you installed a new drum unit. a Press Menu, 8, 3. 83.Parts Life 1.Drum 2.Fuser 3.Laser Select ab or OK b Press a or b to the settings that part's life counter was reset during the life of the machine's drum...
... password and IP address infromation. 2 Address & Fax Address & Fax resets the following settings: „ Address Book (One-Touch Dial, Speed-Dial and Setup Groups) „ Programmed fax jobs... 3 All Settings You can see the remaining life of the used part. Brother strongly recommends you use this operation when you choose Network or All Settings. 166...reset the drum counter when you installed a new drum unit. a Press Menu, 8, 3. 83.Parts Life 1.Drum 2.Fuser 3.Laser Select ab or OK b Press a or b to the settings that part's life counter was reset during the life of the machine's drum...
Service Manual
Page 77
... Refer to The device is time to replace the paper feeding kit for Tray 2. was 1) Open the front cover, and then not reset when a new drum press Clear/Back. Replace the PF Kit MP. 3-14 It is removed Press Stop/Exit. processing. its life. machine that is indicated...tray. interface while the data is not installed properly. The drum unit counter was installed. 2) Press 1 to replace the fuser unit. Replace the PF Kit 1. 3-15 It is time to replace the paper feeding kit for Tray 1. Replace the laser unit. 3-15 It is time to replace the paper feeding...
... Refer to The device is time to replace the paper feeding kit for Tray 2. was 1) Open the front cover, and then not reset when a new drum press Clear/Back. Replace the PF Kit MP. 3-14 It is removed Press Stop/Exit. processing. its life. machine that is indicated...tray. interface while the data is not installed properly. The drum unit counter was installed. 2) Press 1 to replace the fuser unit. Replace the PF Kit 1. 3-15 It is time to replace the paper feeding kit for Tray 1. Replace the laser unit. 3-15 It is time to replace the paper feeding...
Service Manual
Page 119
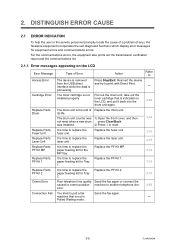
.... developer roller counter? after reseting the Yes counter. Developing bias Is the problem solved Reset the developer roller malfunciton after replacing the drum Yes unit? Yes Clean the electrode. Check that the appropriate media type is selected in the printer driver. Yes Replace the drum unit. ■ Dark - Replace the toner cartridge with a new one . Replace the...
.... developer roller counter? after reseting the Yes counter. Developing bias Is the problem solved Reset the developer roller malfunciton after replacing the drum Yes unit? Yes Clean the electrode. Check that the appropriate media type is selected in the printer driver. Yes Replace the drum unit. ■ Dark - Replace the toner cartridge with a new one . Replace the...
Service Manual
Page 386
... MODE 7-1 2. USER-ACCESS TO THE MAINTENANCE MODE 7-3 4. OTHER SERVICE FUNCTIONS 7-36 5.1 Resetting the Periodical Replacement Parts Life 7-36 5.2 Develop Roller / Developing Bias Voltage Counter Reset Function 7-38 5.3 Drum condensation countermeasure mode 7-39 Confidential You can perform operational checks of panel PCB, sensors, perform...34 4.22 Output of Transmission Log to the Telephone Line (Function code 87 7-34 4.23 Counter Reset After Replacing the Fuser Unit, Laser Unit and Paper Feed Kit (Function code 88 7-35 4.24 Maintenance Mode Finish (Function code 99 7-35 5.
... MODE 7-1 2. USER-ACCESS TO THE MAINTENANCE MODE 7-3 4. OTHER SERVICE FUNCTIONS 7-36 5.1 Resetting the Periodical Replacement Parts Life 7-36 5.2 Develop Roller / Developing Bias Voltage Counter Reset Function 7-38 5.3 Drum condensation countermeasure mode 7-39 Confidential You can perform operational checks of panel PCB, sensors, perform...34 4.22 Output of Transmission Log to the Telephone Line (Function code 87 7-34 4.23 Counter Reset After Replacing the Fuser Unit, Laser Unit and Paper Feed Kit (Function code 88 7-35 4.24 Maintenance Mode Finish (Function code 99 7-35 5.

Service Manual
Page 422
...drum counter and page counter are not reset. 4.24 Maintenance Mode Finish (Function code 99) Finish the maintenance mode. (1) Press the [9] key twice in the initial stage of the maintenance mode. (2) The LCD shows the "Parts Replacement". (3) Press the [ ] or [ ] button to select the item you want to reset. "Reset PF KIT T1 ?" "Reset PF KIT MP ?" "Reset...the standby status. 7-35 Confidential 4.23 Counter Reset After Replacing the Fuser Unit,Laser Unit and Paper Feed Kit (Function code 88) The number of replacement is increased by one, and the warning indication "Replace ***" is...
...drum counter and page counter are not reset. 4.24 Maintenance Mode Finish (Function code 99) Finish the maintenance mode. (1) Press the [9] key twice in the initial stage of the maintenance mode. (2) The LCD shows the "Parts Replacement". (3) Press the [ ] or [ ] button to select the item you want to reset. "Reset PF KIT T1 ?" "Reset PF KIT MP ?" "Reset...the standby status. 7-35 Confidential 4.23 Counter Reset After Replacing the Fuser Unit,Laser Unit and Paper Feed Kit (Function code 88) The number of replacement is increased by one, and the warning indication "Replace ***" is...
Service Manual
Page 423
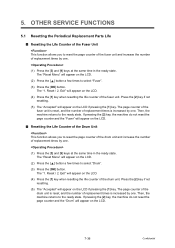
...counter of the drum unit is reset, and the number of replacement times is increased by one . If pressing the [2] key, the machine do not reset the page counter and the "Fuser" will appear on the LCD. ■ Resetting the Life Counter of the Drum Unit This function allows you to reset the page counter of the drum... unit and increase the number of replacement times by one . (1) Press the...
...counter of the drum unit is reset, and the number of replacement times is increased by one . If pressing the [2] key, the machine do not reset the page counter and the "Fuser" will appear on the LCD. ■ Resetting the Life Counter of the Drum Unit This function allows you to reset the page counter of the drum... unit and increase the number of replacement times by one . (1) Press the...
Service Manual
Page 425
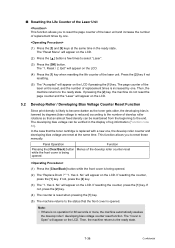
... that the toner cartridge is replaced with a new one, the develop roller counter and developing bias voltage are reset at the same time in the display of replacement times is being opened . (2) The "Replace Drum ?" If resetting the counter, press the [1] key. Yes 2. Note: •... button while the front cover is increased by one . "1. Yes 2. If not, press the [2] key. (4) The counter is reset when pressing the [1] key. (5) The machine returns to reset the page counter of the laser unit and increase the number of replacement times by one . (1) Press the [3] and [9] keys ...
... that the toner cartridge is replaced with a new one, the develop roller counter and developing bias voltage are reset at the same time in the display of replacement times is being opened . (2) The "Replace Drum ?" If resetting the counter, press the [1] key. Yes 2. Note: •... button while the front cover is increased by one . "1. Yes 2. If not, press the [2] key. (4) The counter is reset when pressing the [1] key. (5) The machine returns to reset the page counter of the laser unit and increase the number of replacement times by one . (1) Press the [3] and [9] keys ...


