Users Manual - English
Page 158
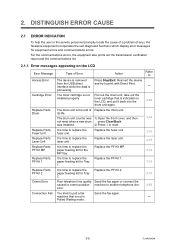
... possible. Call Brother Customer Service to replace the PF Kit MP. 1-877-BROTHER (1-877-276-8437) (in U.S.A) 1-877-BROTHER (in Canada) The toner cartridge is at the end of paper for Tray 2. Replace the toner cartridge with a new one. (See Replacing a toner cartridge on page 144.) Document is time to replace the laser unit. 1-877-BROTHER (1-877-276...
... possible. Call Brother Customer Service to replace the PF Kit MP. 1-877-BROTHER (1-877-276-8437) (in U.S.A) 1-877-BROTHER (in Canada) The toner cartridge is at the end of paper for Tray 2. Replace the toner cartridge with a new one. (See Replacing a toner cartridge on page 144.) Document is time to replace the laser unit. 1-877-BROTHER (1-877-276...
Users Manual - English
Page 181
... see the machine's Serial Number on the LCD please call Brother Customer Service: (in USA) 1-877-BROTHER (1-877-276-8437) (in Canada) 1-877-BROTHER C LCD message Replace Parts PF Kit MP Replace Parts PF Kit 1 Replace Parts PF Kit 2 Replace Parts Description Replace paper feeding kit for PF Kit1, PF Kit2, Fuser and Laser. Replace fuser unit. XXXXXXXXX b Press Stop/Exit. Replace paper...
... see the machine's Serial Number on the LCD please call Brother Customer Service: (in USA) 1-877-BROTHER (1-877-276-8437) (in Canada) 1-877-BROTHER C LCD message Replace Parts PF Kit MP Replace Parts PF Kit 1 Replace Parts PF Kit 2 Replace Parts Description Replace paper feeding kit for PF Kit1, PF Kit2, Fuser and Laser. Replace fuser unit. XXXXXXXXX b Press Stop/Exit. Replace paper...

Users Manual - English
Page 182
...and IP address infromation. 2 Address & Fax Address & Fax resets the following settings: „ Address Book (One-Touch Dial, Speed-Dial and Setup Groups) „ Programmed fax jobs in the memory (Polled TX, Delayed Fax...the LCD. a Press Menu, 8, 3. 83.Parts Life 1.Drum 2.Fuser 3.Laser Select ab or OK b Press a or b to choose 1.Drum, 2.Fuser, 3.Laser, 4.PF Kit MP, 5.PF Kit 1 or 6.PF Kit 2 1. c Press Stop/Exit. Note Unplug the interface cable before you dispose...if that were set at the factory. Brother strongly recommends you use this operation when you choose Network or All Settings. 166
...and IP address infromation. 2 Address & Fax Address & Fax resets the following settings: „ Address Book (One-Touch Dial, Speed-Dial and Setup Groups) „ Programmed fax jobs in the memory (Polled TX, Delayed Fax...the LCD. a Press Menu, 8, 3. 83.Parts Life 1.Drum 2.Fuser 3.Laser Select ab or OK b Press a or b to choose 1.Drum, 2.Fuser, 3.Laser, 4.PF Kit MP, 5.PF Kit 1 or 6.PF Kit 2 1. c Press Stop/Exit. Note Unplug the interface cable before you dispose...if that were set at the factory. Brother strongly recommends you use this operation when you choose Network or All Settings. 166
Users Manual - English
Page 206
Descriptions You can check the 166 percentage of total pages the machine has printed during its life. PF Kit 2 appears only when the optional LT5300 tray is installed. Fax Only* Fax/Tel External TAD Manual - 3.Station ID - 4.Tone/Pulse - (in Canada) 4.Dial Tone - (in ... Print - You can shorten the 138 dial tone detect pause. Menu Selections Options - - 2.Page Counter 3.Parts Life 0.Initial Setup 1.Receive Mode 2.Date&Time - 1.Drum 2.Fuser 3.Laser 4.PF Kit MP 5.PF Kit 1 6.PF Kit 2 - -
Descriptions You can check the 166 percentage of total pages the machine has printed during its life. PF Kit 2 appears only when the optional LT5300 tray is installed. Fax Only* Fax/Tel External TAD Manual - 3.Station ID - 4.Tone/Pulse - (in Canada) 4.Dial Tone - (in ... Print - You can shorten the 138 dial tone detect pause. Menu Selections Options - - 2.Page Counter 3.Parts Life 0.Initial Setup 1.Receive Mode 2.Date&Time - 1.Drum 2.Fuser 3.Laser 4.PF Kit MP 5.PF Kit 1 6.PF Kit 2 - -

Service Manual
Page 21
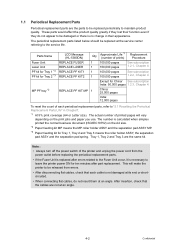
2.5 Service Information These are key service information to CHAPTER 4 in the Service Manual. 1-8 Confidential Machine life: 200,000 pages MTBF (Meantime between failure): Up to 4000 hours MTTR (Meantime to repair): Average 0.5 hours Monthly volume: 30,000 pages Periodical replacement parts: Parts Approximate Life (pages) Fuser unit 100,000 Laser unit 100,000 PF kit China MP: 25,000 Tray 1/2: 100,000 India MP: 12,000 Tray 1/2: 80,000 Others MP: 50,000 Tray 1/2: 100,000 * As for periodical replacement parts, refer to maintain the product.
2.5 Service Information These are key service information to CHAPTER 4 in the Service Manual. 1-8 Confidential Machine life: 200,000 pages MTBF (Meantime between failure): Up to 4000 hours MTTR (Meantime to repair): Average 0.5 hours Monthly volume: 30,000 pages Periodical replacement parts: Parts Approximate Life (pages) Fuser unit 100,000 Laser unit 100,000 PF kit China MP: 25,000 Tray 1/2: 100,000 India MP: 12,000 Tray 1/2: 80,000 Others MP: 50,000 Tray 1/2: 100,000 * As for periodical replacement parts, refer to maintain the product.
Service Manual
Page 77
... Tray 1. The toner cartridge is time to replace the paper feeding kit for the MP tray. Replace the laser unit. 3-15 It is not installed properly. Replace the fuser unit. 3-15 It is - Replace the PF Kit 2. 3-15 Poor telephone line quality Send the fax again or connect the ... indicated on the LCD Error Message Access Error Cartridge Error Replace Parts Drum Replace Parts Fuser Unit Replace Parts Laser Unit Replace Parts PF Kit MP Replace Parts PF Kit 1 Replace Parts PF Kit 2 Comm.Error Connection Fail Type of Error Action Refer to The device is time to poll a fax ...
... Tray 1. The toner cartridge is time to replace the paper feeding kit for the MP tray. Replace the laser unit. 3-15 It is not installed properly. Replace the fuser unit. 3-15 It is - Replace the PF Kit 2. 3-15 Poor telephone line quality Send the fax again or connect the ... indicated on the LCD Error Message Access Error Cartridge Error Replace Parts Drum Replace Parts Fuser Unit Replace Parts Laser Unit Replace Parts PF Kit MP Replace Parts PF Kit 1 Replace Parts PF Kit 2 Comm.Error Connection Fail Type of Error Action Refer to The device is time to poll a fax ...

Service Manual
Page 86
... time of the drum unit User Check • Replace the drum unit with a new one. ■ Error code 51 Replace Parts PF Kit MP Replacement time of the paper feed kit MP Remedy Replace the paper feed kit MP. 3-14 Confidential Step 1 Cause Replacement time of the paper feed... kit MP User Check • Replace the paper feed kit MP with a new one. No toner cartridge User Check &#...
... time of the drum unit User Check • Replace the drum unit with a new one. ■ Error code 51 Replace Parts PF Kit MP Replacement time of the paper feed kit MP Remedy Replace the paper feed kit MP. 3-14 Confidential Step 1 Cause Replacement time of the paper feed... kit MP User Check • Replace the paper feed kit MP with a new one. No toner cartridge User Check &#...

Service Manual
Page 87
... fuser unit. ■ Error code 55 Replace Parts Laser Unit Replacement time of the laser unit Step Cause Remedy 1 Replacement time of the paper feed kit T1 User Check • Replace the paper feed kit T1 with a new one . ■ Error code 52 Replace Parts PF Kit 1 Replacement time of the laser unit Replace the laser unit. 3-15 Confidential
... fuser unit. ■ Error code 55 Replace Parts Laser Unit Replacement time of the laser unit Step Cause Remedy 1 Replacement time of the paper feed kit T1 User Check • Replace the paper feed kit T1 with a new one . ■ Error code 52 Replace Parts PF Kit 1 Replacement time of the laser unit Replace the laser unit. 3-15 Confidential

Service Manual
Page 112
... holder ASSY failure Is the surface of the separation pad or the pickup roller dirty or worn out? 1) Clean the surface of the Replace the PF kit. Roller holder Does the roller holder ASSY catching on PE sensor Is there paper powder in the order of the high-voltage power supply PCB...
... holder ASSY failure Is the surface of the separation pad or the pickup roller dirty or worn out? 1) Clean the surface of the Replace the PF kit. Roller holder Does the roller holder ASSY catching on PE sensor Is there paper powder in the order of the high-voltage power supply PCB...
Service Manual
Page 157
... cables, do not appear to maintain product quality. Parts Name Fuser Unit Laser Unit PF kit for Tray 1 *3 PF kit for Tray 2 *3 MP PF tray *2 LCD Message (HL-5380DN) REPLACE FUSER REPLACE LASER REPLACE PF KIT1 REPLACE PF KIT2 Qty 1 1 1 1 REPLACE PF KIT MP 1 Approximate Life *1 Replacement (number of prints) Procedure 100,000 ... cables, check that the cables are not at an angle. 4-2 Confidential Tray 1, Tray 2 and Tray 3 are the same kit. This will vary depending on the A4 size. *2 Paper feeding kit MP means the MP roller holder ASSY and the separation pad ASSY MP. *3 Paper feeding...
... cables, do not appear to maintain product quality. Parts Name Fuser Unit Laser Unit PF kit for Tray 1 *3 PF kit for Tray 2 *3 MP PF tray *2 LCD Message (HL-5380DN) REPLACE FUSER REPLACE LASER REPLACE PF KIT1 REPLACE PF KIT2 Qty 1 1 1 1 REPLACE PF KIT MP 1 Approximate Life *1 Replacement (number of prints) Procedure 100,000 ... cables, check that the cables are not at an angle. 4-2 Confidential Tray 1, Tray 2 and Tray 3 are the same kit. This will vary depending on the A4 size. *2 Paper feeding kit MP means the MP roller holder ASSY and the separation pad ASSY MP. *3 Paper feeding...

Service Manual
Page 190
Paper tray 4-35 Confidential Hooks Separation pad spring Hook 6b Separation pad ASSY 6b Hook 6a 6c Fig. 4-50 (7) Put the Paper tray into the Paper tray. Note : • Check that the Separation pad spring is assembled correctly. (5) Set the Separation pad spring. (6) Put the Hooks of the Separation pad ASSY into the Paper tray, and turn the Separation pad ASSY to the direction of the arrow 6c to catch the Hooks into the Printer. * Reset the count of the PF Kit after part replacement.
Paper tray 4-35 Confidential Hooks Separation pad spring Hook 6b Separation pad ASSY 6b Hook 6a 6c Fig. 4-50 (7) Put the Paper tray into the Paper tray. Note : • Check that the Separation pad spring is assembled correctly. (5) Set the Separation pad spring. (6) Put the Hooks of the Separation pad ASSY into the Paper tray, and turn the Separation pad ASSY to the direction of the arrow 6c to catch the Hooks into the Printer. * Reset the count of the PF Kit after part replacement.

Service Manual
Page 195
(3) Put the Holder bearing MP into the Printer. (6) Close the Front cover. * Reset the count of the arrow 3c to the direction of the PF Kit MP after part replacement. 4-40 Confidential MP feed frame cover MP feed frame MP feed frame Front cover Fig. 4-58 (5) Install the Drum/toner ASSY into the MP feed frame and turn the Holder bearing MP to lock. Holder bearing MP Hook 3a 3c 3b Fig. 4-57 (4) Close the MP feed frame cover.
(3) Put the Holder bearing MP into the Printer. (6) Close the Front cover. * Reset the count of the arrow 3c to the direction of the PF Kit MP after part replacement. 4-40 Confidential MP feed frame cover MP feed frame MP feed frame Front cover Fig. 4-58 (5) Install the Drum/toner ASSY into the MP feed frame and turn the Holder bearing MP to lock. Holder bearing MP Hook 3a 3c 3b Fig. 4-57 (4) Close the MP feed frame cover.

Service Manual
Page 422
... to select the item you want to reset. "Reset PF KIT T2 ?" (4) Press the [OK] or [Start] button to the standby status of the maintenance mode. "Reset Fuser ?" "Reset Laser ?" "Reset PF KIT T1 ?" At this order in the initial stage of the... maintenance mode. (2) The maintenance mode is finished, and the machine returns to the standby status. 7-35 Confidential 4.23 Counter Reset After Replacing the Fuser Unit,Laser Unit and Paper Feed Kit (Function code 88) The number of replacement is increased by one...
... to select the item you want to reset. "Reset PF KIT T2 ?" (4) Press the [OK] or [Start] button to the standby status of the maintenance mode. "Reset Fuser ?" "Reset Laser ?" "Reset PF KIT T1 ?" At this order in the initial stage of the... maintenance mode. (2) The maintenance mode is finished, and the machine returns to the standby status. 7-35 Confidential 4.23 Counter Reset After Replacing the Fuser Unit,Laser Unit and Paper Feed Kit (Function code 88) The number of replacement is increased by one...

Service Manual
Page 424
.... The page counter of the paper feeding kit is reset, and the number of replacement times is increased by one. Press the [2] key if not resetting. (5) The "Accepted" will appear on the LCD. (2) Press the [ ] button a few times to select "PF Kit 1" or "PF Kit 2". (3) Press the [OK] button. ...The page counter of the MP paper feeding kit is reset, and the number of replacement times is increased by one. The "1. The "1. The "Reset Menu" will appear on the LCD. (4) ...
.... The page counter of the paper feeding kit is reset, and the number of replacement times is increased by one. Press the [2] key if not resetting. (5) The "Accepted" will appear on the LCD. (2) Press the [ ] button a few times to select "PF Kit 1" or "PF Kit 2". (3) Press the [OK] button. ...The page counter of the MP paper feeding kit is reset, and the number of replacement times is increased by one. The "1. The "1. The "Reset Menu" will appear on the LCD. (4) ...


