Software Users Manual - English
Page 50
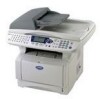
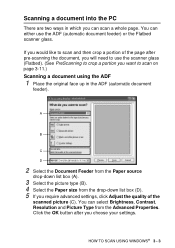
... crop a portion you want to scan on page 3-11.) Scanning a document using the ADF 1 Place the original face up in which you choose your settings. A B C D 2 Select the Document Feeder from the Paper source drop-down list box (A). 3 Select the picture type (B). 4 Select the Paper size... from the Advanced Properties. HOW TO SCAN USING WINDOWS® 3 - 3 If you will need to scan and then crop a portion of the scanned picture (C).
... crop a portion you want to scan on page 3-11.) Scanning a document using the ADF 1 Place the original face up in which you choose your settings. A B C D 2 Select the Document Feeder from the Paper source drop-down list box (A). 3 Select the picture type (B). 4 Select the Paper size... from the Advanced Properties. HOW TO SCAN USING WINDOWS® 3 - 3 If you will need to scan and then crop a portion of the scanned picture (C).
Software Users Manual - English
Page 52
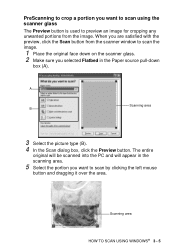
...; 3 - 5 When you are satisfied with the preview, click the Scan button from the scanner window to scan the image. 1 Place the original face down box (A). A Scanning area B 3 Select the picture type (B). 4 In the Scan dialog box, click the Preview button. The entire original will be scanned into the PC and will appear in the Paper source...
...; 3 - 5 When you are satisfied with the preview, click the Scan button from the scanner window to scan the image. 1 Place the original face down box (A). A Scanning area B 3 Select the picture type (B). 4 In the Scan dialog box, click the Preview button. The entire original will be scanned into the PC and will appear in the Paper source...
Software Users Manual - English
Page 53
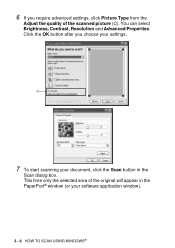
Click the OK button after you require advanced settings, click Picture Type from the Adjust the quality of the original will appear in the Scan dialog box. This time only the selected area of the scanned picture (C). C 7 To start scanning your document, click the Scan button in the PaperPort® window (or your settings. 6 If you choose your software application window). 3 - 6 HOW TO SCAN USING WINDOWS® You can select Brightness, Contrast, Resolution and Advanced Properties.
Click the OK button after you require advanced settings, click Picture Type from the Adjust the quality of the original will appear in the Scan dialog box. This time only the selected area of the scanned picture (C). C 7 To start scanning your document, click the Scan button in the PaperPort® window (or your settings. 6 If you choose your software application window). 3 - 6 HOW TO SCAN USING WINDOWS® You can select Brightness, Contrast, Resolution and Advanced Properties.

Software Users Manual - English
Page 65
... face up in the ADF, or face down on the scanner glass. 2 Press Scan. 3 Press or to select Scan to be addressed. Scan to Image You can scan a color picture into your E-mail application as a file attachment. Scan to E-mail You can either scan a black and white or color original into your graphics application for viewing and...
... face up in the ADF, or face down on the scanner glass. 2 Press Scan. 3 Press or to select Scan to be addressed. Scan to Image You can scan a color picture into your E-mail application as a file attachment. Scan to E-mail You can either scan a black and white or color original into your graphics application for viewing and...

Software Users Manual - English
Page 70
... files saved in OCR application, or you can use your preferred OCR application if it is really just a picture of the text) into PaperPort® 9.0SE in a variety of the text to scanning items, you can edit with PaperPort® 9.0SE -OR- You can Import items from another application, such... ScanSoft® OmniPage®, which is already on a ScanSoft® PaperPort® 9.0SE item (which comes with a word processing application. HOW TO SCAN USING WINDOWS® 3 - 23 PaperPort® 9.0SE can bring items into text that you can use your own OCR application.
... files saved in OCR application, or you can use your preferred OCR application if it is really just a picture of the text) into PaperPort® 9.0SE in a variety of the text to scanning items, you can edit with PaperPort® 9.0SE -OR- You can Import items from another application, such... ScanSoft® OmniPage®, which is already on a ScanSoft® PaperPort® 9.0SE item (which comes with a word processing application. HOW TO SCAN USING WINDOWS® 3 - 23 PaperPort® 9.0SE can bring items into text that you can use your own OCR application.

Software Users Manual - English
Page 153
... File button allows you can save the file to the default Pictures folder, or you to scan an image and save to directory, click on the button while holding down list. To configure the file type and save it in a specific file ...
... File button allows you can save the file to the default Pictures folder, or you to scan an image and save to directory, click on the button while holding down list. To configure the file type and save it in a specific file ...

Software Users Manual - English
Page 158
You can enter up to 30 characters in the Name for Custom field. Scan to File: In the General tab You can also select Resolution, Scan Type, Document Size, Brightness and Contrast settings. This name will appear as the button name. You can either send the file to the default My pictures folder or select your own destination folder by using the Browse button. USING YOUR MACHINE WITH A MACINTOSH® 7 - 43 In the Settings tab Select the file format from the Scan Action field. Select the type of scan from the File Type pull down list.
You can enter up to 30 characters in the Name for Custom field. Scan to File: In the General tab You can also select Resolution, Scan Type, Document Size, Brightness and Contrast settings. This name will appear as the button name. You can either send the file to the default My pictures folder or select your own destination folder by using the Browse button. USING YOUR MACHINE WITH A MACINTOSH® 7 - 43 In the Settings tab Select the file format from the Scan Action field. Select the type of scan from the File Type pull down list.


