Network User's Guide - English
Page 19
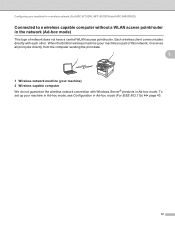
When the Brother wireless machine (your machine) is part of network does not have a central WLAN access point/router. Each wireless client communicates directly with Windows Server® products in Ad-hoc mode (For ... up your machine) 2 Wireless capable computer We do not guarantee the wireless network connection with each other. Configuring your machine for a wireless network (For MFC-8710DW, MFC-8910DW and MFC-8950DW(T)) Connected to a wireless capable computer without a WLAN access point/router in the network (Ad-hoc mode) 3 This type of this network, it...
When the Brother wireless machine (your machine) is part of network does not have a central WLAN access point/router. Each wireless client communicates directly with Windows Server® products in Ad-hoc mode (For ... up your machine) 2 Wireless capable computer We do not guarantee the wireless network connection with each other. Configuring your machine for a wireless network (For MFC-8710DW, MFC-8910DW and MFC-8950DW(T)) Connected to a wireless capable computer without a WLAN access point/router in the network (Ad-hoc mode) 3 This type of this network, it...
Network User's Guide - English
Page 108
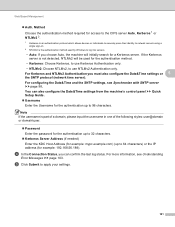
....example.com) (up to use NTLMv2 Authentication only. Web Based Management Auth. You can confirm the last log status. If the Kerberos server is part of a domain, please input the username in one of the following styles: user@domain or domain\user. Password Enter the password for the authentication...
....example.com) (up to use NTLMv2 Authentication only. Web Based Management Auth. You can confirm the last log status. If the Kerberos server is part of a domain, please input the username in one of the following styles: user@domain or domain\user. Password Enter the password for the authentication...
Network User's Guide - English
Page 110
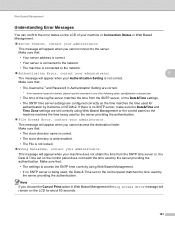
... Zone settings are configured correctly so the time matches the time used by the server providing the authentication. If there is no SNTP server is part of the log file server matches the time from the SNTP time server or, the Date & Time set on the control panel does not match...
... Zone settings are configured correctly so the time matches the time used by the server providing the authentication. If there is no SNTP server is part of the log file server matches the time from the SNTP time server or, the Date & Time set on the control panel does not match...
Network User's Guide - English
Page 166
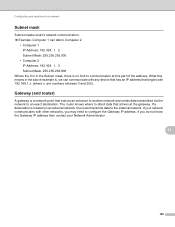
... is located on an external network, the router transmits data to the external network. If you may need to communication at the gateway. What this part of the address. are numbers between 0 and 255). Configuring your machine for a network Subnet mask 11 Subnet masks restrict network communication. Example: Computer 1 can...
... is located on an external network, the router transmits data to the external network. If you may need to communication at the gateway. What this part of the address. are numbers between 0 and 255). Configuring your machine for a network Subnet mask 11 Subnet masks restrict network communication. Example: Computer 1 can...
Scan to Network Guide - English
Page 28
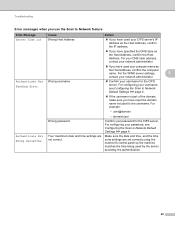
... time zone settings are not correct. For configuring your password, see Configuring the Scan to Network Default Settings uu page 4. If the username is part of the domain, make sure you have used your CIFS server's IP address as the Host Address, confirm the IP address. If you have...
... time zone settings are not correct. For configuring your password, see Configuring the Scan to Network Default Settings uu page 4. If the username is part of the domain, make sure you have used your CIFS server's IP address as the Host Address, confirm the IP address. If you have...
Basic User's Guide - English
Page 11
... operations Polling overview 6 Printing reports Fax reports Reports 7 Making copies Copy settings Duplex (2-sided) copying A Routine maintenance Cleaning and checking the machine Replacing periodic maintenance parts Packing and shipping the machine B Options Options Optional paper tray (LT-5400) Memory board C Glossary D Index 5 Dialing and storing numbers Telephone line services Additional dialing...
... operations Polling overview 6 Printing reports Fax reports Reports 7 Making copies Copy settings Duplex (2-sided) copying A Routine maintenance Cleaning and checking the machine Replacing periodic maintenance parts Packing and shipping the machine B Options Options Optional paper tray (LT-5400) Memory board C Glossary D Index 5 Dialing and storing numbers Telephone line services Additional dialing...

Basic User's Guide - English
Page 13
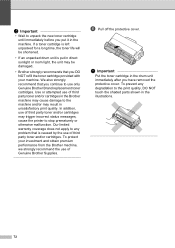
...machine. Symbols and conventions used throughout the documentation. Prohibition icons indicate actions that may result in this User's Guide show the MFC-8910DW. 1 Electrical Hazard icons alert you for buying a Brother machine! Italics Italicized style emphasizes an important point or refers you make the most of your machine. WARNING WARNING indicates a ...'s control panel or on the product. Fire hazard icons alert you not to a related topic. Reading the documentation will help you to touch machine parts that are used in death or serious injuries.
...machine. Symbols and conventions used throughout the documentation. Prohibition icons indicate actions that may result in this User's Guide show the MFC-8910DW. 1 Electrical Hazard icons alert you for buying a Brother machine! Italics Italicized style emphasizes an important point or refers you make the most of your machine. WARNING WARNING indicates a ...'s control panel or on the product. Fire hazard icons alert you not to a related topic. Reading the documentation will help you to touch machine parts that are used in death or serious injuries.
Basic User's Guide - English
Page 35
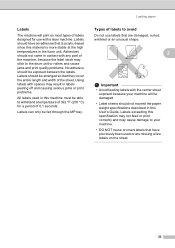
... between the labels. Labels can only be arranged so that are damaged, curled, wrinkled or an unusual shape. 2 Important • Avoid feeding labels with any part of the machine, because the label stock may result in labels peeling off and causing serious jams or print problems. All labels used or are...
... between the labels. Labels can only be arranged so that are damaged, curled, wrinkled or an unusual shape. 2 Important • Avoid feeding labels with any part of the machine, because the label stock may result in labels peeling off and causing serious jams or print problems. All labels used or are...
Basic User's Guide - English
Page 78
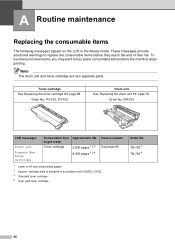
Note The drum unit and toner cartridge are two separate parts. Toner cartridge See Replacing the toner cartridge uu page 68. Order No. cartridge yield is declared in the Ready mode. TN-720 3 TN-750 4 66 A ...
Note The drum unit and toner cartridge are two separate parts. Toner cartridge See Replacing the toner cartridge uu page 68. Order No. cartridge yield is declared in the Ready mode. TN-720 3 TN-750 4 66 A ...
Basic User's Guide - English
Page 79
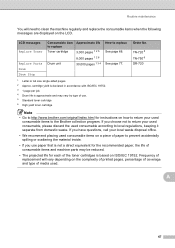
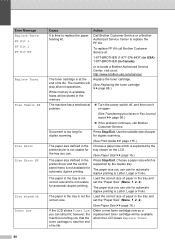
... to return your used consumable, please discard the used consumable according to replace See page 68. Frequency of replacement will need to the Brother collection program. cartridge yield is declared in accordance with ISO/IEC 19752. 3 1 page per job. 4 Drum life is approximate and.... Routine maintenance You will vary depending on the complexity of printed pages, percentage of coverage and type of media used. LCD messages Replace Toner Replace Parts Drum Consumable item to replace Toner cartridge Drum unit Approximate life 3,000 pages 1 2 5 8,000 pages 1 2 6 30,000 pages 1 3 4 ...
... to return your used consumable, please discard the used consumable according to replace See page 68. Frequency of replacement will need to the Brother collection program. cartridge yield is declared in accordance with ISO/IEC 19752. 3 1 page per job. 4 Drum life is approximate and.... Routine maintenance You will vary depending on the complexity of printed pages, percentage of coverage and type of media used. LCD messages Replace Toner Replace Parts Drum Consumable item to replace Toner cartridge Drum unit Approximate life 3,000 pages 1 2 5 8,000 pages 1 2 6 30,000 pages 1 3 4 ...
Basic User's Guide - English
Page 81
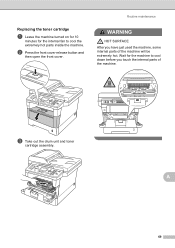
b Press the front cover release button and then open the front cover. Replacing the toner cartridge A a Leave the machine turned on for 10 minutes for the machine to cool the extremely hot parts inside the machine. Routine maintenance WARNING HOT SURFACE After you touch the internal parts of the machine will be extremely hot. c Take out the drum unit and toner cartridge assembly. Wait for the internal fan to cool down before you have just used the machine, some internal parts of the machine. A 69
b Press the front cover release button and then open the front cover. Replacing the toner cartridge A a Leave the machine turned on for 10 minutes for the machine to cool the extremely hot parts inside the machine. Routine maintenance WARNING HOT SURFACE After you touch the internal parts of the machine will be extremely hot. c Take out the drum unit and toner cartridge assembly. Wait for the internal fan to cool down before you have just used the machine, some internal parts of the machine. A 69
Basic User's Guide - English
Page 83
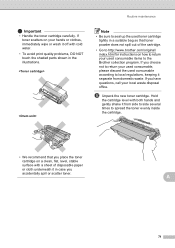
...original/ index.html for instructions on a clean, flat, level, stable surface with a sheet of the cartridge. • Go to the Brother collection program. A 71 If you have questions, call your hands or clothes, immediately wipe or wash it off with both hands and gently ... accidentally spill or scatter toner. Hold the cartridge level with cold water. • To avoid print quality problems, DO NOT touch the shaded parts shown in case you choose not to return your used consumable, please discard the used consumable according to local regulations, keeping it from domestic waste...
...original/ index.html for instructions on a clean, flat, level, stable surface with a sheet of the cartridge. • Go to the Brother collection program. A 71 If you have questions, call your hands or clothes, immediately wipe or wash it off with both hands and gently ... accidentally spill or scatter toner. Hold the cartridge level with cold water. • To avoid print quality problems, DO NOT touch the shaded parts shown in case you choose not to return your used consumable, please discard the used consumable according to local regulations, keeping it from domestic waste...
Basic User's Guide - English
Page 84
... it in the machine. Our limited warranty coverage does not apply to any degradation to the print quality, DO NOT touch the shaded parts shown in the illustrations. 72 To prevent any problem that is left unpacked for a long time, the toner life will be damaged. •...; Brother strongly recommends that you have removed the protective cover. We also strongly recommend that you DO NOT refill the toner cartridge provided with your ...
... it in the machine. Our limited warranty coverage does not apply to any degradation to the print quality, DO NOT touch the shaded parts shown in the illustrations. 72 To prevent any problem that is left unpacked for a long time, the toner life will be damaged. •...; Brother strongly recommends that you have removed the protective cover. We also strongly recommend that you DO NOT refill the toner cartridge provided with your ...
Basic User's Guide - English
Page 86
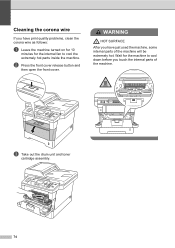
WARNING HOT SURFACE After you have print quality problems, clean the corona wire as follows: a Leave the machine turned on for 10 minutes for the machine to cool the extremely hot parts inside the machine. Cleaning the corona wire A If you have just used the machine, some internal parts of the machine. c Take out the drum unit and toner cartridge assembly. 74 Wait for the internal fan to cool down before you touch the internal parts of the machine will be extremely hot. b Press the front cover release button and then open the front cover.
WARNING HOT SURFACE After you have print quality problems, clean the corona wire as follows: a Leave the machine turned on for 10 minutes for the machine to cool the extremely hot parts inside the machine. Cleaning the corona wire A If you have just used the machine, some internal parts of the machine. c Take out the drum unit and toner cartridge assembly. 74 Wait for the internal fan to cool down before you touch the internal parts of the machine will be extremely hot. b Press the front cover release button and then open the front cover.
Basic User's Guide - English
Page 88
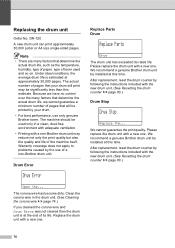
...time. Drum Error A Drum Error Open the... We recommend a genuine Brother drum unit be installed at approximately 30,000 pages. We cannot guarantee ...pages that your drum. • For best performance, use of a non-Brother drum unit. Please replace the drum unit with the new drum unit. ... with adequate ventilation. • Printing with a new one. We recommend a genuine Brother drum unit be printed by following the instructions included with a new one . DR... drum counter by the use only genuine Brother toner. Replacing the drum unit A Order No. The corona wire has ...
...time. Drum Error A Drum Error Open the... We recommend a genuine Brother drum unit be installed at approximately 30,000 pages. We cannot guarantee ...pages that your drum. • For best performance, use of a non-Brother drum unit. Please replace the drum unit with the new drum unit. ... with adequate ventilation. • Printing with a new one. We recommend a genuine Brother drum unit be printed by following the instructions included with a new one . DR... drum counter by the use only genuine Brother toner. Replacing the drum unit A Order No. The corona wire has ...
Basic User's Guide - English
Page 89
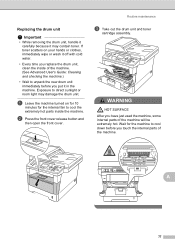
...the drum unit, clean the inside the machine. WARNING HOT SURFACE After you have just used the machine, some internal parts of the machine. Wait for the internal fan to cool the extremely hot parts inside of the machine. (See Advanced User's Guide: Cleaning and checking the machine.) • Wait to ...unpack the new drum unit immediately before you put it may damage the drum unit. Exposure to cool down before you touch the internal parts of the machine will be extremely hot. b Press the front cover release button and then open the front cover. A 77 Routine maintenance c ...
...the drum unit, clean the inside the machine. WARNING HOT SURFACE After you have just used the machine, some internal parts of the machine. Wait for the internal fan to cool the extremely hot parts inside of the machine. (See Advanced User's Guide: Cleaning and checking the machine.) • Wait to ...unpack the new drum unit immediately before you put it may damage the drum unit. Exposure to cool down before you touch the internal parts of the machine will be extremely hot. b Press the front cover release button and then open the front cover. A 77 Routine maintenance c ...
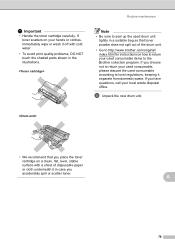
Basic User's Guide - English
Page 91
...have questions, call your hands or clothes, immediately wipe or wash it off with a sheet of the drum unit. • Go to http://www.brother.com/original/ index.html for instructions on a clean, flat, level, stable surface with cold water. • To avoid print quality problems, DO ...NOT touch the shaded parts shown in case you place the toner cartridge on how to local regulations, keeping it in the illustrations. Routine maintenance Important • Handle the ...
...have questions, call your hands or clothes, immediately wipe or wash it off with a sheet of the drum unit. • Go to http://www.brother.com/original/ index.html for instructions on a clean, flat, level, stable surface with cold water. • To avoid print quality problems, DO ...NOT touch the shaded parts shown in case you place the toner cartridge on how to local regulations, keeping it in the illustrations. Routine maintenance Important • Handle the ...
Basic User's Guide - English
Page 93
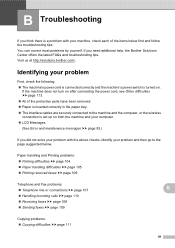
Visit us at http://solutions.brother.com/. If the machine does not turn on after connecting the power cord, see Other difficulties uu page 113. All of the items below . If you think there is a problem with the above checks, identify your machine, check each of the protective parts have been removed... connected correctly and the machine's power switch is set up on . You can correct most problems by yourself. B Troubleshooting B If you need additional help, the Brother Solutions Center offers the latest FAQs and troubleshooting tips.
Visit us at http://solutions.brother.com/. If the machine does not turn on after connecting the power cord, see Other difficulties uu page 113. All of the items below . If you think there is a problem with the above checks, identify your machine, check each of the protective parts have been removed... connected correctly and the machine's power switch is set up on . You can correct most problems by yourself. B Troubleshooting B If you need additional help, the Brother Solutions Center offers the latest FAQs and troubleshooting tips.
Basic User's Guide - English
Page 99
... Service Center, visit us at : http://www.brother-usa.com/service/ 87 To replace Fuser Unit call Brother Customer Service at: 1-877-BROTHER (1-877-276-8437) (in USA) 1-877-BROTHER (in Canada) or to locate a Brother Authorized Service Center, visit us at : http://www.brother-usa.com/service/ Replace Parts Laser Unit It is time to replace...
... Service Center, visit us at : http://www.brother-usa.com/service/ 87 To replace Fuser Unit call Brother Customer Service at: 1-877-BROTHER (1-877-276-8437) (in USA) 1-877-BROTHER (in Canada) or to locate a Brother Authorized Service Center, visit us at : http://www.brother-usa.com/service/ Replace Parts Laser Unit It is time to replace...
Basic User's Guide - English
Page 100
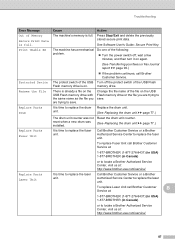
... supported by the tray shown on again. (See Transferring your faxes or Fax Journal report uu page 90.) If the problem continues, call Brother Customer Service at the end of paper for duplex scanning. (See Print media uu page 175.) The paper size defined in the memory. Order a ... 88 Document is time to replace the paper feeding kit. Use the suitable size of its life. To replace PF Kit call Brother Customer Service. Error Message Replace Parts PF Kit 1 PF Kit 2 PF Kit MP Replace Toner Scan Unable XX Size Error Size Error DX Size mismatch Toner Low Cause...
... supported by the tray shown on again. (See Transferring your faxes or Fax Journal report uu page 90.) If the problem continues, call Brother Customer Service at the end of paper for duplex scanning. (See Print media uu page 175.) The paper size defined in the memory. Order a ... 88 Document is time to replace the paper feeding kit. Use the suitable size of its life. To replace PF Kit call Brother Customer Service. Error Message Replace Parts PF Kit 1 PF Kit 2 PF Kit MP Replace Toner Scan Unable XX Size Error Size Error DX Size mismatch Toner Low Cause...


