Wi-Fi Direct Guide - English
Page 2
... arise or give tips about how the operation works with other countries. Trademarks The Brother logo is a trademark of Google Inc. HL-5470DW(T)/6180DW(T)/MFC-8710DW/8910DW/8950DW(T) Definitions of notes We use the following models. and other features. Applicable models This User's Guide applies to the following icons throughout this manual has a Software License...
... arise or give tips about how the operation works with other countries. Trademarks The Brother logo is a trademark of Google Inc. HL-5470DW(T)/6180DW(T)/MFC-8710DW/8910DW/8950DW(T) Definitions of notes We use the following models. and other features. Applicable models This User's Guide applies to the following icons throughout this manual has a Software License...
Wi-Fi Direct Guide - English
Page 24
... correctly. uu page 24 21 All protective packaging has been removed from the lists below 3 Error messages when using the Brother machine. Go to the page for your model page to download other manuals. First check the following items are working correctly. The front and back covers are unable to resolve...
... correctly. uu page 24 21 All protective packaging has been removed from the lists below 3 Error messages when using the Brother machine. Go to the page for your model page to download other manuals. First check the following items are working correctly. The front and back covers are unable to resolve...
Wi-Fi Direct Guide - English
Page 28
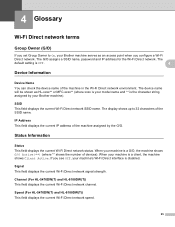
...This field displays the current Wi-Fi Direct network speed. 25 The display shows up to On, your model name and ** is the character string assigned by the G/O. SSID 4 This field displays the current Wi...(**) (where ** shows the number of devices). The default setting is disabled. If you see Off, your Brother machine). Signal 4 This field displays the current Wi-Fi Direct network signal strength. IP Address 4 This field... name will be shown as HL-xxxx** or MFC-xxxx** (where xxxx is your Brother machine serves as an access point when you configure a Wi-Fi Direct network.
...This field displays the current Wi-Fi Direct network speed. 25 The display shows up to On, your model name and ** is the character string assigned by the G/O. SSID 4 This field displays the current Wi...(**) (where ** shows the number of devices). The default setting is disabled. If you see Off, your Brother machine). Signal 4 This field displays the current Wi-Fi Direct network signal strength. IP Address 4 This field... name will be shown as HL-xxxx** or MFC-xxxx** (where xxxx is your Brother machine serves as an access point when you configure a Wi-Fi Direct network.
Software User's Guide - English
Page 1
Version 0 USA Where it says 'MFC' in all countries. (DCP-8110DN, DCP-8150DN and DCP-8155DN) In USA: Please go to the Brother Solutions Center at http://solutions.brother.com/ and click Manuals on your model page to download the other manuals. Software User's Guide Not all models are available in this user's guide, please read 'MFC-xxxx' as 'DCP-xxxx'. For DCP users; This documentation is for both MFC and DCP models.
Version 0 USA Where it says 'MFC' in all countries. (DCP-8110DN, DCP-8150DN and DCP-8155DN) In USA: Please go to the Brother Solutions Center at http://solutions.brother.com/ and click Manuals on your model page to download the other manuals. Software User's Guide Not all models are available in this user's guide, please read 'MFC-xxxx' as 'DCP-xxxx'. For DCP users; This documentation is for both MFC and DCP models.
Software User's Guide - English
Page 2
... the specifications and materials contained herein and shall not be responsible for use the following models. 5-line LCD models: DCP-8110DN/8150DN/8155DN/MFC-8510DN/8710DW/8910DW Touchscreen models: MFC-8950DW(T) Definitions of notes We use in the country of purchase only. Brother reserves the right to make changes without notice. Do not use this document represents...
... the specifications and materials contained herein and shall not be responsible for use the following models. 5-line LCD models: DCP-8110DN/8150DN/8155DN/MFC-8510DN/8710DW/8910DW Touchscreen models: MFC-8950DW(T) Definitions of notes We use in the country of purchase only. Brother reserves the right to make changes without notice. Do not use this document represents...
Software User's Guide - English
Page 4
Administrator ...29 User Authentication (For network models 30 Other Print Options...30 Macro...30 Density Adjustment...30 Improve Print Output ...31 Skip Blank Page ...31 Print Profiles tab ...32 Add Profile ...33 ...
Administrator ...29 User Authentication (For network models 30 Other Print Options...30 Macro...30 Density Adjustment...30 Improve Print Output ...31 Skip Blank Page ...31 Print Profiles tab ...32 Add Profile ...33 ...
Software User's Guide - English
Page 5
... data 80 Device Settings tab...81 Configuring Remote Setup (For MFC models 81 Accessing Quick Dial (For MFC models 82 Configuring Scan key settings ...82 Launching the BRAdmin utility...84 Support tab ...85 Opening ControlCenter Help ...85 Using Brother Solutions Center ...85 Accessing the Brother CreativeCenter 85 Using ControlCenter4 in Advanced Mode 86 ControlCenter4 Features for...
... data 80 Device Settings tab...81 Configuring Remote Setup (For MFC models 81 Accessing Quick Dial (For MFC models 82 Configuring Scan key settings ...82 Launching the BRAdmin utility...84 Support tab ...85 Opening ControlCenter Help ...85 Using Brother Solutions Center ...85 Accessing the Brother CreativeCenter 85 Using ControlCenter4 in Advanced Mode 86 ControlCenter4 Features for...
Software User's Guide - English
Page 6
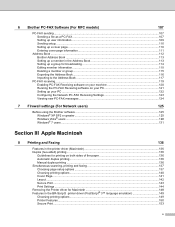
... Software (For MFC models) 107 PC-FAX sending ...107 Sending a file as a PC-FAX...107 Setting up user information...109 Sending setup...110 Setting up a cover page...110 Entering cover page information...111 Address Book ...112 Brother Address Book ...113 Setting up a member in the Address Book ... Configuring the Network PC-FAX Receiving Settings 123 Viewing new PC-FAX messages...124 7 Firewall settings (For Network users) 125 Before using the Brother software ...125 Windows® XP SP2 or greater...125 Windows Vista® users ...128 Windows® 7 users ...131 Section III Apple ...
... Software (For MFC models) 107 PC-FAX sending ...107 Sending a file as a PC-FAX...107 Setting up user information...109 Sending setup...110 Setting up a cover page...110 Entering cover page information...111 Address Book ...112 Brother Address Book ...113 Setting up a member in the Address Book ... Configuring the Network PC-FAX Receiving Settings 123 Viewing new PC-FAX messages...124 7 Firewall settings (For Network users) 125 Before using the Brother software ...125 Windows® XP SP2 or greater...125 Windows Vista® users ...128 Windows® 7 users ...131 Section III Apple ...

Software User's Guide - English
Page 7
... Hiding or showing the window ...155 Quitting the window ...155 Web Based Management (Network Connection Only 155 Sending a fax (For MFC models)...156 Using the Addresses panel...160 9 Scanning 162 Scanning a document using the TWAIN driver 162 Scanning an image into your Macintosh ... from Print & Fax or Print & Scan 174 Using Presto! PageManager...175 Features ...175 System requirements for MFC models only 197 DEVICE SETTINGS ...199 Remote Setup (For MFC models 200 Quick-Dial (For MFC models)...201 Status Monitor ...201 11 Remote Setup (For MFC models) 202 Remote Setup...202 vi
... Hiding or showing the window ...155 Quitting the window ...155 Web Based Management (Network Connection Only 155 Sending a fax (For MFC models)...156 Using the Addresses panel...160 9 Scanning 162 Scanning a document using the TWAIN driver 162 Scanning an image into your Macintosh ... from Print & Fax or Print & Scan 174 Using Presto! PageManager...175 Features ...175 System requirements for MFC models only 197 DEVICE SETTINGS ...199 Remote Setup (For MFC models 200 Quick-Dial (For MFC models)...201 Status Monitor ...201 11 Remote Setup (For MFC models) 202 Remote Setup...202 vi
Software User's Guide - English
Page 8
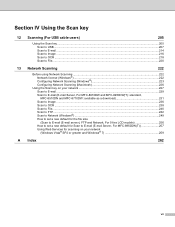
...Macintosh 226 Using the Scan key on your network ...227 Scan to E-mail ...229 Scan to E-mail (E-mail Server, For MFC-8910DW and MFC-8950DW(T): standard, MFC-8510DN and MFC-8710DW: available as a download 231 Scan to Image ...236 Scan to OCR ...238 Scan to File...240 Scan to FTP...242 ...Scan to Network (Windows®) ...249 How to set a new default for the file size (Scan to E-mail (E-mail server), FTP and Network, For 5-line LCD models...
...Macintosh 226 Using the Scan key on your network ...227 Scan to E-mail ...229 Scan to E-mail (E-mail Server, For MFC-8910DW and MFC-8950DW(T): standard, MFC-8510DN and MFC-8710DW: available as a download 231 Scan to Image ...236 Scan to OCR ...238 Scan to File...240 Scan to FTP...242 ...Scan to Network (Windows®) ...249 How to set a new default for the file size (Scan to E-mail (E-mail server), FTP and Network, For 5-line LCD models...
Software User's Guide - English
Page 10
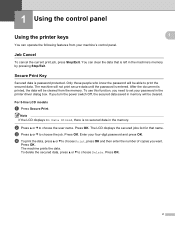
The machine will be cleared from your four-digit password and press OK. For 5-line LCD models 1 a Press Secure Print. The machine prints the data. If you turn the power switch Off, the secured data saved in the printer driver dialog box. ...
The machine will be cleared from your four-digit password and press OK. For 5-line LCD models 1 a Press Secure Print. The machine prints the data. If you turn the power switch Off, the secured data saved in the printer driver dialog box. ...
Software User's Guide - English
Page 11
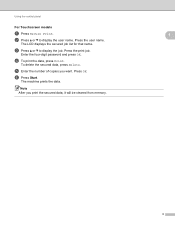
Press the print job. Press OK. Using the control panel For Touchscreen models a Press Secure Print. Press the user name. d To print the data, press Print. To delete the secured data, press Delete. c Press a or b to display the user name. f Press Start. Note After you want. e Enter the number of copies you print the secured data, it will be cleared from memory. 1 1 3 Enter the four-digit password and press OK. b Press a or b to display the job. The LCD displays the secured job list for that name. The machine prints the data.
Press the print job. Press OK. Using the control panel For Touchscreen models a Press Secure Print. Press the user name. d To print the data, press Print. To delete the secured data, press Delete. c Press a or b to display the user name. f Press Start. Note After you want. e Enter the number of copies you print the secured data, it will be cleared from memory. 1 1 3 Enter the four-digit password and press OK. b Press a or b to display the job. The LCD displays the secured job list for that name. The machine prints the data.

Software User's Guide - English
Page 13
... Auto(EPSON), Auto(IBM), HP LaserJet, BR-Script 3, Epson FX-850 or IBM Proprinter. Press OK. e Press Stop/Exit. For Touchscreen models 1 a Press Menu. Press OK. e Press Stop/Exit. Press Emulation. Note We recommend that you set the emulation setting with your application software... or network server. Using the control panel Setting the Emulation mode 1 For 5-line LCD models 1 1 a Press Menu. d Press a or b to display Emulation. d Press to choose Printer. b Press a or b to choose Auto (EPSON),...
... Auto(EPSON), Auto(IBM), HP LaserJet, BR-Script 3, Epson FX-850 or IBM Proprinter. Press OK. e Press Stop/Exit. For Touchscreen models 1 a Press Menu. Press OK. e Press Stop/Exit. Press Emulation. Note We recommend that you set the emulation setting with your application software... or network server. Using the control panel Setting the Emulation mode 1 For 5-line LCD models 1 1 a Press Menu. d Press a or b to display Emulation. d Press to choose Printer. b Press a or b to choose Auto (EPSON),...
Software User's Guide - English
Page 14
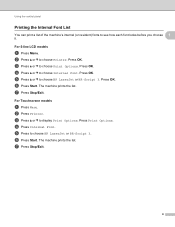
Press OK. Press OK. f Press Start. e Press to choose Internal Font. For 5-line LCD models 1 a Press Menu. Press Print Options. g Press Stop/Exit. 6 d Press a or b to choose HP LaserJet or BR-Script 3. b Press Printer. b Press a or b to choose ... see how each font looks before you choose 1 it. Using the control panel Printing the Internal Font List 1 You can print a list of the machine's internal (or resident) fonts to display Print Options. Press OK. For Touchscreen models 1 a Press Menu. f Press Start. Press OK. g Press Stop/Exit. The machine prints the ...
Press OK. Press OK. f Press Start. e Press to choose Internal Font. For 5-line LCD models 1 a Press Menu. Press Print Options. g Press Stop/Exit. 6 d Press a or b to choose HP LaserJet or BR-Script 3. b Press Printer. b Press a or b to choose ... see how each font looks before you choose 1 it. Using the control panel Printing the Internal Font List 1 You can print a list of the machine's internal (or resident) fonts to display Print Options. Press OK. For Touchscreen models 1 a Press Menu. f Press Start. Press OK. g Press Stop/Exit. The machine prints the ...
Software User's Guide - English
Page 15
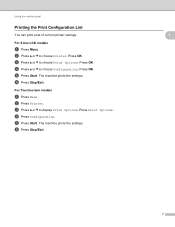
.... c Press a or b to choose Configuration. c Press a or b to choose Printer. The machine prints the settings. f Press Stop/Exit. 1 1 1 1 7 The machine prints the settings. For Touchscreen models a Press Menu. e Press Start. e Press Start. Using the control panel Printing the Print Configuration List You can print a list of current printer settings. Press OK...
.... c Press a or b to choose Configuration. c Press a or b to choose Printer. The machine prints the settings. f Press Stop/Exit. 1 1 1 1 7 The machine prints the settings. For Touchscreen models a Press Menu. e Press Start. e Press Start. Using the control panel Printing the Print Configuration List You can print a list of current printer settings. Press OK...

Software User's Guide - English
Page 16
... a test print. d Press a or b to choose Print Options. Press OK. b Press a or b to display Print Options. Press Print Options. e Press Start. Press OK. For Touchscreen models a Press Menu. b Press Printer. d Press Test Print. f Press Stop/Exit. c Press a or b to choose Printer. Press OK. Note If the problem appears on the printout...
... a test print. d Press a or b to choose Print Options. Press OK. b Press a or b to display Print Options. Press Print Options. e Press Start. Press OK. For Touchscreen models a Press Menu. b Press Printer. d Press Test Print. f Press Stop/Exit. c Press a or b to choose Printer. Press OK. Note If the problem appears on the printout...
Software User's Guide - English
Page 17
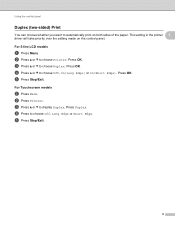
Press OK. b Press Printer. Press Duplex. b Press a or b to choose Duplex. For Touchscreen models 1 a Press Menu. e Press Stop/Exit. 9 Using the control panel Duplex (two-sided) Print 1 You can choose whether you want to automatically print on the control ... setting in the printer 1 driver will take priority over the setting made on both sides of the paper. Press OK. Press OK. For 5-line LCD models 1 a Press Menu. c Press a or b to choose Printer. d Press a or b to display Duplex. e Press Stop/Exit. c Press a or b to choose Off, On(Long Edge) or On...
Press OK. b Press Printer. Press Duplex. b Press a or b to choose Duplex. For Touchscreen models 1 a Press Menu. e Press Stop/Exit. 9 Using the control panel Duplex (two-sided) Print 1 You can choose whether you want to automatically print on the control ... setting in the printer 1 driver will take priority over the setting made on both sides of the paper. Press OK. Press OK. For 5-line LCD models 1 a Press Menu. c Press a or b to choose Printer. d Press a or b to display Duplex. e Press Stop/Exit. c Press a or b to choose Off, On(Long Edge) or On...
Software User's Guide - English
Page 18
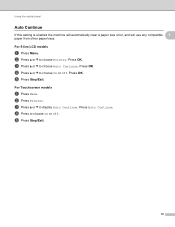
Using the control panel Auto Continue 1 If this setting is enabled the machine will automatically clear a paper size error, and will use any compatible 1 paper from other paper trays. c Press a or b to display Auto Continue. c Press a or b to choose Auto Continue. Press OK. Press Auto Continue. d Press a or b to choose Printer. e Press Stop/Exit. Press OK. b Press Printer. b Press a or b to choose On or Off. d Press to choose On or Off. For Touchscreen models 1 a Press Menu. e Press Stop/Exit. 10 Press OK. For 5-line LCD models 1 a Press Menu.
Using the control panel Auto Continue 1 If this setting is enabled the machine will automatically clear a paper size error, and will use any compatible 1 paper from other paper trays. c Press a or b to display Auto Continue. c Press a or b to choose Auto Continue. Press OK. Press Auto Continue. d Press a or b to choose Printer. e Press Stop/Exit. Press OK. b Press Printer. b Press a or b to choose On or Off. d Press to choose On or Off. For Touchscreen models 1 a Press Menu. e Press Stop/Exit. 10 Press OK. For 5-line LCD models 1 a Press Menu.
Software User's Guide - English
Page 19
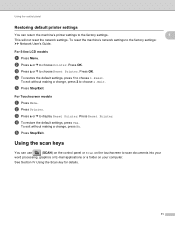
For 5-line LCD models a Press Menu. e Press Stop/Exit. Press Reset Printer. This will not reset the network settings. Press OK. d To restore the default settings, press 1 to the ... use (SCAN) on the control panel or Scan on your computer. c Press a or b to choose 2.Exit. To exit without making a change , press No. For Touchscreen models a Press Menu. c Press a or b to scan documents into your word processing, graphics or E-mail applications or a folder on the touchscreen to display Reset Printer. e Press...
For 5-line LCD models a Press Menu. e Press Stop/Exit. Press Reset Printer. This will not reset the network settings. Press OK. d To restore the default settings, press 1 to the ... use (SCAN) on the control panel or Scan on your computer. c Press a or b to choose 2.Exit. To exit without making a change , press No. For Touchscreen models a Press Menu. c Press a or b to scan documents into your word processing, graphics or E-mail applications or a folder on the touchscreen to display Reset Printer. e Press...
Software User's Guide - English
Page 20
Section II Windows® Printing Scanning ControlCenter4 Remote Setup (For MFC models) Brother PC-FAX Software (For MFC models) Firewall settings (For Network users) II 13 48 70 105 107 125
Section II Windows® Printing Scanning ControlCenter4 Remote Setup (For MFC models) Brother PC-FAX Software (For MFC models) Firewall settings (For Network users) II 13 48 70 105 107 125


