Basic User's Guide - English
Page 10
... document cover 91 Removing small documents jammed in the ADF 92 Document is jammed at the output tray 92 Paper Jams...93 Paper is jammed in the MP tray 93 Paper is jammed in paper tray 1 or tray 2 94 Paper is jammed at the back of the machine 95 Paper is jammed inside the machine 98 Paper is jammed in the duplex tray 102 If...
... document cover 91 Removing small documents jammed in the ADF 92 Document is jammed at the output tray 92 Paper Jams...93 Paper is jammed in the MP tray 93 Paper is jammed in paper tray 1 or tray 2 94 Paper is jammed at the back of the machine 95 Paper is jammed inside the machine 98 Paper is jammed in the duplex tray 102 If...
Basic User's Guide - English
Page 22
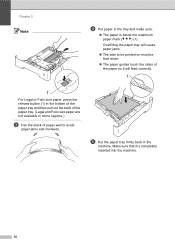
.... 1 1 For Legal or Folio size paper, press the release button (1) in the bottom of the paper tray and then pull out the back of the paper so it is below the maximum paper mark ( ) (1). Make sure that it will cause paper jams. The side to avoid paper jams and misfeeds. e Put the paper tray firmly back in the...
.... 1 1 For Legal or Folio size paper, press the release button (1) in the bottom of the paper tray and then pull out the back of the paper so it is below the maximum paper mark ( ) (1). Make sure that it will cause paper jams. The side to avoid paper jams and misfeeds. e Put the paper tray firmly back in the...

Basic User's Guide - English
Page 26
Note • Remove each printed envelope immediately to prevent a paper jam. • If your thick paper curls during printing, put only one sheet at a time in the MP tray and open the back cover (face-up output tray) to let the ... up output tray. Make sure: The number of envelopes in the MP tray. f Close the back cover (face-up output tray). 14 Chapter 2 d Put paper, labels or envelopes in the MP tray does not exceed 3. The...
Note • Remove each printed envelope immediately to prevent a paper jam. • If your thick paper curls during printing, put only one sheet at a time in the MP tray and open the back cover (face-up output tray) to let the ... up output tray. Make sure: The number of envelopes in the MP tray. f Close the back cover (face-up output tray). 14 Chapter 2 d Put paper, labels or envelopes in the MP tray does not exceed 3. The...
Basic User's Guide - English
Page 31
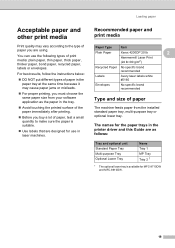
... paper jams or misfeeds. For proper printing, you must choose the same paper size from the installed standard paper tray, multi-purpose tray or optional lower tray. The names for the paper trays in the printer driver and this Guide are as the paper in laser machines. Loading paper Recommended paper and print media 2 Paper Type Item Plain Paper...
... paper jams or misfeeds. For proper printing, you must choose the same paper size from the installed standard paper tray, multi-purpose tray or optional lower tray. The names for the paper trays in the printer driver and this Guide are as the paper in laser machines. Loading paper Recommended paper and print media 2 Paper Type Item Plain Paper...
Basic User's Guide - English
Page 33
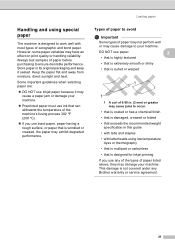
...; that is damaged, creased or folded • that exceeds the recommended weight specification in its original packaging and keep it may cause a paper jam or damage your machine. Store paper in this guide • with tabs and staples • with most types of xerographic and bond... • that is multipart or carbonless • that is designed for inkjet printing If you use bond paper, paper having a rough surface, or paper that can withstand the temperature of the machine's fusing process 392 °F (200 °C). If you use any Brother warranty or service agreement. 21
...; that is damaged, creased or folded • that exceeds the recommended weight specification in its original packaging and keep it may cause a paper jam or damage your machine. Store paper in this guide • with tabs and staples • with most types of xerographic and bond... • that is multipart or carbonless • that is designed for inkjet printing If you use bond paper, paper having a rough surface, or paper that can withstand the temperature of the machine's fusing process 392 °F (200 °C). If you use any Brother warranty or service agreement. 21
Basic User's Guide - English
Page 35
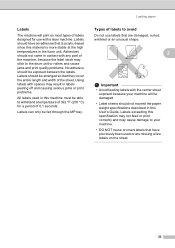
... 2 The machine will be damaged. • Label sheets should not exceed the paper weight specifications described in this User's Guide. Labels should have previously been used in labels peeling off and causing serious jams or print problems. All labels used or are damaged, curled, wrinkled or an unusual shape. 2 ...may stick to avoid 2 Do not use with any part of the sheet. Types of labels to the drum unit or rollers and cause jams and print quality problems. No adhesive should not come in contact with a laser machine. Adhesives should be fed through the MP tray. Labels...
... 2 The machine will be damaged. • Label sheets should not exceed the paper weight specifications described in this User's Guide. Labels should have previously been used in labels peeling off and causing serious jams or print problems. All labels used or are damaged, curled, wrinkled or an unusual shape. 2 ...may stick to avoid 2 Do not use with any part of the sheet. Types of labels to the drum unit or rollers and cause jams and print quality problems. No adhesive should not come in contact with a laser machine. Adhesives should be fed through the MP tray. Labels...

Basic User's Guide - English
Page 36
... and MFC-8910DW) and feeds each sheet individually. Using the automatic document feeder (ADF) 3 The ADF can send a fax, make copies, and scan from the ADF (Automatic Document Feeder) and the scanner glass. a Unfold the ADF document support (1). If you do this, the ADF may jam. • DO NOT use paper that are... the ADF, see Using the scanner glass uu page 25. • It is easier to load documents 3 You can hold up to 35 pages (for MFC-8510DN) or up to load documents 3 Important • DO NOT leave thick documents on the document while it is feeding.
... and MFC-8910DW) and feeds each sheet individually. Using the automatic document feeder (ADF) 3 The ADF can send a fax, make copies, and scan from the ADF (Automatic Document Feeder) and the scanner glass. a Unfold the ADF document support (1). If you do this, the ADF may jam. • DO NOT use paper that are... the ADF, see Using the scanner glass uu page 25. • It is easier to load documents 3 You can hold up to 35 pages (for MFC-8510DN) or up to load documents 3 Important • DO NOT leave thick documents on the document while it is feeding.
Basic User's Guide - English
Page 96
.... Turn off distinctive ring uu page 40.) The corona wire on the power. Close the fuser cover of the machine. Make sure paper is not jammed inside the back of the machine, and then close the fuser cover and press Start. (See... the ADF was not inserted or fed correctly, or the document scanned from Manual to Distinctive Ring mode. See Document is not completely closed or paper was jammed in the top of the machine. assembly in Put the toner cartridge into the drum unit, and the machine without the drum then re...
.... Turn off distinctive ring uu page 40.) The corona wire on the power. Close the fuser cover of the machine. Make sure paper is not jammed inside the back of the machine, and then close the fuser cover and press Start. (See... the ADF was not inserted or fed correctly, or the document scanned from Manual to Distinctive Ring mode. See Document is not completely closed or paper was jammed in the top of the machine. assembly in Put the toner cartridge into the drum unit, and the machine without the drum then re...
Basic User's Guide - English
Page 97
...wait a few seconds, and then turn it again. The fuser unit is not correctly loaded in the paper tray shown on the LCD. See Paper is placed in the machine. The toner cartridge is jammed in paper tray 1 or tray 2 uu page 94. assembly in Put the toner cartridge into the drum unit... machine without the drum then re-install the drum unit and toner cartridge unit. Jam MP Tray The paper is jammed in the MP See Paper is jammed in the MP tray tray of the machine. Jam Rear The paper is jammed in the back of the machine. Print Log to a specified temperature within the ...
...wait a few seconds, and then turn it again. The fuser unit is not correctly loaded in the paper tray shown on the LCD. See Paper is placed in the machine. The toner cartridge is jammed in paper tray 1 or tray 2 uu page 94. assembly in Put the toner cartridge into the drum unit... machine without the drum then re-install the drum unit and toner cartridge unit. Jam MP Tray The paper is jammed in the MP See Paper is jammed in the MP tray tray of the machine. Jam Rear The paper is jammed in the back of the machine. Print Log to a specified temperature within the ...
Basic User's Guide - English
Page 103
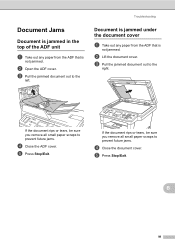
... the document rips or tears, be sure you remove all small paper scraps to prevent future jams. d Close the ADF cover. If the document rips or tears, be sure you remove all small paper scraps to prevent future jams. d Close the document cover. b Lift the document cover. e Press Stop/Exit. e Press Stop/Exit. c Pull...
... the document rips or tears, be sure you remove all small paper scraps to prevent future jams. d Close the ADF cover. If the document rips or tears, be sure you remove all small paper scraps to prevent future jams. d Close the document cover. b Lift the document cover. e Press Stop/Exit. e Press Stop/Exit. c Pull...
Basic User's Guide - English
Page 104
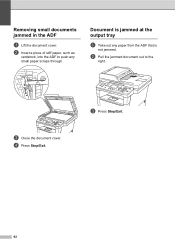
b Pull the jammed document out to push any paper from the ADF that is jammed at the output tray B a Take out any small paper scraps through. d Press Stop/Exit. c Close the document cover. Document is not jammed. Removing small documents jammed in the ADF B a Lift the document cover. c Press Stop/Exit. 92 b Insert a piece of stiff paper, such as cardstock, into the ADF to the right.
b Pull the jammed document out to push any paper from the ADF that is jammed at the output tray B a Take out any small paper scraps through. d Press Stop/Exit. c Close the document cover. Document is not jammed. Removing small documents jammed in the ADF B a Lift the document cover. c Press Stop/Exit. 92 b Insert a piece of stiff paper, such as cardstock, into the ADF to the right.
Basic User's Guide - English
Page 105
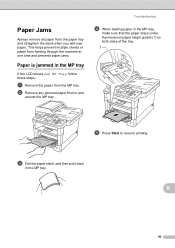
... that the paper stays under the maximum paper height guides (1) on both sides of paper from feeding through the machine at one time and prevents paper jams. Paper is jammed in the MP tray B If the LCD shows Jam MP Tray, follow these steps: a Remove the paper from in the MP tray. Paper Jams B Always remove all paper from the paper tray and...
... that the paper stays under the maximum paper height guides (1) on both sides of paper from feeding through the machine at one time and prevents paper jams. Paper is jammed in the MP tray B If the LCD shows Jam MP Tray, follow these steps: a Remove the paper from in the MP tray. Paper Jams B Always remove all paper from the paper tray and...
Basic User's Guide - English
Page 106
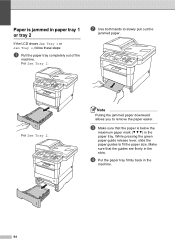
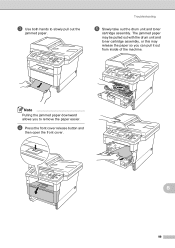
... in the machine. 94 Make sure that the paper is jammed in paper tray 1 or tray 2 B If the LCD shows Jam Tray 1 or Jam Tray 2, follow these steps: a Pull the paper tray completely out of the machine. Paper is below the maximum paper mark ( ) in the paper tray. For Jam Tray 2: Note Pulling the jammed paper downward allows you to remove the...
... in the machine. 94 Make sure that the paper is jammed in paper tray 1 or tray 2 B If the LCD shows Jam Tray 1 or Jam Tray 2, follow these steps: a Pull the paper tray completely out of the machine. Paper is below the maximum paper mark ( ) in the paper tray. For Jam Tray 2: Note Pulling the jammed paper downward allows you to remove the...
Basic User's Guide - English
Page 107
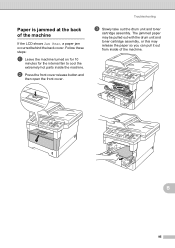
The jammed paper may be pulled out with the drum unit and toner cartridge assembly, or this may release the paper so you can pull it out from inside the machine. b Press the front cover release button and then open the front cover. Troubleshooting c Slowly take out the drum unit and toner cartridge assembly. Paper is jammed at the back of the machine. Follow these steps: a Leave the machine turned on for 10 minutes for the internal fan to cool the extremely hot parts inside of the machine B If the LCD shows Jam Rear, a paper jam occurred behind the back cover. B 95
The jammed paper may be pulled out with the drum unit and toner cartridge assembly, or this may release the paper so you can pull it out from inside the machine. b Press the front cover release button and then open the front cover. Troubleshooting c Slowly take out the drum unit and toner cartridge assembly. Paper is jammed at the back of the machine. Follow these steps: a Leave the machine turned on for 10 minutes for the internal fan to cool the extremely hot parts inside of the machine B If the LCD shows Jam Rear, a paper jam occurred behind the back cover. B 95
Basic User's Guide - English
Page 109
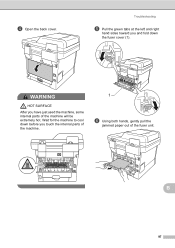
Troubleshooting e Pull the green tabs at the left and right hand sides toward you touch the internal parts of the machine. 1 f Using both hands, gently pull the jammed paper out of the machine will be extremely hot. Wait for the machine to cool down before you and fold down the fuser cover (1). d Open the back cover. WARNING HOT SURFACE After you have just used the machine, some internal parts of the fuser unit. B 97
Troubleshooting e Pull the green tabs at the left and right hand sides toward you touch the internal parts of the machine. 1 f Using both hands, gently pull the jammed paper out of the machine will be extremely hot. Wait for the machine to cool down before you and fold down the fuser cover (1). d Open the back cover. WARNING HOT SURFACE After you have just used the machine, some internal parts of the fuser unit. B 97

Basic User's Guide - English
Page 110
h Close the back cover. b Pull the paper tray completely out of the machine. 98 j Close the front cover of the machine. i Put the drum unit and toner cartridge assembly back into the machine. g Close the fuser cover (1). 1 Paper is jammed inside the machine B If the LCD shows Jam Inside, follow these steps: a Leave the machine turned on for 10 minutes for the internal fan to cool the extremely hot parts inside the machine.
h Close the back cover. b Pull the paper tray completely out of the machine. 98 j Close the front cover of the machine. i Put the drum unit and toner cartridge assembly back into the machine. g Close the fuser cover (1). 1 Paper is jammed inside the machine B If the LCD shows Jam Inside, follow these steps: a Leave the machine turned on for 10 minutes for the internal fan to cool the extremely hot parts inside the machine.
Basic User's Guide - English
Page 111
Troubleshooting e Slowly take out the drum unit and toner cartridge assembly. Note Pulling the jammed paper downward allows you can pull it out from inside of the machine. d Press the front cover release button and then open the front cover. c Use both hands to remove the paper easier. The jammed paper may be pulled out with the drum unit and toner cartridge assembly, or this may release the paper so you to slowly pull out the jammed paper. B 99
Troubleshooting e Slowly take out the drum unit and toner cartridge assembly. Note Pulling the jammed paper downward allows you can pull it out from inside of the machine. d Press the front cover release button and then open the front cover. c Use both hands to remove the paper easier. The jammed paper may be pulled out with the drum unit and toner cartridge assembly, or this may release the paper so you to slowly pull out the jammed paper. B 99
Basic User's Guide - English
Page 117
...have text missing. Your computer is chosen in the printer driver are the same. Try changing the printer driver setting. The machine does not feed paper from Adobe® Illustrator®. Make sure that it is helpful to the USB direct interface. You need to 105 g/m2). Print speed ... firmly installed. The machine does not print from the MP tray. If the LCD shows the Paper Jam message and you connect a USB flash memory drive to reduce the print resolution. Troubleshooting Printing difficulties (continued) Difficulties The machine prints the first ...
...have text missing. Your computer is chosen in the printer driver are the same. Try changing the printer driver setting. The machine does not feed paper from Adobe® Illustrator®. Make sure that it is helpful to the USB direct interface. You need to 105 g/m2). Print speed ... firmly installed. The machine does not print from the MP tray. If the LCD shows the Paper Jam message and you connect a USB flash memory drive to reduce the print resolution. Troubleshooting Printing difficulties (continued) Difficulties The machine prints the first ...

Basic User's Guide - English
Page 201
... 41 Text, entering 170 Toner cartridge replacing 68 Troubleshooting 104 document jam 91, 92 error messages on LCD 83 if you are having difficulty copy quality 111 incoming calls 110 network 112 E paper handling 105 print quality 115 printing 104, 106 receiving faxes 108 ...scanning 111 sending faxes 109 software 111 telephone line 114 maintenance messages on LCD .......... 83 paper jam 93, 94, 95, 98, 102 V Voice Mail 37 VoIP 114 W Warranties Notice-Disclaimer iii Weights 173 Wi-Fi Direct 4 Windows...
... 41 Text, entering 170 Toner cartridge replacing 68 Troubleshooting 104 document jam 91, 92 error messages on LCD 83 if you are having difficulty copy quality 111 incoming calls 110 network 112 E paper handling 105 print quality 115 printing 104, 106 receiving faxes 108 ...scanning 111 sending faxes 109 software 111 telephone line 114 maintenance messages on LCD .......... 83 paper jam 93, 94, 95, 98, 102 V Voice Mail 37 VoIP 114 W Warranties Notice-Disclaimer iii Weights 173 Wi-Fi Direct 4 Windows...
Advanced User's Guide - English
Page 74
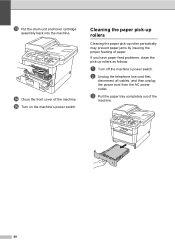
... from the AC power outlet. c Pull the paper tray completely out of paper. Cleaning the paper pick-up rollers A Cleaning the paper pick-up rollers as follows: a Turn off the machine's power switch. If you have paper feed problems, clean the pick-up roller periodically may prevent paper jams by insuring the proper feeding of the machine...
... from the AC power outlet. c Pull the paper tray completely out of paper. Cleaning the paper pick-up rollers A Cleaning the paper pick-up rollers as follows: a Turn off the machine's power switch. If you have paper feed problems, clean the pick-up roller periodically may prevent paper jams by insuring the proper feeding of the machine...


