Users Manual - English
Page 4
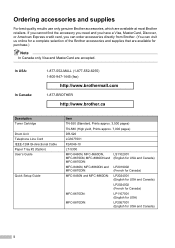
...-BROTHER http://www.brother.ca Description Toner Cartridge Drum Unit Telephone Line Cord IEEE-1284 Bi-directional Cable Paper Tray #2 (Option) User's Guide Quick Setup Guide Item TN-550 (Standard, Prints approx. 3,500 pages) TN-580 (High yield, Prints approx. 7,000 pages) DR-520 LG3077001 F2A046-10 LT-5300 MFC-8460N, MFC-8660DN, LS1102001 MFC-8670DN, MFC-8860DN...
...-BROTHER http://www.brother.ca Description Toner Cartridge Drum Unit Telephone Line Cord IEEE-1284 Bi-directional Cable Paper Tray #2 (Option) User's Guide Quick Setup Guide Item TN-550 (Standard, Prints approx. 3,500 pages) TN-580 (High yield, Prints approx. 7,000 pages) DR-520 LG3077001 F2A046-10 LT-5300 MFC-8460N, MFC-8660DN, LS1102001 MFC-8670DN, MFC-8860DN...
Users Manual - English
Page 6
....com. You are responsible for parts or labor. What Brother will ask you to do: After contacting Brother or a Brother Authorized Service Center, you may be free from other than defects in materials or workmanship; Brother® One-Year Limited Warranty and Replacement Service (USA only) Who is covered:...-8437) or to print heads, toner, drums, ink cartridges, print cartridges, cordless handset battery, refill ribbons, therma PLUS paper and thermal paper. „ Except as Paper Feeding Kit, Fuser and Laser Units. What Brother will do if you think your Product is eligible for loss or...
....com. You are responsible for parts or labor. What Brother will ask you to do: After contacting Brother or a Brother Authorized Service Center, you may be free from other than defects in materials or workmanship; Brother® One-Year Limited Warranty and Replacement Service (USA only) Who is covered:...-8437) or to print heads, toner, drums, ink cartridges, print cartridges, cordless handset battery, refill ribbons, therma PLUS paper and thermal paper. „ Except as Paper Feeding Kit, Fuser and Laser Units. What Brother will do if you think your Product is eligible for loss or...
Users Manual - English
Page 8
...MFC/Fax machine remove the ink cartridges and replace them with the Serial Number or Rating Label removed shall be deemed abuse and all repairs thereafter shall be the sole liability of the end-user/purchaser. For Technical Assistance or for labour and parts, Brother International Corporation (Canada) Ltd. ("Brother...prepaid by the end-user/purchaser to the Laser MFC/Fax machine and will cause severe damage to a "Brother" Authorized Service Centre, together with your nearest Authorized Service Centre call 1-877-BROTHER. Neither Brother nor anyone other rights which vary from the...
...MFC/Fax machine remove the ink cartridges and replace them with the Serial Number or Rating Label removed shall be deemed abuse and all repairs thereafter shall be the sole liability of the end-user/purchaser. For Technical Assistance or for labour and parts, Brother International Corporation (Canada) Ltd. ("Brother...prepaid by the end-user/purchaser to the Laser MFC/Fax machine and will cause severe damage to a "Brother" Authorized Service Centre, together with your nearest Authorized Service Centre call 1-877-BROTHER. Neither Brother nor anyone other rights which vary from the...
Users Manual - English
Page 13
...89 Important Information 92 Standard telephone and FCC Notices 92 Industry Canada Compliance Statement (Canada only 95 Disconnect device 95 LAN connection 95 Laser safety 95 FDA regulations 96 Important safety instructions 97 Trademarks 98 B Options 99 Options ...99 Optional Paper Tray (LT-5300 100 ... the machine 126 Cleaning the scanner glass 128 Cleaning the laser scanner window 128 Cleaning the corona wire 130 Cleaning the drum unit 131 Replacing the toner cartridge (TN-550/TN-580 132 Replacing the toner cartridge 132 Replacing the drum unit (DR-520 135 Replacing periodic...
...89 Important Information 92 Standard telephone and FCC Notices 92 Industry Canada Compliance Statement (Canada only 95 Disconnect device 95 LAN connection 95 Laser safety 95 FDA regulations 96 Important safety instructions 97 Trademarks 98 B Options 99 Options ...99 Optional Paper Tray (LT-5300 100 ... the machine 126 Cleaning the scanner glass 128 Cleaning the laser scanner window 128 Cleaning the corona wire 130 Cleaning the drum unit 131 Replacing the toner cartridge (TN-550/TN-580 132 Replacing the toner cartridge 132 Replacing the drum unit (DR-520 135 Replacing periodic...
Users Manual - English
Page 24
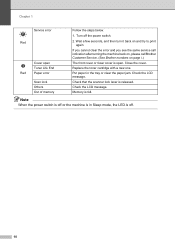
If you cannot clear the error and you see the same service call indication after turning the machine back on, please call Brother Customer Service. (See Brother numbers on and try to print again. Check the LCD message. Close the cover. Note When the power switch is off or the machine is ...in the tray or clear the paper jam. Replace the toner cartridge with a new one. Check the LCD message. Memory is off the power switch...
If you cannot clear the error and you see the same service call indication after turning the machine back on, please call Brother Customer Service. (See Brother numbers on and try to print again. Check the LCD message. Close the cover. Note When the power switch is off or the machine is ...in the tray or clear the paper jam. Replace the toner cartridge with a new one. Check the LCD message. Memory is off the power switch...
Users Manual - English
Page 118
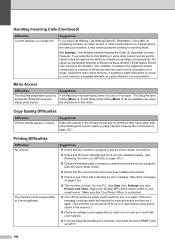
...and its signal comes through the line while your machine. „ If you are using the parallel port connection, check that the toner cartridge and drum unit are available only when Setup Send menus. This condition is related to the telephone system industry and is common to turn it... again. (The machine can temporarily interrupt or disrupt the faxes. Right-click 'Brother MFC-XXXX (where XXXX is your PC, click Start, then Settings, and then Printers and Faxes. Clean them both the machine and your computer. (See the Quick Setup Guide.) „ Check ...
...and its signal comes through the line while your machine. „ If you are using the parallel port connection, check that the toner cartridge and drum unit are available only when Setup Send menus. This condition is related to the telephone system industry and is common to turn it... again. (The machine can temporarily interrupt or disrupt the faxes. Right-click 'Brother MFC-XXXX (where XXXX is your PC, click Start, then Settings, and then Printers and Faxes. Clean them both the machine and your computer. (See the Quick Setup Guide.) „ Check ...
Users Manual - English
Page 124
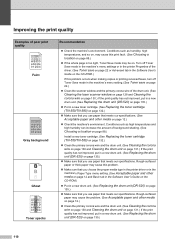
...132; Clean the scanner window and the primary corona wire of the drum unit. (See Cleaning the laser scanner window on page 128 and Cleaning the corona wire on page 130.) If the print quality has... C Examples of background shading. (See Choosing a location on page 88.) Install a new toner cartridge. (See Replacing the toner cartridge (TN-550/TN-580) on page 132.) „ Clean the primary corona wire and the ... „ Make sure that you use paper that you choose the proper media type in the printer driver or in the machine's Paper Type menu setting. (See Acceptable paper and other media on ...
...132; Clean the scanner window and the primary corona wire of the drum unit. (See Cleaning the laser scanner window on page 128 and Cleaning the corona wire on page 130.) If the print quality has... C Examples of background shading. (See Choosing a location on page 88.) Install a new toner cartridge. (See Replacing the toner cartridge (TN-550/TN-580) on page 132.) „ Clean the primary corona wire and the ... „ Make sure that you use paper that you choose the proper media type in the printer driver or in the machine's Paper Type menu setting. (See Acceptable paper and other media on ...

Users Manual - English
Page 126
... Set the paper guides correctly. „ If you choose the proper media type in the printer driver or in the machine's Paper Type menu setting. (See Acceptable paper and other media ...132; Clean the scanner window with a soft cloth. (See Cleaning the laser scanner window on page 128.) „ The toner cartridge may be damaged. Put in the Software User's Guide on page 135.)...specifications. Put in Canada). Call Brother Customer Service at the home position (a). „ The drum unit may be damaged. Put in a new toner cartridge. (See Replacing the toner cartridge (TN-550/TN-580) ...
... Set the paper guides correctly. „ If you choose the proper media type in the printer driver or in the machine's Paper Type menu setting. (See Acceptable paper and other media ...132; Clean the scanner window with a soft cloth. (See Cleaning the laser scanner window on page 128.) „ The toner cartridge may be damaged. Put in the Software User's Guide on page 135.)...specifications. Put in Canada). Call Brother Customer Service at the home position (a). „ The drum unit may be damaged. Put in a new toner cartridge. (See Replacing the toner cartridge (TN-550/TN-580) ...

Users Manual - English
Page 130
The temperature of the drum unit or toner cartridge is not spinning follow the suggestions below . During the cooling down mode. Turn off for a while You tried to poll a fax machine that is any ...
The temperature of the drum unit or toner cartridge is not spinning follow the suggestions below . During the cooling down mode. Turn off for a while You tried to poll a fax machine that is any ...
Users Manual - English
Page 132
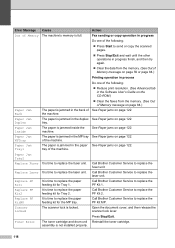
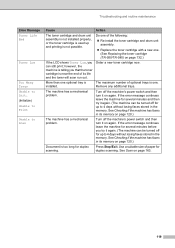
...Tray2 Replace Fuser It is time to replace the laser unit. It is time to replace the PF Kit 1. Call Brother Customer Service to replace the paper feeding kit for the MP tray. Toner Error The toner cartridge and drum unit Reinstall the toner cartridge. The paper is not installed properly. 118 ...Error Message Cause Action Out of the machine. The paper is time to replace the fuser unit. Fax sending or copy operation in progress Do one of the following: „ Press Start to send or copy the scanned pages. „ Press Stop/Exit and wait until the other operations ...
...Tray2 Replace Fuser It is time to replace the laser unit. It is time to replace the PF Kit 1. Call Brother Customer Service to replace the paper feeding kit for the MP tray. Toner Error The toner cartridge and drum unit Reinstall the toner cartridge. The paper is not installed properly. 118 ...Error Message Cause Action Out of the machine. The paper is time to replace the fuser unit. Fax sending or copy operation in progress Do one of the following: „ Press Start to send or copy the scanned pages. „ Press Stop/Exit and wait until the other operations ...
Users Manual - English
Page 133
...drum unit assembly is not installed properly, or the toner cartridge is used up and printing is installed. Turn off the machine's power switch and then turn it on page 120.) The machine has a mechanical problem. Do one . (See Replacing the toner cartridge (TN-550/TN-580) on page 163. 119 The... maximum number of the following: „ Re-install the toner cartridge and drum unit assembly. „ Replace the toner cartridge with a new one of optional trays is too long for several minutes and then try it again. (The machine can be turned off ...
...drum unit assembly is not installed properly, or the toner cartridge is used up and printing is installed. Turn off the machine's power switch and then turn it on page 120.) The machine has a mechanical problem. Do one . (See Replacing the toner cartridge (TN-550/TN-580) on page 163. 119 The... maximum number of the following: „ Re-install the toner cartridge and drum unit assembly. „ Replace the toner cartridge with a new one of optional trays is too long for several minutes and then try it again. (The machine can be turned off ...
Users Manual - English
Page 137
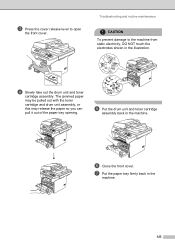
... paper tray firmly back in the illustration. e Put the drum unit and toner cartridge assembly back in the machine. d Slowly take out the drum unit and toner cartridge assembly. The jammed paper may be pulled out with the toner cartridge and drum unit assembly, or this may release the paper so you can...
... paper tray firmly back in the illustration. e Put the drum unit and toner cartridge assembly back in the machine. d Slowly take out the drum unit and toner cartridge assembly. The jammed paper may be pulled out with the toner cartridge and drum unit assembly, or this may release the paper so you can...
Users Manual - English
Page 138
e Using both hands, gently pull the jammed paper out of the machine C a Press the cover release lever to open the front cover. f Close the back cover. 124 c Open the back cover. Paper is jammed at the left and right hand sides toward you to open the fuser cover (1). 1 b Take out the drum unit and toner cartridge assembly. d Pull the tabs at the back of the fuser unit.
e Using both hands, gently pull the jammed paper out of the machine C a Press the cover release lever to open the front cover. f Close the back cover. 124 c Open the back cover. Paper is jammed at the left and right hand sides toward you to open the fuser cover (1). 1 b Take out the drum unit and toner cartridge assembly. d Pull the tabs at the back of the fuser unit.
Users Manual - English
Page 139
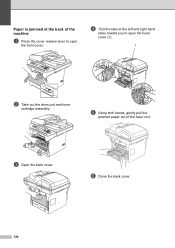
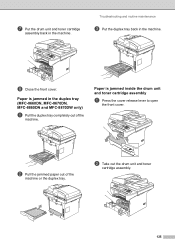
g Put the drum unit and toner cartridge assembly back in the machine. b Pull the jammed paper out of the machine. Paper is jammed in the duplex tray (MFC-8660DN, MFC-8670DN, MFC-8860DN and MFC-8870DW only) C a Pull the duplex tray completely out of the machine or the duplex tray. Paper is jammed inside the drum unit and toner cartridge assembly C a Press the cover release lever to open the front cover. h Close the front cover. b Take out the drum unit and toner cartridge assembly. 125 Troubleshooting and routine maintenance c Put the duplex tray back in the machine.
g Put the drum unit and toner cartridge assembly back in the machine. b Pull the jammed paper out of the machine. Paper is jammed in the duplex tray (MFC-8660DN, MFC-8670DN, MFC-8860DN and MFC-8870DW only) C a Pull the duplex tray completely out of the machine or the duplex tray. Paper is jammed inside the drum unit and toner cartridge assembly C a Press the cover release lever to open the front cover. h Close the front cover. b Take out the drum unit and toner cartridge assembly. 125 Troubleshooting and routine maintenance c Put the duplex tray back in the machine.
Users Manual - English
Page 140
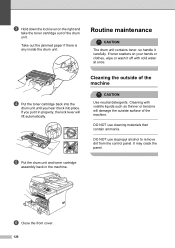
...f Close the front cover. 126 Cleaning the outside surface of the machine. Cleaning with cold water at once. e Put the drum unit and toner cartridge assembly back in properly, the lock lever will damage the outside of the drum unit. If toner scatters on the right and take the toner... cartridge out of the machine C CAUTION Use neutral detergents. d Put the toner cartridge back into place. It may crack the panel. If you hear it carefully. Routine maintenance C CAUTION The ...
...f Close the front cover. 126 Cleaning the outside surface of the machine. Cleaning with cold water at once. e Put the drum unit and toner cartridge assembly back in properly, the lock lever will damage the outside of the drum unit. If toner scatters on the right and take the toner... cartridge out of the machine C CAUTION Use neutral detergents. d Put the toner cartridge back into place. It may crack the panel. If you hear it carefully. Routine maintenance C CAUTION The ...
Users Manual - English
Page 142
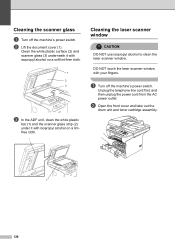
... power outlet. a Turn off the machine's power switch. b Open the front cover and take out the drum unit and toner cartridge assembly. 2 128 DO NOT touch the laser scanner window with isopropyl alcohol on a soft lint-free cloth. 1 2 3 c In the ADF unit, clean the white plastic... bar (1) and the scanner glass strip (2) under it with isopropyl alcohol on a lintfree cloth. 1 Cleaning the laser scanner window C CAUTION DO NOT use isopropyl alcohol to clean the laser scanner window. Cleaning the scanner glass C a Turn off the machine's power switch.
... power outlet. a Turn off the machine's power switch. b Open the front cover and take out the drum unit and toner cartridge assembly. 2 128 DO NOT touch the laser scanner window with isopropyl alcohol on a soft lint-free cloth. 1 2 3 c In the ADF unit, clean the white plastic... bar (1) and the scanner glass strip (2) under it with isopropyl alcohol on a lintfree cloth. 1 Cleaning the laser scanner window C CAUTION DO NOT use isopropyl alcohol to clean the laser scanner window. Cleaning the scanner glass C a Turn off the machine's power switch.
Users Manual - English
Page 143
... maintenance c Gently clean the laser scanner window (1) by wiping it with a clean soft, dry lintfree cloth. d Put the drum unit and toner cartridge assembly back into the AC power outlet first, and then plug in the telephone line cord. When you have just used the machine, some internal parts of the machine, DO...
... maintenance c Gently clean the laser scanner window (1) by wiping it with a clean soft, dry lintfree cloth. d Put the drum unit and toner cartridge assembly back into the AC power outlet first, and then plug in the telephone line cord. When you have just used the machine, some internal parts of the machine, DO...
Users Manual - English
Page 144
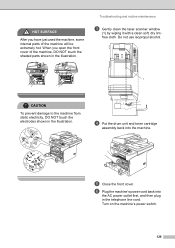
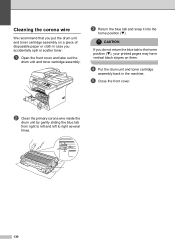
... If you do not return the blue tab to right several times. 130 a Open the front cover and take out the drum unit and toner cartridge assembly. e Close the front cover. Cleaning the corona wire C We recommend that you put the drum unit and toner... cartridge assembly on them. b Clean the primary corona wire inside the drum unit by gently sliding the blue tab from right to left and left to ...
... If you do not return the blue tab to right several times. 130 a Open the front cover and take out the drum unit and toner cartridge assembly. e Close the front cover. Cleaning the corona wire C We recommend that you put the drum unit and toner... cartridge assembly on them. b Clean the primary corona wire inside the drum unit by gently sliding the blue tab from right to left and left to ...
Users Manual - English
Page 145
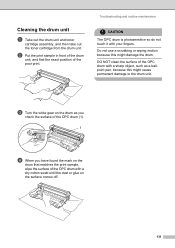
... drum unit. DO NOT clean the surface of the OPC drum with your fingers. Cleaning the drum unit C a Take out the drum unit and toner cartridge assembly, and then take out the toner...
... drum unit. DO NOT clean the surface of the OPC drum with your fingers. Cleaning the drum unit C a Take out the drum unit and toner cartridge assembly, and then take out the toner...
Users Manual - English
Page 146
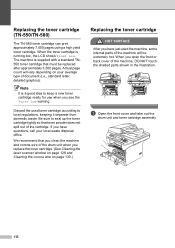
... machine, some internal parts of the cartridge. When you see the Toner Low warning. a Open the front cover and take out the drum unit and toner cartridge assembly. 132 Actual page count will be replaced after approximately 3,500 pages. Be sure to seal up the toner cartridge tightly so that... We recommend that must be extremely hot. When the toner cartridge is supplied with a standard TN550 toner cartridge that you clean the machine and corona wire of the drum unit when you replace the toner cartridge. (See Cleaning the laser scanner window on page 128 and Cleaning the corona wire on ...
... machine, some internal parts of the cartridge. When you see the Toner Low warning. a Open the front cover and take out the drum unit and toner cartridge assembly. 132 Actual page count will be replaced after approximately 3,500 pages. Be sure to seal up the toner cartridge tightly so that... We recommend that must be extremely hot. When the toner cartridge is supplied with a standard TN550 toner cartridge that you clean the machine and corona wire of the drum unit when you replace the toner cartridge. (See Cleaning the laser scanner window on page 128 and Cleaning the corona wire on ...


