
Users Manual - English
Page 86
..., call your dealer or local power company. 8 This product is used with this product, make sure that the total of the MFC that the total ampere ratings on the products plugged into the extension cord do not exceed the extension cord ampere rating. Do not ...an unstable cart, stand, or table. Do not defeat the purpose of your nearest Brother Authorized Service Center, please call your electrician to insert the plug into this product yourself because opening or removing covers may touch dangerous voltage points or short out parts resulting in installation unless proper ventilation ...
..., call your dealer or local power company. 8 This product is used with this product, make sure that the total of the MFC that the total ampere ratings on the products plugged into the extension cord do not exceed the extension cord ampere rating. Do not ...an unstable cart, stand, or table. Do not defeat the purpose of your nearest Brother Authorized Service Center, please call your electrician to insert the plug into this product yourself because opening or removing covers may touch dangerous voltage points or short out parts resulting in installation unless proper ventilation ...

Users Manual - English
Page 88
...MESSAGE CAUSE Back Cover Open The back cover is not completely closed . Cover is Open The front cover is not completely closed . Data Remaining Print data is left in the MFC's memory. Print data is near the end of the drum unit or toner cartridge is not in the MFC's memory. ... that is too hot. Re-start printing from the memory. 11 Troubleshooting and routine maintenance Troubleshooting IMPORTANT For technical help , the Brother Solutions Center offers latest FAQs and troubleshooting tips. Connection Fail You tried to send or receive again. 11 - 1 Try to poll a fax...
...MESSAGE CAUSE Back Cover Open The back cover is not completely closed . Cover is Open The front cover is not completely closed . Data Remaining Print data is left in the MFC's memory. Print data is near the end of the drum unit or toner cartridge is not in the MFC's memory. ... that is too hot. Re-start printing from the memory. 11 Troubleshooting and routine maintenance Troubleshooting IMPORTANT For technical help , the Brother Solutions Center offers latest FAQs and troubleshooting tips. Connection Fail You tried to send or receive again. 11 - 1 Try to poll a fax...
Users Manual - English
Page 93
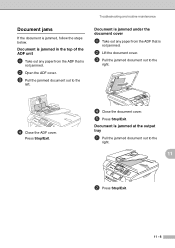
... the jammed document out to the right. 11 2 Press Stop/Exit. 11 - 6 Document is jammed under the document cover 1 Take out any paper from the ADF that is not jammed. 2 Lift the document cover. 3 Pull the jammed document out to the left. Document is jammed in the top of the ADF unit... 1 Take out any paper from the ADF that is not jammed. 2 Open the ADF cover. 3 Pull the jammed document out to the right. 4 Close...
... the jammed document out to the right. 11 2 Press Stop/Exit. 11 - 6 Document is jammed under the document cover 1 Take out any paper from the ADF that is not jammed. 2 Lift the document cover. 3 Pull the jammed document out to the left. Document is jammed in the top of the ADF unit... 1 Take out any paper from the ADF that is not jammed. 2 Open the ADF cover. 3 Pull the jammed document out to the right. 4 Close...
Users Manual - English
Page 94
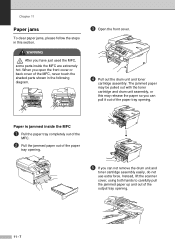
Paper is jammed inside the MFC are extremely hot. When you open the front cover or back cover of the MFC, never touch the shaded parts shown in this may release the paper so you can pull it out of the paper tray opening . 5 If you have just used the MFC, some parts inside the MFC 1 Pull the paper... tray completely out of the MFC. 2 Pull ...
Paper is jammed inside the MFC are extremely hot. When you open the front cover or back cover of the MFC, never touch the shaded parts shown in this may release the paper so you can pull it out of the paper tray opening . 5 If you have just used the MFC, some parts inside the MFC 1 Pull the paper... tray completely out of the MFC. 2 Pull ...
Users Manual - English
Page 95
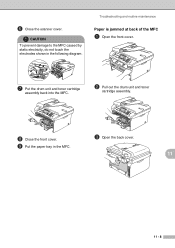
CAUTION To prevent damage to the MFC caused by static electricity, do not touch the electrodes shown in the MFC. 11 11 - 8 Troubleshooting and routine maintenance Paper is jammed at back of the MFC 1 Open the front cover. 7 Put the drum unit and toner cartridge assembly back into the MFC. 2 Pull out the drum unit and toner cartridge assembly. 8 Close the front cover. 3 Open the back cover. 9 Put the paper tray in the following diagram. 6 Close the scanner cover.
CAUTION To prevent damage to the MFC caused by static electricity, do not touch the electrodes shown in the MFC. 11 11 - 8 Troubleshooting and routine maintenance Paper is jammed at back of the MFC 1 Open the front cover. 7 Put the drum unit and toner cartridge assembly back into the MFC. 2 Pull out the drum unit and toner cartridge assembly. 8 Close the front cover. 3 Open the back cover. 9 Put the paper tray in the following diagram. 6 Close the scanner cover.

Users Manual - English
Page 96
Chapter 11 4 Pull the tab toward you gently pull out the paper with the other hand. 8 Close the front cover. 11 - 9 If the jammed paper cannot be pulled out easily, push down the tab with one hand as you to open the rear chute cover. 6 Close the back cover. 7 Put the drum unit and toner cartridge assembly back into the MFC. 5 Pull the jammed paper out of the fuser unit.
Chapter 11 4 Pull the tab toward you gently pull out the paper with the other hand. 8 Close the front cover. 11 - 9 If the jammed paper cannot be pulled out easily, push down the tab with one hand as you to open the rear chute cover. 6 Close the back cover. 7 Put the drum unit and toner cartridge assembly back into the MFC. 5 Pull the jammed paper out of the fuser unit.

Users Manual - English
Page 97
... cartridge assembly. 5 Put the drum unit and toner cartridge assembly back into place. Paper is 11 any inside the drum unit and toner cartridge assembly 1 Open the front cover. Troubleshooting and routine maintenance 4 Put the toner cartridge back into the drum unit until you put it lock into the...
... cartridge assembly. 5 Put the drum unit and toner cartridge assembly back into place. Paper is 11 any inside the drum unit and toner cartridge assembly 1 Open the front cover. Troubleshooting and routine maintenance 4 Put the toner cartridge back into the drum unit until you put it lock into the...
Users Manual - English
Page 107
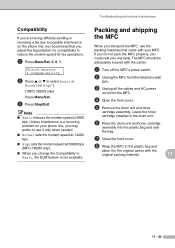
... line, we recommend that came with the carrier. 1 Turn off the MFC's power switch. 2 Unplug the MFC from the telephone wall jack. 3 Unplug all the cables and AC power cord from the MFC. 4 Open the front cover. 5 Remove the drum unit and toner cartridge assembly. Packing and shipping ...the MFC When you change the Compatibility to select Basic or Normal (or High*). (*MFC-7820N only) Press Menu/Set. 3 Press Stop/Exit. Miscellaneous...
... line, we recommend that came with the carrier. 1 Turn off the MFC's power switch. 2 Unplug the MFC from the telephone wall jack. 3 Unplug all the cables and AC power cord from the MFC. 4 Open the front cover. 5 Remove the drum unit and toner cartridge assembly. Packing and shipping ...the MFC When you change the Compatibility to select Basic or Normal (or High*). (*MFC-7820N only) Press Menu/Set. 3 Press Stop/Exit. Miscellaneous...

Users Manual - English
Page 110
... shown below . 11 - 23 When you have used the MFC, some internal parts of the MFC, turn off the MFC's power switch. Chapter 11 Cleaning the laser scanner window CAUTION ■ Do not use isopropyl alcohol to the MFC from the AC power outet. 2 Open the front cover and pull out the drum unit and toner cartridge assembly.
... shown below . 11 - 23 When you have used the MFC, some internal parts of the MFC, turn off the MFC's power switch. Chapter 11 Cleaning the laser scanner window CAUTION ■ Do not use isopropyl alcohol to the MFC from the AC power outet. 2 Open the front cover and pull out the drum unit and toner cartridge assembly.
Users Manual - English
Page 111
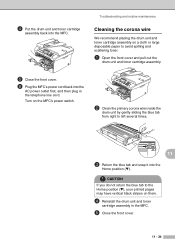
4 Put the drum unit and toner cartridge assembly back into the AC power outlet first, and then plug in the MFC. 5 Close the front cover. 11 - 24 Troubleshooting and routine maintenance Cleaning the corona wire We recommend placing the drum unit and toner cartridge assembly on them. 4 Reinstall the...cloth or large disposable paper to left several times. 11 3 Return the blue tab and snap it into the Home position (▼). Turn on the MFC's power switch. 2 Clean the primary corona wire inside the drum unit by gently sliding the blue tab from right to avoid spilling and scattering toner...
4 Put the drum unit and toner cartridge assembly back into the AC power outlet first, and then plug in the MFC. 5 Close the front cover. 11 - 24 Troubleshooting and routine maintenance Cleaning the corona wire We recommend placing the drum unit and toner cartridge assembly on them. 4 Reinstall the...cloth or large disposable paper to left several times. 11 3 Return the blue tab and snap it into the Home position (▼). Turn on the MFC's power switch. 2 Clean the primary corona wire inside the drum unit by gently sliding the blue tab from right to avoid spilling and scattering toner...
Users Manual - English
Page 112
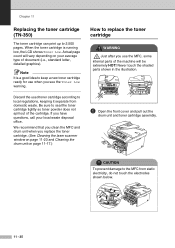
... used toner cartridge according to keep a new toner cartridge ready for use the MFC, some internal parts of the machine will vary depending on page 11-17.) How to ... Never touch the shaded parts shown in the illustration. 1 Open the front cover and pull out the drum unit and toner cartridge assembly. Be sure to the MFC from domestic waste. CAUTION To prevent damage to seal the...page count will be extremely HOT! We recommend that you clean the MFC and drum unit when you replace the toner cartridge. (See Cleaning the laser scanner window on page 11-23 and Cleaning the drum unit on ...
... used toner cartridge according to keep a new toner cartridge ready for use the MFC, some internal parts of the machine will vary depending on page 11-17.) How to ... Never touch the shaded parts shown in the illustration. 1 Open the front cover and pull out the drum unit and toner cartridge assembly. Be sure to the MFC from domestic waste. CAUTION To prevent damage to seal the...page count will be extremely HOT! We recommend that you clean the MFC and drum unit when you replace the toner cartridge. (See Cleaning the laser scanner window on page 11-23 and Cleaning the drum unit on ...

Users Manual - English
Page 115
... it periodically. There are many factors that determine the actual drum life, we have used the MFC, some internal parts of the machine are extremely HOT! WARNING Just after you may be replaced. So please...actual number of paper and how much toner you replace the drum unit. (See Cleaning the laser scanner window on paper. Even if the LCD shows Change Drum Soon, you have no control... over the many factors that will print may be careful. 1 Open the front cover and pull out the drum unit and toner cartridge assembly. The estimated drum life is a ...
... it periodically. There are many factors that determine the actual drum life, we have used the MFC, some internal parts of the machine are extremely HOT! WARNING Just after you may be replaced. So please...actual number of paper and how much toner you replace the drum unit. (See Cleaning the laser scanner window on paper. Even if the LCD shows Change Drum Soon, you have no control... over the many factors that will print may be careful. 1 Open the front cover and pull out the drum unit and toner cartridge assembly. The estimated drum life is a ...
Quick Setup Guide - English
Page 6
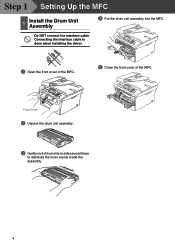
Connecting the interface cable is done when installing the driver. 1 Open the front cover of the MFC. 5 Close the front cover of the MFC. Front Cover 2 Unpack the drum unit assembly. 3 Gently rock it from side to side several times to distribute the toner evenly inside the assembly. 4 Step 1 Setting Up the MFC 1 Install the Drum Unit Assembly 4 Put the drum unit assembly into the MFC. Do NOT connect the interface cable.
Connecting the interface cable is done when installing the driver. 1 Open the front cover of the MFC. 5 Close the front cover of the MFC. Front Cover 2 Unpack the drum unit assembly. 3 Gently rock it from side to side several times to distribute the toner evenly inside the assembly. 4 Step 1 Setting Up the MFC 1 Install the Drum Unit Assembly 4 Put the drum unit assembly into the MFC. Do NOT connect the interface cable.


