

Users Manual - English
Page 3
... technical questions and product information for Brother Printer Driver updates. You can use fax-back system, so you can check here for all there. Frequently Asked Questions (FAQs) You can 't resolve difficulty with your MFC machine using the system, and an...to receive faxed instructions about Brother products on One Touch key 1. Brother Bulletin Board Brother's Bulletin Board Numbers are calling. USA: 1-800-521-2846 From within Montreal: 1-514-685-6464 (voice) BROTHER NUMBERS i Brother Numbers Brother fax-back system Brother Customer Service has installed an ...
... technical questions and product information for Brother Printer Driver updates. You can use fax-back system, so you can check here for all there. Frequently Asked Questions (FAQs) You can 't resolve difficulty with your MFC machine using the system, and an...to receive faxed instructions about Brother products on One Touch key 1. Brother Bulletin Board Brother's Bulletin Board Numbers are calling. USA: 1-800-521-2846 From within Montreal: 1-514-685-6464 (voice) BROTHER NUMBERS i Brother Numbers Brother fax-back system Brother Customer Service has installed an ...

Users Manual - English
Page 12
Printer Functions 4-5 3. PhotoCapture Center™ Function (For MFC 7400C only 4-6 Initial Setup 5-1 Getting Started 5-1 Setting Station ID 5-1 Entering Text 5-2 Inserting spaces 5-2 Making corrections 5-2 Repeating letters 5-2 Special characters and symbols 5-3 Setting Tone/Pulse Dialing ...
Printer Functions 4-5 3. PhotoCapture Center™ Function (For MFC 7400C only 4-6 Initial Setup 5-1 Getting Started 5-1 Setting Station ID 5-1 Entering Text 5-2 Inserting spaces 5-2 Making corrections 5-2 Repeating letters 5-2 Special characters and symbols 5-3 Setting Tone/Pulse Dialing ...

Users Manual - English
Page 17
...98/98SE/ME/ 2000 Professional or Windows NT® 4.0 14-31 Receiving Faxes into the PC (For MFC 7400C only 14-32 15 Using the MFC as a Printer 15-1 Features 15-1 Printer Driver 15-1 Choosing the Right Kind of Paper 15-2 Multi-purpose Sheet Feeder 15-2 Loading Paper 15-3 ... Keys 15-4 Reset Key 15-4 Ink Management Key 15-4 Turning Off Bi-directional Printing 15-4 16 Printer Driver Settings 16-1 Using the Brother MFC 7300C/MFC 7400C Printer Driver.... 16-1 The Paper Tab 16-1 Paper Size 16-2 User Defined Paper Size 16-3 Orientation 16-3 Copies 16-3 Collate 16-3 Reverse...
...98/98SE/ME/ 2000 Professional or Windows NT® 4.0 14-31 Receiving Faxes into the PC (For MFC 7400C only 14-32 15 Using the MFC as a Printer 15-1 Features 15-1 Printer Driver 15-1 Choosing the Right Kind of Paper 15-2 Multi-purpose Sheet Feeder 15-2 Loading Paper 15-3 ... Keys 15-4 Reset Key 15-4 Ink Management Key 15-4 Turning Off Bi-directional Printing 15-4 16 Printer Driver Settings 16-1 Using the Brother MFC 7300C/MFC 7400C Printer Driver.... 16-1 The Paper Tab 16-1 Paper Size 16-2 User Defined Paper Size 16-3 Orientation 16-3 Copies 16-3 Collate 16-3 Reverse...

Users Manual - English
Page 20
...Automatic E-Mail Printing 21-1 For Windows® 95/98/98SE, ME only 21-1 To Access the On-Line Documentation 21-1 Using the Brother MFC with a New Power Macintosh® G3, G4 or iMac™/iBook 22-1 Set up Your USB Equipped Apple® Macintosh®...8482; with Mac OS 8.5/8.51/8.6/9.0 22-1 Notice to Computer Users 22-1 Installing the Brother Printer and Scanner Drivers 22-2 Installing PaperPort 22-2 Using Brother Printer driver with your Apple® Macintosh® .... 22-3 Using Brother TWAIN Scanner Driver with Your Apple® Macintosh 22-5 Accessing the Scanner 22-6 ...
...Automatic E-Mail Printing 21-1 For Windows® 95/98/98SE, ME only 21-1 To Access the On-Line Documentation 21-1 Using the Brother MFC with a New Power Macintosh® G3, G4 or iMac™/iBook 22-1 Set up Your USB Equipped Apple® Macintosh®...8482; with Mac OS 8.5/8.51/8.6/9.0 22-1 Notice to Computer Users 22-1 Installing the Brother Printer and Scanner Drivers 22-2 Installing PaperPort 22-2 Using Brother Printer driver with your Apple® Macintosh® .... 22-3 Using Brother TWAIN Scanner Driver with Your Apple® Macintosh 22-5 Accessing the Scanner 22-6 ...

Users Manual - English
Page 21
... and Routine Maintenance 24-1 Troubleshooting 24-1 Frequently Asked Questions (FAQs 24-1 Brother Bulletin Board 24-1 Error Messages 24-2 Document Jam 24-3 Printer Jam or Paper Jam 24-4 If You Are Having Difficulty with Your MFC 24-6 How to Improve Print Quality 24-8 Cleaning the Print Head 24...-8 Aligning Ink Cartridges 24-9 Turning Off Bi-directional Printing 24-10 Packing and Shipping the MFC 24-10 Routine Maintenance 24-12 Cleaning the MFC Printer Platen 24-13 Replacing the Ink Cartridges 24-13 25 Glossary G-1 26 Specifications S-1 Product Description S-1 Fax...
... and Routine Maintenance 24-1 Troubleshooting 24-1 Frequently Asked Questions (FAQs 24-1 Brother Bulletin Board 24-1 Error Messages 24-2 Document Jam 24-3 Printer Jam or Paper Jam 24-4 If You Are Having Difficulty with Your MFC 24-6 How to Improve Print Quality 24-8 Cleaning the Print Head 24...-8 Aligning Ink Cartridges 24-9 Turning Off Bi-directional Printing 24-10 Packing and Shipping the MFC 24-10 Routine Maintenance 24-12 Cleaning the MFC Printer Platen 24-13 Replacing the Ink Cartridges 24-13 25 Glossary G-1 26 Specifications S-1 Product Description S-1 Fax...

Users Manual - English
Page 24
...calls on the ratio you select. Options You can be used as a keyboard for entering information into the MFC. (Only for Copy and Video Printing and PhotoCapture Center™ (For MFC 7400C only). MFC 7300C and MFC 7400C Control Panel Overview 2 1 15 14 13 3 12 4 56 7 89 10 11 1 Liquid ... memory. Quality Use this key to previously stored phone numbers. 8 Shift To access memory locations 5 through 8 in autodial numbers. 3 Color Printer Keys: Ink Management Cleans the ink print heads and/or resets the ink dot counter after replacing an ink cartridge. Also inserts a pause in...
...calls on the ratio you select. Options You can be used as a keyboard for entering information into the MFC. (Only for Copy and Video Printing and PhotoCapture Center™ (For MFC 7400C only). MFC 7300C and MFC 7400C Control Panel Overview 2 1 15 14 13 3 12 4 56 7 89 10 11 1 Liquid ... memory. Quality Use this key to previously stored phone numbers. 8 Shift To access memory locations 5 through 8 in autodial numbers. 3 Color Printer Keys: Ink Management Cleans the ink print heads and/or resets the ink dot counter after replacing an ink cartridge. Also inserts a pause in...
Users Manual - English
Page 42
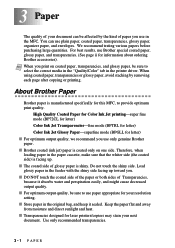
... Transparencies-fine mode (BPTRL for letter) Color Ink Jet Glossy Paper-superfine mode (BPGLL for laser printers/copiers may stain your resolution setting. Do not touch the shiny side. Load glossy paper in the... feeder with the shiny side facing up . s Store paper in the MFC. Use only recommended transparencies. 3-1 PAPER Note When you use in the original bag, and keep it...or glossy paper, avoid stacking by the kind of paper you print on one side. About Brother Paper Brother paper is shiny. You can be sure to select the correct media in the "Quality/Color...
... Transparencies-fine mode (BPTRL for letter) Color Ink Jet Glossy Paper-superfine mode (BPGLL for laser printers/copiers may stain your resolution setting. Do not touch the shiny side. Load glossy paper in the... feeder with the shiny side facing up . s Store paper in the MFC. Use only recommended transparencies. 3-1 PAPER Note When you use in the original bag, and keep it...or glossy paper, avoid stacking by the kind of paper you print on one side. About Brother Paper Brother paper is shiny. You can be sure to select the correct media in the "Quality/Color...

Users Manual - English
Page 44
...clasps s Envelopes of baggy construction s Envelopes not sharply creased s Embossed envelopes s Paper and envelopes already printed with a laser printer s Envelopes preprinted on cut sheets and envelopes. The figures below show the unprintable areas on the inside s Paper and envelopes that...Cut Sheet 3 4 1 Envelopes 3 4 1 2 2 unprintable area Paper Type Paper Size Fax Cut Sheet Letter, Legal Mono Copy Color Copy Printer Executive Printer Organizer K, L Printer Envelopes Printer (inch) 1 2 3 4 0.16 0.12 0.43 0.16 0.24 0.34 0.12 0.43 0.13 0.13 0.12 0.43 0.13 0.13 0.39 ...
...clasps s Envelopes of baggy construction s Envelopes not sharply creased s Embossed envelopes s Paper and envelopes already printed with a laser printer s Envelopes preprinted on cut sheets and envelopes. The figures below show the unprintable areas on the inside s Paper and envelopes that...Cut Sheet 3 4 1 Envelopes 3 4 1 2 2 unprintable area Paper Type Paper Size Fax Cut Sheet Letter, Legal Mono Copy Color Copy Printer Executive Printer Organizer K, L Printer Envelopes Printer (inch) 1 2 3 4 0.16 0.12 0.43 0.16 0.24 0.34 0.12 0.43 0.13 0.13 0.12 0.43 0.13 0.13 0.39 ...

Users Manual - English
Page 45
... help you can "scroll" more quickly through the function menu selections and programming options and settings. ON-SCREEN PROGRAMMING 4-1 press 2 for Printer Functions-OR-press 3 for Copy Functions-OR-press 4 for Video Functions-OR-press 5 for Fax Functions-OR- 4 On-Screen Programming ...advantage of Level One Functions from which you program your MFC. The screen displays: Then press 1 for PhotoCapture Center™ Functions (For MFC 7400C only). 1.FAX 2.PRINTER 3.COPY 4.VIDEO 5.PHOTOCAPTURE When you enter the Function Mode, your MFC displays a list of all options, in the opposite ...
... help you can "scroll" more quickly through the function menu selections and programming options and settings. ON-SCREEN PROGRAMMING 4-1 press 2 for Printer Functions-OR-press 3 for Copy Functions-OR-press 4 for Video Functions-OR-press 5 for Fax Functions-OR- 4 On-Screen Programming ...advantage of Level One Functions from which you program your MFC. The screen displays: Then press 1 for PhotoCapture Center™ Functions (For MFC 7400C only). 1.FAX 2.PRINTER 3.COPY 4.VIDEO 5.PHOTOCAPTURE When you enter the Function Mode, your MFC displays a list of all options, in the opposite ...

Users Manual - English
Page 49
...amount of paper in copies. View or print a list of Black, when you - 24-8 need to adjust the print - 24-9 quality. Printer Functions Function 1. ON 15-4 3. Copy Functions Function 1. QUALITY 3. ON-SCREEN PROGRAMMING 4-5 COLOR ADJUST 4. CALLER ID Description Factory Setting Page ...TEL SERVICE Function 1. DISTINCTIVE 2. 0. Adjusts the contrast. - 11-8 Selects a single color to register the ring pattern with the MFC. BI-DIR PRINT Description Factory Setting Page Use these functions when you use , OFF=Black 11-8 instead of the last 30 -...
...amount of paper in copies. View or print a list of Black, when you - 24-8 need to adjust the print - 24-9 quality. Printer Functions Function 1. ON 15-4 3. Copy Functions Function 1. QUALITY 3. ON-SCREEN PROGRAMMING 4-5 COLOR ADJUST 4. CALLER ID Description Factory Setting Page ...TEL SERVICE Function 1. DISTINCTIVE 2. 0. Adjusts the contrast. - 11-8 Selects a single color to register the ring pattern with the MFC. BI-DIR PRINT Description Factory Setting Page Use these functions when you use , OFF=Black 11-8 instead of the last 30 -...

Users Manual - English
Page 121
...-function center, by enabling you to use it first. If you install the software. Install the Multi-Function Link® Pro and other Brother software from Windows® applications in the root directory of the CD-ROM for another machine, uninstall it from the bundled CD-ROM. Before... a bi-directional IEEE-1284 compliant to Connect the MFC to use your fax machine as a printer and a scanner and to the PC, page 14-2. Caution It is a 6in1 multi-function center. The MFC 7300C is a 5 in1 multi-function center and the MFC 7400C is important that you must read the README.WRI...
...-function center, by enabling you to use it first. If you install the software. Install the Multi-Function Link® Pro and other Brother software from Windows® applications in the root directory of the CD-ROM for another machine, uninstall it from the bundled CD-ROM. Before... a bi-directional IEEE-1284 compliant to Connect the MFC to use your fax machine as a printer and a scanner and to the PC, page 14-2. Caution It is a 6in1 multi-function center. The MFC 7300C is a 5 in1 multi-function center and the MFC 7400C is important that you must read the README.WRI...

Users Manual - English
Page 124
For the location of the Brother machine, then turn on which operating system you are using. 14 - 4 S E T T I N G U P T H E M F C A N D P C T O W O R K T O G E T H E R Note Please follow the instructions for your computer. 7 Before plugging in your PC. If .... 8 When the Add New Hardware Wizard screen appears, click Next. 6 Connect the interface cable to the printer port of the computer and secure it on, plug in the electrical cord of your computer's parallel printer port, see the User's Guide for the operating system you are using. For Windows® 98, 98SE...
For the location of the Brother machine, then turn on which operating system you are using. 14 - 4 S E T T I N G U P T H E M F C A N D P C T O W O R K T O G E T H E R Note Please follow the instructions for your computer. 7 Before plugging in your PC. If .... 8 When the Add New Hardware Wizard screen appears, click Next. 6 Connect the interface cable to the printer port of the computer and secure it on, plug in the electrical cord of your computer's parallel printer port, see the User's Guide for the operating system you are using. For Windows® 98, 98SE...
Users Manual - English
Page 127
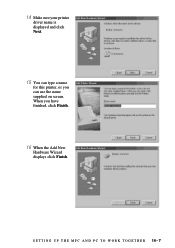
When you can use the name supplied on screen. 14 Make sure your printer driver name is displayed and click Next. 15 You can type a name for this printer, or you have finished, click Finish. 16 When the Add New Hardware Wizard displays click Finish. S E T T I N G U P T H E M F C A N D P C T O W O R K T O G E T H E R 14 - 7
When you can use the name supplied on screen. 14 Make sure your printer driver name is displayed and click Next. 15 You can type a name for this printer, or you have finished, click Finish. 16 When the Add New Hardware Wizard displays click Finish. S E T T I N G U P T H E M F C A N D P C T O W O R K T O G E T H E R 14 - 7
Users Manual - English
Page 131
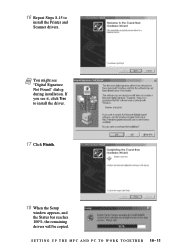
16 Repeat Steps 8-15 to install the driver. 17 Click Finish. 18 When the Setup window appears, and the Status bar reaches 100%, the remaining drivers will be copied. Note You might see it, click Yes to install the Printer and Scanner drivers. If you see "Digital Signature Not Found" dialog during installation. S E T T I N G U P T H E M F C A N D P C T O W O R K T O G E T H E R 14 - 11
16 Repeat Steps 8-15 to install the driver. 17 Click Finish. 18 When the Setup window appears, and the Status bar reaches 100%, the remaining drivers will be copied. Note You might see it, click Yes to install the Printer and Scanner drivers. If you see "Digital Signature Not Found" dialog during installation. S E T T I N G U P T H E M F C A N D P C T O W O R K T O G E T H E R 14 - 11

Users Manual - English
Page 132
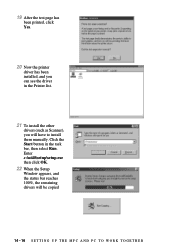
19 Click OK. 20 All the drivers have to install drivers manually. Then double click the Add Printer. 9 Select My Computer and click Next. 14 - 12 S E T T I N G U P T H E M F C A N D P C T O W O R K T O G E T H E R Now you have been installed. Click the Start button in the Task bar, and select Setting, Printer. Note If you want to install PaparPort® or MFLPro, go to the CD section. (See Installing the Brother Software on page 14-27.) Using Windows NT® Workstation Version 4.0 8 Windows NT® Workstation 4.0 does not have Plug & Play, so you can print and scan.
19 Click OK. 20 All the drivers have to install drivers manually. Then double click the Add Printer. 9 Select My Computer and click Next. 14 - 12 S E T T I N G U P T H E M F C A N D P C T O W O R K T O G E T H E R Now you have been installed. Click the Start button in the Task bar, and select Setting, Printer. Note If you want to install PaparPort® or MFLPro, go to the CD section. (See Installing the Brother Software on page 14-27.) Using Windows NT® Workstation Version 4.0 8 Windows NT® Workstation 4.0 does not have Plug & Play, so you can print and scan.

Users Manual - English
Page 134
This dialog box may not be displayed on the "x:\nt40" (x: is the drive letter for your CD-ROM drive.) folder, then click Open. 14 Make sure Specify a location is selected and click OK. 15 Select your printer model, then click Next. 13 Double-click on the CD icon and click on some MFC models. 14 - 14 S E T T I N G U P T H E M F C A N D P C T O W O R K T O G E T H E R
This dialog box may not be displayed on the "x:\nt40" (x: is the drive letter for your CD-ROM drive.) folder, then click Open. 14 Make sure Specify a location is selected and click OK. 15 Select your printer model, then click Next. 13 Double-click on the CD icon and click on some MFC models. 14 - 14 S E T T I N G U P T H E M F C A N D P C T O W O R K T O G E T H E R
Users Manual - English
Page 136
Enter x:\nt40\setup\setup.exe then click OK. 22 When the Setup Window appears, and the status bar reaches 100%, the remaining drivers will have to install them manually. Click the Start button in the Printer list. 21 To install the other drivers (such as Scanner), you will be copied 14 - 16 S E T T I N G U P T H E M F C A N D P C T O W O R K T O G E T H E R 19 After the test page has been printed, click Yes. 20 Now the printer driver has been installed, and you can see the driver in the task bar, then select Run.
Enter x:\nt40\setup\setup.exe then click OK. 22 When the Setup Window appears, and the status bar reaches 100%, the remaining drivers will have to install them manually. Click the Start button in the Printer list. 21 To install the other drivers (such as Scanner), you will be copied 14 - 16 S E T T I N G U P T H E M F C A N D P C T O W O R K T O G E T H E R 19 After the test page has been printed, click Yes. 20 Now the printer driver has been installed, and you can see the driver in the task bar, then select Run.
Users Manual - English
Page 142
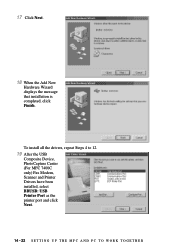
To install all the drivers, repeat Steps 4 to 12. 19 After the USB Composite Device, PhotoCapture Center (For MFC 7400C only) Fax Modem, Scanner and Printer Drivers have been installed, select BRUSB: USB Printer Port as the printer port and click Next. 14 - 22 S E T T I N G U P T H E M F C A N D P C T O W O R K T O G E T H E R 17 Click Next. 18 When the Add New Hardware Wizard displays the message that installation is completed, click Finish.
To install all the drivers, repeat Steps 4 to 12. 19 After the USB Composite Device, PhotoCapture Center (For MFC 7400C only) Fax Modem, Scanner and Printer Drivers have been installed, select BRUSB: USB Printer Port as the printer port and click Next. 14 - 22 S E T T I N G U P T H E M F C A N D P C T O W O R K T O G E T H E R 17 Click Next. 18 When the Add New Hardware Wizard displays the message that installation is completed, click Finish.

Users Manual - English
Page 143
S E T T I N G U P T H E M F C A N D P C T O W O R K T O G E T H E R 14 - 23 20 Enter a name for the printer, or you have finished, click Next. 21 Select Yes (Recommended) to print a Test Page and click Finish. 22 After the test page has been printed, click Yes. When you can use the name supplied.
S E T T I N G U P T H E M F C A N D P C T O W O R K T O G E T H E R 14 - 23 20 Enter a name for the printer, or you have finished, click Next. 21 Select Yes (Recommended) to print a Test Page and click Finish. 22 After the test page has been printed, click Yes. When you can use the name supplied.

Users Manual - English
Page 147
...: (If this chapter.) 1 Insert CD-ROM into your CD-ROM drive. A window appears listing the following screen will display it at the bottom of the Brother CD.) Please note that the software will automatically detect the operating system you are using and will appear: S E T T I N G U P T...H E R 14 - 27 Note If you are using Windows® 2000 Professional or NT®4.0, before you can install the software, you must install drivers for Printer and Scanner before you install the software (MFL Pro), See the beginning of this window does not appear, please use Windows Explorer to run the...
...: (If this chapter.) 1 Insert CD-ROM into your CD-ROM drive. A window appears listing the following screen will display it at the bottom of the Brother CD.) Please note that the software will automatically detect the operating system you are using and will appear: S E T T I N G U P T...H E R 14 - 27 Note If you are using Windows® 2000 Professional or NT®4.0, before you can install the software, you must install drivers for Printer and Scanner before you install the software (MFL Pro), See the beginning of this window does not appear, please use Windows Explorer to run the...


