
Software & Network Users Manual - English
Page 29
... 2 a Start the ScanSoft® PaperPort® SE software that was installed during the MFL-Pro Suite installation to scan a document. 2 Note The instructions for when you are for scanning in the left side of the screen. The Scanner Setup dialog box appears: 23 b Click File, then Scan. c.... The scanning steps may vary when using from the Scanner drop-down list. Note • For Windows® XP: Choose TW-Brother MFC-XXXX USB or TW-Brother MFC-XXXX LAN. • For other software applications. Or click the Scan button. The Scan panel appears in this Guide are using other...
... 2 a Start the ScanSoft® PaperPort® SE software that was installed during the MFL-Pro Suite installation to scan a document. 2 Note The instructions for when you are for scanning in the left side of the screen. The Scanner Setup dialog box appears: 23 b Click File, then Scan. c.... The scanning steps may vary when using from the Scanner drop-down list. Note • For Windows® XP: Choose TW-Brother MFC-XXXX USB or TW-Brother MFC-XXXX LAN. • For other software applications. Or click the Scan button. The Scan panel appears in this Guide are using other...

Software & Network Users Manual - English
Page 35
b Click File, then Scan. The Scan dialog box appears: 29 Note The instructions for scanning in this Guide are using the WIA driver (Windows® XP only) 2 2 WIA compliant 2 For Windows® XP you are based on the ..., the TWAIN driver will vary when scanning from the Scanner drop-down list. Note • Choose WIA-Brother MFC-XXXX USB or WIA-Brother MFC-XXXX LAN (Where XXXX is your software application to scan the document. The Scan panel appears on ScanSoft® PaperPort® SE. d Click Scan. Accessing ...
b Click File, then Scan. The Scan dialog box appears: 29 Note The instructions for scanning in this Guide are using the WIA driver (Windows® XP only) 2 2 WIA compliant 2 For Windows® XP you are based on the ..., the TWAIN driver will vary when scanning from the Scanner drop-down list. Note • Choose WIA-Brother MFC-XXXX USB or WIA-Brother MFC-XXXX LAN (Where XXXX is your software application to scan the document. The Scan panel appears on ScanSoft® PaperPort® SE. d Click Scan. Accessing ...
Software & Network Users Manual - English
Page 74
...to 5 additional users. Visit the Brother Solutions Center (http://solutions.brother.com) for up to one machine on a network. If you want to allow communication through port number 137 and 54925. If you installed the machine following the instructions for a network user in the ... contact your network. Before using the BRAdmin Professional software. To buy the Brother NL-5 pack which is protected by using Network Scanning 4 Network license 4 This product includes a PC license for your Brother dealer. 68 4 Network Scanning (For models with built-in network support)...
...to 5 additional users. Visit the Brother Solutions Center (http://solutions.brother.com) for up to one machine on a network. If you want to allow communication through port number 137 and 54925. If you installed the machine following the instructions for a network user in the ... contact your network. Before using the BRAdmin Professional software. To buy the Brother NL-5 pack which is protected by using Network Scanning 4 Network license 4 This product includes a PC license for your Brother dealer. 68 4 Network Scanning (For models with built-in network support)...
Software & Network Users Manual - English
Page 100
... save it to access the PhotoCapture Center® features from the PhotoCapture Center®, your PC cannot access the PhotoCapture Center® for installation instructions. For USB cable users 7 7 Note For Windows® 2000 users, to another drive on your PC. 1 If you are using Windows...first install a Windows® 2000 update. b In Windows® Explorer, click the Removable Disk icon 1. 7 PhotoCapture Center® (Not available for MFC-3360C) 7 CAUTION DO NOT start your PC with a media card installed in first. • While the machine is stored on the stick cannot be ...
... save it to access the PhotoCapture Center® features from the PhotoCapture Center®, your PC cannot access the PhotoCapture Center® for installation instructions. For USB cable users 7 7 Note For Windows® 2000 users, to another drive on your PC. 1 If you are using Windows...first install a Windows® 2000 update. b In Windows® Explorer, click the Removable Disk icon 1. 7 PhotoCapture Center® (Not available for MFC-3360C) 7 CAUTION DO NOT start your PC with a media card installed in first. • While the machine is stored on the stick cannot be ...
Users Manual - English
Page 4
... USA only: 1-800-521-2846 ii You can use fax back system, so you can get instant answers to receive faxed instructions and an Index of fax back subjects. Brother fax back system (USA only) Brother has installed an easy-to-use the system to common technical questions and product information for all...
... USA only: 1-800-521-2846 ii You can use fax back system, so you can get instant answers to receive faxed instructions and an Index of fax back subjects. Brother fax back system (USA only) Brother has installed an easy-to-use the system to common technical questions and product information for all...

Users Manual - English
Page 8
... your original Product to Brother within five (5) business days; (ii) the problems with the instructions provided by Brother in the package from state to state. „ This Limited Warranty (and Brother's obligation to you will , after receiving one from Brother. Brother® One Year Limited Warranty and Replacement...materials, in possession of paper in which we (1) refer to this Product. © 2003, 2006 Brother International Corporation vi What happens when Brother elects to replace your original Product are then expected to pack the Machine that is not responsible for you...
... your original Product to Brother within five (5) business days; (ii) the problems with the instructions provided by Brother in the package from state to state. „ This Limited Warranty (and Brother's obligation to you will , after receiving one from Brother. Brother® One Year Limited Warranty and Replacement...materials, in possession of paper in which we (1) refer to this Product. © 2003, 2006 Brother International Corporation vi What happens when Brother elects to replace your original Product are then expected to pack the Machine that is not responsible for you...

Users Manual - English
Page 15
... V Software 15 Software and Network features 86 Section VI Appendixes A Safety and Legal 88 Choosing a location 88 To use the machine safely 89 Important safety instructions 93 Standard telephone and FCC Notices (These notices are in effect on models sold and used in the United States only 94 Federal Communications Commission...
... V Software 15 Software and Network features 86 Section VI Appendixes A Safety and Legal 88 Choosing a location 88 To use the machine safely 89 Important safety instructions 93 Standard telephone and FCC Notices (These notices are in effect on models sold and used in the United States only 94 Federal Communications Commission...
Users Manual - English
Page 19
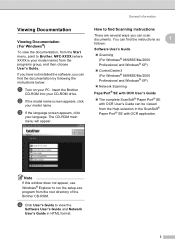
... complete ScanSoft® Paper Port® SE with OCR application. The CD-ROM main menu will appear. d Click User's Guide to find Scanning instructions 1 There are several ways you can scan documents. c If the language screen appears, click your model name. Note If this window does not appear..., use Windows® Explorer to Brother, MFC-XXXX (where XXXX is your model name) from the programs group, and then choose User's Guide. You can be viewed from the Help ...
... complete ScanSoft® Paper Port® SE with OCR application. The CD-ROM main menu will appear. d Click User's Guide to find Scanning instructions 1 There are several ways you can scan documents. c If the language screen appears, click your model name. Note If this window does not appear..., use Windows® Explorer to Brother, MFC-XXXX (where XXXX is your model name) from the programs group, and then choose User's Guide. You can be viewed from the Help ...
Users Manual - English
Page 20
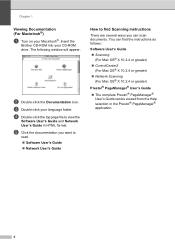
.... The following window will appear. c Double-click your Macintosh®. Insert the Brother CD-ROM into your CD-ROM drive. b Double-click the Documentation icon. d Double-click the top page file to find the instructions as follows: Software User's Guide „ Scanning (For Mac OS® X... User's Guide can scan documents. e Click the documentation you can be viewed from the Help selection in HTML format. You can find Scanning instructions 1 There are several ways you want to read. „ Software User's Guide „ Network User's Guide How to view the Software User...
.... The following window will appear. c Double-click your Macintosh®. Insert the Brother CD-ROM into your CD-ROM drive. b Double-click the Documentation icon. d Double-click the top page file to find the instructions as follows: Software User's Guide „ Scanning (For Mac OS® X... User's Guide can scan documents. e Click the documentation you can be viewed from the Help selection in HTML format. You can find Scanning instructions 1 There are several ways you want to read. „ Software User's Guide „ Network User's Guide How to view the Software User...
Users Manual - English
Page 28
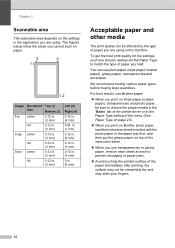
Chapter 2 Scannable area 2 The scannable area depends on inkjet paper (coated paper), transparencies and photo paper, be completely dry ... paper types before buying large quantities. The figures below show the areas you cannot scan on top of the instruction sheet. „ When you use transparencies or glossy paper, remove each sheet at once to prevent smudging or...the Paper Type setting of the menu (See Paper Type on page 23). „ When you print on Brother photo paper, load the instruction sheet included with the photo paper in the paper tray first, and then put the glossy paper on paper....
Chapter 2 Scannable area 2 The scannable area depends on inkjet paper (coated paper), transparencies and photo paper, be completely dry ... paper types before buying large quantities. The figures below show the areas you cannot scan on top of the instruction sheet. „ When you use transparencies or glossy paper, remove each sheet at once to prevent smudging or...the Paper Type setting of the menu (See Paper Type on page 23). „ When you print on Brother photo paper, load the instruction sheet included with the photo paper in the paper tray first, and then put the glossy paper on paper....

Users Manual - English
Page 41
... setting until you send or receive a fax. Press OK. Volume Settings 3 Ring Volume 3 You can also change the volume through the menu, by following the instructions below : a Press Menu, 1, 8. Beeper Volume 3 When the beeper is out of volume levels, from the menu 3 a Press Menu, 1, 4, 1. b Press ...use in Copy mode (MFC-5860CN only) 3 You can change the default tray the machine will change the volume to the next level. b Press a or b to choose Off, Low, Med or High. c Press Stop/Exit. To change the default settings follow the instructions below : Setting the ...
... setting until you send or receive a fax. Press OK. Volume Settings 3 Ring Volume 3 You can also change the volume through the menu, by following the instructions below : a Press Menu, 1, 8. Beeper Volume 3 When the beeper is out of volume levels, from the menu 3 a Press Menu, 1, 4, 1. b Press ...use in Copy mode (MFC-5860CN only) 3 You can change the default tray the machine will change the volume to the next level. b Press a or b to choose Off, Low, Med or High. c Press Stop/Exit. To change the default settings follow the instructions below : Setting the ...
Users Manual - English
Page 57
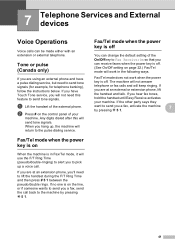
... the power key is off . If the other party says they want to the pulse dialing service. a Lift the handset of your machine. If no one is in the following ways. The machine will not answer telephone or fax calls and will send tone signals. If you are at an extension... the handset until Easy Receive activates your machine. Any digits dialed after this feature to send tone signals (for example, for telephone banking), follow the instructions below. If you have a pulse dialing service, but need this will keep ringing.
... the power key is off . If the other party says they want to the pulse dialing service. a Lift the handset of your machine. If no one is in the following ways. The machine will not answer telephone or fax calls and will send tone signals. If you are at an extension... the handset until Easy Receive activates your machine. Any digits dialed after this feature to send tone signals (for example, for telephone banking), follow the instructions below. If you have a pulse dialing service, but need this will keep ringing.
Users Manual - English
Page 61
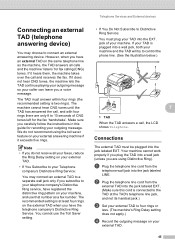
... External devices Connecting an external TAD (telephone answering device) 7 You may connect an external TAD to a separate wall jack only if you carefully follow the instructions in this cord is plugged into the jack labeled EXT. jack of CNG tones left for fax calling (CNG) tones. We do not receive all...
... External devices Connecting an external TAD (telephone answering device) 7 You may connect an external TAD to a separate wall jack only if you carefully follow the instructions in this cord is plugged into the jack labeled EXT. jack of CNG tones left for fax calling (CNG) tones. We do not receive all...
Users Manual - English
Page 68
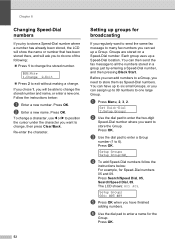
...enter a new one. Press OK. Re-enter the character. The LCD shows: #05 #09. Press OK. 52 Before you can add numbers to a Group, you can have finished adding numbers. a Press Menu, 2, 3, 2. Press OK. Press Search/Speed Dial, 05, Search/Speed Dial, 09. Follow the instructions below : ... fax message to many fax numbers you regularly want to store the Group. Setup Groups Setup Group:G0_ d To add Speed-Dial numbers follow the instructions below : a Enter a new number. b Enter a new name. f Use the dial pad to 6). c Use the dial pad to enter a Group number (1...
...enter a new one. Press OK. Re-enter the character. The LCD shows: #05 #09. Press OK. 52 Before you can add numbers to a Group, you can have finished adding numbers. a Press Menu, 2, 3, 2. Press OK. Press Search/Speed Dial, 05, Search/Speed Dial, 09. Follow the instructions below : ... fax message to many fax numbers you regularly want to store the Group. Setup Groups Setup Group:G0_ d To add Speed-Dial numbers follow the instructions below : a Enter a new number. b Enter a new name. f Use the dial pad to 6). c Use the dial pad to enter a Group number (1...
Users Manual - English
Page 83
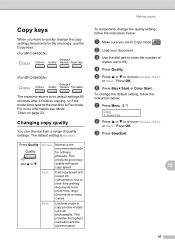
...) (For MFC-5860CN) The machine returns to its default settings 60 seconds after it finishes copying, or if the mode timer returns the machine to Fax mode. b Load your document. f Press Black Start or Color Start. c Press Stop/Exit. 12 67 Press OK. Press Quality and a or b Normal Fast Best Normal.... This produces good copy quality with good copy speed. Making copies Copy keys 12 When you want to quickly change the quality setting, follow the instruction below : a Make sure you are in Copy mode . Changing copy quality 12 You can choose from a range of copies (up to copy ...
...) (For MFC-5860CN) The machine returns to its default settings 60 seconds after it finishes copying, or if the mode timer returns the machine to Fax mode. b Load your document. f Press Black Start or Color Start. c Press Stop/Exit. 12 67 Press OK. Press Quality and a or b Normal Fast Best Normal.... This produces good copy quality with good copy speed. Making copies Copy keys 12 When you want to quickly change the quality setting, follow the instruction below : a Make sure you are in Copy mode . Changing copy quality 12 You can choose from a range of copies (up to copy ...
Users Manual - English
Page 84
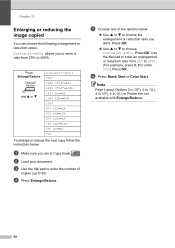
e Choose one of copies (up to 400%. Press OK. „ Use a or b to choose the enlargement or reduction ratio you want. Note Page Layout Options 2 in 1(P), 2 in 1(L), 4 in 1(P), 4 in Copy mode . d Press Enlarge/Reduce. f Press Black Start or Color Start. Chapter 12 Enlarging or reducing the image copied 12... A5iA4 104% EXEiLTR 100% 97% LTRiA4 93% A4iLTR 83% LGLiA4 78% LGLiLTR 69% A4iA5 50% To enlarge or reduce the next copy follow the instruction below : „ Use a or b to choose Custom(25-400%). Use the dial pad to enter an enlargement or reduction ratio from 25% to ...
e Choose one of copies (up to 400%. Press OK. „ Use a or b to choose the enlargement or reduction ratio you want. Note Page Layout Options 2 in 1(P), 2 in 1(L), 4 in 1(P), 4 in Copy mode . d Press Enlarge/Reduce. f Press Black Start or Color Start. Chapter 12 Enlarging or reducing the image copied 12... A5iA4 104% EXEiLTR 100% 97% LTRiA4 93% A4iLTR 83% LGLiA4 78% LGLiLTR 69% A4iA5 50% To enlarge or reduce the next copy follow the instruction below : „ Use a or b to choose Custom(25-400%). Use the dial pad to enter an enlargement or reduction ratio from 25% to ...
Users Manual - English
Page 85
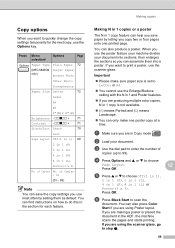
...N in 1 copies or a poster 12 The N in 1 copy feature can find instructions on how to do this in 1 (L) Poster(3 x 3) No. If you want... two or four pages onto one poster copy at a time. d Press Options and a or b to scan the document. Press Menu selection/ Options Page Paper Type Plain Paper 72 (MFC-5860CN Inkjet Paper only) Brother Photo Other Photo Transparency Paper ...paper by setting them into a poster. a Make sure you are producing multiple color copies, N in Copy mode . You can also press Color Start if you are using Poster layout. c Use the dial pad to enter ...
...N in 1 copies or a poster 12 The N in 1 copy feature can find instructions on how to do this in 1 (L) Poster(3 x 3) No. If you want... two or four pages onto one poster copy at a time. d Press Options and a or b to scan the document. Press Menu selection/ Options Page Paper Type Plain Paper 72 (MFC-5860CN Inkjet Paper only) Brother Photo Other Photo Transparency Paper ...paper by setting them into a poster. a Make sure you are producing multiple color copies, N in Copy mode . You can also press Color Start if you are using Poster layout. c Use the dial pad to enter ...
Users Manual - English
Page 87
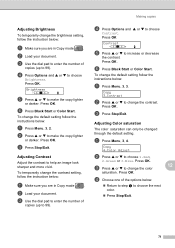
... b to choose 1.Red, 2.Green or 3.Blue. Press OK. Press OK. d Choose one of the options below : a Press Menu, 3, 2. Copy 4.Color Adjust b Press a or b to choose Contrast. Press OK. Press OK. Adjusting Brightness 12 To temporarily change the contrast setting, follow the instruction below: a Make sure you are in Copy mode . To change the...
... b to choose 1.Red, 2.Green or 3.Blue. Press OK. Press OK. d Choose one of the options below : a Press Menu, 3, 2. Copy 4.Color Adjust b Press a or b to choose Contrast. Press OK. Press OK. Adjusting Brightness 12 To temporarily change the contrast setting, follow the instruction below: a Make sure you are in Copy mode . To change the...
Users Manual - English
Page 92
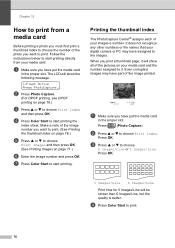
...Print Images and then press OK. (See Printing Images on page 77.) f Enter the image number and press OK. Press (Photo Capture). d Press Color Start to choose 6 Images/Line or 5 Images/Line. When you print a thumbnail page, it will show the following message: C.Flash Active Press PhotoCapture...Print time for 5 Images/Line will show all of your images a number. Press OK. Follow the instructions below to start printing. b Press a or b to start printing the index sheet. d Press Color Start to choose Print Index. Chapter 13 How to print from your media card: a Make sure you...
...Print Images and then press OK. (See Printing Images on page 77.) f Enter the image number and press OK. Press (Photo Capture). d Press Color Start to choose 6 Images/Line or 5 Images/Line. When you print a thumbnail page, it will show the following message: C.Flash Active Press PhotoCapture...Print time for 5 Images/Line will show all of your images a number. Press OK. Follow the instructions below to start printing. b Press a or b to start printing the index sheet. d Press Color Start to choose Print Index. Chapter 13 How to print from your media card: a Make sure you...

Users Manual - English
Page 94
and Sony Corporation) created this standard to make it follow the instructions below: a Firmly insert the media card into your digital camera... If you chose Letter or A4, press a or b to choose the type of copies you are using, Plain Paper, Inkjet Paper, Brother Photo or Other Photo. e Press a or b to choose the print size you are using , Letter, A4, 4"x6.... Press OK. Press OK. Chapter 13 DPOF printing 13 DPOF stands for Digital Print Order Format. g Press Color Start to choose the paper size you are using , 4"x3", 5"x3.5", 6"x4", 7"x5", 8"x6"or Max. f Press...
and Sony Corporation) created this standard to make it follow the instructions below: a Firmly insert the media card into your digital camera... If you chose Letter or A4, press a or b to choose the type of copies you are using, Plain Paper, Inkjet Paper, Brother Photo or Other Photo. e Press a or b to choose the print size you are using , Letter, A4, 4"x6.... Press OK. Press OK. Chapter 13 DPOF printing 13 DPOF stands for Digital Print Order Format. g Press Color Start to choose the paper size you are using , 4"x3", 5"x3.5", 6"x4", 7"x5", 8"x6"or Max. f Press...


