
Users Manual - English
Page 3
... from the electrical outlet immediately after using and before using this machine, basic safety precautions should always be taken, including the following: Read all moving parts. WARNING - Do not allow this manual. 3. Return the machine to break. 12. Never operate the machine with this manual. Always use . 1 SAVE THESE INSTRUCTIONS This...
... from the electrical outlet immediately after using and before using this machine, basic safety precautions should always be taken, including the following: Read all moving parts. WARNING - Do not allow this manual. 3. Return the machine to break. 12. Never operate the machine with this manual. Always use . 1 SAVE THESE INSTRUCTIONS This...
Users Manual - English
Page 5
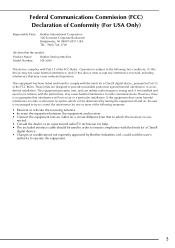
...Part 15 of the FCC Rules. This equipment has been tested and found to comply with the limits for a Class B digital device. • Changes or modifications not expressly approved by Brother Industries, Ltd. Federal Communications Commission (FCC) Declaration of Conformity (For USA Only) Responsible Party: Brother International... Corporation 100 Somerset Corporate Boulevard Bridgewater, NJ 08807-0911 USA TEL : (908) 704-1700 declares that the product Product Name: Model Number: Brother Sewing Machine NX-2000 This device complies...
...Part 15 of the FCC Rules. This equipment has been tested and found to comply with the limits for a Class B digital device. • Changes or modifications not expressly approved by Brother Industries, Ltd. Federal Communications Commission (FCC) Declaration of Conformity (For USA Only) Responsible Party: Brother International... Corporation 100 Somerset Corporate Boulevard Bridgewater, NJ 08807-0911 USA TEL : (908) 704-1700 declares that the product Product Name: Model Number: Brother Sewing Machine NX-2000 This device complies...
Users Manual - English
Page 6
...been dropped or damaged, or water is completed • Replacing or removing the needle or any location exposed to keep your local authorized Brother dealer. When storing this machine. Benzene, thinner, and scouring powders can damage the machine, and should never be used. 3. CONGRATULATIONS...operation manual when replacing or installing any assemblies, the presser feet, needle, or other moving parts. 2. For additional product information and updates, visit our web site at www.brother.com The contents of this manual and specifications of the operation manual to clean the case. ...
...been dropped or damaged, or water is completed • Replacing or removing the needle or any location exposed to keep your local authorized Brother dealer. When storing this machine. Benzene, thinner, and scouring powders can damage the machine, and should never be used. 3. CONGRATULATIONS...operation manual when replacing or installing any assemblies, the presser feet, needle, or other moving parts. 2. For additional product information and updates, visit our web site at www.brother.com The contents of this manual and specifications of the operation manual to clean the case. ...

Users Manual - English
Page 7
Chapter 1 Chapter 2 Chapter 4 • Parts related to . 5 Perform the operations while comparing the screens in the procedures with those that appear on the machine. • If, while using the machine, ...
Chapter 1 Chapter 2 Chapter 4 • Parts related to . 5 Perform the operations while comparing the screens in the procedures with those that appear on the machine. • If, while using the machine, ...
Users Manual - English
Page 8
CONTENTS NAMES OF MACHINE PARTS AND THEIR Scalloping 81 FUNCTIONS 9 Machine 9 Needle and Presser Foot Section 10 Operation Buttons 11 Included Accessories 11 Options 14 Chapter 1 Getting Ready 15 Top ...
CONTENTS NAMES OF MACHINE PARTS AND THEIR Scalloping 81 FUNCTIONS 9 Machine 9 Needle and Presser Foot Section 10 Operation Buttons 11 Included Accessories 11 Options 14 Chapter 1 Getting Ready 15 Top ...
Users Manual - English
Page 11
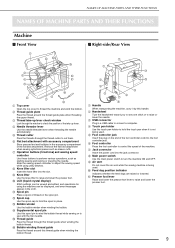
... THEIR FUNCTIONS NAMES OF MACHINE PARTS AND THEIR FUNCTIONS Machine ■ Front View ■ Right-side/Rear View a Top cover Open the top cover to raise and lower the presser foot. b ...
... THEIR FUNCTIONS NAMES OF MACHINE PARTS AND THEIR FUNCTIONS Machine ■ Front View ■ Right-side/Rear View a Top cover Open the top cover to raise and lower the presser foot. b ...
Users Manual - English
Page 12
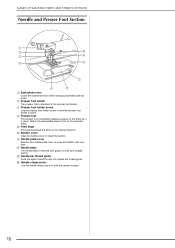
... plate The needle plate is sewn. b Presser foot holder The presser foot is attached to hold the needle in the sewing direction. NAMES OF MACHINE PARTS AND THEIR FUNCTIONS Needle and Presser Foot Section a Buttonhole lever Lower the buttonhole lever when sewing buttonholes and bar tacks.
... plate The needle plate is sewn. b Presser foot holder The presser foot is attached to hold the needle in the sewing direction. NAMES OF MACHINE PARTS AND THEIR FUNCTIONS Needle and Presser Foot Section a Buttonhole lever Lower the buttonhole lever when sewing buttonholes and bar tacks.
Users Manual - English
Page 13
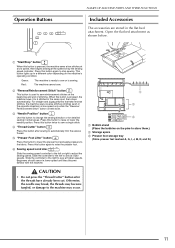
... zigzag stitches that take reverse stitches, the machine sews reverse stitches (stitches sewn in the opposite direction) at higher speeds. Operation Buttons NAMES OF MACHINE PARTS AND THEIR FUNCTIONS Included Accessories The accessories are stored in the same spot, then stops automatically. e "Presser Foot Lifter" button Press this button to automatically...
... zigzag stitches that take reverse stitches, the machine sews reverse stitches (stitches sewn in the opposite direction) at higher speeds. Operation Buttons NAMES OF MACHINE PARTS AND THEIR FUNCTIONS Included Accessories The accessories are stored in the same spot, then stops automatically. e "Presser Foot Lifter" button Press this button to automatically...
Users Manual - English
Page 14
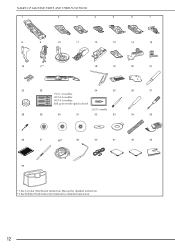
NAMES OF MACHINE PARTS AND THEIR FUNCTIONS 1 2 3 4 5 6 7 8 9 10 11 12 13 14 15 16 17*1 18 19 20 21 22 23 24 25 26 27 75/11 2 needles 90/14 2 needles 90/14 2 needles: Ball point needle (gold colored) 2.0/11 needle 28 29 30 31 32 33 34 35 36 37 38*2 39 40 41 42 43 44 *1 See Circular Attachment Instruction Manual for detailed instruction. *2 See Bobbin Work Instruction Manual for detailed instruction. 12
NAMES OF MACHINE PARTS AND THEIR FUNCTIONS 1 2 3 4 5 6 7 8 9 10 11 12 13 14 15 16 17*1 18 19 20 21 22 23 24 25 26 27 75/11 2 needles 90/14 2 needles 90/14 2 needles: Ball point needle (gold colored) 2.0/11 needle 28 29 30 31 32 33 34 35 36 37 38*2 39 40 41 42 43 44 *1 See Circular Attachment Instruction Manual for detailed instruction. *2 See Bobbin Work Instruction Manual for detailed instruction. 12
Users Manual - English
Page 15
...30 Spool cap (medium) × 2 One is available through your authorized dealer (part code: XA4813051). • This operation manual and the foot controller can be stored in the soft cover. 13 Part Name Part Code U.S.A./ Canada Others 1 Buttonhole foot "A" X57789-151 2 Overcasting foot "G" XC3098-051...*1 See Circular Attachment Instruction Manual for detailed instruction. *2 See Bobbin Work Instruction Manual for the presser foot holder is on using parts 13 and 43, refer to the instruction sheet enclosed with this machine. • The screw for detailed instruction. only) Foot...
...30 Spool cap (medium) × 2 One is available through your authorized dealer (part code: XA4813051). • This operation manual and the foot controller can be stored in the soft cover. 13 Part Name Part Code U.S.A./ Canada Others 1 Buttonhole foot "A" X57789-151 2 Overcasting foot "G" XC3098-051...*1 See Circular Attachment Instruction Manual for detailed instruction. *2 See Bobbin Work Instruction Manual for the presser foot holder is on using parts 13 and 43, refer to the instruction sheet enclosed with this machine. • The screw for detailed instruction. only) Foot...

Users Manual - English
Page 16
Note Visit your machine. 14 Part Name 1 Quilting foot 2 1/4" quilting foot 3 Side cutter foot 4 Spool stand Part Code U.S.A./ Canada Others SA129 F005N SA125 F001N SA177 F054 SA542 TS3 Memo • All specifications are correct at the time of optional accessories available for your authorized dealer for complete listing of printing. • Please be aware that some specifications may change without notice. NAMES OF MACHINE PARTS AND THEIR FUNCTIONS Options 1 2 3 4 No.
Note Visit your machine. 14 Part Name 1 Quilting foot 2 1/4" quilting foot 3 Side cutter foot 4 Spool stand Part Code U.S.A./ Canada Others SA129 F005N SA125 F001N SA177 F054 SA542 TS3 Memo • All specifications are correct at the time of optional accessories available for your authorized dealer for complete listing of printing. • Please be aware that some specifications may change without notice. NAMES OF MACHINE PARTS AND THEIR FUNCTIONS Options 1 2 3 4 No.

Users Manual - English
Page 19
... the machine is automatically selected (see page 20). • The display may take some time until the opening screen appears. Getting Ready • All or part of brightness. • If you are not directly facing the display, the colors may be dark immediately after the machine is turned on the setting...
... the machine is automatically selected (see page 20). • The display may take some time until the opening screen appears. Getting Ready • All or part of brightness. • If you are not directly facing the display, the colors may be dark immediately after the machine is turned on the setting...
Users Manual - English
Page 20
... Stitch key 18 LCD SCREEN ■ Key Functions With your finger or the touch pen, press a key at the top of the display ( screen that parts can safely be changed. Machine operation mode key Press this key to see descriptions for upper threading, winding the bobbin, changing the presser foot, and...
... Stitch key 18 LCD SCREEN ■ Key Functions With your finger or the touch pen, press a key at the top of the display ( screen that parts can safely be changed. Machine operation mode key Press this key to see descriptions for upper threading, winding the bobbin, changing the presser foot, and...
Users Manual - English
Page 23
LCD SCREEN Using the Machine Operation Mode Key Basic machine operations and other information based on the contents of Machine Parts and Their Functions Sewing Basics Troubleshooting Getting Ready Presser foot lever Sewing speed controller Handwheel Flat bed attachment with accessory compartment Knee lifter Foot controller ...
LCD SCREEN Using the Machine Operation Mode Key Basic machine operations and other information based on the contents of Machine Parts and Their Functions Sewing Basics Troubleshooting Getting Ready Presser foot lever Sewing speed controller Handwheel Flat bed attachment with accessory compartment Knee lifter Foot controller ...
Users Manual - English
Page 25
... wound. 65 a 3, 4 2 7, 8 9,10 l o 1 a Supplemental spool pin a Turn on the shaft. With this sewing machine. Use only the included bobbin or bobbins of the same type (part code: SA156, SFB: XA5539-051). 11.5 mm (approx. 7/16 inch) Actual size This model Other models a Supplemental spool pin d Place the spool of the spool...
... wound. 65 a 3, 4 2 7, 8 9,10 l o 1 a Supplemental spool pin a Turn on the shaft. With this sewing machine. Use only the included bobbin or bobbins of the same type (part code: SA156, SFB: XA5539-051). 11.5 mm (approx. 7/16 inch) Actual size This model Other models a Supplemental spool pin d Place the spool of the spool...
Users Manual - English
Page 32
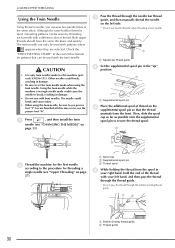
... manually thread the needle on the supplemental spool pin so that can only be sewn by threading each needle with a different color of this machine (part code X59296-151). a a Needle bar thread guide d Set the supplemental spool pin in damage. • Be sure to secure the thread spool. a Spool cap b Supplemental...
... manually thread the needle on the supplemental spool pin so that can only be sewn by threading each needle with a different color of this machine (part code X59296-151). a a Needle bar thread guide d Set the supplemental spool pin in damage. • Be sure to secure the thread spool. a Spool cap b Supplemental...
Users Manual - English
Page 37
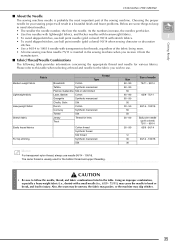
... break, and lead to 100/16 needle with a small needle (i.e., 65/9 - 75/11), may skip stitches. 35 The same thread is probably the most important part of the sewing machine. Choosing the proper needle for your sewing project will result in a beautiful finish and fewer problems. Below are some things to...
... break, and lead to 100/16 needle with a small needle (i.e., 65/9 - 75/11), may skip stitches. 35 The same thread is probably the most important part of the sewing machine. Choosing the proper needle for your sewing project will result in a beautiful finish and fewer problems. Below are some things to...
Users Manual - English
Page 40
Keep your hands away from moving parts while the machine is in the upper-left corner of the LCD. Otherwise, the needle may break and cause injury. • If stitches become bunched, ...
Keep your hands away from moving parts while the machine is in the upper-left corner of the LCD. Otherwise, the needle may break and cause injury. • If stitches become bunched, ...

Users Manual - English
Page 90
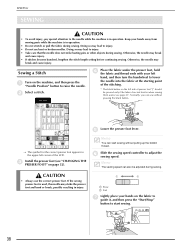
... foot is set by clamping the button in the button holder plate. e Pull down the buttonhole lever. * The buttonhole lever should be positioned behind the part of the button). d Hold the outside frame of the buttonhole foot backward as far as possible, making sure that the mark on the fabric aligns...
... foot is set by clamping the button in the button holder plate. e Pull down the buttonhole lever. * The buttonhole lever should be positioned behind the part of the button). d Hold the outside frame of the buttonhole foot backward as far as possible, making sure that the mark on the fabric aligns...

Users Manual - English
Page 93
... marked "A", as possible, making sure that it aligns with your finger, and then lower the presser foot so that there is no gap behind the part of the buttonhole foot backward as far as shown in the illustration. a b d c a Presser foot scale b Finished measurement c 7 mm wide (approx. 1/4 inch) d 5 mm (approx. 3/16 inch...
... marked "A", as possible, making sure that it aligns with your finger, and then lower the presser foot so that there is no gap behind the part of the buttonhole foot backward as far as shown in the illustration. a b d c a Presser foot scale b Finished measurement c 7 mm wide (approx. 1/4 inch) d 5 mm (approx. 3/16 inch...

