
Users Manual - English and Spanish
Page 2
...Please read these safety instructions before attempting to carry it by any other part may damage the machine or result in the machine falling, which could cause injuries. • When lifting the machine, be sure to use the machine. Do not use an extension cord. • Always unplug your work... cord. • When transporting the machine, be careful not to the needle. Do not use the machine near a heat source, such as an unsteady or slanted table, otherwise the machine may fall, resulting in injuries. 5 Special care is required when sewing: • Always pay close attention ...
...Please read these safety instructions before attempting to carry it by any other part may damage the machine or result in the machine falling, which could cause injuries. • When lifting the machine, be sure to use the machine. Do not use an extension cord. • Always unplug your work... cord. • When transporting the machine, be careful not to the needle. Do not use the machine near a heat source, such as an unsteady or slanted table, otherwise the machine may fall, resulting in injuries. 5 Special care is required when sewing: • Always pay close attention ...
Users Manual - English and Spanish
Page 3
...authorized Brother dealer. FOR USERS IN THE UK, EIRE, MALTA AND CYPRUS ONLY IMPORTANT • In the event of this machine only for its intended use plugs with this manual. Never use as it could cause the needle to clean the case. • Keep fingers away from all moving parts. The...required around the machine needle. • Switch the machine to the symbol "O" position to turn it off when making any assemblies, the presser feet, needle, or other hot objects. • Use only neutral soaps or detergents to break. • Do not push or pull the fabric when sewing, and follow ...
...authorized Brother dealer. FOR USERS IN THE UK, EIRE, MALTA AND CYPRUS ONLY IMPORTANT • In the event of this machine only for its intended use plugs with this manual. Never use as it could cause the needle to clean the case. • Keep fingers away from all moving parts. The...required around the machine needle. • Switch the machine to the symbol "O" position to turn it off when making any assemblies, the presser feet, needle, or other hot objects. • Use only neutral soaps or detergents to break. • Do not push or pull the fabric when sewing, and follow ...

Users Manual - English and Spanish
Page 4
KNOWING YOUR SEWING MACHINE 4 ACCESSORIES 4 Optional accessories 4 THE MAIN PARTS 5 Flat bed attachment 5 USING YOUR SEWING MACHINE 6 Connecting plugs 6 Main power and sewing light switch 7 Foot controller 7 Checking the needle 7 Replacing the needle 7 Changing the presser foot 8 THE CONTROLS 9 Pattern selection dial 9 Patterns and stitch names 9 Reverse sewing lever 10 THREADING THE MACHINE 11 Winding the bobbin 11 Lower...
KNOWING YOUR SEWING MACHINE 4 ACCESSORIES 4 Optional accessories 4 THE MAIN PARTS 5 Flat bed attachment 5 USING YOUR SEWING MACHINE 6 Connecting plugs 6 Main power and sewing light switch 7 Foot controller 7 Checking the needle 7 Replacing the needle 7 Changing the presser foot 8 THE CONTROLS 9 Pattern selection dial 9 Patterns and stitch names 9 Reverse sewing lever 10 THREADING THE MACHINE 11 Winding the bobbin 11 Lower...
Users Manual - English and Spanish
Page 5
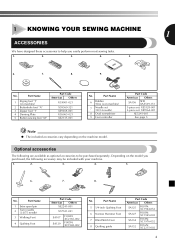
... SA134 F018N: XC1976-052 SA132 F016N: XC2215-002 4 1 KNOWING YOUR SEWING MACHINE 1 ACCESSORIES We have designed these accessories to be included with your machine. 1. 2. 3. 4. 5. 6. 7. 8. Depending on the model you purchased, the following are available as optional accessories to help you easily perform most sewing tasks. 1. 2. 3. 4. 5. 6. 7. 8. 9. Part Name 1 Extra spool pin 2 Twin needle (2.0/75 needle) 3 Walking...
... SA134 F018N: XC1976-052 SA132 F016N: XC2215-002 4 1 KNOWING YOUR SEWING MACHINE 1 ACCESSORIES We have designed these accessories to be included with your machine. 1. 2. 3. 4. 5. 6. 7. 8. Depending on the model you purchased, the following are available as optional accessories to help you easily perform most sewing tasks. 1. 2. 3. 4. 5. 6. 7. 8. 9. Part Name 1 Extra spool pin 2 Twin needle (2.0/75 needle) 3 Walking...

Users Manual - English and Spanish
Page 6
... D E F Foot controller (Page 7) You can turn the main power and sewing light switch on the country or region. KNOWING YOUR SEWING MACHINE THE MAIN PARTS 43 2 1 5 A 6 0 7 9 8 1 Bobbin winder (Page 11) This winds the thread onto the bobbin for 220/240V area The foot controller part code differs depending on and off. Foot Controller: Model KD...
... D E F Foot controller (Page 7) You can turn the main power and sewing light switch on the country or region. KNOWING YOUR SEWING MACHINE THE MAIN PARTS 43 2 1 5 A 6 0 7 9 8 1 Bobbin winder (Page 11) This winds the thread onto the bobbin for 220/240V area The foot controller part code differs depending on and off. Foot Controller: Model KD...

Users Manual - English and Spanish
Page 9
..., and securely tighten prevent the needle from falling into the the needle clamp screw with this machine. Turn off the machine before you use excessive force when loosening or tightening the needle clamp screw, otherwise certain parts of the needle toward you (counterclockwise) so that the bar on the presser foot is in... your left hand, and 4 then use the correct presser foot for the stitch pattern you leave the power on and step on the controller, the machine will have chosen. With the flat side of the sewing machine may be damaged.
..., and securely tighten prevent the needle from falling into the the needle clamp screw with this machine. Turn off the machine before you use excessive force when loosening or tightening the needle clamp screw, otherwise certain parts of the needle toward you (counterclockwise) so that the bar on the presser foot is in... your left hand, and 4 then use the correct presser foot for the stitch pattern you leave the power on and step on the controller, the machine will have chosen. With the flat side of the sewing machine may be damaged.

Users Manual - English and Spanish
Page 12
If you use the bobbin that comes with this machine. Using other models, the machine will not work properly. Actual size 11.5 mm (7/16 inch) This model Other models 1 1 Pull the thread in completely. 2 3 1 Pre-tension disk 2 Bobbin winder shaft... the spool of thread is set incorrectly, the thread may cause damage to the machine. KNOWING YOUR SEWING MACHINE THREADING THE MACHINE Winding the bobbin CAUTION ● We designed the bobbin that comes with this machine or bobbins of the same type (part code: SA156, SFB: XA5539-151). Only use bobbins from the spool 2 with ...
If you use the bobbin that comes with this machine. Using other models, the machine will not work properly. Actual size 11.5 mm (7/16 inch) This model Other models 1 1 Pull the thread in completely. 2 3 1 Pre-tension disk 2 Bobbin winder shaft... the spool of thread is set incorrectly, the thread may cause damage to the machine. KNOWING YOUR SEWING MACHINE THREADING THE MACHINE Winding the bobbin CAUTION ● We designed the bobbin that comes with this machine or bobbins of the same type (part code: SA156, SFB: XA5539-151). Only use bobbins from the spool 2 with ...
Users Manual - English and Spanish
Page 19
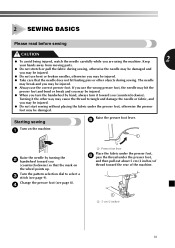
Keep 2 your hands away from moving parts. ● Do not stretch or pull the fabric during sewing. Turning it toward the rear of the machine. 1 1 5 cm (2 inches) 18 Starting sewing Raise the presser foot lever. 5 Turn on the wheel points up. Turn the pattern selection dial to tangle ...may be injured. ● Do not use bent or broken needles, otherwise you (counterclockwise). If you are using the machine. 2 SEWING BASICS Please read before sewing CAUTION ● To avoid being injured, watch the needle carefully while you use the correct presser foot. Change the presser ...
Keep 2 your hands away from moving parts. ● Do not stretch or pull the fabric during sewing. Turning it toward the rear of the machine. 1 1 5 cm (2 inches) 18 Starting sewing Raise the presser foot lever. 5 Turn on the wheel points up. Turn the pattern selection dial to tangle ...may be injured. ● Do not use bent or broken needles, otherwise you (counterclockwise). If you are using the machine. 2 SEWING BASICS Please read before sewing CAUTION ● To avoid being injured, watch the needle carefully while you use the correct presser foot. Change the presser ...
Users Manual - English and Spanish
Page 21
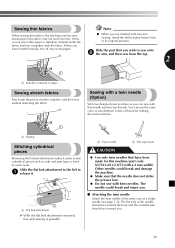
...; Attaching the twin needle Attach the twin needle in its original position. You can sew with this machine (part code: X57521-021:2.0/75 with bent needles. The needle could break and damage the machine. ● Make sure that have finished sewing, tear off any excess paper. Slide the flat bed attachment to the left to...
...; Attaching the twin needle Attach the twin needle in its original position. You can sew with this machine (part code: X57521-021:2.0/75 with bent needles. The needle could break and damage the machine. ● Make sure that have finished sewing, tear off any excess paper. Slide the flat bed attachment to the left to...
Users Manual - English and Spanish
Page 35
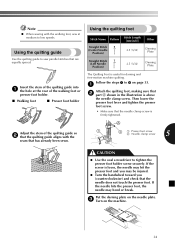
...Follow the steps 1 to sew parallel stitches that are equally spaced. Then lower the presser foot lever and tighten the presser foot screw. • Make sure that the needle does not touch the presser foot. Using the quilting guide Use the quilting guide to 3 on the machine. 34 Using the quilting foot...handwheel toward you may bend or break. A Adjust the stem of the quilting guide so 2 that the quilting guide aligns with the walking foot, sew at the rear of the walking foot or presser foot holder. ■ Walking foot ■ Presser foot holder The Quilting Foot is useful for ...
...Follow the steps 1 to sew parallel stitches that are equally spaced. Then lower the presser foot lever and tighten the presser foot screw. • Make sure that the needle does not touch the presser foot. Using the quilting guide Use the quilting guide to 3 on the machine. 34 Using the quilting foot...handwheel toward you may bend or break. A Adjust the stem of the quilting guide so 2 that the quilting guide aligns with the walking foot, sew at the rear of the walking foot or presser foot holder. ■ Walking foot ■ Presser foot holder The Quilting Foot is useful for ...
Users Manual - English and Spanish
Page 40
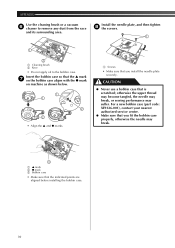
... bobbin case so that the ▲ mark 7 on the bobbin case aligns with the ● mark on machine as shown below. 1 1 2 2 • Align the ▲ and ● marks. 1 Screws...8226; Make sure that is scratched; otherwise the upper thread may become tangled, the needle may break, or sewing performance may break. 3 1 ▲ mark 2 ● mark 3 Bobbin case • Make sure ...that the indicated points are aligned before installing the bobbin case. 39 For a new bobbin case (part code: XE9326-001), contact your nearest authorized service center. ● Make sure that you install the ...
... bobbin case so that the ▲ mark 7 on the bobbin case aligns with the ● mark on machine as shown below. 1 1 2 2 • Align the ▲ and ● marks. 1 Screws...8226; Make sure that is scratched; otherwise the upper thread may become tangled, the needle may break, or sewing performance may break. 3 1 ▲ mark 2 ● mark 3 Bobbin case • Make sure ...that the indicated points are aligned before installing the bobbin case. 39 For a new bobbin case (part code: XE9326-001), contact your nearest authorized service center. ● Make sure that you install the ...


