
Users Manual - English and Spanish
Page 2
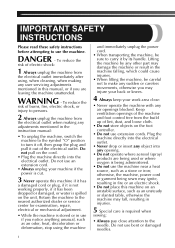
... - To reduce the risk of lint, dust, and loose cloth. • Do not store objects on the unit. Keep ventilation openings of the machine and foot control free from the build up of burns, fire, electric shock, or injury to persons. 2 Always unplug the machine from the electrical outlet immediately after..., be careful not to turn it off, then grasp the plug and pull it has been dropped or damaged, or water is spilled on the foot controller. • Do not use if you notice anything unusual, such as an odor, heat, discoloration or deformation, stop using , when cleaning, when making any...
... - To reduce the risk of lint, dust, and loose cloth. • Do not store objects on the unit. Keep ventilation openings of the machine and foot control free from the build up of burns, fire, electric shock, or injury to persons. 2 Always unplug the machine from the electrical outlet immediately after..., be careful not to turn it off, then grasp the plug and pull it has been dropped or damaged, or water is spilled on the foot controller. • Do not use if you notice anything unusual, such as an odor, heat, discoloration or deformation, stop using , when cleaning, when making any...

Users Manual - English and Spanish
Page 4
... Flat bed attachment 5 USING YOUR SEWING MACHINE 6 Connecting plugs 6 Main power and sewing light switch 7 Foot controller 7 Checking the needle 7 Replacing the needle 7 Changing the presser foot 8 THE CONTROLS 9 Pattern selection dial 9 Patterns and stitch names 9 Reverse sewing lever 10 THREADING THE ...31 Appliqués 32 OPTIONAL ACCESSORIES 33 Using the walking foot 33 Using the quilting guide 34 Using the quilting foot 34 Using the 1/4-inch quilting foot 35 Using the narrow hemmer foot 35 Using the blind stitch foot 37 6. CONTENTS IMPORTANT SAFETY INSTRUCTIONS 1 1.
... Flat bed attachment 5 USING YOUR SEWING MACHINE 6 Connecting plugs 6 Main power and sewing light switch 7 Foot controller 7 Checking the needle 7 Replacing the needle 7 Changing the presser foot 8 THE CONTROLS 9 Pattern selection dial 9 Patterns and stitch names 9 Reverse sewing lever 10 THREADING THE ...31 Appliqués 32 OPTIONAL ACCESSORIES 33 Using the walking foot 33 Using the quilting guide 34 Using the quilting foot 34 Using the 1/4-inch quilting foot 35 Using the narrow hemmer foot 35 Using the blind stitch foot 37 6. CONTENTS IMPORTANT SAFETY INSTRUCTIONS 1 1.
Users Manual - English and Spanish
Page 5
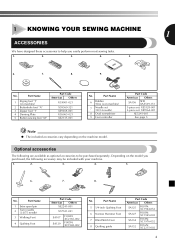
...Americas Others XE2241-001 X57521-021 SA107 SA129 F034N: XC2165-002 F005N: XC1948-002 No. Part Name 5 1/4-inch Quilting Foot 6 Narrow Hemmer Foot 7 Blind Stitch Foot 8 Quilting guide Part Code Americas Others SA125 F001N: XC1944-052 SA127 F003N: XC1945-002 SA134 F018N: XC1976-052 SA132 ...F016N: XC2215-002 4 Part Name 6 Bobbin (One is on machine) 7 Needle set (90/14 needle) 8 Oval screwdriver 9 Foot controller Part Code Americas Others SA156 SFB: XA5539-151 3-piece set: XE5328-001 2-piece set: XE7064-001 XE5241-001 See page 5 Note &#...
...Americas Others XE2241-001 X57521-021 SA107 SA129 F034N: XC2165-002 F005N: XC1948-002 No. Part Name 5 1/4-inch Quilting Foot 6 Narrow Hemmer Foot 7 Blind Stitch Foot 8 Quilting guide Part Code Americas Others SA125 F001N: XC1944-052 SA127 F003N: XC1945-002 SA134 F018N: XC1976-052 SA132 ...F016N: XC2215-002 4 Part Name 6 Bobbin (One is on machine) 7 Needle set (90/14 needle) 8 Oval screwdriver 9 Foot controller Part Code Americas Others SA156 SFB: XA5539-151 3-piece set: XE5328-001 2-piece set: XE7064-001 XE5241-001 See page 5 Note &#...

Users Manual - English and Spanish
Page 6
... Thread cutter (Page 19) Pass the threads through the thread cutter to cut them. 7 Flat bed attachment with accessory compartment (Page 5) 8 Presser foot (Page 8) 9 Reverse sewing lever (Page 10) Push this to control the sewing speed, and to choose the stitch you want. Contact your dealer ...or the nearest authorized service center. B FC D E F Foot controller (Page 7) You can be stored in a compartment inside the flat bed attachment. B Buttonhole fine-adjustment screw (Page 28) C Main power and...
... Thread cutter (Page 19) Pass the threads through the thread cutter to cut them. 7 Flat bed attachment with accessory compartment (Page 5) 8 Presser foot (Page 8) 9 Reverse sewing lever (Page 10) Push this to control the sewing speed, and to choose the stitch you want. Contact your dealer ...or the nearest authorized service center. B FC D E F Foot controller (Page 7) You can be stored in a compartment inside the flat bed attachment. B Buttonhole fine-adjustment screw (Page 28) C Main power and...

Users Manual - English and Spanish
Page 7
... plug. To reduce the risk of time. Using other appliances plugged in a polarized outlet only one blade wider than the other). Connecting plugs Connect the foot controller plug to heat. When restarting the sewing machine, follow the necessary procedure to be cut, damaged, modified, forcefully bent, pulled, twisted, or bundled. only...
... plug. To reduce the risk of time. Using other appliances plugged in a polarized outlet only one blade wider than the other). Connecting plugs Connect the foot controller plug to heat. When restarting the sewing machine, follow the necessary procedure to be cut, damaged, modified, forcefully bent, pulled, twisted, or bundled. only...

Users Manual - English and Spanish
Page 8
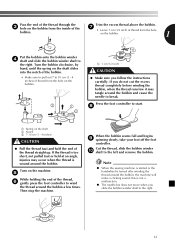
... You should make sure that the mark on the wheel points up on (toward you change the needle. Other needles may occur if the foot controller is placed on the machine with a bent needle. The product code is not in use. CAUTION ● Always turn off the machine...) so that nothing is accidentally pressed and the machine starts sewing. ● Only use . Lower the presser foot lever. 3 1 1 Presser foot lever 7 When you take your foot off the foot controller, the machine will stop. ■ Checking the needle correctly Put the flat side of the needle on the...
... You should make sure that the mark on the wheel points up on (toward you change the needle. Other needles may occur if the foot controller is placed on the machine with a bent needle. The product code is not in use. CAUTION ● Always turn off the machine...) so that nothing is accidentally pressed and the machine starts sewing. ● Only use . Lower the presser foot lever. 3 1 1 Presser foot lever 7 When you take your foot off the foot controller, the machine will stop. ■ Checking the needle correctly Put the flat side of the needle on the...

Users Manual - English and Spanish
Page 9
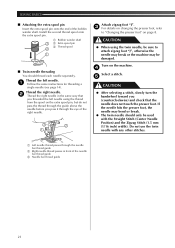
... the needle clamp using an oval screwdriver. 2 3 You will start and you may be damaged. If you use the wrong presser foot, the needle may strike the presser foot and bend or break, and may cause injury. ● Only use an oval screwdriver to turn off the machine. 1 Raise the.... CAUTION CAUTION ● Before replacing the needle, place fabric ● Make sure you insert the needle until it 1 or paper under the presser foot to touches the stopper, and securely tighten prevent the needle from falling into the the needle clamp screw with your left hand, and 4 then use...
... the needle clamp using an oval screwdriver. 2 3 You will start and you may be damaged. If you use the wrong presser foot, the needle may strike the presser foot and bend or break, and may cause injury. ● Only use an oval screwdriver to turn off the machine. 1 Raise the.... CAUTION CAUTION ● Before replacing the needle, place fabric ● Make sure you insert the needle until it 1 or paper under the presser foot to touches the stopper, and securely tighten prevent the needle from falling into the the needle clamp screw with your left hand, and 4 then use...
Users Manual - English and Spanish
Page 10
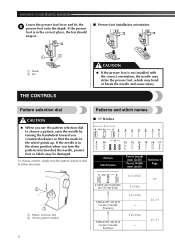
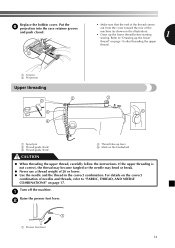
...orientation, the needle may strike the presser foot, which may be damaged. If the presser foot is in the correct place, the bar should snap in. ■ Presser foot installation orientation 1 2 1 Shank 2 Bar THE CONTROLS CAUTION ● If the presser foot is in either direction. 2 1 1... (1/16) - 1.8 (1/16) - Reference Page 27 23, 31 23, 31 9 To choose a stitch, simply turn the pattern selection dial, the needle, presser foot or fabric may bend or break the needle and cause injury. Pattern selection dial Patterns and stitch names CAUTION ● When you use the pattern...
...orientation, the needle may strike the presser foot, which may be damaged. If the presser foot is in the correct place, the bar should snap in. ■ Presser foot installation orientation 1 2 1 Shank 2 Bar THE CONTROLS CAUTION ● If the presser foot is in either direction. 2 1 1... (1/16) - 1.8 (1/16) - Reference Page 27 23, 31 23, 31 9 To choose a stitch, simply turn the pattern selection dial, the needle, presser foot or fabric may bend or break the needle and cause injury. Pattern selection dial Patterns and stitch names CAUTION ● When you use the pattern...
Users Manual - English and Spanish
Page 11
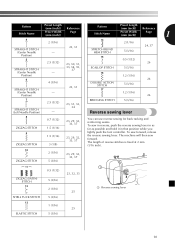
.... To sew in reverse, push the reverse sewing lever in as far as possible and hold it in that position while you lightly push the foot controller. To sew forward, release the reverse sewing lever.
.... To sew in reverse, push the reverse sewing lever in as far as possible and hold it in that position while you lightly push the foot controller. To sew forward, release the reverse sewing lever.
Users Manual - English and Spanish
Page 13
... on the shaft 2 Notch 3 7-10 cm (3 - 4 inches) CAUTION ● Pull the thread taut and hold the end of the thread straight up. Press the foot controller to wind the thread around the bobbin and cause the needle to the right. 12 Pass the end of the thread through the Trim...3 1 2 1 1 1 cm (1/2 inch) CAUTION ● Make sure you follow the instructions carefully. When the bobbin seems full and begins 9 spinning slowly, take your foot off the foot controller. Note ● When the sewing machine is started or the handwheel is too short, not pulled taut or held at an angle, injuries...
... on the shaft 2 Notch 3 7-10 cm (3 - 4 inches) CAUTION ● Pull the thread taut and hold the end of the thread straight up. Press the foot controller to wind the thread around the bobbin and cause the needle to the right. 12 Pass the end of the thread through the Trim...3 1 2 1 1 1 cm (1/2 inch) CAUTION ● Make sure you follow the instructions carefully. When the bobbin seems full and begins 9 spinning slowly, take your foot off the foot controller. Note ● When the sewing machine is started or the handwheel is too short, not pulled taut or held at an angle, injuries...

Users Manual - English and Spanish
Page 14
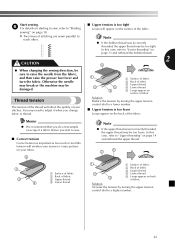
Remove the bobbin cover by sliding it and 3 lift toward you (counterclockwise) and raise the presser foot lever. CAUTION ● Make sure you . CAUTION ● Make sure you could be incorrect or break the needle. Hold the end of the bobbin case, ... the bobbin wound properly 1 before threading the lower thread. • See page 11 for the details about bobbin winding. If you accidentally step on the foot controller and the machine starts to loosen, and may cause incorrect thread tension. 1 1 1 Tension-adjusting spring 1 Bobbin cover 13 Raise the needle by the arrow...
Remove the bobbin cover by sliding it and 3 lift toward you (counterclockwise) and raise the presser foot lever. CAUTION ● Make sure you . CAUTION ● Make sure you could be incorrect or break the needle. Hold the end of the bobbin case, ... the bobbin wound properly 1 before threading the lower thread. • See page 11 for the details about bobbin winding. If you accidentally step on the foot controller and the machine starts to loosen, and may cause incorrect thread tension. 1 1 1 Tension-adjusting spring 1 Bobbin cover 13 Raise the needle by the arrow...
Users Manual - English and Spanish
Page 15
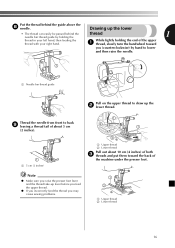
... threading 2 2 3 4 1 5 1 Spool pin 2 Thread guide (back) 3 Thread guide (front) 4 Thread take-up the lower thread before starting 1 sewing. Turn off the machine. 1 Raise the presser foot lever. 2 1 1 Presser foot lever 14
... threading 2 2 3 4 1 5 1 Spool pin 2 Thread guide (back) 3 Thread guide (front) 4 Thread take-up the lower thread before starting 1 sewing. Turn off the machine. 1 Raise the presser foot lever. 2 1 1 Presser foot lever 14
Users Manual - English and Spanish
Page 17
...the lower • The thread can easily be passed behind the guide above the 8 needle. Note ● Make sure you raise the presser foot lever and the thread take-up the 2 lower thread. Put the thread behind the needle bar thread guide by hand to lower and then ...a thread tail of about 5 cm (2 inches). 1 1 5 cm (2 inches) 1 2 1 2 1 Upper thread 2 Lower thread Pull out about 10 cm (4 inches) of the machine under the presser foot. Thread the needle from front to draw up lever before you feed the upper thread. ● If you incorrectly feed the thread you (counterclockwise) by...
...the lower • The thread can easily be passed behind the guide above the 8 needle. Note ● Make sure you raise the presser foot lever and the thread take-up the 2 lower thread. Put the thread behind the needle bar thread guide by hand to lower and then ...a thread tail of about 5 cm (2 inches). 1 1 5 cm (2 inches) 1 2 1 2 1 Upper thread 2 Lower thread Pull out about 10 cm (4 inches) of the machine under the presser foot. Thread the needle from front to draw up lever before you feed the upper thread. ● If you incorrectly feed the thread you (counterclockwise) by...
Users Manual - English and Spanish
Page 19
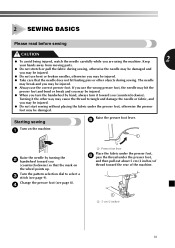
... 9). The needle may break and you may be injured. ● Take care that the mark on the wheel points up. Starting sewing Raise the presser foot lever. 5 Turn on the machine. 1 1 Raise the needle by hand, always turn the handwheel by turning the 2 handwheel toward you (counterclockwise). Turning it... to tangle and damage the needle or fabric, and you may be injured. ● Do not start sewing without placing the fabric under the presser foot, and then pull out about 5 cm (2 inches) of thread toward you (counterclockwise) so that the needle does not hit basting pins or other...
... 9). The needle may break and you may be injured. ● Take care that the mark on the wheel points up. Starting sewing Raise the presser foot lever. 5 Turn on the machine. 1 1 Raise the needle by hand, always turn the handwheel by turning the 2 handwheel toward you (counterclockwise). Turning it... to tangle and damage the needle or fabric, and you may be injured. ● Do not start sewing without placing the fabric under the presser foot, and then pull out about 5 cm (2 inches) of thread toward you (counterclockwise) so that the needle does not hit basting pins or other...
Users Manual - English and Spanish
Page 20
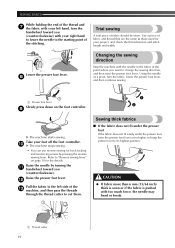
... the same as a pivot, turn the handwheel toward you (counterclockwise) with your right hand to lower the needle to its highest position. Lower the presser foot lever. 8 Changing the sewing direction Stop the machine with too much force, the needle may bend or break. 1 Thread cutter 19 Using the needle as... used for your project, and check the thread tension and stitch length and width. Refer to change the sewing direction, and then raise the presser foot lever. CAUTION ● If fabric more than 6 mm (15/64 inch) thick is sewn or if the fabric is pushed with the needle in the...
... the same as a pivot, turn the handwheel toward you (counterclockwise) with your right hand to lower the needle to its highest position. Lower the presser foot lever. 8 Changing the sewing direction Stop the machine with too much force, the needle may bend or break. 1 Thread cutter 19 Using the needle as... used for your project, and check the thread tension and stitch length and width. Refer to change the sewing direction, and then raise the presser foot lever. CAUTION ● If fabric more than 6 mm (15/64 inch) thick is sewn or if the fabric is pushed with the needle in the...
Users Manual - English and Spanish
Page 21
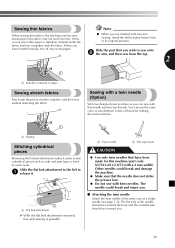
... removed, free-arm sewing is possible. 1 Twin needle 2 Extra spool pin CAUTION ● Use only twin needles that the needle does not strike the presser foot. ● Do not sew with a 2 mm width). When you are finished with this occurs, place thin paper or stabilizer material under the ● When you...
... removed, free-arm sewing is possible. 1 Twin needle 2 Extra spool pin CAUTION ● Use only twin needles that the needle does not strike the presser foot. ● Do not sew with a 2 mm width). When you are finished with this occurs, place thin paper or stabilizer material under the ● When you...
Users Manual - English and Spanish
Page 22
...extra spool pin, but do not pass the thread through the eye of the right needle. 3 2 1 Attach zigzag foot "J". 3 For details on changing the presser foot, refer to attach zigzag foot "J", otherwise the needle may break or the machine may bend or break. ● The twin needle should thread each needle... Insert the extra spool pin onto the end of the needle bar thread guide 3 Needle bar thread guide 21 If the needle hits the presser foot, the needle may be used with any other stitches. 1 Left needle thread passes through the needle bar thread guide 2 Right needle thread passes...
...extra spool pin, but do not pass the thread through the eye of the right needle. 3 2 1 Attach zigzag foot "J". 3 For details on changing the presser foot, refer to attach zigzag foot "J", otherwise the needle may break or the machine may bend or break. ● The twin needle should thread each needle... Insert the extra spool pin onto the end of the needle bar thread guide 3 Needle bar thread guide 21 If the needle hits the presser foot, the needle may be used with any other stitches. 1 Left needle thread passes through the needle bar thread guide 2 Right needle thread passes...
Users Manual - English and Spanish
Page 23
... be damaged. Otherwise the needle may break or the machine may be sure to raise the needle from the fabric, and then raise the presser foot lever and turn the fabric. Memo ● We recommend that you do a test sample on scrap of a fabric before you change fabric or thread. 1 3 5 4 1 Surface...
... be damaged. Otherwise the needle may break or the machine may be sure to raise the needle from the fabric, and then raise the presser foot lever and turn the fabric. Memo ● We recommend that you do a test sample on scrap of a fabric before you change fabric or thread. 1 3 5 4 1 Surface...
Users Manual - English and Spanish
Page 26
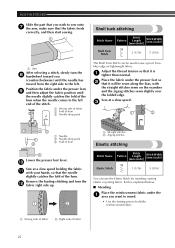
...at a slow speed. 3 1 2 1 23 1 2 1 Needle 2 Needle drop point 3 Fold of hem 1 Straight stitches 2 Zigzag stitches Elastic stitching 3 Lower the presser foot lever. 0 Sew at a slow speed holding the fabric a with the straight stitches sewn on lightweight fabric. Remove the basting stitching and turn the 8 handwheel toward...1 Wrong side of fabric 2 Right side of the hem. Each is explained below. ■ Mending Place the reinforcement fabric under the presser foot so 2 that it is 1 tighter than normal. BUILT-IN STITCHES Slide the part that you wish to sew onto 7 the arm, make ...
...at a slow speed. 3 1 2 1 23 1 2 1 Needle 2 Needle drop point 3 Fold of hem 1 Straight stitches 2 Zigzag stitches Elastic stitching 3 Lower the presser foot lever. 0 Sew at a slow speed holding the fabric a with the straight stitches sewn on lightweight fabric. Remove the basting stitching and turn the 8 handwheel toward...1 Wrong side of fabric 2 Right side of the hem. Each is explained below. ■ Mending Place the reinforcement fabric under the presser foot so 2 that it is 1 tighter than normal. BUILT-IN STITCHES Slide the part that you wish to sew onto 7 the arm, make ...
Users Manual - English and Spanish
Page 27
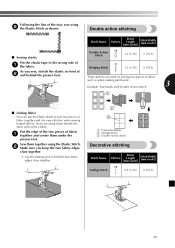
... 1 together and center them together using the Elastic Stitch. 2 Make sure you sew, stretch the elastic in front of 2 and behind the presser foot. Sew them under the presser foot. Following the line of the tear, sew using 2 the Elastic Stitch as when making patchwork. 3 Example: Patchwork with Double Action Stitch 1 ■...
... 1 together and center them together using the Elastic Stitch. 2 Make sure you sew, stretch the elastic in front of 2 and behind the presser foot. Sew them under the presser foot. Following the line of the tear, sew using 2 the Elastic Stitch as when making patchwork. 3 Example: Patchwork with Double Action Stitch 1 ■...


