
Users Manual - English and Spanish
Page 3
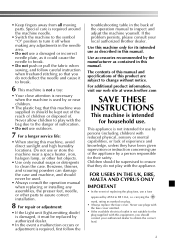
... plug fuse, use a damaged or incorrect needle plate, as marked on plug. • Always replace the fuse cover. Benzene, thinner, and scouring powders can damage the case and machine, and should contact your local authorized Brother dealer. FOR USERS IN THE UK, EIRE, MALTA AND CYPRUS ONLY IMPORTANT • In the event of..., unless they do not deflect the needle and cause it could cause the needle to break. • Do not push or pull the fabric when sewing, and follow careful instruction when freehand stitching so that this manual.
... plug fuse, use a damaged or incorrect needle plate, as marked on plug. • Always replace the fuse cover. Benzene, thinner, and scouring powders can damage the case and machine, and should contact your local authorized Brother dealer. FOR USERS IN THE UK, EIRE, MALTA AND CYPRUS ONLY IMPORTANT • In the event of..., unless they do not deflect the needle and cause it could cause the needle to break. • Do not push or pull the fabric when sewing, and follow careful instruction when freehand stitching so that this manual.

Users Manual - English and Spanish
Page 8
... The product code is accidentally pressed and the machine starts sewing. ● Only use . KNOWING YOUR SEWING MACHINE Main power and sewing light switch This switch turns the main power and sewing light on or off the machine before you change the needle. When you (...machine is not in use sewing machine needles for smooth sewing. 1 2 1 Turn on (toward the 'I' mark) 2 Turn off (toward you press harder, the machine's speed will easily break and cause injury. CAUTION ● Do not allow pieces of any bent needles safely. 1 2 1 Parallel space 2 Level surface (bobbin cover...
... The product code is accidentally pressed and the machine starts sewing. ● Only use . KNOWING YOUR SEWING MACHINE Main power and sewing light switch This switch turns the main power and sewing light on or off the machine before you change the needle. When you (...machine is not in use sewing machine needles for smooth sewing. 1 2 1 Turn on (toward the 'I' mark) 2 Turn off (toward you press harder, the machine's speed will easily break and cause injury. CAUTION ● Do not allow pieces of any bent needles safely. 1 2 1 Parallel space 2 Level surface (bobbin cover...

Users Manual - English and Spanish
Page 14
...See page 11 for the details about bobbin winding. CAUTION ● Make sure you could be incorrect or break the needle. Remove the bobbin cover by sliding it and 3 lift toward you (counterclockwise) and raise the presser foot lever. Raise the needle by the arrow. 1 2 1...foot controller and the machine starts to sew, you turn off the machine while threading. KNOWING YOUR SEWING MACHINE CAUTION ● Not winding the bobbin properly may cause the thread tension to loosen, and may cause incorrect thread tension. 1 1 1 Tension-adjusting spring 1 Bobbin cover 13 If the ...
...See page 11 for the details about bobbin winding. CAUTION ● Make sure you could be incorrect or break the needle. Remove the bobbin cover by sliding it and 3 lift toward you (counterclockwise) and raise the presser foot lever. Raise the needle by the arrow. 1 2 1...foot controller and the machine starts to sew, you turn off the machine while threading. KNOWING YOUR SEWING MACHINE CAUTION ● Not winding the bobbin properly may cause the thread tension to loosen, and may cause incorrect thread tension. 1 1 1 Tension-adjusting spring 1 Bobbin cover 13 If the ...
Users Manual - English and Spanish
Page 15
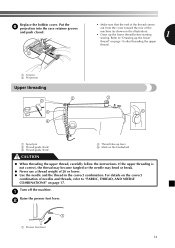
.... 1 Groove 2 Projection Upper threading 2 2 3 4 1 5 1 Spool pin 2 Thread guide (back) 3 Thread guide (front) 4 Thread take-up the lower thread before starting 1 sewing. Put the 6 projection into the race retainer groove and push closed. 1 2 • Make sure that the end of the thread comes out from the...the thread in the illustration). • Draw up lever 5 Mark on page 17. Turn off the machine. 1 Raise the presser foot lever. 2 1 1 Presser foot lever 14 Replace the bobbin cover. If the upper threading is not correct, the thread may become tangled or the needle may bend or...
.... 1 Groove 2 Projection Upper threading 2 2 3 4 1 5 1 Spool pin 2 Thread guide (back) 3 Thread guide (front) 4 Thread take-up the lower thread before starting 1 sewing. Put the 6 projection into the race retainer groove and push closed. 1 2 • Make sure that the end of the thread comes out from the...the thread in the illustration). • Draw up lever 5 Mark on page 17. Turn off the machine. 1 Raise the presser foot lever. 2 1 1 Presser foot lever 14 Replace the bobbin cover. If the upper threading is not correct, the thread may become tangled or the needle may bend or...


