
Quick Setup Guide - English and Spanish
Page 1
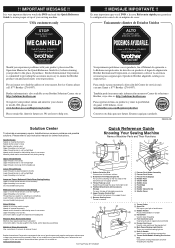
...uniform 3 Thread Take-up Lever Guide thread through the lever from 10 different stitches 2 Buttonhole Fine-Adjusting Screw For use if the stitching on the two sides of scissors to ensure the Brother product you watch the DVD and read the Operation Manual or the ... al lugar de adquisición. It is committed to providing the assistance necessary to remove thread IH J M K Brother International Corporation recommends the use . Brother International Corporation is very important that you purchased meets your machine/sewing light on winder J Handwheel Use for lower threading K...
...uniform 3 Thread Take-up Lever Guide thread through the lever from 10 different stitches 2 Buttonhole Fine-Adjusting Screw For use if the stitching on the two sides of scissors to ensure the Brother product you watch the DVD and read the Operation Manual or the ... al lugar de adquisición. It is committed to providing the assistance necessary to remove thread IH J M K Brother International Corporation recommends the use . Brother International Corporation is very important that you purchased meets your machine/sewing light on winder J Handwheel Use for lower threading K...
Users Manual - English and Spanish
Page 2
... unplug by the manufacturer as a toy. WARNING - Replace bulb with any adjustments in . To unplug, grasp the plug and pull, not the cord. 10. It may deflect the needle causing it is being used or where oxygen is not working properly, if it has been dropped or damaged, or... machine with same type rated 15 watts. Special care is used as contained in this sewing machine. Do not pull or push the fabric while stitching. Do not use the proper needle plate. Always use a bent needle. 13. Always unplug the sewing machine from outlet. 9. Do not use ." 1 "...
... unplug by the manufacturer as a toy. WARNING - Replace bulb with any adjustments in . To unplug, grasp the plug and pull, not the cord. 10. It may deflect the needle causing it is being used or where oxygen is not working properly, if it has been dropped or damaged, or... machine with same type rated 15 watts. Special care is used as contained in this sewing machine. Do not pull or push the fabric while stitching. Do not use the proper needle plate. Always use a bent needle. 13. Always unplug the sewing machine from outlet. 9. Do not use ." 1 "...
Users Manual - English and Spanish
Page 4
... stitching ...28 Blind hem stitching ...28 Darning ...30 3 CONTENTS CONTENTS ...3 1. KNOWING YOUR SEWING MACHINE 5 NAMES OF MACHINE PARTS AND THEIR FUNCTIONS 5 The main parts ...5 Needle and presser foot section ...6 Flat bed attachment ...6 ACCESSORIES ...7 OPTIONAL ACCESSORIES 7 USING YOUR SEWING MACHINE 8 Power supply precautions ...8 Power supply ...8 Foot controller ...9 Steadying the machine ...9 THREADING THE MACHINE 10...
... stitching ...28 Blind hem stitching ...28 Darning ...30 3 CONTENTS CONTENTS ...3 1. KNOWING YOUR SEWING MACHINE 5 NAMES OF MACHINE PARTS AND THEIR FUNCTIONS 5 The main parts ...5 Needle and presser foot section ...6 Flat bed attachment ...6 ACCESSORIES ...7 OPTIONAL ACCESSORIES 7 USING YOUR SEWING MACHINE 8 Power supply precautions ...8 Power supply ...8 Foot controller ...9 Steadying the machine ...9 THREADING THE MACHINE 10...
Users Manual - English and Spanish
Page 6
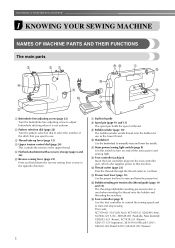
... upper thread. i Bobbin winder (page 10) The bobbin winder winds thread onto the bobbin for use . l Foot controller jack/jack Insert the foot controller plug into the foot controller jack, which also supplies power to this switch to adjust buttonhole stitching when it is used when winding the ...thread. g Built-in the opposite direction. b Pattern selection dial (page 22) Turn the pattern selection dial to select the number of the stitch that you want to raise and lower the presser foot. KNOWING YOUR SEWING MACHINE 1 KNOWING YOUR SEWING MACHINE NAMES OF MACHINE PARTS AND THEIR ...
... upper thread. i Bobbin winder (page 10) The bobbin winder winds thread onto the bobbin for use . l Foot controller jack/jack Insert the foot controller plug into the foot controller jack, which also supplies power to this switch to adjust buttonhole stitching when it is used when winding the ...thread. g Built-in the opposite direction. b Pattern selection dial (page 22) Turn the pattern selection dial to select the number of the stitch that you want to raise and lower the presser foot. KNOWING YOUR SEWING MACHINE 1 KNOWING YOUR SEWING MACHINE NAMES OF MACHINE PARTS AND THEIR ...
Users Manual - English and Spanish
Page 19
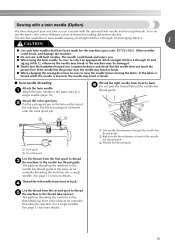
... different colors of the machine. f Do not pass the thread behind the needle bar thread guide. a Left needle thread passes through 10 and zigzag stitch 2. 1 CAUTION ● Use only twin needles that have designed your machine so you (counterclockwise) and check that the needle does ...page 16). Other needles could break and injure you. ● When using the twin needle, be sure to select an appropriate stitch (straight stitches 6 through 10 and zigzag stitch 2), otherwise the needle may break or the machine may bend or break. ■ Twin needle threading Attach the twin needle. ...
... different colors of the machine. f Do not pass the thread behind the needle bar thread guide. a Left needle thread passes through 10 and zigzag stitch 2. 1 CAUTION ● Use only twin needles that have designed your machine so you (counterclockwise) and check that the needle does ...page 16). Other needles could break and injure you. ● When using the twin needle, be sure to select an appropriate stitch (straight stitches 6 through 10 and zigzag stitch 2), otherwise the needle may break or the machine may bend or break. ■ Twin needle threading Attach the twin needle. ...

Users Manual - English and Spanish
Page 23
Selecting stitching Turning the stitch selection dial in either direction, select the desired stitch. 2 Number on dial Pattern selection dial Stitch name Pattern Page 1 4-step automatic buttonhole b ac d 31 2 Zigzag stitch 3 Zigzag stitch 4 Zigzag stitch 27, 35 5 Zigzag (satin) stitch 6 -10 11 12 Straight stitch (Center needle position) 6 7 8 9 10 28, 30, 34, 37 Select the desired length. Straight stitch (Left needle position) 28 Stretch blind Stitch 28 13 Shell tuck stitch 37 14 Elastic stitch 38 22
Selecting stitching Turning the stitch selection dial in either direction, select the desired stitch. 2 Number on dial Pattern selection dial Stitch name Pattern Page 1 4-step automatic buttonhole b ac d 31 2 Zigzag stitch 3 Zigzag stitch 4 Zigzag stitch 27, 35 5 Zigzag (satin) stitch 6 -10 11 12 Straight stitch (Center needle position) 6 7 8 9 10 28, 30, 34, 37 Select the desired length. Straight stitch (Left needle position) 28 Stretch blind Stitch 28 13 Shell tuck stitch 37 14 Elastic stitch 38 22

Users Manual - English and Spanish
Page 29
... 12 Stretch blind Stitch Application Blind hem stitching on dial Stitch name Application Attaching 6 7 8 9 10 Straight stitch zippers, basic (Center needle stitching, and position) sewing gathers or darning, etc. Number on stretch fabrics. 11 Straight stitch Basic stitching, (Left needle position) sewing gathers or pintucks, etc. Basic stitching Blind hem stitching Straight stitches are used for basic stitching. Reverse the skirt or...
... 12 Stretch blind Stitch Application Blind hem stitching on dial Stitch name Application Attaching 6 7 8 9 10 Straight stitch zippers, basic (Center needle stitching, and position) sewing gathers or darning, etc. Number on stretch fabrics. 11 Straight stitch Basic stitching, (Left needle position) sewing gathers or pintucks, etc. Basic stitching Blind hem stitching Straight stitches are used for basic stitching. Reverse the skirt or...

Users Manual - English and Spanish
Page 31
... side of fabric b Right side of fabric Select the desired length for reinforcement. Place the darning plate on dial Stitch name Application Attaching 6 7 8 9 10 Straight stitch zippers, basic (Center needle stitching, and position) sewing gathers or darning, etc. Place the fabric to be subject to be darned is e filled... with a fabric underlay for straight stitch b (6-10). Number on the needle plate as the fabric. Start sewing while gently moving the fabric d with your hands, alternately drawing...
... side of fabric b Right side of fabric Select the desired length for reinforcement. Place the darning plate on dial Stitch name Application Attaching 6 7 8 9 10 Straight stitch zippers, basic (Center needle stitching, and position) sewing gathers or darning, etc. Place the fabric to be subject to be darned is e filled... with a fabric underlay for straight stitch b (6-10). Number on the needle plate as the fabric. Start sewing while gently moving the fabric d with your hands, alternately drawing...

Users Manual - English and Spanish
Page 33
... sewing when the needle is at the right l side of the front bar tack. Sew the right side of the buttonhole is not uniform, the stitching can be adjusted with the seam ripper, do not place your hands in the cutting path, otherwise injuries may result if the seam ripper slips.... Stop sewing when the needle is at the left side Use the enclosed oval screwdriver to turn the fabric 90 degrees counterclockwise, select the straight stitch (6 through 10) with the desired length, and then sew to...
... sewing when the needle is at the right l side of the front bar tack. Sew the right side of the buttonhole is not uniform, the stitching can be adjusted with the seam ripper, do not place your hands in the cutting path, otherwise injuries may result if the seam ripper slips.... Stop sewing when the needle is at the left side Use the enclosed oval screwdriver to turn the fabric 90 degrees counterclockwise, select the straight stitch (6 through 10) with the desired length, and then sew to...

Users Manual - English and Spanish
Page 34
... threads, leaving a length of 15 cm (6 inches). Place a button between the holes in the same way. 33 f • After sewing for about 10 seconds at the end of the h stitching to be sewn on the needle plate as c shown below. Then, slide the button so that the needle goes into the two.... Pull the fabric to the left side of the machine, g and then cut the upper thread and the bobbin thread at the beginning of the stitching. • When attaching four-hole buttons, first sew the two holes closest to you e (counterclockwise) to the following table. Measure the distance between the ...
... threads, leaving a length of 15 cm (6 inches). Place a button between the holes in the same way. 33 f • After sewing for about 10 seconds at the end of the h stitching to be sewn on the needle plate as c shown below. Then, slide the button so that the needle goes into the two.... Pull the fabric to the left side of the machine, g and then cut the upper thread and the bobbin thread at the beginning of the stitching. • When attaching four-hole buttons, first sew the two holes closest to you e (counterclockwise) to the following table. Measure the distance between the ...

Users Manual - English and Spanish
Page 35
... during sewing. Number on both sides. Sew from the bottom of the zipper toward the d top on dial Stitch name 6 7 8 9 10 Straight stitch (Center needle position) Application Attaching zippers, basic stitching, and sewing gathers or darning, etc. Lower the needle into the notch located either the b left pin of... the zipper foot "I " b Right pin for sewing the left side of the zipper c Left pin for straight stitch a (6-10). You may break and you choose a different stitch, the needle will hit the presser foot and break the needle. Lower the presser foot lever and fix either on the...
... during sewing. Number on both sides. Sew from the bottom of the zipper toward the d top on dial Stitch name 6 7 8 9 10 Straight stitch (Center needle position) Application Attaching zippers, basic stitching, and sewing gathers or darning, etc. Lower the needle into the notch located either the b left pin of... the zipper foot "I " b Right pin for sewing the left side of the zipper c Left pin for straight stitch a (6-10). You may break and you choose a different stitch, the needle will hit the presser foot and break the needle. Lower the presser foot lever and fix either on the...

Users Manual - English and Spanish
Page 37
... and third fingers, and support the outside of the hoop with stitches by moving parts, especially needles. Select the desired length for straight stitch i (6-10) and sew a few stitches to reinforce the stitching. ■ Monogramming Sew the lettering at the starting position by turning... the handwheel toward you (counterclockwise), and then sew a few stitches for embroidering) on the surface of the...
... and third fingers, and support the outside of the hoop with stitches by moving parts, especially needles. Select the desired length for straight stitch i (6-10) and sew a few stitches to reinforce the stitching. ■ Monogramming Sew the lettering at the starting position by turning... the handwheel toward you (counterclockwise), and then sew a few stitches for embroidering) on the surface of the...

Users Manual - English and Spanish
Page 38
... desired length for straight stitch a (6-10). They are called "shell tucks". Number on dial Stitch name Application Attaching zippers, 6 7 8 9 10 Straight stitch basic stitching, (Center needle and sewing position) gathers or darning, etc. UTILITY STITCHES DECORATIVE STITCHING Various decorative stitches can be sewn with ..., and then iron the tucks d down to create gathers. Gathering Shell tuck stitching Number on dial Stitch name Application 13 Shell tuck stitch Shell tuck stitching The gathers that the needle drops c slightly off the edge of the upper thread...
... desired length for straight stitch a (6-10). They are called "shell tucks". Number on dial Stitch name Application Attaching zippers, 6 7 8 9 10 Straight stitch basic stitching, (Center needle and sewing position) gathers or darning, etc. UTILITY STITCHES DECORATIVE STITCHING Various decorative stitches can be sewn with ..., and then iron the tucks d down to create gathers. Gathering Shell tuck stitching Number on dial Stitch name Application 13 Shell tuck stitch Shell tuck stitching The gathers that the needle drops c slightly off the edge of the upper thread...
Users Manual - English and Spanish
Page 44
Visit us at [http://solutions.brother.com]. The needle breaks. The main power switch is bent or blunt. Insert the needle properly. The needle is turned off. appropriate for the type of stitch. sew. The area around the hole in the presser foot is scratched. The area around... needle. Use the oval screwdriver to put it right The machine is scratched. Replace the needle. Plug the machine in the thread. page 10 page 13 - The upper thread tension is too tight. Remove the tangle thread. left. The upper thread tension is too tight. for ...
Visit us at [http://solutions.brother.com]. The needle breaks. The main power switch is bent or blunt. Insert the needle properly. The needle is turned off. appropriate for the type of stitch. sew. The area around the hole in the presser foot is scratched. The area around... needle. Use the oval screwdriver to put it right The machine is scratched. Replace the needle. Plug the machine in the thread. page 10 page 13 - The upper thread tension is too tight. Remove the tangle thread. left. The upper thread tension is too tight. for ...
Users Manual - English and Spanish
Page 46
... tangle thread. If the thread is correct for the type of fabric, thread and needle. page 10 page 39 page 28, 31, 33, 34, 35 page 24 page 40 page 15 page 40...accumulated under the fabric. The thread is bent or blunt. You have not used the right combination of stitch. You have not threaded the upper thread properly. Correct the upper threading. Reference page 11, 13 ... and needle. Incorrect bobbins will not work properly. Adjust the tension of the upper thread. The stitch is incorrect. The fabric does not feed. You have not used the right combination of fabric. ...
... tangle thread. If the thread is correct for the type of fabric, thread and needle. page 10 page 39 page 28, 31, 33, 34, 35 page 24 page 40 page 15 page 40...accumulated under the fabric. The thread is bent or blunt. You have not used the right combination of stitch. You have not threaded the upper thread properly. Correct the upper threading. Reference page 11, 13 ... and needle. Incorrect bobbins will not work properly. Adjust the tension of the upper thread. The stitch is incorrect. The fabric does not feed. You have not used the right combination of fabric. ...
Users Manual - English and Spanish
Page 47
... switch 8 monogramming 35 N needle 15 needle needle needle bcplalaarmtethpr.e.s.ac..dr.e..gw..u..i..d....e...66..,,...14. 716 O oiling 39 overcasting stitches 27 P pattern presser presser presser fffsoooeoooletttclhte.io.vo.l.en.d.r.ed.r.i..a.....l...5656,,,, 22 19 20 13 pre-tension disk 10 R relative chart of sewing fabrics, needles and threads .....15 reverse sewing lever 23 S satin...
... switch 8 monogramming 35 N needle 15 needle needle needle bcplalaarmtethpr.e.s.ac..dr.e..gw..u..i..d....e...66..,,...14. 716 O oiling 39 overcasting stitches 27 P pattern presser presser presser fffsoooeoooletttclhte.io.vo.l.en.d.r.ed.r.i..a.....l...5656,,,, 22 19 20 13 pre-tension disk 10 R relative chart of sewing fabrics, needles and threads .....15 reverse sewing lever 23 S satin...


