
Quick Setup Guide - English and Spanish
Page 1
... a small pair of scissors to remove thread IH J M K Brother International Corporation recommends the use of genuine parts and supplies and proper maintenance to win $1,000, please visit www.brother-usa.com/Registermybrother Please retain this Quick Reference Guide to find the address of your machine/sewing light on N Built-in jack to operate foot...
... a small pair of scissors to remove thread IH J M K Brother International Corporation recommends the use of genuine parts and supplies and proper maintenance to win $1,000, please visit www.brother-usa.com/Registermybrother Please retain this Quick Reference Guide to find the address of your machine/sewing light on N Built-in jack to operate foot...

Quick Setup Guide - English and Spanish
Page 2
...-50 Mercerized Heavy Duty Polyester Long Fiber Cotton Wrapped Polyester Polyester Long Fiber Uses common replacement accessories: Bobbin: Class 15 Needle: Standard sewing machine needles Light Bulb: Small screw base sewing machine bulb Remove the hook by turning the handwheel. Toll Free Phone 877-276-8437 Use and pass the thread around the take...
...-50 Mercerized Heavy Duty Polyester Long Fiber Cotton Wrapped Polyester Polyester Long Fiber Uses common replacement accessories: Bobbin: Class 15 Needle: Standard sewing machine needles Light Bulb: Small screw base sewing machine bulb Remove the hook by turning the handwheel. Toll Free Phone 877-276-8437 Use and pass the thread around the take...
Users Manual - English and Spanish
Page 1
ENGLISH KNOWING YOUR SEWING MACHINE SEWING BASICS UTILITY STITCHES APPENDIX Basic Sewing and Mending Machine Operation Manual Please visit us at http://solutions.brother.com where you can get product support and answers to frequently asked questions (FAQs).
ENGLISH KNOWING YOUR SEWING MACHINE SEWING BASICS UTILITY STITCHES APPENDIX Basic Sewing and Mending Machine Operation Manual Please visit us at http://solutions.brother.com where you can get product support and answers to frequently asked questions (FAQs).
Users Manual - English and Spanish
Page 2
... outlet. 9. Special care is intended for use ." 1 "SAVE THESE INSTRUCTIONS" "This sewing machine is required around the sewing machine needle. 11. Always unplug this sewing machine. Never operate the sewing machine with same type rated 15 watts. Always use this machine where aerosol (spray) products are being administered. 8. The sewing machine should be supervised to break. 14. Do not operate this...
... outlet. 9. Special care is intended for use ." 1 "SAVE THESE INSTRUCTIONS" "This sewing machine is required around the sewing machine needle. 11. Always unplug this sewing machine. Never operate the sewing machine with same type rated 15 watts. Always use this machine where aerosol (spray) products are being administered. 8. The sewing machine should be supervised to break. 14. Do not operate this...
Users Manual - English and Spanish
Page 3
... Use only neutral soaps or detergents to keep your eye on the needle while sewing. Benzene, thinner, and scouring powders can damage the case and machine, and should contact your local authorized Brother dealer. If the problem persists, please consult your authorized dealer to assure correct ... manual before using the machine. For additional product information and updates, visit our web site at www.brother.com The contents of this manual and specifications of the operation manual to BS 1362, i.e. FOR USERS IN AUSTRALIA AND NEW ZEALAND This sewing machine is not suitable for ...
... Use only neutral soaps or detergents to keep your eye on the needle while sewing. Benzene, thinner, and scouring powders can damage the case and machine, and should contact your local authorized Brother dealer. If the problem persists, please consult your authorized dealer to assure correct ... manual before using the machine. For additional product information and updates, visit our web site at www.brother.com The contents of this manual and specifications of the operation manual to BS 1362, i.e. FOR USERS IN AUSTRALIA AND NEW ZEALAND This sewing machine is not suitable for ...
Users Manual - English and Spanish
Page 4
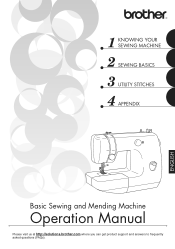
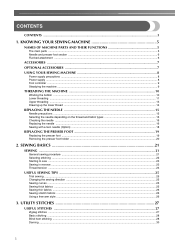
...SEWING BASICS 21 SEWING ...21 General sewing procedure ...21 Selecting stitching ...22 Starting to sew ...23 Sewing in reverse ...23 Thread tension ...24 USEFUL SEWING TIPS ...25 Trial sewing ...25 Changing the sewing direction ...25 Sewing curves ...25 Sewing thick fabrics ...25 Sewing thin fabrics ...26 Sewing stretch fabrics ...26 Using a free-arm style ...26 3. KNOWING YOUR SEWING MACHINE 5 NAMES OF MACHINE...ACCESSORIES 7 USING YOUR SEWING MACHINE 8 Power supply precautions ...8 Power supply ...8 Foot controller ...9 Steadying the machine ...9 THREADING THE MACHINE 10 Winding the ...
...SEWING BASICS 21 SEWING ...21 General sewing procedure ...21 Selecting stitching ...22 Starting to sew ...23 Sewing in reverse ...23 Thread tension ...24 USEFUL SEWING TIPS ...25 Trial sewing ...25 Changing the sewing direction ...25 Sewing curves ...25 Sewing thick fabrics ...25 Sewing thin fabrics ...26 Sewing stretch fabrics ...26 Using a free-arm style ...26 3. KNOWING YOUR SEWING MACHINE 5 NAMES OF MACHINE...ACCESSORIES 7 USING YOUR SEWING MACHINE 8 Power supply precautions ...8 Power supply ...8 Foot controller ...9 Steadying the machine ...9 THREADING THE MACHINE 10 Winding the ...
Users Manual - English and Spanish
Page 6
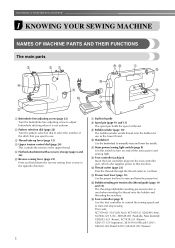
... power to this switch to turn on and off the main power and sewing light. Part code; p Foot controller (page 9) Use the foot controller to control the sewing speed and to start and stop sewing. KNOWING YOUR SEWING MACHINE 1 KNOWING YOUR SEWING MACHINE NAMES OF MACHINE PARTS AND THEIR FUNCTIONS The main parts a Buttonhole fine-adjusting screw (page...
... power to this switch to turn on and off the main power and sewing light. Part code; p Foot controller (page 9) Use the foot controller to control the sewing speed and to start and stop sewing. KNOWING YOUR SEWING MACHINE 1 KNOWING YOUR SEWING MACHINE NAMES OF MACHINE PARTS AND THEIR FUNCTIONS The main parts a Buttonhole fine-adjusting screw (page...
Users Manual - English and Spanish
Page 8
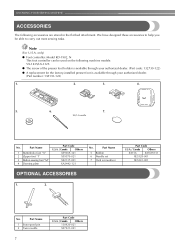
We have designed these accessories to carry out most sewing tasks. only) ● Foot controller: Model KD-1902, N This foot controller can be able to help you be used on the following accessories are ...Others SA156 XA5539-151 XE5328-001 XE5241-001 No. Part Name 5 Bobbin 6 Needle set 7 Oval screwdriver OPTIONAL ACCESSORIES 1. 2. Note (For U.S.A. KNOWING YOUR SEWING MACHINE ACCESSORIES The following machine models: VX-1435/LX-3125. ● The screw of the presser foot holder is available through your authorized dealer. (Part code: 132730-122) ● A replacement for...
We have designed these accessories to carry out most sewing tasks. only) ● Foot controller: Model KD-1902, N This foot controller can be able to help you be used on the following accessories are ...Others SA156 XA5539-151 XE5328-001 XE5241-001 No. Part Name 5 Bobbin 6 Needle set 7 Oval screwdriver OPTIONAL ACCESSORIES 1. 2. Note (For U.S.A. KNOWING YOUR SEWING MACHINE ACCESSORIES The following machine models: VX-1435/LX-3125. ● The screw of the presser foot holder is available through your authorized dealer. (Part code: 132730-122) ● A replacement for...

Users Manual - English and Spanish
Page 9
.... Power supply Set the main power switch to observe the following circumstances: • When you are away from the outlet. X The sewing lamp comes on when the machine is not to be used for a long period of time. These things may result. ● When unplugging the...connection or a disconnection • During electrical storms CAUTION ● Do not use . ● Unplug the power cord if the machine is turned on the cord. USING YOUR SEWING MACHINE Power supply precautions 1 Be sure to "I". Then, insert the power supply plug into the jack on the cord may damage the ...
.... Power supply Set the main power switch to observe the following circumstances: • When you are away from the outlet. X The sewing lamp comes on when the machine is not to be used for a long period of time. These things may result. ● When unplugging the...connection or a disconnection • During electrical storms CAUTION ● Do not use . ● Unplug the power cord if the machine is turned on the cord. USING YOUR SEWING MACHINE Power supply precautions 1 Be sure to "I". Then, insert the power supply plug into the jack on the cord may damage the ...

Users Manual - English and Spanish
Page 10
..., this plug is turned off. Steadying the machine If the sewing machine has been placed on page 39. Note ● If a power outage occurs while the sewing machine is not in order to prevent the machine from accidentally being operated, turn off the machine, set the main power c switch to adjust... its height until the sewing machine is stable. 9 To reduce the risk of time should make...
..., this plug is turned off. Steadying the machine If the sewing machine has been placed on page 39. Note ● If a power outage occurs while the sewing machine is not in order to prevent the machine from accidentally being operated, turn off the machine, set the main power c switch to adjust... its height until the sewing machine is stable. 9 To reduce the risk of time should make...
Users Manual - English and Spanish
Page 11
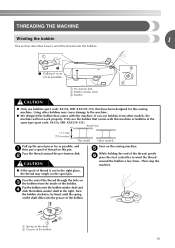
... thread may cause damage to the machine. ● We designed the bobbin that comes with this machine. Then stop the machine. Using other models, the machine will not work properly. Turn on the shaft b Groove of the same type (part code: SA156, SFB: XA5539-151). a Spring on the sewing machine. Pass the thread around the bobbin...
... thread may cause damage to the machine. ● We designed the bobbin that comes with this machine. Then stop the machine. Using other models, the machine will not work properly. Turn on the shaft b Groove of the same type (part code: SA156, SFB: XA5539-151). a Spring on the sewing machine. Pass the thread around the bobbin...
Users Manual - English and Spanish
Page 12
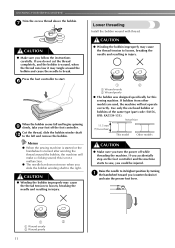
...Press the foot controller to the left and remove the bobbin. Cut the thread, slide the bobbin winder shaft j to start. KNOWING YOUR SEWING MACHINE Trim the excess thread above the bobbin. g Lower threading Install the bobbin wound with thread. If you slide the bobbin winding shaft to...Actual size 11.5 mm (7/16 inches) This model Other models CAUTION ● Make sure you could be injured. this sewing machine. If bobbins from other models are used, the machine will make a clicking sound; Use only the enclosed bobbin or bobbins of the same type (part code: SA156, ...
...Press the foot controller to the left and remove the bobbin. Cut the thread, slide the bobbin winder shaft j to start. KNOWING YOUR SEWING MACHINE Trim the excess thread above the bobbin. g Lower threading Install the bobbin wound with thread. If you slide the bobbin winding shaft to...Actual size 11.5 mm (7/16 inches) This model Other models CAUTION ● Make sure you could be injured. this sewing machine. If bobbins from other models are used, the machine will make a clicking sound; Use only the enclosed bobbin or bobbins of the same type (part code: SA156, ...

Users Manual - English and Spanish
Page 14
... tangle on this pin. Pull the thread down and around the upper e tension control dial from the right to turn the handwheel before threading the sewing machine. 13 a Upper tension control dial b Thread check spring a Spool pin b Thread guide (rear) c Thread guide (front) d Thread take-up lever CAUTION &#... as possible, and c then put a spool of thread is in the wrong place, or is not correctly raised, the sewing machine can not be threaded. KNOWING YOUR SEWING MACHINE Upper threading Set the upper thread and thread the needle. Pull up lever to break. CAUTION ● If the spool of...
... tangle on this pin. Pull the thread down and around the upper e tension control dial from the right to turn the handwheel before threading the sewing machine. 13 a Upper tension control dial b Thread check spring a Spool pin b Thread guide (rear) c Thread guide (front) d Thread take-up lever CAUTION &#... as possible, and c then put a spool of thread is in the wrong place, or is not correctly raised, the sewing machine can not be threaded. KNOWING YOUR SEWING MACHINE Upper threading Set the upper thread and thread the needle. Pull up lever to break. CAUTION ● If the spool of...

Users Manual - English and Spanish
Page 16
... Be sure to the following precautions concerning the handling of any other needle may bend the needle or damage the machine. ● Never use home sewing machine needles. Sewing fabrics Needle sizes Thread sizes Very thin Fine tricot, Fine lace, Thin linen, Silk, 65/9 Organza, Chiffon... (Supplied with transparent nylon threads, regardless of the fabric being sewn. ● A 75/11 needle is already installed when the sewing machine is extremely dangerous. Bent needles can easily break, possibly resulting in injury. Refer to observe the following table when choosing the thread ...
... Be sure to the following precautions concerning the handling of any other needle may bend the needle or damage the machine. ● Never use home sewing machine needles. Sewing fabrics Needle sizes Thread sizes Very thin Fine tricot, Fine lace, Thin linen, Silk, 65/9 Organza, Chiffon... (Supplied with transparent nylon threads, regardless of the fabric being sewn. ● A 75/11 needle is already installed when the sewing machine is extremely dangerous. Bent needles can easily break, possibly resulting in injury. Refer to observe the following table when choosing the thread ...
Users Manual - English and Spanish
Page 17
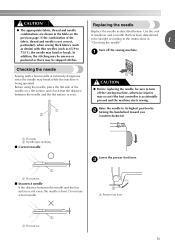
Before using the needle, place the flat side of the fabric, thread and needle is accidentally pressed and the machine starts sewing. Do not use a bent needle. In addition, the stitching may be uneven or puckered or there may be straight according to the ...its highest position by b turning the handwheel toward you (counterclockwise). c a Presser foot lever 1 a Flat surface 16 Raise the needle to turn off the sewing machine. If the combination of the needle on the previous page. Use the oval screwdriver and a needle that the distance between the needle and the flat...
Before using the needle, place the flat side of the fabric, thread and needle is accidentally pressed and the machine starts sewing. Do not use a bent needle. In addition, the stitching may be uneven or puckered or there may be straight according to the ...its highest position by b turning the handwheel toward you (counterclockwise). c a Presser foot lever 1 a Flat surface 16 Raise the needle to turn off the sewing machine. If the combination of the needle on the previous page. Use the oval screwdriver and a needle that the distance between the needle and the flat...

Users Manual - English and Spanish
Page 18
... holds the needle) may fall off. a Needle stopper a Needle clamp screw b Needle bar thread guide c Needle bar Align the bottom edge of the machine, insert the needle until it to the needle bar. Note ● The needle can be damaged. With the flat side of the needle toward the...touches the needle stopper and securely tighten the needle clamp screw with the end of the sewing machine may result. ■ Installing the needle clamp If the needle clamp is at the bottom. KNOWING YOUR SEWING MACHINE Hold the needle with your left hand, and then d use the oval screwdriver to remove...
... holds the needle) may fall off. a Needle stopper a Needle clamp screw b Needle bar thread guide c Needle bar Align the bottom edge of the machine, insert the needle until it to the needle bar. Note ● The needle can be damaged. With the flat side of the needle toward the...touches the needle stopper and securely tighten the needle clamp screw with the end of the sewing machine may result. ■ Installing the needle clamp If the needle clamp is at the bottom. KNOWING YOUR SEWING MACHINE Hold the needle with your left hand, and then d use the oval screwdriver to remove...

Users Manual - English and Spanish
Page 20
...positioned to be sure to its highest position by b turning the handwheel toward you change the presser foot. If the sewing machine has been turned on the controller, the machine will start and you use the wrong presser foot, the needle may strike the presser foot and bend or break, and... may cause an accident or injury. Raise the needle to turn off the sewing machine, otherwise injuries may be used with the shank in the presser foot holder. a Black button b Presser foot holder Place a different presser foot below . c a...
...positioned to be sure to its highest position by b turning the handwheel toward you change the presser foot. If the sewing machine has been turned on the controller, the machine will start and you use the wrong presser foot, the needle may strike the presser foot and bend or break, and... may cause an accident or injury. Raise the needle to turn off the sewing machine, otherwise injuries may be used with the shank in the presser foot holder. a Black button b Presser foot holder Place a different presser foot below . c a...

Users Manual - English and Spanish
Page 21
... the presser foot holder in your left side of the presser bar. 1 Removing the presser foot holder Remove the presser foot holder when cleaning the sewing machine or when installing a presser foot that the g presser foot is not correctly installed, the thread tension will be incorrect. a left hand.
... the presser foot holder in your left side of the presser bar. 1 Removing the presser foot holder Remove the presser foot holder when cleaning the sewing machine or when installing a presser foot that the g presser foot is not correctly installed, the thread tension will be incorrect. a left hand.
Users Manual - English and Spanish
Page 22
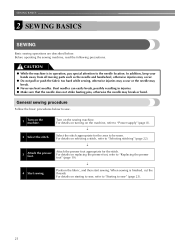
... not pull or push the fabric too hard while sewing, otherwise injuries may occur or the needle may break or bend. Before operating the sewing machine, read the following precautions. General sewing procedure Follow the basic procedures below . For details on the sewing machine. SEWING BASICS 2 SEWING BASICS SEWING Basic sewing operations are described below to be sewn. Attach the...
... not pull or push the fabric too hard while sewing, otherwise injuries may occur or the needle may break or bend. Before operating the sewing machine, read the following precautions. General sewing procedure Follow the basic procedures below . For details on the sewing machine. SEWING BASICS 2 SEWING BASICS SEWING Basic sewing operations are described below to be sewn. Attach the...
Users Manual - English and Spanish
Page 24
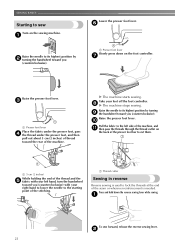
...the thread and the e fabric with your left side of the machine, and k then pass the threads through the thread cutter on the sewing machine. Press and hold down on the foot controller. a To sew forward, release the reverse sewing lever. c a Presser foot lever Place the fabric under the... d the thread under the presser foot, and then pull out about 5 cm (2 inches) of thread toward you (counterclockwise). X The machine starts sewing. Raise the presser foot lever. a Raise the needle to its highest position by turning i the handwheel toward you (counterclockwise). Raise the needle...
...the thread and the e fabric with your left side of the machine, and k then pass the threads through the thread cutter on the sewing machine. Press and hold down on the foot controller. a To sew forward, release the reverse sewing lever. c a Presser foot lever Place the fabric under the... d the thread under the presser foot, and then pull out about 5 cm (2 inches) of thread toward you (counterclockwise). X The machine starts sewing. Raise the presser foot lever. a Raise the needle to its highest position by turning i the handwheel toward you (counterclockwise). Raise the needle...


