Operation Manual
Page 2
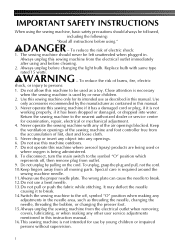
...from outlet. 9. Do not operate this manual. Do not unplug by young children or impaired persons without supervision. 1 It may deflect the needle causing it has been dropped or damaged, or dropped into any object into water. Never drop or insert any openings. 6. IMPORTANT SAFETY ... 16.This sewing machine is being used by or near children. 2. The sewing machine should always be used as threading the needle, changing the needle, threading the bobbin, or changing the presser foot. 15.Always unplug the sewing machine from all instructions before using." To disconnect,...
...from outlet. 9. Do not operate this manual. Do not unplug by young children or impaired persons without supervision. 1 It may deflect the needle causing it has been dropped or damaged, or dropped into any object into water. Never drop or insert any openings. 6. IMPORTANT SAFETY ... 16.This sewing machine is being used by or near children. 2. The sewing machine should always be used as threading the needle, changing the needle, threading the bobbin, or changing the presser foot. 15.Always unplug the sewing machine from all instructions before using." To disconnect,...
Operation Manual
Page 3
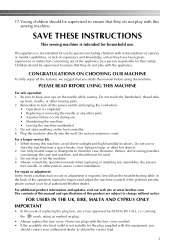
... features, we suggest that you should contact your authorized dealer to obtain the correct lead. 2 Be sure to keep your local authorized Brother dealer. up lever, needle, or other hot objects. 2. When storing this product are subject to change without notice. For repair or adjustment In the event a... play with the appliance. Do not drop or hit the machine. 4. For additional product information and updates, visit our web site at www.brother.com The contents of this manual and specifications of replacing the plug fuse, use or store the machine near a space heater, iron, halogen ...
... features, we suggest that you should contact your authorized dealer to obtain the correct lead. 2 Be sure to keep your local authorized Brother dealer. up lever, needle, or other hot objects. 2. When storing this product are subject to change without notice. For repair or adjustment In the event a... play with the appliance. Do not drop or hit the machine. 4. For additional product information and updates, visit our web site at www.brother.com The contents of this manual and specifications of replacing the plug fuse, use or store the machine near a space heater, iron, halogen ...
Operation Manual
Page 4
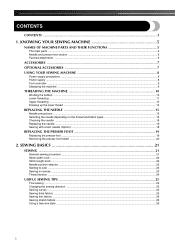
... ...26 Using a free-arm style ...26 3 KNOWING YOUR SEWING MACHINE 5 NAMES OF MACHINE PARTS AND THEIR FUNCTIONS 5 The main parts ...5 Needle and presser foot section ...6 Flat bed attachment ...6 ACCESSORIES ...7 OPTIONAL ACCESSORIES 7 USING YOUR SEWING MACHINE 8 Power supply precautions ...8 Power supply ...8 ... Drawing up the lower thread ...14 REPLACING THE NEEDLE 15 Needle precautions ...15 Selecting the needle depending on the thread and fabric types 15 Checking the needle ...16 Replacing the needle ...16 Sewing with a twin needle (Option) ...18 REPLACING THE PRESSER FOOT 19 Replacing...
... ...26 Using a free-arm style ...26 3 KNOWING YOUR SEWING MACHINE 5 NAMES OF MACHINE PARTS AND THEIR FUNCTIONS 5 The main parts ...5 Needle and presser foot section ...6 Flat bed attachment ...6 ACCESSORIES ...7 OPTIONAL ACCESSORIES 7 USING YOUR SEWING MACHINE 8 Power supply precautions ...8 Power supply ...8 ... Drawing up the lower thread ...14 REPLACING THE NEEDLE 15 Needle precautions ...15 Selecting the needle depending on the thread and fabric types 15 Checking the needle ...16 Replacing the needle ...16 Sewing with a twin needle (Option) ...18 REPLACING THE PRESSER FOOT 19 Replacing...
Operation Manual
Page 6
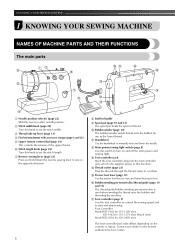
... or the nearest authorized service center. KNOWING YOUR SEWING MACHINE 1 KNOWING YOUR SEWING MACHINE NAMES OF MACHINE PARTS AND THEIR FUNCTIONS The main parts a Needle position selector (page 22) Shift this machine. f Stitch length knob (page 22) Turn this knob to set the stitch length. j Bobbin winder...for use as the lower thread. q Foot controller (page 9) Use the foot controller to control the sewing speed and to manually raise and lower the needle. c Thread take-up lever (page 13) d Flat bed attachment with accessory storage (page 6 and 26) e Upper tension control dial (page 24...
... or the nearest authorized service center. KNOWING YOUR SEWING MACHINE 1 KNOWING YOUR SEWING MACHINE NAMES OF MACHINE PARTS AND THEIR FUNCTIONS The main parts a Needle position selector (page 22) Shift this machine. f Stitch length knob (page 22) Turn this knob to set the stitch length. j Bobbin winder...for use as the lower thread. q Foot controller (page 9) Use the foot controller to control the sewing speed and to manually raise and lower the needle. c Thread take-up lever (page 13) d Flat bed attachment with accessory storage (page 6 and 26) e Upper tension control dial (page 24...
Operation Manual
Page 7
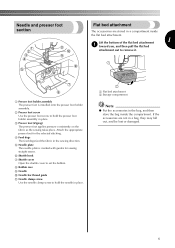
...bag inside the flat bed attachment. h Bobbin case i Needle j Needle bar thread guide k Needle clamp screw Use the needle clamp screw to set the bobbin. If the accessories are stored in a compartment inside the compartment. e Needle plate The needle plate is installed onto the presser foot holder assembly. b... on the fabric as the sewing takes place. a Flat bed attachment b Storage compartment Note ● Put the accessories in place. Needle and presser foot section Flat bed attachment The accessories are not in a bag, they may fall out, and be lost or damaged....
...bag inside the flat bed attachment. h Bobbin case i Needle j Needle bar thread guide k Needle clamp screw Use the needle clamp screw to set the bobbin. If the accessories are stored in a compartment inside the compartment. e Needle plate The needle plate is installed onto the presser foot holder assembly. b... on the fabric as the sewing takes place. a Flat bed attachment b Storage compartment Note ● Put the accessories in place. Needle and presser foot section Flat bed attachment The accessories are not in a bag, they may fall out, and be lost or damaged....
Operation Manual
Page 8
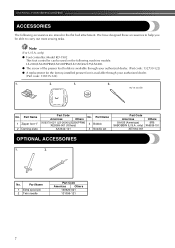
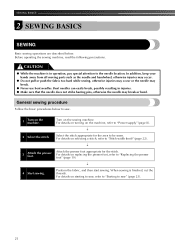
... Americas Others No. Part Name 1 Extra spool pin 2 Twin needle Part Code Americas Others 130920-021 131096-121 7 No. only) XA5539-151 XE7064-001 OPTIONAL ACCESSORIES 1. 2. KNOWING YOUR SEWING MACHINE ACCESSORIES The following machine models: LS-2000/LS2250PRW/LS2300PRW/LS2350/LX2375/LS2400. ● The screw of the presser foot holder is available...
... Americas Others No. Part Name 1 Extra spool pin 2 Twin needle Part Code Americas Others 130920-021 131096-121 7 No. only) XA5539-151 XE7064-001 OPTIONAL ACCESSORIES 1. 2. KNOWING YOUR SEWING MACHINE ACCESSORIES The following machine models: LS-2000/LS2250PRW/LS2300PRW/LS2350/LX2375/LS2400. ● The screw of the presser foot holder is available...
Operation Manual
Page 12
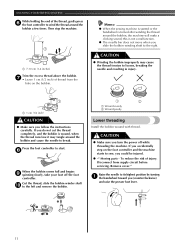
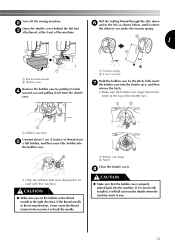
... and the machine starts to sew, you slide the bobbin winding shaft to loosen, breaking the needle and resulting in injury. Then stop the machine. If you turn the power off the foot ...after winding the thread around the bobbin and cause the needle to its highest position by turning a the handwheel toward you follow the instructions carefully. Remove cover." ...Raise the needle to break. g • Leave 1 cm (1/2 inch) of thread from supply circuit before servicing....
... and the machine starts to sew, you slide the bobbin winding shaft to loosen, breaking the needle and resulting in injury. Then stop the machine. If you turn the power off the foot ...after winding the thread around the bobbin and cause the needle to its highest position by turning a the handwheel toward you follow the instructions carefully. Remove cover." ...Raise the needle to break. g • Leave 1 cm (1/2 inch) of thread from supply circuit before servicing....
Operation Manual
Page 13
... bobbin case. • Only use bobbins that the bobbin case is incorrectly installed, it may cause the thread tension to be incorrect or break the needle. Pull the trailing thread through the slot, down f and to sew. 12 CAUTION ● Make sure you and pulling it out from the shuttle when...
... bobbin case. • Only use bobbins that the bobbin case is incorrectly installed, it may cause the thread tension to be incorrect or break the needle. Pull the trailing thread through the slot, down f and to sew. 12 CAUTION ● Make sure you and pulling it out from the shuttle when...
Operation Manual
Page 14
...picks up the spool pin as far as possible, and d then put a spool of thread is in the groove catches the thread 1 • If the needle is set incorrectly, the thread may tangle on this pin. a Upper tension control dial b Thread check spring 13 b CAUTION ● If the spool of thread... on the spool pin and cause the needle to turn the handwheel before threading the sewing machine. Be sure to break. a Spool pin b Thread guide (rear) c Thread guide (front) d Thread take -up ...
...picks up the spool pin as far as possible, and d then put a spool of thread is in the groove catches the thread 1 • If the needle is set incorrectly, the thread may tangle on this pin. a Upper tension control dial b Thread check spring 13 b CAUTION ● If the spool of thread... on the spool pin and cause the needle to turn the handwheel before threading the sewing machine. Be sure to break. a Spool pin b Thread guide (rear) c Thread guide (front) d Thread take -up ...

Operation Manual
Page 15
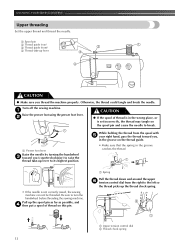
... thread take -up lever before you feed the upper thread. ● If you incorrectly feed the thread you b (counterclockwise) to lower the needle. Guide the thread through the thread take-up g lever from front to finish threading process. Turn the handwheel toward you c (counterclockwise) to raise ...Pull thread loop to back and pull i out about 5 cm (2 inches) of thread. a Upper thread b Lower thread c 5cm (2 inches) 14 a Needle bar thread guide Thread the needle from right to draw up the lower thread. Make sure you raise the presser foot lever and the thread take -up the lower...
... thread take -up lever before you feed the upper thread. ● If you incorrectly feed the thread you b (counterclockwise) to lower the needle. Guide the thread through the thread take-up g lever from front to finish threading process. Turn the handwheel toward you c (counterclockwise) to raise ...Pull thread loop to back and pull i out about 5 cm (2 inches) of thread. a Upper thread b Lower thread c 5cm (2 inches) 14 a Needle bar thread guide Thread the needle from right to draw up the lower thread. Make sure you raise the presser foot lever and the thread take -up the lower...
Operation Manual
Page 16
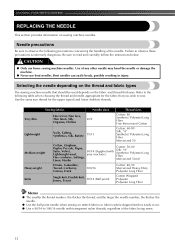
...easily occur. ● Use a 90/14 to the following precautions concerning the handling of the needle. Needle precautions Be sure to sew. CAUTION ● Only use bent needles. Refer to 100/16 needle with your machine.) Cotton: 50-60 Silk: "A" Synthetic/ Polyester Long Fiber Mercerized 50-60 Heavyweight... Fiber Memo ● The smaller the thread number, the thicker the thread; and the larger the needle number, the thicker the needle. ● Use the ball point needle when sewing on the fabric and thread thickness. Be sure to observe these precautions is extremely dangerous. ...
...easily occur. ● Use a 90/14 to the following precautions concerning the handling of the needle. Needle precautions Be sure to sew. CAUTION ● Only use bent needles. Refer to 100/16 needle with your machine.) Cotton: 50-60 Silk: "A" Synthetic/ Polyester Long Fiber Mercerized 50-60 Heavyweight... Fiber Memo ● The smaller the thread number, the thicker the thread; and the larger the needle number, the thicker the needle. ● Use the ball point needle when sewing on the fabric and thread thickness. Be sure to observe these precautions is extremely dangerous. ...

Operation Manual
Page 17
...and the machine starts sewing. If the combination of the needle on the previous page. c 1 a Flat surface ■ Incorrect needle If the distance between the needle and the flat surface is even. 1 2 Replacing the needle Replace the needle as 65/9 to the instructions in the table on a... uneven or puckered or there may break while the machine is bent. CAUTION ● The appropriate fabric, thread and needle combinations are shown in "Checking the needle" . 1 Turn off the sewing machine, otherwise injuries may bend or break. In addition, the stitching may be sure...
...and the machine starts sewing. If the combination of the needle on the previous page. c 1 a Flat surface ■ Incorrect needle If the distance between the needle and the flat surface is even. 1 2 Replacing the needle Replace the needle as 65/9 to the instructions in the table on a... uneven or puckered or there may break while the machine is bent. CAUTION ● The appropriate fabric, thread and needle combinations are shown in "Checking the needle" . 1 Turn off the sewing machine, otherwise injuries may bend or break. In addition, the stitching may be sure...
Operation Manual
Page 18
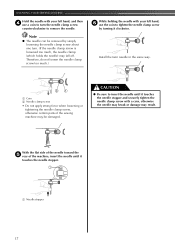
... left hand, and then d use the coin to tighten the needle clamp screw by simply loosening the needle clamp screw about one turn the needle clamp screw counterclockwise to remove the needle. While holding the needle with your left hand, f use a coin to turn . (If the needle clamp screw is loosened too much .) Install the twin...
... left hand, and then d use the coin to tighten the needle clamp screw by simply loosening the needle clamp screw about one turn the needle clamp screw counterclockwise to remove the needle. While holding the needle with your left hand, f use a coin to turn . (If the needle clamp screw is loosened too much .) Install the twin...

Operation Manual
Page 19
...See page 13 for more details. If the needle hits the presser foot, the needle may bend or break. ■ Twin needle threading Attach the twin needle. Thread the left needle from the first spool to thread c the machine to back. The needle could break, and damage the machine. ●...; Do not sew with bent needles. If the fabric is turned while the needle is the same as for normally threading the machine (for a single needle). a Left needle thread passes through the needle bar thread guide. Other needles could break and injure you. ● Use the zigzag...
...See page 13 for more details. If the needle hits the presser foot, the needle may bend or break. ■ Twin needle threading Attach the twin needle. Thread the left needle from the first spool to thread c the machine to back. The needle could break, and damage the machine. ●...; Do not sew with bent needles. If the fabric is turned while the needle is the same as for normally threading the machine (for a single needle). a Left needle thread passes through the needle bar thread guide. Other needles could break and injure you. ● Use the zigzag...
Operation Manual
Page 20
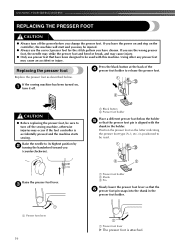
... this machine. CAUTION ● Before replacing the presser foot, be sure to be used with the shank in the presser foot holder. Raise the needle to its highest position by b turning the handwheel toward you have been designed to turn it off. If the sewing machine has been turned on...starts sewing. KNOWING YOUR SEWING MACHINE REPLACING THE PRESSER FOOT CAUTION ● Always turn off the power before you use the wrong presser foot, the needle may strike the presser foot and bend or break, and may cause injury. ● Only use the correct presser foot for the stitch pattern ...
... this machine. CAUTION ● Before replacing the presser foot, be sure to be used with the shank in the presser foot holder. Raise the needle to its highest position by b turning the handwheel toward you have been designed to turn it off. If the sewing machine has been turned on...starts sewing. KNOWING YOUR SEWING MACHINE REPLACING THE PRESSER FOOT CAUTION ● Always turn off the power before you use the wrong presser foot, the needle may strike the presser foot and bend or break, and may cause injury. ● Only use the correct presser foot for the stitch pattern ...
Operation Manual
Page 22
... to sew" (page 23). 21 Position the fabric, and then start sewing. In addition, keep your hands away from all moving parts such as the needle and handwheel, otherwise injuries may occur. ● Do not pull or push the fabric too hard while sewing, otherwise injuries may occur or the... needle may break or bend. For details on turning on the machine. Attach the presser foot appropriate for the area to "Replacing the presser foot" (page ...
... to sew" (page 23). 21 Position the fabric, and then start sewing. In addition, keep your hands away from all moving parts such as the needle and handwheel, otherwise injuries may occur. ● Do not pull or push the fabric too hard while sewing, otherwise injuries may occur or the... needle may break or bend. For details on turning on the machine. Attach the presser foot appropriate for the area to "Replacing the presser foot" (page ...

Operation Manual
Page 23
...fabric scrap. Button sewing (see "Buttonhole sewing" on page 31.) 3. Note ● Do not move the knob while the needle is in the fabric. ● Always set below 3. a Stitch length knob b Shorter 2 c Longer Needle position selector By shifting this knob. When the knob is in the fabric. ● When using the twin... needle. 22 The numbers above the knob represent the stitch length in millimeters (mm). The F area is not fed. The larger numbers set a longer stitch ...
...fabric scrap. Button sewing (see "Buttonhole sewing" on page 31.) 3. Note ● Do not move the knob while the needle is in the fabric. ● Always set below 3. a Stitch length knob b Shorter 2 c Longer Needle position selector By shifting this knob. When the knob is in the fabric. ● When using the twin... needle. 22 The numbers above the knob represent the stitch length in millimeters (mm). The F area is not fed. The larger numbers set a longer stitch ...
Operation Manual
Page 24
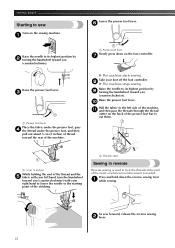
... presser foot, pass d the thread under the presser foot, and then pull out about 5 cm (2 inches) of thread toward you (counterclockwise). a Raise the needle to cut them. h X The machine stops sewing. a 5 cm (2 inches) While holding the end of the thread and the e fabric with your left ... BASICS Starting to its highest position by i turning the handwheel toward the rear of the stitching. Take your right hand to lower the needle to the left hand, turn the handwheel toward you (counterclockwise) with your foot off the foot controller. Press and hold down on the...
... presser foot, pass d the thread under the presser foot, and then pull out about 5 cm (2 inches) of thread toward you (counterclockwise). a Raise the needle to cut them. h X The machine stops sewing. a 5 cm (2 inches) While holding the end of the thread and the e fabric with your left ... BASICS Starting to its highest position by i turning the handwheel toward the rear of the stitching. Take your right hand to lower the needle to the left hand, turn the handwheel toward you (counterclockwise) with your foot off the foot controller. Press and hold down on the...

Operation Manual
Page 26
...If the fabric does not fit easily under the same conditions that are described below. When sewing along a curve while using the twin needle, be achieved. SEWING BASICS USEFUL SEWING TIPS Various ways to achieve better results for your project, and check the thread tension and stitch... length and width. If the needle was raised, lower the needle by turning the handwheel toward you (counterclockwise). Since the results differ depending on the type of fabric sewn, perform the ...
...If the fabric does not fit easily under the same conditions that are described below. When sewing along a curve while using the twin needle, be achieved. SEWING BASICS USEFUL SEWING TIPS Various ways to achieve better results for your project, and check the thread tension and stitch... length and width. If the needle was raised, lower the needle by turning the handwheel toward you (counterclockwise). Since the results differ depending on the type of fabric sewn, perform the ...

Operation Manual
Page 28
...pin together the fabric pieces. c • For details, refer to "Starting to sew" (page 23). 27 Note ● It is recommended that the needle does not touch the presser foot. c • For details, refer to "Starting to sew" (page 23). The Satin Stitch can use the zigzag ...23). CAUTION ● Slowly turn the handwheel toward you (counterclockwise) and check that a test sample be used for reinforcement. If the needle hits the presser foot, the needle may bend or break. ■ Satin stitch When the stitch length is set in one operation. Start sewing. b When sewing is ...
...pin together the fabric pieces. c • For details, refer to "Starting to sew" (page 23). 27 Note ● It is recommended that the needle does not touch the presser foot. c • For details, refer to "Starting to sew" (page 23). The Satin Stitch can use the zigzag ...23). CAUTION ● Slowly turn the handwheel toward you (counterclockwise) and check that a test sample be used for reinforcement. If the needle hits the presser foot, the needle may bend or break. ■ Satin stitch When the stitch length is set in one operation. Start sewing. b When sewing is ...


