Operation Manual
Page 2
... risk of the air openings blocked. Replace bulb with any other user service adjustments mentioned in this instruction manual. 16.This sewing machine is required around the sewing machine needle. 11.Always use as contained in this manual. 3. IMPORTANT SAFETY INSTRUCTIONS When using the sewing machine, basic safety precautions should never be used as threading the needle, changing the needle, threading the bobbin, or changing the presser foot. 15.Always unplug the sewing machine from outlet. 9. The sewing machine should always be followed...
... risk of the air openings blocked. Replace bulb with any other user service adjustments mentioned in this instruction manual. 16.This sewing machine is required around the sewing machine needle. 11.Always use as contained in this manual. 3. IMPORTANT SAFETY INSTRUCTIONS When using the sewing machine, basic safety precautions should never be used as threading the needle, changing the needle, threading the bobbin, or changing the presser foot. 15.Always unplug the sewing machine from outlet. 9. The sewing machine should always be followed...
Operation Manual
Page 3
... sewing machine. PLEASE READ BEFORE USING THIS MACHINE For safe operation 1. Remember to turn off the power switch and unplug the cord when: • Operation is completed • Replacing or removing the needle or any assemblies, the presser feet, needle, or other parts • A power failure occurs during use of replacing the plug fuse, use a fuse approved by ASTA to clean the case. Benzene, thinner, and scouring powders can damage the case and machine...
... sewing machine. PLEASE READ BEFORE USING THIS MACHINE For safe operation 1. Remember to turn off the power switch and unplug the cord when: • Operation is completed • Replacing or removing the needle or any assemblies, the presser feet, needle, or other parts • A power failure occurs during use of replacing the plug fuse, use a fuse approved by ASTA to clean the case. Benzene, thinner, and scouring powders can damage the case and machine...
Operation Manual
Page 4
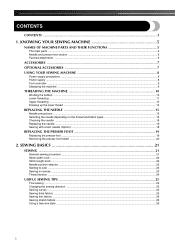
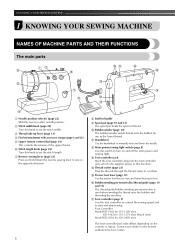
... sewing ...25 Changing the sewing direction ...25 Sewing curves ...25 Sewing thick fabrics ...25 Sewing thin fabrics ...26 Sewing stretch fabrics ...26 Using a free-arm style ...26 3 KNOWING YOUR SEWING MACHINE 5 NAMES OF MACHINE PARTS AND THEIR FUNCTIONS 5 The main parts ...5 Needle and presser foot section ...6 Flat bed attachment ...6 ACCESSORIES ...7 OPTIONAL ACCESSORIES 7 USING YOUR SEWING MACHINE 8 Power supply precautions ...8 Power supply ...8 Foot controller ...9 Steadying the machine ...9 THREADING THE MACHINE 10 Winding the bobbin ...10 Lower threading ...11 Upper threading...
... sewing ...25 Changing the sewing direction ...25 Sewing curves ...25 Sewing thick fabrics ...25 Sewing thin fabrics ...26 Sewing stretch fabrics ...26 Using a free-arm style ...26 3 KNOWING YOUR SEWING MACHINE 5 NAMES OF MACHINE PARTS AND THEIR FUNCTIONS 5 The main parts ...5 Needle and presser foot section ...6 Flat bed attachment ...6 ACCESSORIES ...7 OPTIONAL ACCESSORIES 7 USING YOUR SEWING MACHINE 8 Power supply precautions ...8 Power supply ...8 Foot controller ...9 Steadying the machine ...9 THREADING THE MACHINE 10 Winding the bobbin ...10 Lower threading ...11 Upper threading...
Operation Manual
Page 6
c Thread take-up lever (page 13) d Flat bed attachment with accessory storage (page 6 and 26) e Upper tension control dial (page 24) This controls the tension of thread. j Bobbin winder (page 10) The bobbin winder winds thread onto the bobbin for 220-240V area The foot controller part code differs depending on and off the main power and sewing light. o Presser foot lever (page 13) Use the presser foot lever to start and stop sewing. q Foot controller (page 9) Use the foot controller to control the sewing speed and to raise and lower the presser foot. l Main power/sewing light switch...
c Thread take-up lever (page 13) d Flat bed attachment with accessory storage (page 6 and 26) e Upper tension control dial (page 24) This controls the tension of thread. j Bobbin winder (page 10) The bobbin winder winds thread onto the bobbin for 220-240V area The foot controller part code differs depending on and off the main power and sewing light. o Presser foot lever (page 13) Use the presser foot lever to start and stop sewing. q Foot controller (page 9) Use the foot controller to control the sewing speed and to raise and lower the presser foot. l Main power/sewing light switch...
Operation Manual
Page 7
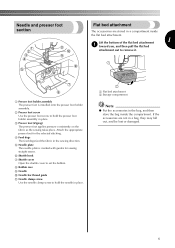
...bed attachment. Lift the bottom of the flat bed attachment 1 a toward you, and then pull the flat bed attachment out to hold the presser foot holder assembly in the sewing direction. a Presser foot holder assembly The presser foot is marked with guides for the selected stitching. Attach the appropriate presser foot for sewing straight seams. f Shuttle hook g Shuttle cover Open the shuttle cover to hold the needle in a bag, they may fall out, and be lost or damaged. 6 h Bobbin case i Needle j Needle bar thread guide k Needle clamp screw Use the needle clamp screw to remove it...
...bed attachment. Lift the bottom of the flat bed attachment 1 a toward you, and then pull the flat bed attachment out to hold the presser foot holder assembly in the sewing direction. a Presser foot holder assembly The presser foot is marked with guides for the selected stitching. Attach the appropriate presser foot for sewing straight seams. f Shuttle hook g Shuttle cover Open the shuttle cover to hold the needle in a bag, they may fall out, and be lost or damaged. 6 h Bobbin case i Needle j Needle bar thread guide k Needle clamp screw Use the needle clamp screw to remove it...
Operation Manual
Page 8
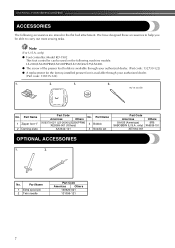
... 1 Zipper foot "I" 2 Darning plate Part Code Americas Others No. Part Name 1 Extra spool pin 2 Twin needle Part Code Americas Others 130920-021 131096-121 7 only) ● Foot controller: Model KD-1902 This foot controller can be able to carry out most sewing tasks. KNOWING YOUR SEWING MACHINE ACCESSORIES The following machine models: LS-2000/LS2250PRW/LS2300PRW/LS2350/LX2375/LS2400. ● The screw of the presser foot holder is available through your authorized dealer. (Part code: 132730-122) ● A replacement for the factory-installed presser foot...
... 1 Zipper foot "I" 2 Darning plate Part Code Americas Others No. Part Name 1 Extra spool pin 2 Twin needle Part Code Americas Others 130920-021 131096-121 7 only) ● Foot controller: Model KD-1902 This foot controller can be able to carry out most sewing tasks. KNOWING YOUR SEWING MACHINE ACCESSORIES The following machine models: LS-2000/LS2250PRW/LS2300PRW/LS2350/LX2375/LS2400. ● The screw of the presser foot holder is available through your authorized dealer. (Part code: 132730-122) ● A replacement for the factory-installed presser foot...
Operation Manual
Page 12
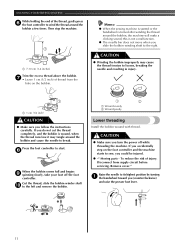
... parts - Remove cover." this is turned after winding the thread around the bobbin, the machine will make a clicking sound; To reduce the risk of injury. Raise the needle to its highest position by turning a the handwheel toward you turn the power off the foot controller. Cut the thread, slide the bobbin winder shaft j to start. CAUTION ● Make sure you (counterclockwise) and raise the presser foot lever. 11 KNOWING YOUR SEWING MACHINE While...
... parts - Remove cover." this is turned after winding the thread around the bobbin, the machine will make a clicking sound; To reduce the risk of injury. Raise the needle to its highest position by turning a the handwheel toward you turn the power off the foot controller. Cut the thread, slide the bobbin winder shaft j to start. CAUTION ● Make sure you (counterclockwise) and raise the presser foot lever. 11 KNOWING YOUR SEWING MACHINE While...

Operation Manual
Page 17
..., the needle is accidentally pressed and the machine starts sewing. a Flat side b Needle type marking ■ Correct needle Lower the presser foot lever. a Presser foot lever 1 a Flat surface 16 Raise the needle to 75/11), the needle may occur if the foot controller is bent. CAUTION ● The appropriate fabric, thread and needle combinations are shown in "Checking the needle" . 1 Turn off the sewing machine, otherwise injuries may bend or break. In addition, the stitching may...
..., the needle is accidentally pressed and the machine starts sewing. a Flat side b Needle type marking ■ Correct needle Lower the presser foot lever. a Presser foot lever 1 a Flat surface 16 Raise the needle to 75/11), the needle may occur if the foot controller is bent. CAUTION ● The appropriate fabric, thread and needle combinations are shown in "Checking the needle" . 1 Turn off the sewing machine, otherwise injuries may bend or break. In addition, the stitching may...

Operation Manual
Page 19
... making decorative stitches. 1 CAUTION ● Use only twin needles that have designed your machine so you (counterclockwise) and check that the needle does not touch the presser foot. c Needle bar thread guide 18 Sewing with a twin needle (Option) We have been made for this machine (part code: 131096-121). a Attach the twin needle in the same way as for normally threading the machine (for threading the machine to the needle bar thread guide is lowered, the needle may bend or break. ● When changing the sewing direction...
... making decorative stitches. 1 CAUTION ● Use only twin needles that have designed your machine so you (counterclockwise) and check that the needle does not touch the presser foot. c Needle bar thread guide 18 Sewing with a twin needle (Option) We have been made for this machine (part code: 131096-121). a Attach the twin needle in the same way as for normally threading the machine (for threading the machine to the needle bar thread guide is lowered, the needle may bend or break. ● When changing the sewing direction...
Operation Manual
Page 20
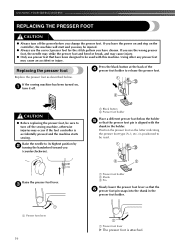
... used with the shank in the presser foot holder. c a Presser foot lever 19 a Presser foot holder b Shank c Pin Slowly lower the presser foot lever so that the f presser foot pin snaps into the shank in the holder. KNOWING YOUR SEWING MACHINE REPLACING THE PRESSER FOOT CAUTION ● Always turn off the power before you have been designed to turn it off the sewing machine, otherwise injuries may cause injury. ● Only use the correct presser foot for the stitch pattern you change the presser foot. If you (counterclockwise). Replace the presser foot...
... used with the shank in the presser foot holder. c a Presser foot lever 19 a Presser foot holder b Shank c Pin Slowly lower the presser foot lever so that the f presser foot pin snaps into the shank in the holder. KNOWING YOUR SEWING MACHINE REPLACING THE PRESSER FOOT CAUTION ● Always turn off the power before you have been designed to turn it off the sewing machine, otherwise injuries may cause injury. ● Only use the correct presser foot for the stitch pattern you change the presser foot. If you (counterclockwise). Replace the presser foot...

Operation Manual
Page 23
... regulated by turning this lever to L (left), M (middle) or R (right), you sew close zigzag stitch), which can sew straight and zigzag stitches on a button. When you can be adjusted according to M when using the twin needle, the knob should be set at M (middle) for sewing on the baseline. The numbers above the knob represent the stitch width in the fabric. ● Always set a longer stitch length. The position needed for the following applications...
... regulated by turning this lever to L (left), M (middle) or R (right), you sew close zigzag stitch), which can sew straight and zigzag stitches on a button. When you can be adjusted according to M when using the twin needle, the knob should be set at M (middle) for sewing on the baseline. The numbers above the knob represent the stitch width in the fabric. ● Always set a longer stitch length. The position needed for the following applications...
Operation Manual
Page 24
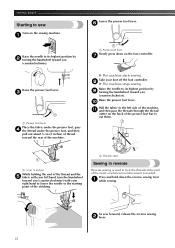
... stitching. Raise the needle to its highest position by b turning the handwheel toward you (counterclockwise). a Thread cutter Sewing in reverse Reverse sewing is needed. Raise the presser foot lever. g X The machine starts sewing. Press and hold down on the foot controller. Raise the presser foot lever. c a Presser foot lever Place the fabric under the presser foot, pass d the thread under the presser foot, and then pull out about 5 cm (2 inches) of thread toward the rear of the seam or wherever reinforcement is used...
... stitching. Raise the needle to its highest position by b turning the handwheel toward you (counterclockwise). a Thread cutter Sewing in reverse Reverse sewing is needed. Raise the presser foot lever. g X The machine starts sewing. Press and hold down on the foot controller. Raise the presser foot lever. c a Presser foot lever Place the fabric under the presser foot, pass d the thread under the presser foot, and then pull out about 5 cm (2 inches) of thread toward the rear of the seam or wherever reinforcement is used...

Operation Manual
Page 25
... to change fabric or thread. If the problem persists, increase the tension in the bobbin by turning the screw clockwise with thin thread. 1 Note ● If the bobbin thread was incorrectly threaded, the upper thread may appear on a scrap of fabric before the next time that the machine is used. Thread tension ■ Upper tension is too loose Loops appear on wrong side of fabric Solution Increase the tension by turning the upper tension- control dial to a lower number. Memo...
... to change fabric or thread. If the problem persists, increase the tension in the bobbin by turning the screw clockwise with thin thread. 1 Note ● If the bobbin thread was incorrectly threaded, the upper thread may appear on a scrap of fabric before the next time that the machine is used. Thread tension ■ Upper tension is too loose Loops appear on wrong side of fabric Solution Increase the tension by turning the upper tension- control dial to a lower number. Memo...

Operation Manual
Page 28
...for sewing stretch materials. Note ● It is set at F.) Needle position M, L, R (For twin needle sewing, always set above 1, it produces a Satin Stitch (a close zigzag stitch). Start sewing. c • For details, refer to "Starting to sew" (page 23). Lower the needle into the fabric at M.) Presser foot Zigzag Needle Single or Twin Baste or pin together the fabric pieces. They are used for reinforcement. b When sewing is set in one operation. Basic stitching Straight stitches are also useful for sewing plain seams. Stitch width 0 Stitch length F-4 Needle...
...for sewing stretch materials. Note ● It is set at F.) Needle position M, L, R (For twin needle sewing, always set above 1, it produces a Satin Stitch (a close zigzag stitch). Start sewing. c • For details, refer to "Starting to sew" (page 23). Lower the needle into the fabric at M.) Presser foot Zigzag Needle Single or Twin Baste or pin together the fabric pieces. They are used for reinforcement. b When sewing is set in one operation. Basic stitching Straight stitches are also useful for sewing plain seams. Stitch width 0 Stitch length F-4 Needle...

Operation Manual
Page 31
... the presser foot. Set the stitch width to the other bar tack. a Sew the predetermined length of the b buttonhole to 2. Stitch length Set between 0 and 1 (F), a stitch width to 5 and the needle position to 1 and sew 5-6 Straight Stitches. b Stop the machine when the needle is in the fabric c on a scrap piece of the stitches (position D). Lower the presser foot. This will move the fabric slightly. Raise the presser foot lever, remove the B b fabric, and cut the thread. 30 Needle position R (right position) Presser foot Zigzag Sew 3-6 stitches. A Step...
... the presser foot. Set the stitch width to the other bar tack. a Sew the predetermined length of the b buttonhole to 2. Stitch length Set between 0 and 1 (F), a stitch width to 5 and the needle position to 1 and sew 5-6 Straight Stitches. b Stop the machine when the needle is in the fabric c on a scrap piece of the stitches (position D). Lower the presser foot. This will move the fabric slightly. Raise the presser foot lever, remove the B b fabric, and cut the thread. 30 Needle position R (right position) Presser foot Zigzag Sew 3-6 stitches. A Step...

Operation Manual
Page 33
... between the holes in order to accommodate most buttons. Place the darning plate on the button as b shown below. Turn the handwheel toward you e (counterclockwise) to sew a few reinforcement stitches. 32 Pull the fabric to the left side of the machine, g and then cut the upper thread and the bobbin thread at a low speed, press and hold down the reverse sewing lever to check that the needle does...
... between the holes in order to accommodate most buttons. Place the darning plate on the button as b shown below. Turn the handwheel toward you e (counterclockwise) to sew a few reinforcement stitches. 32 Pull the fabric to the left side of the machine, g and then cut the upper thread and the bobbin thread at a low speed, press and hold down the reverse sewing lever to check that the needle does...
Operation Manual
Page 43
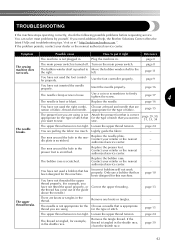
.... Remove the tangle thread. Insert the needle properly. appropriate for example, in . The bobbin case is not appropriate for the type of stitch that has been designed for example, you need additional help, the Brother Solutions Center offers the latest FAQs and troubleshooting tips. Turn on the main power switch. Choose a thread and needle that you are nation of fabric. Use a coin or screwdriver to sew. Loosen the upper thread tension. page...
.... Remove the tangle thread. Insert the needle properly. appropriate for example, in . The bobbin case is not appropriate for the type of stitch that has been designed for example, you need additional help, the Brother Solutions Center offers the latest FAQs and troubleshooting tips. Turn on the main power switch. Choose a thread and needle that you are nation of fabric. Use a coin or screwdriver to sew. Loosen the upper thread tension. page...

Operation Manual
Page 44
... been designed for this machine. The thread tension is scratched or does not turn smoothly. Only use a bobbin that are appropriate for this machine. You have not attached the presserfoot holder properly. Replace the needle plate. Contact your retailer or the nearest authorised service center. Replace the bobbin case. Incorrect bobbins will not work properly. Reset the bobbin thread correctly. Correct the upper threading. Wind the bobbin thread properly. You have not wound the bobbin thread properly. Attach the presser-foot holder...
... been designed for this machine. The thread tension is scratched or does not turn smoothly. Only use a bobbin that are appropriate for this machine. You have not attached the presserfoot holder properly. Replace the needle plate. Contact your retailer or the nearest authorised service center. Replace the bobbin case. Incorrect bobbins will not work properly. Reset the bobbin thread correctly. Correct the upper threading. Wind the bobbin thread properly. You have not wound the bobbin thread properly. Attach the presser-foot holder...

Operation Manual
Page 45
... have not fitted the spool properly. Replace the needle. Remove the needle plate cover and clean the plate and the shuttle race. page 39 You have not threaded the upper thread properly. Correct the upper threading. Replace the bobbin case. Contact your retailer or the nearest authorized service center. Attach the presser foot that is tangled, for this machine. page 24 The thread is correct for the type of stitch. You have not used the right combi...
... have not fitted the spool properly. Replace the needle. Remove the needle plate cover and clean the plate and the shuttle race. page 39 You have not threaded the upper thread properly. Correct the upper threading. Replace the bobbin case. Contact your retailer or the nearest authorized service center. Attach the presser foot that is tangled, for this machine. page 24 The thread is correct for the type of stitch. You have not used the right combi...
Operation Manual
Page 47
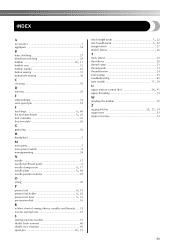
...extra spool pin 18 F feed dogs flat bed attachment 66,, 40 26 foot controller 23 free-arm style 26 G gathering 36 H handwheel 5 M main parts 5 main power switch 8 monogramming 34 N needle 15 needle needle needle pbcllaaarmtethpr.e.s.ac..dr.e..wg..u..i..d....e...66..,,...14. 706 needle position selector 22 O oiling 38 P presser presser presser foot foot foot holder lever 656,,, 19 20 13 pre-tension disk 10 R relative chart of sewing fabrics, needles and threads .....15 reverse sewing lever 23 S sewing machine needles 15 shuttle hook removal 40...
...extra spool pin 18 F feed dogs flat bed attachment 66,, 40 26 foot controller 23 free-arm style 26 G gathering 36 H handwheel 5 M main parts 5 main power switch 8 monogramming 34 N needle 15 needle needle needle pbcllaaarmtethpr.e.s.ac..dr.e..wg..u..i..d....e...66..,,...14. 706 needle position selector 22 O oiling 38 P presser presser presser foot foot foot holder lever 656,,, 19 20 13 pre-tension disk 10 R relative chart of sewing fabrics, needles and threads .....15 reverse sewing lever 23 S sewing machine needles 15 shuttle hook removal 40...


