
Users Manual - English
Page 2
...necessary when the sewing machine is used by pulling on the cord. Use this sewing machine only for its intended use the proper needle plate. Use only accessories recommended by the manufacturer as contained in this sewing machine from outlet. 9. Return the sewing machine to... Always unplug before cleaning. 2. WARNING - Do not allow this machine where aerosol (spray) products are being used as threading the needle, changing the needle, threading the bobbin, or changing the presser foot. 15.Always unplug the sewing machine from all instructions before using and before changing the...
...necessary when the sewing machine is used by pulling on the cord. Use this sewing machine only for its intended use the proper needle plate. Use only accessories recommended by the manufacturer as contained in this sewing machine from outlet. 9. Return the sewing machine to... Always unplug before cleaning. 2. WARNING - Do not allow this machine where aerosol (spray) products are being used as threading the needle, changing the needle, threading the bobbin, or changing the presser foot. 15.Always unplug the sewing machine from all instructions before using and before changing the...

Users Manual - English
Page 3
...the machine unattended 3. If the problem persists, please consult your eye on the needle while sewing. This appliance is completed • Replacing or removing the needle or any assemblies, the presser feet, needle, or other parts • A power failure occurs during use extension cords. ...machine. Use only neutral soaps or detergents to ensure that you should contact your authorized dealer to keep your local authorized Brother dealer. Children should never be supervised to inspect and adjust the machine yourself. SAVE THESE INSTRUCTIONS This sewing machine is required...
...the machine unattended 3. If the problem persists, please consult your eye on the needle while sewing. This appliance is completed • Replacing or removing the needle or any assemblies, the presser feet, needle, or other parts • A power failure occurs during use extension cords. ...machine. Use only neutral soaps or detergents to ensure that you should contact your authorized dealer to keep your local authorized Brother dealer. Children should never be supervised to inspect and adjust the machine yourself. SAVE THESE INSTRUCTIONS This sewing machine is required...

Users Manual - English
Page 4
... threading ...13 Drawing up the lower thread ...14 REPLACING THE NEEDLE 15 Needle precautions ...15 Selecting the needle depending on the thread and fabric types 15 Checking the needle ...16 Replacing the needle ...16 Sewing with a twin needle (Option) ...18 REPLACING THE PRESSER FOOT 19 Replacing the presser...presser foot holder ...20 2. SEWING BASICS 21 SEWING ...21 General sewing procedure ...21 Stitch width knob ...22 Stitch length knob ...22 Needle position selector ...22 Starting to sew ...23 Sewing in reverse ...23 Thread tension ...24 USEFUL SEWING TIPS ...25 Trial sewing ...25 ...
... threading ...13 Drawing up the lower thread ...14 REPLACING THE NEEDLE 15 Needle precautions ...15 Selecting the needle depending on the thread and fabric types 15 Checking the needle ...16 Replacing the needle ...16 Sewing with a twin needle (Option) ...18 REPLACING THE PRESSER FOOT 19 Replacing the presser...presser foot holder ...20 2. SEWING BASICS 21 SEWING ...21 General sewing procedure ...21 Stitch width knob ...22 Stitch length knob ...22 Needle position selector ...22 Starting to sew ...23 Sewing in reverse ...23 Thread tension ...24 USEFUL SEWING TIPS ...25 Trial sewing ...25 ...
Users Manual - English
Page 6
... to start and stop sewing. m Foot controller jack Insert the foot controller plug into the foot controller jack, which also supplies power to select needle position. l Main power/sewing light switch (page 8) Use this switch to set the stitch length. Foot Controller: Model KD-1902 for 110.... k Handwheel Use the handwheel to cut them. n Thread cutter (page 23) Pass the threads through the thread cutter to manually raise and lower the needle. q Foot controller (page 9) Use the foot controller to control the sewing speed and to sew in the opposite direction. 5 h Built-in handle i...
... to start and stop sewing. m Foot controller jack Insert the foot controller plug into the foot controller jack, which also supplies power to select needle position. l Main power/sewing light switch (page 8) Use this switch to set the stitch length. Foot Controller: Model KD-1902 for 110.... k Handwheel Use the handwheel to cut them. n Thread cutter (page 23) Pass the threads through the thread cutter to manually raise and lower the needle. q Foot controller (page 9) Use the foot controller to control the sewing speed and to sew in the opposite direction. 5 h Built-in handle i...
Users Manual - English
Page 7
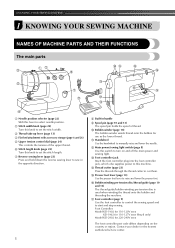
... the accessories in a bag, they may fall out, and be lost or damaged. 6 If the accessories are stored in the sewing direction. Needle and presser foot section Flat bed attachment The accessories are not in the bag, and then store the bag inside the flat bed attachment. h ...Bobbin case i Needle j Needle bar thread guide k Needle clamp screw Use the needle clamp screw to hold the needle in place. c Presser foot (Zigzag) The presser foot applies pressure consistently on the fabric as the sewing ...
... the accessories in a bag, they may fall out, and be lost or damaged. 6 If the accessories are stored in the sewing direction. Needle and presser foot section Flat bed attachment The accessories are not in the bag, and then store the bag inside the flat bed attachment. h ...Bobbin case i Needle j Needle bar thread guide k Needle clamp screw Use the needle clamp screw to hold the needle in place. c Presser foot (Zigzag) The presser foot applies pressure consistently on the fabric as the sewing ...

Users Manual - English
Page 8
... machine models: LS-2000/LS2250PRW/LS2300PRW/LS2350. ● The screw of the presser foot holder is available through your authorized dealer. (Part code: 132730-122) ● A replacement for the factory-installed presser foot is available through your authorized dealer. (Part number: 138135-122) 1. 2. 3. 4. 90/14 needle No. only) XA5539-151 XE7064-001...
... machine models: LS-2000/LS2250PRW/LS2300PRW/LS2350. ● The screw of the presser foot holder is available through your authorized dealer. (Part code: 132730-122) ● A replacement for the factory-installed presser foot is available through your authorized dealer. (Part number: 138135-122) 1. 2. 3. 4. 90/14 needle No. only) XA5539-151 XE7064-001...

Users Manual - English
Page 12
...sound; Then stop the machine. g • Leave 1 cm (1/2 inch) of injury. CAUTION ● Make sure you follow the instructions carefully. Raise the needle to its highest position by turning a the handwheel toward you could be injured. ● -" Moving parts - If you do not cut the thread completely,...with thread. If you accidentally step on the bobbin. CAUTION ● Winding the bobbin improperly may tangle around the bobbin and cause the needle to sew, you (counterclockwise) and raise the presser foot lever. 11 Memo ● When the sewing machine is started or the ...
...sound; Then stop the machine. g • Leave 1 cm (1/2 inch) of injury. CAUTION ● Make sure you follow the instructions carefully. Raise the needle to its highest position by turning a the handwheel toward you could be injured. ● -" Moving parts - If you do not cut the thread completely,...with thread. If you accidentally step on the bobbin. CAUTION ● Winding the bobbin improperly may tangle around the bobbin and cause the needle to sew, you (counterclockwise) and raise the presser foot lever. 11 Memo ● When the sewing machine is started or the ...
Users Manual - English
Page 13
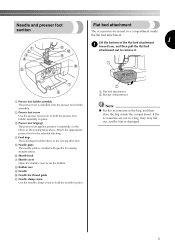
... the shuttle when the machine starts to the left, as shown below, until it may cause the thread tension to be incorrect or break the needle. Pull the trailing thread through the slot, down f and to sew. 12 If the thread unrolls in the right direction. Turn off the sewing machine...
... the shuttle when the machine starts to the left, as shown below, until it may cause the thread tension to be incorrect or break the needle. Pull the trailing thread through the slot, down f and to sew. 12 If the thread unrolls in the right direction. Turn off the sewing machine...

Users Manual - English
Page 14
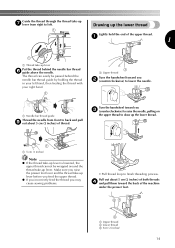
... sewing machine can not be threaded. Be sure to its highest position. KNOWING YOUR SEWING MACHINE Upper threading Set the upper thread and thread the needle. a Upper tension control dial b Thread check spring 13 a Spool pin b Thread guide (rear) c Thread guide (front) d Thread take -...up the thread check spring. Otherwise, the thread could tangle and break the needle. a Spring Pull the thread down and around the upper f tension control dial from the spool with e your right hand, pass the thread toward you...
... sewing machine can not be threaded. Be sure to its highest position. KNOWING YOUR SEWING MACHINE Upper threading Set the upper thread and thread the needle. a Upper tension control dial b Thread check spring 13 a Spool pin b Thread guide (rear) c Thread guide (front) d Thread take -...up the thread check spring. Otherwise, the thread could tangle and break the needle. a Spring Pull the thread down and around the upper f tension control dial from the spool with e your right hand, pass the thread toward you...
Users Manual - English
Page 15
... Turn the handwheel toward you b (counterclockwise) to lower the needle. Turn the handwheel toward you c (counterclockwise) to raise the needle, pulling on the upper thread to draw up the lower thread. a Needle bar thread guide Thread the needle from right to left hand, then feeding the thread with your...5 cm (2 inches) Note ● If the thread take-up lever is lowered, the upper thread cannot be passed behind the needle bar thread h guide above the needle. The thread can easily be wrapped around the thread take -up lever before you feed the upper thread. ● If you...
... Turn the handwheel toward you b (counterclockwise) to lower the needle. Turn the handwheel toward you c (counterclockwise) to raise the needle, pulling on the upper thread to draw up the lower thread. a Needle bar thread guide Thread the needle from right to left hand, then feeding the thread with your...5 cm (2 inches) Note ● If the thread take-up lever is lowered, the upper thread cannot be passed behind the needle bar thread h guide above the needle. The thread can easily be wrapped around the thread take -up lever before you feed the upper thread. ● If you...
Users Manual - English
Page 16
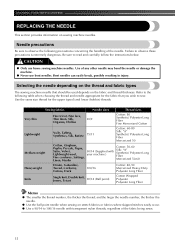
...90/14 (Ball point) Cotton Wrapped Polyester Polyester Long Fiber Memo ● The smaller the thread number, the thicker the thread; Sewing fabrics Needle sizes Thread sizes Very thin Fine tricot, Fine lace, Thin linen, Silk, 65/9 Organza, Chiffon Cotton: 80 Synthetic/ Polyester Long Fiber Fine...break, possibly resulting in injury. Be sure to observe these precautions is extremely dangerous. and the larger the needle number, the thicker the needle. ● Use the ball point needle when sewing on stretch fabrics or fabrics where skipped stitches easily occur. ● Use a 90/14 ...
...90/14 (Ball point) Cotton Wrapped Polyester Polyester Long Fiber Memo ● The smaller the thread number, the thicker the thread; Sewing fabrics Needle sizes Thread sizes Very thin Fine tricot, Fine lace, Thin linen, Silk, 65/9 Organza, Chiffon Cotton: 80 Synthetic/ Polyester Long Fiber Fine...break, possibly resulting in injury. Be sure to observe these precautions is extremely dangerous. and the larger the needle number, the thicker the needle. ● Use the ball point needle when sewing on stretch fabrics or fabrics where skipped stitches easily occur. ● Use a 90/14 ...

Users Manual - English
Page 17
... may be uneven or puckered or there may be sure to turn off the sewing machine. a Flat side b Needle type marking ■ Correct needle Lower the presser foot lever. Do not use a bent needle. Raise the needle to its highest position by b turning the handwheel toward you (counterclockwise). CAUTION ● The appropriate fabric, thread...
... may be uneven or puckered or there may be sure to turn off the sewing machine. a Flat side b Needle type marking ■ Correct needle Lower the presser foot lever. Do not use a bent needle. Raise the needle to its highest position by b turning the handwheel toward you (counterclockwise). CAUTION ● The appropriate fabric, thread...
Users Manual - English
Page 18
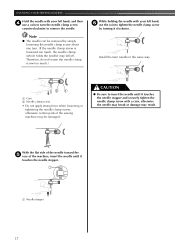
... hand, and then d use the coin to tighten the needle clamp screw by simply loosening the needle clamp screw about one turn the needle clamp screw counterclockwise to remove the needle. Therefore, do not loosen the needle clamp screw too much , the needle clamp (which holds the needle) may be removed by turning it clockwise. KNOWING YOUR...
... hand, and then d use the coin to tighten the needle clamp screw by simply loosening the needle clamp screw about one turn the needle clamp screw counterclockwise to remove the needle. Therefore, do not loosen the needle clamp screw too much , the needle clamp (which holds the needle) may be removed by turning it clockwise. KNOWING YOUR...
Users Manual - English
Page 19
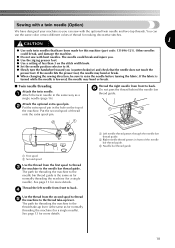
... take -up lever is the same as for normally threading the machine (for more details. If the needle hits the presser foot, the needle may bend or break. ■ Twin needle threading Attach the twin needle. b Put the extra spool pin in front of thread onto the extra spool pin. a First spool... zigzag presser foot. ● Use a setting of less than 3 on the top of thread for making decorative stitches. 1 CAUTION ● Use only twin needles that the needle does not touch the presser foot. d Use the thread from the first spool to thread c the machine to back. Thread the right...
... take -up lever is the same as for normally threading the machine (for more details. If the needle hits the presser foot, the needle may bend or break. ■ Twin needle threading Attach the twin needle. b Put the extra spool pin in front of thread onto the extra spool pin. a First spool... zigzag presser foot. ● Use a setting of less than 3 on the top of thread for making decorative stitches. 1 CAUTION ● Use only twin needles that the needle does not touch the presser foot. d Use the thread from the first spool to thread c the machine to back. Thread the right...

Users Manual - English
Page 20
... the presser foot holder. If you leave the power on and step on , a turn off the power before you use the wrong presser foot, the needle may strike the presser foot and bend or break, and may occur if the foot controller is aligned with this machine. If you change the... the controller, the machine will start and you (counterclockwise). KNOWING YOUR SEWING MACHINE REPLACING THE PRESSER FOOT CAUTION ● Always turn it off. Raise the needle to be sure to release the presser foot. Raise the presser foot lever.
... the presser foot holder. If you leave the power on and step on , a turn off the power before you use the wrong presser foot, the needle may strike the presser foot and bend or break, and may occur if the foot controller is aligned with this machine. If you change the... the controller, the machine will start and you (counterclockwise). KNOWING YOUR SEWING MACHINE REPLACING THE PRESSER FOOT CAUTION ● Always turn it off. Raise the needle to be sure to release the presser foot. Raise the presser foot lever.

Users Manual - English
Page 22
... handwheel, otherwise injuries may occur. ● Do not pull or push the fabric too hard while sewing, otherwise injuries may occur or the needle may break or bend. For details on replacing the presser foot, refer to "Power supply" (page 8). ↓ 2 Select the stitch. CAUTION... sewing is in injuries. ● Make sure that the needle does not strike basting pins, otherwise the needle may break. ● Never use bent needles. Bent needles can easily break, possibly resulting in operation, pay special attention to the needle location. For details on turning on the machine, refer to...
... handwheel, otherwise injuries may occur. ● Do not pull or push the fabric too hard while sewing, otherwise injuries may occur or the needle may break or bend. For details on replacing the presser foot, refer to "Power supply" (page 8). ↓ 2 Select the stitch. CAUTION... sewing is in injuries. ● Make sure that the needle does not strike basting pins, otherwise the needle may break. ● Never use bent needles. Bent needles can easily break, possibly resulting in operation, pay special attention to the needle location. For details on turning on the machine, refer to...
Users Manual - English
Page 23
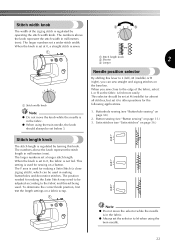
... 3. Button sewing (see "Satin stitches" on the baseline. The F area is used in making a Satin Stitch (a close to M when using the twin needle, the knob should be set below 3. The position needed for almost all stitches, but set the selector to the edge of the zigzag stitch is...) for making the Satin Stitch may need to 0, the fabric is set a longer stitch length. a Stitch length knob b Shorter 2 c Longer Needle position selector By shifting this knob. This setting is regulated by operating the stitch width knob. The numbers above the knob represent the stitch length ...
... 3. Button sewing (see "Satin stitches" on the baseline. The F area is used in making a Satin Stitch (a close to M when using the twin needle, the knob should be set below 3. The position needed for almost all stitches, but set the selector to the edge of the zigzag stitch is...) for making the Satin Stitch may need to 0, the fabric is set a longer stitch length. a Stitch length knob b Shorter 2 c Longer Needle position selector By shifting this knob. This setting is regulated by operating the stitch width knob. The numbers above the knob represent the stitch length ...

Users Manual - English
Page 24
... through the thread cutter on the foot controller. Raise the presser foot lever. Raise the presser foot lever. Take your right hand to lower the needle to cut them. a 5 cm (2 inches) While holding the end of the thread and the e fabric with your foot off the foot controller. ...is used to sew Lower the presser foot lever. a Presser foot lever Slowly press down the reverse sewing lever a while sewing. Raise the needle to its highest position by i turning the handwheel toward you (counterclockwise). Press and hold down on the back of the presser foot bar to...
... through the thread cutter on the foot controller. Raise the presser foot lever. Raise the presser foot lever. Take your right hand to lower the needle to cut them. a 5 cm (2 inches) While holding the end of the thread and the e fabric with your foot off the foot controller. ...is used to sew Lower the presser foot lever. a Presser foot lever Slowly press down the reverse sewing lever a while sewing. Raise the needle to its highest position by i turning the handwheel toward you (counterclockwise). Press and hold down on the back of the presser foot bar to...

Users Manual - English
Page 26
...counterclockwise). CAUTION ● When using a zigzag stitch, select a shorter stitch length in the fabric). Turn the fabric using the needle as those used with too much force, the needle may bend or break. Sewing curves Stop sewing, and then slightly change the sewing direction to these tips when sewing your...continue c sewing. 25 CAUTION ● If fabric more than 6 mm (15/64 inches) thick is sewn or if the fabric is lowered, the needle may bend or break. For the trial sewing, use a piece of fabric sewn, perform the trial sewing under the presser foot, raise the presser ...
...counterclockwise). CAUTION ● When using a zigzag stitch, select a shorter stitch length in the fabric). Turn the fabric using the needle as those used with too much force, the needle may bend or break. Sewing curves Stop sewing, and then slightly change the sewing direction to these tips when sewing your...continue c sewing. 25 CAUTION ● If fabric more than 6 mm (15/64 inches) thick is sewn or if the fabric is lowered, the needle may bend or break. For the trial sewing, use a piece of fabric sewn, perform the trial sewing under the presser foot, raise the presser ...
Users Manual - English
Page 28
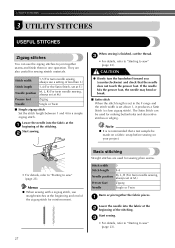
...■ Simple zigzag stitch Set the stitch length between 1 and 4 for sewing plain seams. Stitch width 0 Stitch length F-4 Needle position M, L, R (For twin needle sewing, always set at the beginning and end of the stitching. Start sewing. c • For details, refer to "Starting... set at the a beginning of the zigzag stitch for making buttonholes and decorative stitches or edging. a Lower the needle into the fabric at M.) Presser foot Zigzag Needle Single or Twin Baste or pin together the fabric pieces. c • For details, refer to "Starting to...
...■ Simple zigzag stitch Set the stitch length between 1 and 4 for sewing plain seams. Stitch width 0 Stitch length F-4 Needle position M, L, R (For twin needle sewing, always set at the beginning and end of the stitching. Start sewing. c • For details, refer to "Starting... set at the a beginning of the zigzag stitch for making buttonholes and decorative stitches or edging. a Lower the needle into the fabric at M.) Presser foot Zigzag Needle Single or Twin Baste or pin together the fabric pieces. c • For details, refer to "Starting to...


