
Users Manual - English
Page 2
... attention is necessary when the sewing machine is not intended for its intended use a bent needle. 13.Do not pull or push the fabric while stitching. Keep the ventilation openings of the sewing machine and foot controller free from the accumulation of electric shock: 1. To reduce the risk of lint, dust...
... attention is necessary when the sewing machine is not intended for its intended use a bent needle. 13.Do not pull or push the fabric while stitching. Keep the ventilation openings of the sewing machine and foot controller free from the accumulation of electric shock: 1. To reduce the risk of lint, dust...

Users Manual - English
Page 4
SEWING BASICS 21 SEWING ...21 General sewing procedure ...21 Stitch width knob ...22 Stitch length knob ...22 Needle position selector ...22 Starting to sew ...23 Sewing in reverse ...23 Thread tension ...24 USEFUL SEWING TIPS ...25 Trial sewing ...25 ...
SEWING BASICS 21 SEWING ...21 General sewing procedure ...21 Stitch width knob ...22 Stitch length knob ...22 Needle position selector ...22 Starting to sew ...23 Sewing in reverse ...23 Thread tension ...24 USEFUL SEWING TIPS ...25 Trial sewing ...25 ...

Users Manual - English
Page 5
... dogs ...40 Bobbin case tension adjustment ...41 TROUBLESHOOTING ...42 When the thread is entangled ...45 INDEX ...46 4 UTILITY STITCHES 27 USEFUL STITCHES ...27 Zigzag stitches ...27 Basic stitching ...27 Blind hem stitching ...28 Darning ...29 Over edge stitch ...29 BUTTONHOLE SEWING/ BUTTON SEWING 30 Buttonhole sewing ...30 Button sewing ...31 ZIPPER INSERTION ...33 APPLIQUÉ, MONOGRAMMING...
... dogs ...40 Bobbin case tension adjustment ...41 TROUBLESHOOTING ...42 When the thread is entangled ...45 INDEX ...46 4 UTILITY STITCHES 27 USEFUL STITCHES ...27 Zigzag stitches ...27 Basic stitching ...27 Blind hem stitching ...28 Darning ...29 Over edge stitch ...29 BUTTONHOLE SEWING/ BUTTON SEWING 30 Buttonhole sewing ...30 Button sewing ...31 ZIPPER INSERTION ...33 APPLIQUÉ, MONOGRAMMING...
Users Manual - English
Page 6
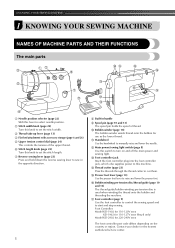
... (page 22) Turn this knob to set the stitch width. j Bobbin winder (page 10) The bobbin winder winds thread onto the bobbin for 220-240V area The foot controller part code differs depending on and off the main power and sewing light. f Stitch length knob (page 22) Turn this knob to... set the stitch length. m Foot controller jack Insert the foot controller plug into the foot controller jack, which also supplies power to ...
... (page 22) Turn this knob to set the stitch width. j Bobbin winder (page 10) The bobbin winder winds thread onto the bobbin for 220-240V area The foot controller part code differs depending on and off the main power and sewing light. f Stitch length knob (page 22) Turn this knob to... set the stitch length. m Foot controller jack Insert the foot controller plug into the foot controller jack, which also supplies power to ...
Users Manual - English
Page 7
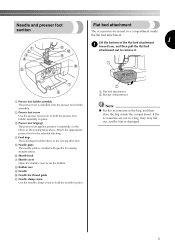
... in a bag, they may fall out, and be lost or damaged. 6 a Presser foot holder assembly The presser foot is marked with guides for the selected stitching. Lift the bottom of the flat bed attachment 1 a toward you, and then pull the flat bed attachment out to set the bobbin.
... in a bag, they may fall out, and be lost or damaged. 6 a Presser foot holder assembly The presser foot is marked with guides for the selected stitching. Lift the bottom of the flat bed attachment 1 a toward you, and then pull the flat bed attachment out to set the bobbin.
Users Manual - English
Page 16
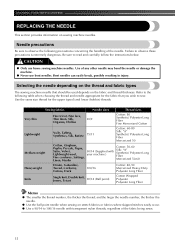
... Polyester Long Fiber Memo ● The smaller the thread number, the thicker the thread; Selecting the needle depending on stretch fabrics or fabrics where skipped stitches easily occur. ● Use a 90/14 to read and carefully follow the instructions below. Sewing fabrics Needle sizes Thread sizes Very thin Fine tricot, Fine...
... Polyester Long Fiber Memo ● The smaller the thread number, the thicker the thread; Selecting the needle depending on stretch fabrics or fabrics where skipped stitches easily occur. ● Use a 90/14 to read and carefully follow the instructions below. Sewing fabrics Needle sizes Thread sizes Very thin Fine tricot, Fine...

Users Manual - English
Page 17
... 65/9 to 75/11), the needle may break while the machine is being operated. a Presser foot lever 1 a Flat surface 16 In addition, the stitching may be uneven or puckered or there may be straight according to turn off the sewing machine. Do not use a bent needle. CAUTION ● The... the sewing machine, otherwise injuries may occur if the foot controller is accidentally pressed and the machine starts sewing. Raise the needle to be skipped stitches. Use a coin and a needle that the distance between the needle and the flat surface is not even, the needle is bent. If the...
... 65/9 to 75/11), the needle may break while the machine is being operated. a Presser foot lever 1 a Flat surface 16 In addition, the stitching may be uneven or puckered or there may be straight according to turn off the sewing machine. Do not use a bent needle. CAUTION ● The... the sewing machine, otherwise injuries may occur if the foot controller is accidentally pressed and the machine starts sewing. Raise the needle to be skipped stitches. Use a coin and a needle that the distance between the needle and the flat surface is not even, the needle is bent. If the...
Users Manual - English
Page 19
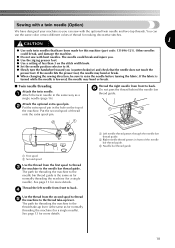
... the fabric is turned while the needle is the same as a single needle (page 16). b Put the extra spool pin in the hole on the stitch width knob. ● Set the needle position selector to the needle bar thread guide is lowered, the needle may bend or break. ● When changing... could break and injure you. ● Use the zigzag presser foot. ● Use a setting of less than 3 on the top of thread for making decorative stitches. 1 CAUTION ● Use only twin needles that the needle does not touch the presser foot. See page 13 for more details. See page 13 for...
... the fabric is turned while the needle is the same as a single needle (page 16). b Put the extra spool pin in the hole on the stitch width knob. ● Set the needle position selector to the needle bar thread guide is lowered, the needle may bend or break. ● When changing... could break and injure you. ● Use the zigzag presser foot. ● Use a setting of less than 3 on the top of thread for making decorative stitches. 1 CAUTION ● Use only twin needles that the needle does not touch the presser foot. See page 13 for more details. See page 13 for...

Users Manual - English
Page 20
... the presser foot lever so that have chosen. If you have been designed to be injured. ● Always use the correct presser foot for the stitch pattern you use the wrong presser foot, the needle may strike the presser foot and bend or break, and may cause an accident or injury...
... the presser foot lever so that have chosen. If you have been designed to be injured. ● Always use the correct presser foot for the stitch pattern you use the wrong presser foot, the needle may strike the presser foot and bend or break, and may cause an accident or injury...

Users Manual - English
Page 22
...threads. Turn on the machine, refer to "Power supply" (page 8). ↓ 2 Select the stitch. For details on turning on the sewing machine. Select the stitch appropriate for the stitch. For details on the machine. Before operating the sewing machine, read the following precautions. General sewing ... the needle does not strike basting pins, otherwise the needle may break. ● Never use bent needles. For details on selecting a stitch, refer to "Stitch width knob" (page 22). ↓ 3 Attach the presser foot. Attach the presser foot appropriate for the area to sew" (page...
...threads. Turn on the machine, refer to "Power supply" (page 8). ↓ 2 Select the stitch. For details on turning on the sewing machine. Select the stitch appropriate for the stitch. For details on the machine. Before operating the sewing machine, read the following precautions. General sewing ... the needle does not strike basting pins, otherwise the needle may break. ● Never use bent needles. For details on selecting a stitch, refer to "Stitch width knob" (page 22). ↓ 3 Attach the presser foot. Attach the presser foot appropriate for the area to sew" (page...
Users Manual - English
Page 23
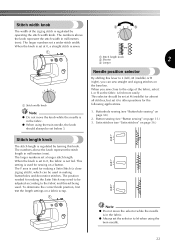
... set at M (middle) for sewing on a fabric scrap. The position needed for making the Satin Stitch may need to other positions for making buttonholes and decorative stitches. Satin stitches (see "Buttonhole sewing" on the baseline. Buttonhole sewing (see "Satin stitches" on page 31.) 3. The F area is regulated by turning this lever to L (left), M (middle...
... set at M (middle) for sewing on a fabric scrap. The position needed for making the Satin Stitch may need to other positions for making buttonholes and decorative stitches. Satin stitches (see "Buttonhole sewing" on the baseline. Buttonhole sewing (see "Satin stitches" on page 31.) 3. The F area is regulated by turning this lever to L (left), M (middle...

Users Manual - English
Page 24
... and the e fabric with your foot off the foot controller. Raise the needle to the left hand, turn the handwheel toward the rear of the stitching. To sew forward, release the reverse sewing b lever. 23 a Thread cutter Sewing in reverse Reverse sewing is needed. j Pull the fabric to its highest position...
... and the e fabric with your foot off the foot controller. Raise the needle to the left hand, turn the handwheel toward the rear of the stitching. To sew forward, release the reverse sewing b lever. 23 a Thread cutter Sewing in reverse Reverse sewing is needed. j Pull the fabric to its highest position...
Users Manual - English
Page 25
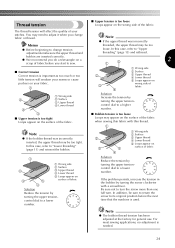
... upper tensioncontrol dial to change fabric or thread. You may be too tight. The thread tension will weaken your seams or cause puckers on your stitches. Memo ● Before beginning to a lower number. Note ● If the upper thread was incorrectly inserted, the upper thread may need to adjust it when...
... upper tensioncontrol dial to change fabric or thread. You may be too tight. The thread tension will weaken your seams or cause puckers on your stitches. Memo ● Before beginning to a lower number. Note ● If the upper thread was incorrectly inserted, the upper thread may need to adjust it when...

Users Manual - English
Page 26
...thread that will be used for your project. Leave the needle lowered (in order to its highest position. Changing the sewing direction When the stitching reaches a corner, stop the a sewing machine. If the needle was raised, lower the needle by turning the handwheel toward you (counterclockwise)....64 inches) thick is sewn or if the fabric is lowered, the needle may bend or break. Turn the fabric using a zigzag stitch, select a shorter stitch length in the fabric). Sewing thick fabrics ■ If the fabric does not fit under the presser foot If the fabric does not...
...thread that will be used for your project. Leave the needle lowered (in order to its highest position. Changing the sewing direction When the stitching reaches a corner, stop the a sewing machine. If the needle was raised, lower the needle by turning the handwheel toward you (counterclockwise)....64 inches) thick is sewn or if the fabric is lowered, the needle may bend or break. Turn the fabric using a zigzag stitch, select a shorter stitch length in the fabric). Sewing thick fabrics ■ If the fabric does not fit under the presser foot If the fabric does not...

Users Manual - English
Page 27
... -reach areas. If this occurs, place thin paper or stabilizer material under the fabric and sew it . Sewing thin fabrics When sewing thin fabrics, the stitching may become misaligned or the fabric may not feed correctly. When you , and then pull the flat bed attachment out to remove it together with...
... -reach areas. If this occurs, place thin paper or stabilizer material under the fabric and sew it . Sewing thin fabrics When sewing thin fabrics, the stitching may become misaligned or the fabric may not feed correctly. When you , and then pull the flat bed attachment out to remove it together with...
Users Manual - English
Page 28
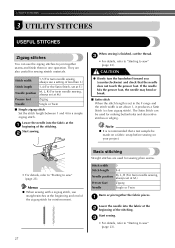
...). Note ● It is finished, cut the thread. They are used for a simple zigzag stitch. Stitch width 1-5 (For twin needle sewing, always use a setting of the stitching. Lower the needle into the fabric at M.) Presser foot Zigzag Needle Single or Twin Baste or ...; For details, refer to "Starting to sew" (page 23). 27 Basic stitching Straight stitches are also useful for reinforcement. a Lower the needle into the fabric at the a beginning of less than 3.) Stitch length 1-4 (For the Satin Stitch, set at F.) Needle position M, L, R (For twin needle sewing, always...
...). Note ● It is finished, cut the thread. They are used for a simple zigzag stitch. Stitch width 1-5 (For twin needle sewing, always use a setting of the stitching. Lower the needle into the fabric at M.) Presser foot Zigzag Needle Single or Twin Baste or ...; For details, refer to "Starting to sew" (page 23). 27 Basic stitching Straight stitches are also useful for reinforcement. a Lower the needle into the fabric at the a beginning of less than 3.) Stitch length 1-4 (For the Satin Stitch, set at F.) Needle position M, L, R (For twin needle sewing, always...

Users Manual - English
Page 29
... is finished, cut the thread. Quickly set the width to 2-3, sew 1 stitch and set the width back to sew" (page 23). a b 28 Repeat. Blind hem stitching You can use the Blind Hem Stitch to the desired location of trousers, without the stitch showing. 3 Stitch width Stitch length Needle position Presser foot Needle 3-5 2-3 R Zigzag Single Both the...
... is finished, cut the thread. Quickly set the width to 2-3, sew 1 stitch and set the width back to sew" (page 23). a b 28 Repeat. Blind hem stitching You can use the Blind Hem Stitch to the desired location of trousers, without the stitch showing. 3 Stitch width Stitch length Needle position Presser foot Needle 3-5 2-3 R Zigzag Single Both the...

Users Manual - English
Page 30
... Reinforce points that will be darned under the presser foot so the needle enters the fabric when the left side of the zigzag stitch is used to prevent the edge of the fabric from fraying. Place the fabric to be subject to be darned is d filled with a fabric underlay ... Stop sewing when the portion to strain. Sew with your hands, alternately drawing the fabric away and pulling it toward you. Stitch width Stitch length Needle position Presser foot Needle Other 0 F-2 M None Single Darning plate Place the darning plate on the needle plate as a shown below, and then remove ...
... Reinforce points that will be darned under the presser foot so the needle enters the fabric when the left side of the zigzag stitch is used to prevent the edge of the fabric from fraying. Place the fabric to be subject to be darned is d filled with a fabric underlay ... Stop sewing when the portion to strain. Sew with your hands, alternately drawing the fabric away and pulling it toward you. Stitch width Stitch length Needle position Presser foot Needle Other 0 F-2 M None Single Darning plate Place the darning plate on the needle plate as a shown below, and then remove ...
Users Manual - English
Page 31
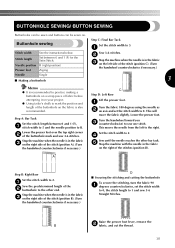
...and length of the b buttonhole to the other bar tack. Step A: Bar Tack Set the stitch length between 0 and 1 (F) for the Satin Stitch. Set the stitch width to 2. Stitch length Set between 0 and 1 (F), a stitch width to 5 and the needle position to R. Lower the presser foot over the top right ... the presser foot lever, remove the B b fabric, and cut the thread. 30 Lower the presser foot. A Step B: Right Row Set the stitch width to 2. Turn the handwheel toward you c (counterclockwise) to 5. Stop the machine when the needle is in the fabric c on the right ...
...and length of the b buttonhole to the other bar tack. Step A: Bar Tack Set the stitch length between 0 and 1 (F) for the Satin Stitch. Set the stitch width to 2. Stitch length Set between 0 and 1 (F), a stitch width to 5 and the needle position to R. Lower the presser foot over the top right ... the presser foot lever, remove the B b fabric, and cut the thread. 30 Lower the presser foot. A Step B: Right Row Set the stitch width to 2. Turn the handwheel toward you c (counterclockwise) to 5. Stop the machine when the needle is in the fabric c on the right ...

Users Manual - English
Page 32
...the seam ripper in the fabric c and at the right side of the stitches. (position D) D Step E: Securing Buttonhole Stitch To secure stitching, set the stitch width to 0. b Stop the machine when the needle is in any other bar tack. Stitch length 0 Needle position L or R Presser foot Zigzag Needle Single Other ... plate b Stop the machine when the needle is in the fabric c and at the left side of the stitches. (position B) B Step C: Final Bar Tack Set the stitch width at 5 and stitch length at 0. b Button sewing Buttons can be sewn on with 4 holes can be attached. b Stop the...
...the seam ripper in the fabric c and at the right side of the stitches. (position D) D Step E: Securing Buttonhole Stitch To secure stitching, set the stitch width to 0. b Stop the machine when the needle is in any other bar tack. Stitch length 0 Needle position L or R Presser foot Zigzag Needle Single Other ... plate b Stop the machine when the needle is in the fabric c and at the left side of the stitches. (position B) B Step C: Final Bar Tack Set the stitch width at 5 and stitch length at 0. b Button sewing Buttons can be sewn on with 4 holes can be attached. b Stop the...


