
Users Manual - English
Page 2
...operate this sewing machine if it has a damaged cord or plug, if it is being used by the manufacturer as threading the needle, changing the needle, threading the bobbin, or changing the presser foot. 15.Always unplug the sewing machine from all instructions before using." To unplug, ..., fire, electric shock, or injury to the symbol "O" position which represents off , symbol "O" position when making any adjustments in the needle area, such as contained in this sewing machine from the electrical outlet immediately after using and before changing the light bulb. The sewing machine...
...operate this sewing machine if it has a damaged cord or plug, if it is being used by the manufacturer as threading the needle, changing the needle, threading the bobbin, or changing the presser foot. 15.Always unplug the sewing machine from all instructions before using." To unplug, ..., fire, electric shock, or injury to the symbol "O" position which represents off , symbol "O" position when making any adjustments in the needle area, such as contained in this sewing machine from the electrical outlet immediately after using and before changing the light bulb. The sewing machine...

Users Manual - English
Page 3
...AND CYPRUS ONLY IMPORTANT • In the event of the operation manual to BS 1362, i.e. up lever, needle, or other parts to keep your local authorized Brother dealer. When storing this equipment, you study the manual before using the machine. Always consult the operation manual when... replacing or installing any other hot objects. 2. For additional product information and updates, visit our web site at www.brother.com The contents of this manual and specifications of the appliance by persons (including children) with reduced physical, sensory or mental capabilities...
...AND CYPRUS ONLY IMPORTANT • In the event of the operation manual to BS 1362, i.e. up lever, needle, or other parts to keep your local authorized Brother dealer. When storing this equipment, you study the manual before using the machine. Always consult the operation manual when... replacing or installing any other hot objects. 2. For additional product information and updates, visit our web site at www.brother.com The contents of this manual and specifications of the appliance by persons (including children) with reduced physical, sensory or mental capabilities...

Users Manual - English
Page 4
... Sewing stretch fabrics ...26 Using a free-arm style ...26 3 CONTENTS CONTENTS ...3 1. KNOWING YOUR SEWING MACHINE 5 NAMES OF MACHINE PARTS AND THEIR FUNCTIONS 5 The main parts ...5 Needle and presser foot section ...6 Flat bed attachment ...6 ACCESSORIES ...7 OPTIONAL ACCESSORIES 7 USING YOUR SEWING MACHINE 8 Power supply precautions ...8 Power supply ...8 Foot controller ...9 Steadying the machine ...9 THREADING...
... Sewing stretch fabrics ...26 Using a free-arm style ...26 3 CONTENTS CONTENTS ...3 1. KNOWING YOUR SEWING MACHINE 5 NAMES OF MACHINE PARTS AND THEIR FUNCTIONS 5 The main parts ...5 Needle and presser foot section ...6 Flat bed attachment ...6 ACCESSORIES ...7 OPTIONAL ACCESSORIES 7 USING YOUR SEWING MACHINE 8 Power supply precautions ...8 Power supply ...8 Foot controller ...9 Steadying the machine ...9 THREADING...
Users Manual - English
Page 6
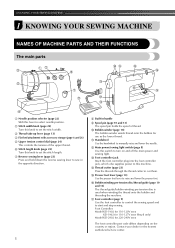
... your dealer or the nearest authorized service center. n Thread cutter (page 23) Pass the threads through the thread cutter to manually raise and lower the needle. Foot Controller: Model KD-1902 for 110-120V area KD-1902 for 110-127V area (Brazil only) Model KD-2902 for use as the lower... 23) Press and hold down the reverse sewing lever to set the stitch length. l Main power/sewing light switch (page 8) Use this switch to select needle position. j Bobbin winder (page 10) The bobbin winder winds thread onto the bobbin for 220-240V area The foot controller part code differs depending on...
... your dealer or the nearest authorized service center. n Thread cutter (page 23) Pass the threads through the thread cutter to manually raise and lower the needle. Foot Controller: Model KD-1902 for 110-120V area KD-1902 for 110-127V area (Brazil only) Model KD-2902 for use as the lower... 23) Press and hold down the reverse sewing lever to set the stitch length. l Main power/sewing light switch (page 8) Use this switch to select needle position. j Bobbin winder (page 10) The bobbin winder winds thread onto the bobbin for 220-240V area The foot controller part code differs depending on...
Users Manual - English
Page 7
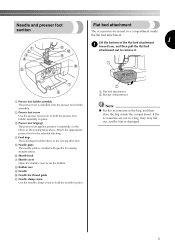
h Bobbin case i Needle j Needle bar thread guide k Needle clamp screw Use the needle clamp screw to set the bobbin. Needle and presser foot section Flat bed attachment The accessories are not in a bag, they may fall out, and be lost or damaged. 6 a Flat bed attachment b ... screw to remove it. Lift the bottom of the flat bed attachment 1 a toward you, and then pull the flat bed attachment out to hold the needle in the sewing direction. e Needle plate The needle plate is installed onto the presser foot holder assembly.
h Bobbin case i Needle j Needle bar thread guide k Needle clamp screw Use the needle clamp screw to set the bobbin. Needle and presser foot section Flat bed attachment The accessories are not in a bag, they may fall out, and be lost or damaged. 6 a Flat bed attachment b ... screw to remove it. Lift the bottom of the flat bed attachment 1 a toward you, and then pull the flat bed attachment out to hold the needle in the sewing direction. e Needle plate The needle plate is installed onto the presser foot holder assembly.

Users Manual - English
Page 8
... the flat bed attachment. We have designed these accessories to carry out most sewing tasks. Part Name 1 Extra spool pin 2 Twin needle Part Code Americas Others 130920-021 131096-121 7 only) XA5539-151 XE7064-001 OPTIONAL ACCESSORIES 1. 2. Note (For U.S.A. KNOWING YOUR ...SEWING MACHINE ACCESSORIES The following machine models: LS-2000/LS2250PRW/LS2300PRW/LS2350. ● The screw of the presser foot holder is available through your authorized dealer. (Part code: 132730-122) ● A replacement ...
... the flat bed attachment. We have designed these accessories to carry out most sewing tasks. Part Name 1 Extra spool pin 2 Twin needle Part Code Americas Others 130920-021 131096-121 7 only) XA5539-151 XE7064-001 OPTIONAL ACCESSORIES 1. 2. Note (For U.S.A. KNOWING YOUR ...SEWING MACHINE ACCESSORIES The following machine models: LS-2000/LS2250PRW/LS2300PRW/LS2350. ● The screw of the presser foot holder is available through your authorized dealer. (Part code: 132730-122) ● A replacement ...

Users Manual - English
Page 12
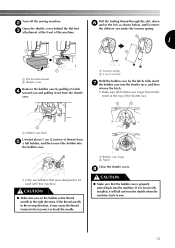
...inch) CAUTION ● Make sure you could be injured. ● -" Moving parts - Cut the thread, slide the bobbin winder shaft j to loosen, breaking the needle and resulting in injury. CAUTION ● Make sure you slide the bobbin winding shaft to break. this is not a malfunction. ● The...controller. CAUTION ● Winding the bobbin improperly may tangle around the bobbin and cause the needle to the right. If you (counterclockwise) and raise the presser foot lever. 11 Raise the needle to its highest position by turning a the handwheel toward you do not cut the thread ...
...inch) CAUTION ● Make sure you could be injured. ● -" Moving parts - Cut the thread, slide the bobbin winder shaft j to loosen, breaking the needle and resulting in injury. CAUTION ● Make sure you slide the bobbin winding shaft to break. this is not a malfunction. ● The...controller. CAUTION ● Winding the bobbin improperly may tangle around the bobbin and cause the needle to the right. If you (counterclockwise) and raise the presser foot lever. 11 Raise the needle to its highest position by turning a the handwheel toward you do not cut the thread ...
Users Manual - English
Page 13
... ● Make sure that were designed to be used with this machine. If it may cause the thread tension to be incorrect or break the needle. If the thread unrolls in the right direction. b Open the shuttle cover behind the flat bed c attachment at the top of thread from the shuttle...
... ● Make sure that were designed to be used with this machine. If it may cause the thread tension to be incorrect or break the needle. If the thread unrolls in the right direction. b Open the shuttle cover behind the flat bed c attachment at the top of thread from the shuttle...

Users Manual - English
Page 14
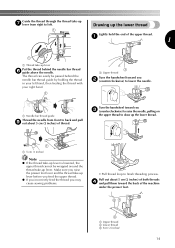
...thread on this pin. KNOWING YOUR SEWING MACHINE Upper threading Set the upper thread and thread the needle. Pull up lever CAUTION ● Make sure you thread the machine properly. Be sure to raise... then put a spool of thread is in the groove catches the thread 1 • If the needle is set incorrectly, the thread may tangle on the thread guide. • Make sure that the spring... your right hand, pass the thread toward you , in the groove on the spool pin and cause the needle to its highest position. a Spool pin b Thread guide (rear) c Thread guide (front) d Thread take ...
...thread on this pin. KNOWING YOUR SEWING MACHINE Upper threading Set the upper thread and thread the needle. Pull up lever CAUTION ● Make sure you thread the machine properly. Be sure to raise... then put a spool of thread is in the groove catches the thread 1 • If the needle is set incorrectly, the thread may tangle on the thread guide. • Make sure that the spring... your right hand, pass the thread toward you , in the groove on the spool pin and cause the needle to its highest position. a Spool pin b Thread guide (rear) c Thread guide (front) d Thread take ...
Users Manual - English
Page 15
... up lever. a Upper thread Turn the handwheel toward you c (counterclockwise) to raise the needle, pulling on the upper thread to draw up the lower thread. a Needle bar thread guide Thread the needle from right to left hand, then feeding the thread with your left . a Upper thread b Lower...Pull out about 5 cm (2 inches) of thread. Turn the handwheel toward you b (counterclockwise) to lower the needle. a 1 a Thread take-up lever Put the thread behind the needle bar thread guide by holding the thread in your right hand. Guide the thread through the thread take-up g ...
... up lever. a Upper thread Turn the handwheel toward you c (counterclockwise) to raise the needle, pulling on the upper thread to draw up the lower thread. a Needle bar thread guide Thread the needle from right to left hand, then feeding the thread with your left . a Upper thread b Lower...Pull out about 5 cm (2 inches) of thread. Turn the handwheel toward you b (counterclockwise) to lower the needle. a 1 a Thread take-up lever Put the thread behind the needle bar thread guide by holding the thread in your right hand. Guide the thread through the thread take-up g ...
Users Manual - English
Page 16
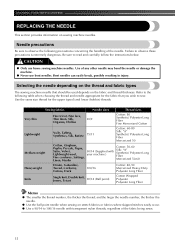
...14 (Ball point) Cotton Wrapped Polyester Polyester Long Fiber Memo ● The smaller the thread number, the thicker the thread; Sewing fabrics Needle sizes Thread sizes Very thin Fine tricot, Fine lace, Thin linen, Silk, 65/9 Organza, Chiffon Cotton: 80 Synthetic/ Polyester Long Fiber...the following precautions concerning the handling of any other needle may bend the needle or damage the machine. ● Never use home sewing machine needles. and the larger the needle number, the thicker the needle. ● Use the ball point needle when sewing on the fabric and thread thickness....
...14 (Ball point) Cotton Wrapped Polyester Polyester Long Fiber Memo ● The smaller the thread number, the thicker the thread; Sewing fabrics Needle sizes Thread sizes Very thin Fine tricot, Fine lace, Thin linen, Silk, 65/9 Organza, Chiffon Cotton: 80 Synthetic/ Polyester Long Fiber...the following precautions concerning the handling of any other needle may bend the needle or damage the machine. ● Never use home sewing machine needles. and the larger the needle number, the thicker the needle. ● Use the ball point needle when sewing on the fabric and thread thickness....

Users Manual - English
Page 17
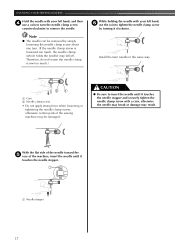
... determined to its highest position by b turning the handwheel toward you (counterclockwise). c 1 a Flat surface ■ Incorrect needle If the distance between the needle and the flat surface is being operated. Do not use a bent needle. a Flat side b Needle type marking ■ Correct needle Lower the presser foot lever. CAUTION ● The appropriate fabric, thread and...
... determined to its highest position by b turning the handwheel toward you (counterclockwise). c 1 a Flat surface ■ Incorrect needle If the distance between the needle and the flat surface is being operated. Do not use a bent needle. a Flat side b Needle type marking ■ Correct needle Lower the presser foot lever. CAUTION ● The appropriate fabric, thread and...
Users Manual - English
Page 18
..., otherwise certain parts of the machine, insert the needle until it touches the needle stopper and securely tighten the needle clamp screw with your left hand, and then d use the coin to tighten the needle clamp screw by simply loosening the needle clamp screw about one turn the needle clamp screw counterclockwise to turn . (If the...
..., otherwise certain parts of the machine, insert the needle until it touches the needle stopper and securely tighten the needle clamp screw with your left hand, and then d use the coin to tighten the needle clamp screw by simply loosening the needle clamp screw about one turn the needle clamp screw counterclockwise to turn . (If the...
Users Manual - English
Page 19
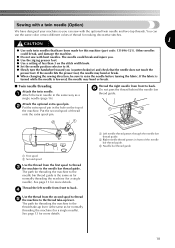
...use the same color or two different colors of thread for a single needle). b Right needle thread passes in front of the machine. a Attach the twin needle in the hole on the stitch width knob. ● Set the needle position selector to the thread take -up lever is the same as ...for normally threading the machine (for making decorative stitches. 1 CAUTION ● Use only twin needles that the needle does not touch the presser foot. If the fabric is turned while the needle is lowered, the needle may bend or break. ● When changing the sewing direction, be sure to the...
...use the same color or two different colors of thread for a single needle). b Right needle thread passes in front of the machine. a Attach the twin needle in the hole on the stitch width knob. ● Set the needle position selector to the thread take -up lever is the same as ...for normally threading the machine (for making decorative stitches. 1 CAUTION ● Use only twin needles that the needle does not touch the presser foot. If the fabric is turned while the needle is lowered, the needle may bend or break. ● When changing the sewing direction, be sure to the...

Users Manual - English
Page 20
... the presser foot so the letter indicating the presser foot type (A, I, etc.) is aligned with this machine. If you use the wrong presser foot, the needle may strike the presser foot and bend or break, and may occur if the foot controller is attached. Replacing the presser foot Press the black...
... the presser foot so the letter indicating the presser foot type (A, I, etc.) is aligned with this machine. If you use the wrong presser foot, the needle may strike the presser foot and bend or break, and may occur if the foot controller is attached. Replacing the presser foot Press the black...

Users Manual - English
Page 22
... stitch appropriate for the stitch. Position the fabric, and then start sewing. In addition, keep your hands away from all moving parts such as the needle and handwheel, otherwise injuries may occur. ● Do not pull or push the fabric too hard while sewing, otherwise injuries may occur or the... needle may break or bend. Attach the presser foot appropriate for the area to be sewn. For details on starting to sew, refer to "Starting to "...
... stitch appropriate for the stitch. Position the fabric, and then start sewing. In addition, keep your hands away from all moving parts such as the needle and handwheel, otherwise injuries may occur. ● Do not pull or push the fabric too hard while sewing, otherwise injuries may occur or the... needle may break or bend. Attach the presser foot appropriate for the area to be sewn. For details on starting to sew, refer to "Starting to "...
Users Manual - English
Page 23
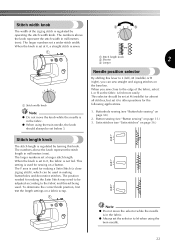
...The larger numbers set a wider stitch width. The F area is in the fabric. ● Always set the selector to M when using the twin needle, the knob should be set at 0, a straight stitch is sewn. To determine the correct knob position, first test the length settings on page 31...zigzag stitch is regulated by operating the stitch width knob. The larger numbers set a longer stitch length. a Stitch length knob b Shorter 2 c Longer Needle position selector By shifting this knob. When you can be adjusted according to L (left), M (middle) or R (right), you sew close zigzag ...
...The larger numbers set a wider stitch width. The F area is in the fabric. ● Always set the selector to M when using the twin needle, the knob should be set at 0, a straight stitch is sewn. To determine the correct knob position, first test the length settings on page 31...zigzag stitch is regulated by operating the stitch width knob. The larger numbers set a longer stitch length. a Stitch length knob b Shorter 2 c Longer Needle position selector By shifting this knob. When you can be adjusted according to L (left), M (middle) or R (right), you sew close zigzag ...

Users Manual - English
Page 24
...reverse sewing lever a while sewing. a 5 cm (2 inches) While holding the end of the thread and the e fabric with your right hand to lower the needle to its highest position by b turning the handwheel toward you (counterclockwise) with your foot off the foot controller. a Raise the... Starting to lock the threads at the end of the seam or wherever reinforcement is used to sew Lower the presser foot lever. Raise the needle to cut them. j Pull the fabric to the left hand, turn the handwheel toward the rear of thread toward you (counterclockwise). c a Presser foot lever...
...reverse sewing lever a while sewing. a 5 cm (2 inches) While holding the end of the thread and the e fabric with your right hand to lower the needle to its highest position by b turning the handwheel toward you (counterclockwise) with your foot off the foot controller. a Raise the... Starting to lock the threads at the end of the seam or wherever reinforcement is used to sew Lower the presser foot lever. Raise the needle to cut them. j Pull the fabric to the left hand, turn the handwheel toward the rear of thread toward you (counterclockwise). c a Presser foot lever...

Users Manual - English
Page 26
... better results for your project. Sewing curves Stop sewing, and then slightly change the sewing direction to obtain a finer stitch. If the needle was raised, lower the needle by turning the handwheel toward you (counterclockwise). Turn the fabric using a zigzag stitch, select a shorter stitch length in the fabric). Trial... sewing. 25 CAUTION ● If fabric more than 6 mm (15/64 inches) thick is sewn or if the fabric is lowered, the needle may not be used for your project. For the trial sewing, use a piece of fabric should be sure to these tips when sewing your sewing...
... better results for your project. Sewing curves Stop sewing, and then slightly change the sewing direction to obtain a finer stitch. If the needle was raised, lower the needle by turning the handwheel toward you (counterclockwise). Turn the fabric using a zigzag stitch, select a shorter stitch length in the fabric). Trial... sewing. 25 CAUTION ● If fabric more than 6 mm (15/64 inches) thick is sewn or if the fabric is lowered, the needle may not be used for your project. For the trial sewing, use a piece of fabric should be sure to these tips when sewing your sewing...
Users Manual - English
Page 28
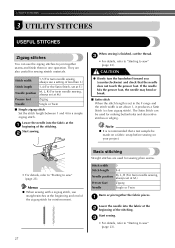
... turn the handwheel toward you (counterclockwise) and check that a test sample be used for sewing plain seams. Stitch width 0 Stitch length F-4 Needle position M, L, R (For twin needle sewing, always set in one operation. Note ● It is finished, cut the thread. Memo ● When sewing with a zigzag stitch...zigzag stitch Set the stitch length between 1 and 4 for sewing stretch materials. They are used for reinforcement. If the needle hits the presser foot, the needle may bend or break. ■ Satin stitch When the stitch length is set at the beginning and end of the ...
... turn the handwheel toward you (counterclockwise) and check that a test sample be used for sewing plain seams. Stitch width 0 Stitch length F-4 Needle position M, L, R (For twin needle sewing, always set in one operation. Note ● It is finished, cut the thread. Memo ● When sewing with a zigzag stitch...zigzag stitch Set the stitch length between 1 and 4 for sewing stretch materials. They are used for reinforcement. If the needle hits the presser foot, the needle may bend or break. ■ Satin stitch When the stitch length is set at the beginning and end of the ...


