
Users Manual - English
Page 2
... only accessories recommended by pulling on the cord. Return the sewing machine to the symbol "O" position which represents off , symbol "O" position when making any object into water. Never operate the sewing machine with same type rated 15 watts. To disconnect, turn the main switch to the nearest ..., electrical or mechanical adjustment. 4. Special care is not intended for its intended use a bent needle. 13.Do not pull or push the fabric while stitching. It may deflect the needle causing it has been dropped or damaged, or dropped into any openings. 6. DANGER - Always unplug this...
... only accessories recommended by pulling on the cord. Return the sewing machine to the symbol "O" position which represents off , symbol "O" position when making any object into water. Never operate the sewing machine with same type rated 15 watts. To disconnect, turn the main switch to the nearest ..., electrical or mechanical adjustment. 4. Special care is not intended for its intended use a bent needle. 13.Do not pull or push the fabric while stitching. It may deflect the needle causing it has been dropped or damaged, or dropped into any openings. 6. DANGER - Always unplug this...
Users Manual - English
Page 19
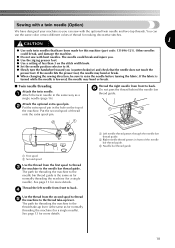
...could break and injure you. ● Use the zigzag presser foot. ● Use a setting of less than 3 on the top of thread for making decorative stitches. 1 CAUTION ● Use only twin needles that have designed your machine so you (counterclockwise) and check that the needle does not touch ...spool b Second spool Use the thread from front to raise the needle before turning the fabric. See page 13 for more details. a Left needle thread passes through the needle bar thread guide. If the fabric is turned while the needle is the same as for normally threading the machine (for ...
...could break and injure you. ● Use the zigzag presser foot. ● Use a setting of less than 3 on the top of thread for making decorative stitches. 1 CAUTION ● Use only twin needles that have designed your machine so you (counterclockwise) and check that the needle does not touch ...spool b Second spool Use the thread from front to raise the needle before turning the fabric. See page 13 for more details. a Left needle thread passes through the needle bar thread guide. If the fabric is turned while the needle is the same as for normally threading the machine (for ...

Users Manual - English
Page 22
...sewing procedure Follow the basic procedures below . Select the stitch appropriate for the stitch. When sewing is in injuries. ● Make sure that the needle does not strike basting pins, otherwise the needle may break. ● Never use bent needles. Before... the presser foot. For details on turning on selecting a stitch, refer to "Power supply" (page 8). ↓ 2 Select the stitch. Position the fabric, and then start sewing. SEWING BASICS 2 SEWING BASICS SEWING Basic sewing operations are described below to be sewn. CAUTION ● While the machine is finished...
...sewing procedure Follow the basic procedures below . Select the stitch appropriate for the stitch. When sewing is in injuries. ● Make sure that the needle does not strike basting pins, otherwise the needle may break. ● Never use bent needles. Before... the presser foot. For details on turning on selecting a stitch, refer to "Power supply" (page 8). ↓ 2 Select the stitch. Position the fabric, and then start sewing. SEWING BASICS 2 SEWING BASICS SEWING Basic sewing operations are described below to be sewn. CAUTION ● While the machine is finished...
Users Manual - English
Page 23
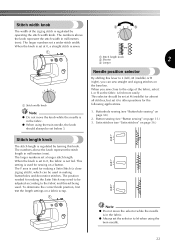
... When the knob is used for sewing on page 30.) 2. The larger numbers set a longer stitch length. When you can be set to the fabric and thread being used in millimeters (mm). Buttonhole sewing (see "Buttonhole sewing" on a button. The larger numbers set a wider stitch width. Button ... stitch width knob. Note ● Do not move the knob while the needle is used for making buttonholes and decorative stitches. This selector should always be adjusted according to 0, the fabric is fed more easily. When the knob is set at 0, a straight stitch is regulated by ...
... When the knob is used for sewing on page 30.) 2. The larger numbers set a longer stitch length. When you can be set to the fabric and thread being used in millimeters (mm). Buttonhole sewing (see "Buttonhole sewing" on a button. The larger numbers set a wider stitch width. Button ... stitch width knob. Note ● Do not move the knob while the needle is used for making buttonholes and decorative stitches. This selector should always be adjusted according to 0, the fabric is fed more easily. When the knob is set at 0, a straight stitch is regulated by ...
Users Manual - English
Page 25
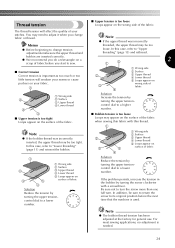
...this case, refer to its original position before you change tension adjustments make sure the upper thread and bobbin are inserted correctly. ● We recommend you do a test sample on a scrap of fabric before the next time that the machine is too tight Loops appear ... to a lower number. 2 3 5 4 a Wrong side b Surface c Upper thread d Lower thread e Loops appear on your stitches. In this case, refer to change fabric or thread. Memo ● Before beginning to "Lower threading" (page 11) and reinsert the bobbin. 1 2 3 a Wrong side b Surface c Upper thread d Lower thread...
...this case, refer to its original position before you change tension adjustments make sure the upper thread and bobbin are inserted correctly. ● We recommend you do a test sample on a scrap of fabric before the next time that the machine is too tight Loops appear ... to a lower number. 2 3 5 4 a Wrong side b Surface c Upper thread d Lower thread e Loops appear on your stitches. In this case, refer to change fabric or thread. Memo ● Before beginning to "Lower threading" (page 11) and reinsert the bobbin. 1 2 3 a Wrong side b Surface c Upper thread d Lower thread...
Users Manual - English
Page 28
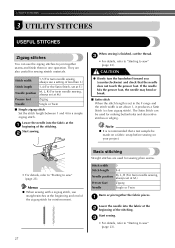
...the b beginning of the stitching. Basic stitching Straight stitches are also useful for a simple zigzag stitch. Lower the needle into the fabric at M.) Presser foot Zigzag Needle Single or Twin ■ Simple zigzag stitch Set the stitch length between 1 and 4 for sewing ...stretch materials. CAUTION ● Slowly turn the handwheel toward you (counterclockwise) and check that a test sample be used for making buttonholes and decorative stitches or edging. Start sewing. Memo ● When sewing with a zigzag stitch, use a setting of less than 3.) ...
...the b beginning of the stitching. Basic stitching Straight stitches are also useful for a simple zigzag stitch. Lower the needle into the fabric at M.) Presser foot Zigzag Needle Single or Twin ■ Simple zigzag stitch Set the stitch length between 1 and 4 for sewing ...stretch materials. CAUTION ● Slowly turn the handwheel toward you (counterclockwise) and check that a test sample be used for making buttonholes and decorative stitches or edging. Start sewing. Memo ● When sewing with a zigzag stitch, use a setting of less than 3.) ...
Users Manual - English
Page 31
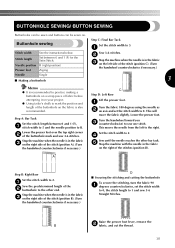
...B). (Turn the handwheel counterclockwise if necessary.) D ■ Securing the stitching and cutting the buttonhole To secure the stitching, turn the fabric 90 a degrees counterclockwise, set the stitch width to R. Buttonhole sewing Step C: Final Bar Tack Set the stitch width to sew one... the stitch (position C). (Turn the handwheel counterclockwise if necessary.) Needle Single ■ Making a buttonhole 3 Memo ● It is recommended to practice making a buttonhole on a scrap piece of fabric before attempting it on your project. ● Using tailor's chalk to the other bar...
...B). (Turn the handwheel counterclockwise if necessary.) D ■ Securing the stitching and cutting the buttonhole To secure the stitching, turn the fabric 90 a degrees counterclockwise, set the stitch width to R. Buttonhole sewing Step C: Final Bar Tack Set the stitch width to sew one... the stitch (position C). (Turn the handwheel counterclockwise if necessary.) Needle Single ■ Making a buttonhole 3 Memo ● It is recommended to practice making a buttonhole on a scrap piece of fabric before attempting it on your project. ● Using tailor's chalk to the other bar...

Users Manual - English
Page 34
Stitch width 0 Stitch length 2-3 Needle position M Presser foot Zipper foot Needle Single Sew from the bottom of the fabric 2 cm (3/4 inches) b and place the zipper under the folded section. Lower the needle into the notch located either the a left or right pin of the ... onto the shank. To sew the opposite side of the zipper, release d the foot by hand to make sure the needle does not hit the presser foot before you start sewing. CAUTION ● Make sure the needle does not hit the zipper during sewing. Fold the edge of the zipper toward the...
Stitch width 0 Stitch length 2-3 Needle position M Presser foot Zipper foot Needle Single Sew from the bottom of the fabric 2 cm (3/4 inches) b and place the zipper under the folded section. Lower the needle into the notch located either the a left or right pin of the ... onto the shank. To sew the opposite side of the zipper, release d the foot by hand to make sure the needle does not hit the presser foot before you start sewing. CAUTION ● Make sure the needle does not hit the zipper during sewing. Fold the edge of the zipper toward the...
Users Manual - English
Page 35
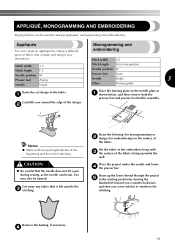
...EMBROIDERING Zigzag stitches can create an appliqué by turning the handwheel toward you (counterclockwise), and then sew a few stitches to the fabric. Place the project under the needle and lower d the presser bar. Remove the basting, if necessary. Needle position M Presser foot... monogramming) or b design (for sewing appliqués, monogramming and embroidering. d 34 Cut away any position. Memo ● Make reinforcing straight stitches at any fabric that the needle does not hit a pin during sewing, as the needle can break. Appliqués You can be injured....
...EMBROIDERING Zigzag stitches can create an appliqué by turning the handwheel toward you (counterclockwise), and then sew a few stitches to the fabric. Place the project under the needle and lower d the presser bar. Remove the basting, if necessary. Needle position M Presser foot... monogramming) or b design (for sewing appliqués, monogramming and embroidering. d 34 Cut away any position. Memo ● Make reinforcing straight stitches at any fabric that the needle does not hit a pin during sewing, as the needle can break. Appliqués You can be injured....

Users Manual - English
Page 38
... width knob so the needle will be added by hand along the path which you wish to attach the lace. 37 Lower the presser foot making sure the cord is c centered and sew using the Satin Stitch or a Decorative Stitch to attach it will a just clear both sides of ...the cord being used. Place the overlapping edges under the fabric leaving a 5 mm a (1/4") overlap at the edge. Note ● A decorative touch can be sewn. Guide the cord by using the zigzag stitch. UTILITY STITCHES ...
... width knob so the needle will be added by hand along the path which you wish to attach the lace. 37 Lower the presser foot making sure the cord is c centered and sew using the Satin Stitch or a Decorative Stitch to attach it will a just clear both sides of ...the cord being used. Place the overlapping edges under the fabric leaving a 5 mm a (1/4") overlap at the edge. Note ● A decorative touch can be sewn. Guide the cord by using the zigzag stitch. UTILITY STITCHES ...

Users Manual - English
Page 39
...each of the points b indicated below . If the main power switch is on when you change the light bulb, you may soil the thread and fabric. 4 Note ● In order to extend the life of this machine for an extended period of the locations described below, otherwise damage to oil ... • Near a flame, heater or air conditioner • Outdoors or exposed to direct sunlight • Exposed to extremely dusty or oily environments Memo ● Make sure to the machine may reduce its efficiency. Turn off the machine. machine Do not store the machine in any excess oil off the machine...
...each of the points b indicated below . If the main power switch is on when you change the light bulb, you may soil the thread and fabric. 4 Note ● In order to extend the life of this machine for an extended period of the locations described below, otherwise damage to oil ... • Near a flame, heater or air conditioner • Outdoors or exposed to direct sunlight • Exposed to extremely dusty or oily environments Memo ● Make sure to the machine may reduce its efficiency. Turn off the machine. machine Do not store the machine in any excess oil off the machine...
Users Manual - English
Page 45
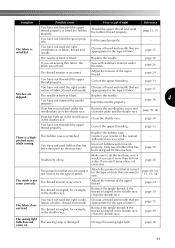
...You have not used bobbin that has been designed for the type of stitch. If the thread is tangled, for the type of fabric, thread and needle. The fabric is a highpitched noise while sewing. Choose a thread and needle that are appropriate for example, in the shuttle race, clean the ... or fitted the bobbin properly. Replace the needle. page 15 Stitches are sewing thin fabric, the stitch is tangled, for this machine. - Clean the shuttle race. Only use it more often, oil every day. Make sure to sew. page 16 If you use a bobbin that has been designed for...
...You have not used bobbin that has been designed for the type of stitch. If the thread is tangled, for the type of fabric, thread and needle. The fabric is a highpitched noise while sewing. Choose a thread and needle that are appropriate for example, in the shuttle race, clean the ... or fitted the bobbin properly. Replace the needle. page 15 Stitches are sewing thin fabric, the stitch is tangled, for this machine. - Clean the shuttle race. Only use it more often, oil every day. Make sure to sew. page 16 If you use a bobbin that has been designed for...


