Users Manual - English and Spanish
Page 2
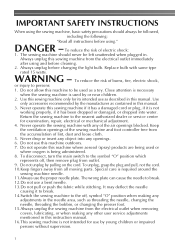
... care is being used as threading the needle, changing the needle, threading the bobbin, or changing the presser foot. 15.Always unplug the sewing machine from the electrical outlet when removing covers, lubricating, or when making any of burns, fire, electric shock, or injury to the nearest authorized...the light bulb. It may deflect the needle causing it has been dropped or damaged, or dropped into any object into water. Return the sewing machine to persons: 1. To unplug, grasp the plug and pull, not the cord. 10.Keep fingers away from the accumulation of electric shock:...
... care is being used as threading the needle, changing the needle, threading the bobbin, or changing the presser foot. 15.Always unplug the sewing machine from the electrical outlet when removing covers, lubricating, or when making any of burns, fire, electric shock, or injury to the nearest authorized...the light bulb. It may deflect the needle causing it has been dropped or damaged, or dropped into any object into water. Return the sewing machine to persons: 1. To unplug, grasp the plug and pull, not the cord. 10.Keep fingers away from the accumulation of electric shock:...
Users Manual - English and Spanish
Page 3
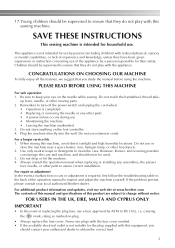
... a longer service life 1. If the problem persists, please consult your eye on the needle while sewing. For additional product information and updates, visit our web site at www.brother.com The contents of this sewing machine. FOR USERS IN THE UK, EIRE, MALTA AND CYPRUS ONLY IMPORTANT • In the event of replacing the...
... a longer service life 1. If the problem persists, please consult your eye on the needle while sewing. For additional product information and updates, visit our web site at www.brother.com The contents of this sewing machine. FOR USERS IN THE UK, EIRE, MALTA AND CYPRUS ONLY IMPORTANT • In the event of replacing the...
Users Manual - English and Spanish
Page 4
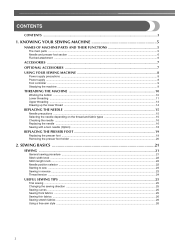
...sew ...23 Sewing in reverse ...23 Thread tension ...24 USEFUL SEWING TIPS ...25 Trial sewing ...25 Changing the sewing direction ...25 Sewing curves ...25 Sewing thick fabrics ...25 Sewing thin fabrics ...26 Sewing stretch fabrics ...26 Using a free-arm style ...26 3 KNOWING YOUR SEWING MACHINE 5 NAMES OF MACHINE......6 Flat bed attachment ...6 ACCESSORIES ...7 OPTIONAL ACCESSORIES 7 USING YOUR SEWING MACHINE 8 Power supply precautions ...8 Power supply ...8 Foot controller ...9 Steadying the machine ...9 THREADING THE MACHINE 10 Winding the bobbin ...10 Lower threading ...11 Upper threading ...
...sew ...23 Sewing in reverse ...23 Thread tension ...24 USEFUL SEWING TIPS ...25 Trial sewing ...25 Changing the sewing direction ...25 Sewing curves ...25 Sewing thick fabrics ...25 Sewing thin fabrics ...26 Sewing stretch fabrics ...26 Using a free-arm style ...26 3 KNOWING YOUR SEWING MACHINE 5 NAMES OF MACHINE......6 Flat bed attachment ...6 ACCESSORIES ...7 OPTIONAL ACCESSORIES 7 USING YOUR SEWING MACHINE 8 Power supply precautions ...8 Power supply ...8 Foot controller ...9 Steadying the machine ...9 THREADING THE MACHINE 10 Winding the bobbin ...10 Lower threading ...11 Upper threading ...
Users Manual - English and Spanish
Page 6
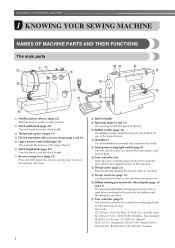
...bobbin winding pre-tension disc is used when winding the thread onto the bobbin and threading the machine. g Reverse sewing lever (page 23) Press and hold down the reverse sewing lever to manually raise and lower the needle. j Bobbin winder (page 10) The bobbin winder...XC7438-421 (Russia), XD0112-121 (Argentina), XE3414-001 (Brazil(120V)), XE4302-001 (Brazil(220V)),XE3447-001 (Taiwan) 5 KNOWING YOUR SEWING MACHINE 1 KNOWING YOUR SEWING MACHINE NAMES OF MACHINE PARTS AND THEIR FUNCTIONS The main parts a Needle position selector (page 22) Shift this knob to set the stitch width. n ...
...bobbin winding pre-tension disc is used when winding the thread onto the bobbin and threading the machine. g Reverse sewing lever (page 23) Press and hold down the reverse sewing lever to manually raise and lower the needle. j Bobbin winder (page 10) The bobbin winder...XC7438-421 (Russia), XD0112-121 (Argentina), XE3414-001 (Brazil(120V)), XE4302-001 (Brazil(220V)),XE3447-001 (Taiwan) 5 KNOWING YOUR SEWING MACHINE 1 KNOWING YOUR SEWING MACHINE NAMES OF MACHINE PARTS AND THEIR FUNCTIONS The main parts a Needle position selector (page 22) Shift this knob to set the stitch width. n ...

Users Manual - English and Spanish
Page 8
KNOWING YOUR SEWING MACHINE ACCESSORIES The following machine models: LS-2000/LS2250PRW/LS2300PRW. ● The screw of the presser foot holder is available through your authorized dealer. (Part code: 132730-122) ● A replacement for the factory-installed presser ... in the flat bed attachment. Part Name 3 Bobbin 4 Needle set Part Code Americas SA156 (Americas) SABOBBIN (U.S.A. We have designed these accessories to carry out most sewing tasks.
KNOWING YOUR SEWING MACHINE ACCESSORIES The following machine models: LS-2000/LS2250PRW/LS2300PRW. ● The screw of the presser foot holder is available through your authorized dealer. (Part code: 132730-122) ● A replacement for the factory-installed presser ... in the flat bed attachment. Part Name 3 Bobbin 4 Needle set Part Code Americas SA156 (Americas) SABOBBIN (U.S.A. We have designed these accessories to carry out most sewing tasks.
Users Manual - English and Spanish
Page 9
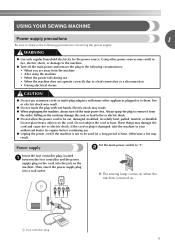
... the foot controller plug, located a between the foot controller and the power supply plug on the cord, into a wall outlet. X The sewing lamp comes on when the machine is not to be cut, damaged, modified, forcefully bent, pulled, twisted, or bundled. Using other power sources may result. ● When... lead to fire or electric shock. ● Do not allow the power cord to be used for a long period of time. USING YOUR SEWING MACHINE Power supply precautions 1 Be sure to observe the following circumstances: • When you are away from the outlet. Electric shock may result in ...
... the foot controller plug, located a between the foot controller and the power supply plug on the cord, into a wall outlet. X The sewing lamp comes on when the machine is not to be cut, damaged, modified, forcefully bent, pulled, twisted, or bundled. Using other power sources may result. ● When... lead to fire or electric shock. ● Do not allow the power cord to be used for a long period of time. USING YOUR SEWING MACHINE Power supply precautions 1 Be sure to observe the following circumstances: • When you are away from the outlet. Electric shock may result in ...
Users Manual - English and Spanish
Page 10
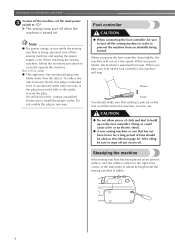
...been in the right-front corner of cloth and dust to correctly operate the machine. (For U.S.A. When you press the foot controller down lightly, the machine will increase. Steadying the machine If the sewing machine has been placed on page 38. CAUTION ● Do not allow pieces...it still does not fit, contact a qualified electrician to adjust its height until the sewing machine is being started. KNOWING YOUR SEWING MACHINE To turn off . When you take your foot off the sewing machine and unplug the power supply cord. Note ● If a power outage occurs while...
...been in the right-front corner of cloth and dust to correctly operate the machine. (For U.S.A. When you press the foot controller down lightly, the machine will increase. Steadying the machine If the sewing machine has been placed on page 38. CAUTION ● Do not allow pieces...it still does not fit, contact a qualified electrician to adjust its height until the sewing machine is being started. KNOWING YOUR SEWING MACHINE To turn off . When you take your foot off the sewing machine and unplug the power supply cord. Note ● If a power outage occurs while...
Users Manual - English and Spanish
Page 11
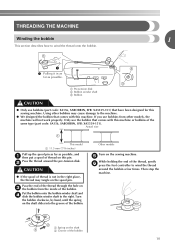
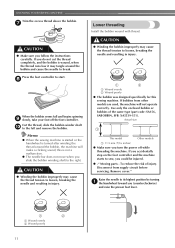
...the end of the bobbin. If you use bobbins (part code: SA156, SABOBBIN, SFB: XA5539-151) that comes with this sewing machine. Then stop the machine. Using other models, the machine will not work properly. Pass the thread around the bobbin a few times. Turn the bobbin clockwise, by hand, until the ...spring on the spool pin. a Spring on the shaft b Groove of thread on the sewing machine. Put the bobbin onto the bobbin winder shaft and d slide the bobbin winder shaft to wind the thread onto the bobbin. 1 Pulling it in ...
...the end of the bobbin. If you use bobbins (part code: SA156, SABOBBIN, SFB: XA5539-151) that comes with this sewing machine. Then stop the machine. Using other models, the machine will not work properly. Pass the thread around the bobbin a few times. Turn the bobbin clockwise, by hand, until the ...spring on the spool pin. a Spring on the shaft b Groove of thread on the sewing machine. Put the bobbin onto the bobbin winder shaft and d slide the bobbin winder shaft to wind the thread onto the bobbin. 1 Pulling it in ...
Users Manual - English and Spanish
Page 12
...remove the bobbin. h When the bobbin seems full and begins spinning i slowly, take your foot off while threading the machine. Memo ● When the sewing machine is started or the handwheel is turned after winding the thread around the bobbin and cause the needle to break. Remove cover...this is wound, when the thread runs low it may cause the thread tension to the right. KNOWING YOUR SEWING MACHINE Trim the excess thread above the bobbin. this sewing machine. CAUTION ● Winding the bobbin improperly may cause the thread tension to its highest position by turning a ...
...remove the bobbin. h When the bobbin seems full and begins spinning i slowly, take your foot off while threading the machine. Memo ● When the sewing machine is started or the handwheel is turned after winding the thread around the bobbin and cause the needle to break. Remove cover...this is wound, when the thread runs low it may cause the thread tension to the right. KNOWING YOUR SEWING MACHINE Trim the excess thread above the bobbin. this sewing machine. CAUTION ● Winding the bobbin improperly may cause the thread tension to its highest position by turning a ...
Users Manual - English and Spanish
Page 14
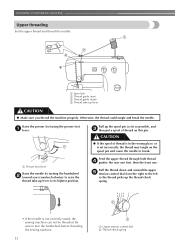
...the thread down and around the upper e tension control dial from the right to break. Pull up lever to turn the handwheel before threading the sewing machine. 13 a Upper tension control dial b Thread check spring Raise the presser foot using the presser foot a lever. CAUTION ● If the ... the left so the thread picks up the thread check spring. • If the needle is not correctly raised, the sewing machine can not be threaded. KNOWING YOUR SEWING MACHINE Upper threading Set the upper thread and thread the needle. Feed the upper thread through both thread d guides: the rear ...
...the thread down and around the upper e tension control dial from the right to break. Pull up lever to turn the handwheel before threading the sewing machine. 13 a Upper tension control dial b Thread check spring Raise the presser foot using the presser foot a lever. CAUTION ● If the ... the left so the thread picks up the thread check spring. • If the needle is not correctly raised, the sewing machine can not be threaded. KNOWING YOUR SEWING MACHINE Upper threading Set the upper thread and thread the needle. Feed the upper thread through both thread d guides: the rear ...
Users Manual - English and Spanish
Page 16
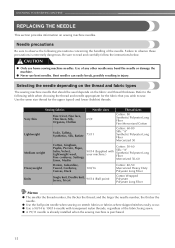
... 90/14 (Supplied with transparent nylon threads, regardless of any other needle may bend the needle or damage the machine. ● Never use home sewing machine needles. Selecting the needle depending on the fabric and thread thickness. Bent needles can easily break, possibly resulting in... the instructions below. Be sure to observe these precautions is purchased. 15 CAUTION ● Only use bent needles. KNOWING YOUR SEWING MACHINE REPLACING THE NEEDLE This section provides information on stretch fabrics or fabrics where skipped stitches easily occur. ● Use a 90...
... 90/14 (Supplied with transparent nylon threads, regardless of any other needle may bend the needle or damage the machine. ● Never use home sewing machine needles. Selecting the needle depending on the fabric and thread thickness. Bent needles can easily break, possibly resulting in... the instructions below. Be sure to observe these precautions is purchased. 15 CAUTION ● Only use bent needles. KNOWING YOUR SEWING MACHINE REPLACING THE NEEDLE This section provides information on stretch fabrics or fabrics where skipped stitches easily occur. ● Use a 90...
Users Manual - English and Spanish
Page 17
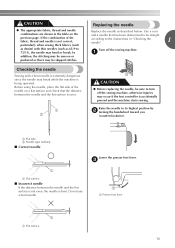
...occur if the foot controller is accidentally pressed and the machine starts sewing. a CAUTION ● Before replacing the needle, be sure to turn off the sewing machine. Do not use a bent needle. Checking the needle Sewing with thin needles (such as described below. Raise ...surface and check that has been determined to be straight according to the instructions in "Checking the needle" . 1 Turn off the sewing machine, otherwise injuries may break while the machine is being operated. c a Presser foot lever 1 a Flat surface 16 a Flat side b Needle type marking ■ Correct ...
...occur if the foot controller is accidentally pressed and the machine starts sewing. a CAUTION ● Before replacing the needle, be sure to turn off the sewing machine. Do not use a bent needle. Checking the needle Sewing with thin needles (such as described below. Raise ...surface and check that has been determined to be straight according to the instructions in "Checking the needle" . 1 Turn off the sewing machine, otherwise injuries may break while the machine is being operated. c a Presser foot lever 1 a Flat surface 16 a Flat side b Needle type marking ■ Correct ...

Users Manual - English and Spanish
Page 18
... the needle until it touches the needle stopper. With the flat side of the needle toward the e rear of the sewing machine may be removed by turning it clockwise. KNOWING YOUR SEWING MACHINE Hold the needle with your left hand, and then d use the coin to tighten the needle clamp screw by simply loosening...
... the needle until it touches the needle stopper. With the flat side of the needle toward the e rear of the sewing machine may be removed by turning it clockwise. KNOWING YOUR SEWING MACHINE Hold the needle with your left hand, and then d use the coin to tighten the needle clamp screw by simply loosening...

Users Manual - English and Spanish
Page 20
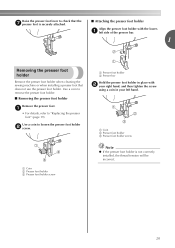
... c Pin Slowly lower the presser foot lever so that the presser foot pin is accidentally pressed and the machine starts sewing. Replacing the presser foot Press the black button at the back of the d presser foot holder to its...; Before replacing the presser foot, be used with the shank in the presser foot holder. KNOWING YOUR SEWING MACHINE REPLACING THE PRESSER FOOT CAUTION ● Always turn it off. Using other any presser feet may be ... have been designed to be sure to turn off the sewing machine, otherwise injuries may occur if the foot controller is aligned with this...
... c Pin Slowly lower the presser foot lever so that the presser foot pin is accidentally pressed and the machine starts sewing. Replacing the presser foot Press the black button at the back of the d presser foot holder to its...; Before replacing the presser foot, be used with the shank in the presser foot holder. KNOWING YOUR SEWING MACHINE REPLACING THE PRESSER FOOT CAUTION ● Always turn it off. Using other any presser feet may be ... have been designed to be sure to turn off the sewing machine, otherwise injuries may occur if the foot controller is aligned with this...
Users Manual - English and Spanish
Page 21
... the presser foot holder with b your left side of the presser bar. 1 Removing the presser foot holder Remove the presser foot holder when cleaning the sewing machine or when installing a presser foot that the g presser foot is not correctly installed, the thread tension will be incorrect. 20 a left hand.
... the presser foot holder with b your left side of the presser bar. 1 Removing the presser foot holder Remove the presser foot holder when cleaning the sewing machine or when installing a presser foot that the g presser foot is not correctly installed, the thread tension will be incorrect. 20 a left hand.
Users Manual - English and Spanish
Page 22
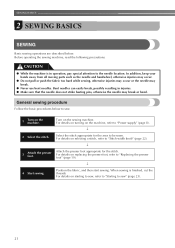
... the stitch appropriate for the stitch. For details on the machine, refer to "Stitch width knob" (page 22). ↓ 3 Attach the presser foot. For details on the sewing machine. General sewing procedure Follow the basic procedures below . Position the fabric, and then start sewing. Before operating the sewing machine, read the following precautions. CAUTION ● While the...
... the stitch appropriate for the stitch. For details on the machine, refer to "Stitch width knob" (page 22). ↓ 3 Attach the presser foot. For details on the sewing machine. General sewing procedure Follow the basic procedures below . Position the fabric, and then start sewing. Before operating the sewing machine, read the following precautions. CAUTION ● While the...

Users Manual - English and Spanish
Page 24
... (2 inches) While holding the end of the thread and the e fabric with your left side of the machine, k and then pass the threads through the thread cutter on the sewing machine. g Raise the presser foot lever. SEWING BASICS Starting to lock the threads at the end of the seam or wherever reinforcement is used...
... (2 inches) While holding the end of the thread and the e fabric with your left side of the machine, k and then pass the threads through the thread cutter on the sewing machine. g Raise the presser foot lever. SEWING BASICS Starting to lock the threads at the end of the seam or wherever reinforcement is used...
Users Manual - English and Spanish
Page 26
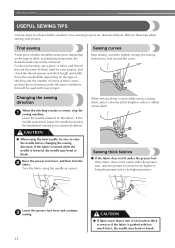
...same conditions that are described below. For the trial sewing, use a piece of fabric and stitching being sewn, the desired results may bend or break. Changing the sewing direction When the stitching reaches a corner, stop the a sewing machine. CAUTION ● When using a zigzag stitch,... select a shorter stitch length in the fabric). When sewing along a curve while using the twin needle, be ...
...same conditions that are described below. For the trial sewing, use a piece of fabric and stitching being sewn, the desired results may bend or break. Changing the sewing direction When the stitching reaches a corner, stop the a sewing machine. CAUTION ● When using a zigzag stitch,... select a shorter stitch length in the fabric). When sewing along a curve while using the twin needle, be ...

Users Manual - English and Spanish
Page 32
Lower the presser foot and sew 3 to 4 stitches. A Step B: Left Row Set the stitch width at 2 and stitch length at 0. a Sew 3 to 4 stitches. Buttons with 2 or with the sewing machine. a Sew the desired length in the c fabric at the left side of the stitches. (position A) Step D: Right... Row Set the needle position at R, stitch width at 2 a and stitch length at F. Sew until the needle ...
Lower the presser foot and sew 3 to 4 stitches. A Step B: Left Row Set the stitch width at 2 and stitch length at 0. a Sew 3 to 4 stitches. Buttons with 2 or with the sewing machine. a Sew the desired length in the c fabric at the left side of the stitches. (position A) Step D: Right... Row Set the needle position at R, stitch width at 2 a and stitch length at F. Sew until the needle ...
Users Manual - English and Spanish
Page 37
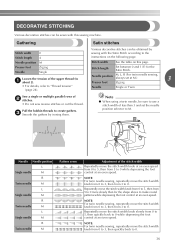
...knob from 0 to 3, then from 0 to 3, then quickly back to 0. 36 c Smooth the gathers by sewing with this page. NOTE: For twin needle sewing, repeatedly move the stitch width knob from 3 to 0. Stitch length Set between 0 and 1 (F) for the ...0 more slowly than 3 and set at M.) 3 Presser foot Zigzag Needle Single or Twin Sew a single or multiple parallel rows of b stitches. • Do not sew reverse stitches or cut the thread. Pull the bobbin threads to "Thread tension" (page 24... knob from 0 to 5, then from 0 to 5, then quickly back to the instructions on this sewing machine.
...knob from 0 to 3, then from 0 to 3, then quickly back to 0. 36 c Smooth the gathers by sewing with this page. NOTE: For twin needle sewing, repeatedly move the stitch width knob from 3 to 0. Stitch length Set between 0 and 1 (F) for the ...0 more slowly than 3 and set at M.) 3 Presser foot Zigzag Needle Single or Twin Sew a single or multiple parallel rows of b stitches. • Do not sew reverse stitches or cut the thread. Pull the bobbin threads to "Thread tension" (page 24... knob from 0 to 5, then from 0 to 5, then quickly back to the instructions on this sewing machine.


