Users Manual - English
Page 2
... use a bent needle. 13. Young children should be supervised to break. 14. The sewing machine should never be used as threading the needle, changing the needle, threading the bobbin, or changing the presser foot. 15. Use this manual. Do not use the proper needle plate. It may deflect ... attention is necessary when the sewing machine is used or where oxygen is intended for examination, repair, electrical or mechanical adjustment. 4. Do not use by pulling on the cord. Do not operate this machine outdoors. 7. Do not pull or push the fabric while stitching. To reduce the risk of...
... use a bent needle. 13. Young children should be supervised to break. 14. The sewing machine should never be used as threading the needle, changing the needle, threading the bobbin, or changing the presser foot. 15. Use this manual. Do not use the proper needle plate. It may deflect ... attention is necessary when the sewing machine is used or where oxygen is intended for examination, repair, electrical or mechanical adjustment. 4. Do not use by pulling on the cord. Do not operate this machine outdoors. 7. Do not pull or push the fabric while stitching. To reduce the risk of...
Users Manual - English
Page 39
... ac c a b ac c a d How to Sew 1. Sew the right side until the needle reaches the stitches formed in step a. a 3. Mettre le sélecteur de modèle sur d. 2. d 31 Arrêter la machine lorsque l'aiguille se trouve à gauche des points et...machine lorsque l'aiguille se trouve à droite des points et lever l'aiguille du tissu. Coudre la lèvre droite jusqu'à ce que l'aiguille atteigne les points formés à la phase a. Abaisser le pied-de-biche et coudre 5 ou 6 points. 3. Turn the pattern selection dial to 6 stitches. 3. Lower the presser foot and sew...
... ac c a b ac c a d How to Sew 1. Sew the right side until the needle reaches the stitches formed in step a. a 3. Mettre le sélecteur de modèle sur d. 2. d 31 Arrêter la machine lorsque l'aiguille se trouve à gauche des points et...machine lorsque l'aiguille se trouve à droite des points et lever l'aiguille du tissu. Coudre la lèvre droite jusqu'à ce que l'aiguille atteigne les points formés à la phase a. Abaisser le pied-de-biche et coudre 5 ou 6 points. 3. Turn the pattern selection dial to 6 stitches. 3. Lower the presser foot and sew...
Users Manual - English
Page 55
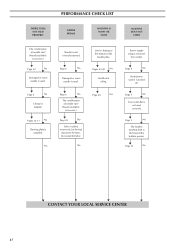
...12 No M M M M CONTACT YOUR LOCAL SERVICE CENTER 47 M Page 43 No Power supply plug is not correctly inserted. M Page 5 No M Foot controller is incorrect. Do not pull the fabric. M Page 6 No M The combination of needle size/ thread size/fabric is not used correctly. M ...oiling. M Page 5 No M The bobbin winding shaft is incorrect. PERFORMANCE CHECK LIST FABRIC DOES NOT FEED PROPERLY NEEDLE BREAKS MACHINE IS NOISY OR SLOW MACHINE DOES NOT START The combination of needle size/ thread size/fabric is slid toward the bobbin presser. M Pages 12-17 ...
...12 No M M M M CONTACT YOUR LOCAL SERVICE CENTER 47 M Page 43 No Power supply plug is not correctly inserted. M Page 5 No M Foot controller is incorrect. Do not pull the fabric. M Page 6 No M The combination of needle size/ thread size/fabric is not used correctly. M ...oiling. M Page 5 No M The bobbin winding shaft is incorrect. PERFORMANCE CHECK LIST FABRIC DOES NOT FEED PROPERLY NEEDLE BREAKS MACHINE IS NOISY OR SLOW MACHINE DOES NOT START The combination of needle size/ thread size/fabric is slid toward the bobbin presser. M Pages 12-17 ...
Users Manual - English
Page 63
... Bobbin winding 12 Buttonhole 30-31, 33 Buttonhole Fine Adjustment 34 Button Sewing 35 C Cleaning 43-45 Connecting Plugs 4 D Darning 38 Drawing Up Lower Thread 17 E Elastic Stitching 27 Embroidering 40-41 F Feed Dog Cleaning 45 Foot Controller 5 Free-Arm Style 8 G Gathering 37 L Lower Threading 14 M Main Power Switch 5 Monogramming 40-41 N Needle...
... Bobbin winding 12 Buttonhole 30-31, 33 Buttonhole Fine Adjustment 34 Button Sewing 35 C Cleaning 43-45 Connecting Plugs 4 D Darning 38 Drawing Up Lower Thread 17 E Elastic Stitching 27 Embroidering 40-41 F Feed Dog Cleaning 45 Foot Controller 5 Free-Arm Style 8 G Gathering 37 L Lower Threading 14 M Main Power Switch 5 Monogramming 40-41 N Needle...
Quick Setup Guide - English
Page 1
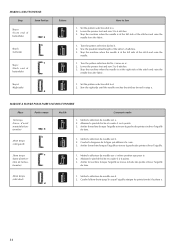
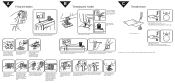
... dial from front to back and pull out about 2" of the thread, depress the foot controller. Thread the needle from the right to the left. 6 7 8 ∗If these actions do not correct the problem, please rethread the machine using step A and B. A Filling the bobbin 1 B Threading the needle 1 2 3 Place the... The latch should hold the bobbin case in place. Guide the thread up the left channel, clear to the left side of the machine. Hold the bobbin case as shown, insert the bobbin with the top opening around the bobbin winder thread guide. 2 3 4 4 Raise the ...
... dial from front to back and pull out about 2" of the thread, depress the foot controller. Thread the needle from the right to the left. 6 7 8 ∗If these actions do not correct the problem, please rethread the machine using step A and B. A Filling the bobbin 1 B Threading the needle 1 2 3 Place the... The latch should hold the bobbin case in place. Guide the thread up the left channel, clear to the left side of the machine. Hold the bobbin case as shown, insert the bobbin with the top opening around the bobbin winder thread guide. 2 3 4 4 Raise the ...


