Quick Setup Guide - English
Page 1
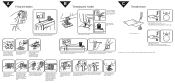
... latch should hold the bobbin case in place. When the bobbin is too loose. (Locks appear on both sides of the thread, depress the foot controller. Pass the thread into the thread guide hole. Place the thread spool on the front of thread. C Thread tension 1 2 654 87...it is in place. Hold the bobbin case as shown, insert the bobbin with the top opening around the bobbin winder thread guide. 2 3 4 4 Raise the presser foot lifter. 5 * Raise the thread takeup lever to thread the take -up the left . 6 7 8 ∗If these actions do not correct the problem,...
... latch should hold the bobbin case in place. When the bobbin is too loose. (Locks appear on both sides of the thread, depress the foot controller. Pass the thread into the thread guide hole. Place the thread spool on the front of thread. C Thread tension 1 2 654 87...it is in place. Hold the bobbin case as shown, insert the bobbin with the top opening around the bobbin winder thread guide. 2 3 4 4 Raise the presser foot lifter. 5 * Raise the thread takeup lever to thread the take -up the left . 6 7 8 ∗If these actions do not correct the problem,...
Users Manual - English
Page 2
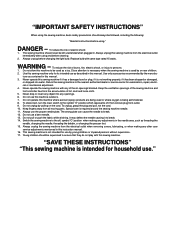
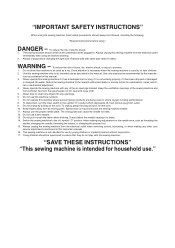
...SAVE THESE INSTRUCTIONS" "This sewing machine is not working properly, if it to persons: 1. To reduce the risk of the sewing machine and foot controller free from all instructions before changing the light bulb. Never operate this sewing machine if it has a damaged cord or plug, if ... center for household use the proper needle plate. turer as threading the needle, changing the needle, threading the bobbin, or changing the presser foot. 15. Young children should be left unattended when plugged in. Switch the sewing machine to break. 12. Always unplug the sewing machine...
...SAVE THESE INSTRUCTIONS" "This sewing machine is not working properly, if it to persons: 1. To reduce the risk of the sewing machine and foot controller free from all instructions before changing the light bulb. Never operate this sewing machine if it has a damaged cord or plug, if ... center for household use the proper needle plate. turer as threading the needle, changing the needle, threading the bobbin, or changing the presser foot. 15. Young children should be left unattended when plugged in. Switch the sewing machine to break. 12. Always unplug the sewing machine...
Users Manual - English
Page 7
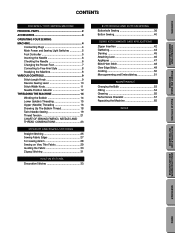
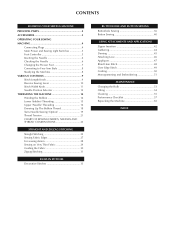
... STITCHES STITCHING KNOWING YOUR SEWING MACHINE PRINCIPAL PARTS 2 ACCESSORIES 3 OPERATING YOUR SEWING MACHINE 4 Connecting Plugs 4 Main Power and Sewing Light Switches 5 Foot Controller 5 Inserting the Needle 6 Checking the Needle 6 Changing the Presser Foot 7 Converting to Free-Arm Style 8 Steadying the Machine 8 VARIOUS CONTROLS 9 Stitch Length Knob 9 Reverse Sewing Lever 10 Stitch Width Knob...
... STITCHES STITCHING KNOWING YOUR SEWING MACHINE PRINCIPAL PARTS 2 ACCESSORIES 3 OPERATING YOUR SEWING MACHINE 4 Connecting Plugs 4 Main Power and Sewing Light Switches 5 Foot Controller 5 Inserting the Needle 6 Checking the Needle 6 Changing the Presser Foot 7 Converting to Free-Arm Style 8 Steadying the Machine 8 VARIOUS CONTROLS 9 Stitch Length Knob 9 Reverse Sewing Lever 10 Stitch Width Knob...
Users Manual - English
Page 29
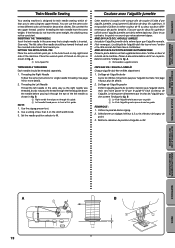
... eye of the left needle in the same way as the right needle was threaded, but do not have the same weight. Use the zigzag presser foot. 2. Use a setting of less than 3 on que l'aiguille normale. (Voir remarque). MISE EN PLACE DE L'AIGUILLE JUMELÉE Introduire l'aiguille jumelée de la mê...
... eye of the left needle in the same way as the right needle was threaded, but do not have the same weight. Use the zigzag presser foot. 2. Use a setting of less than 3 on que l'aiguille normale. (Voir remarque). MISE EN PLACE DE L'AIGUILLE JUMELÉE Introduire l'aiguille jumelée de la mê...
Users Manual - English
Page 68
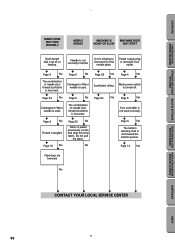
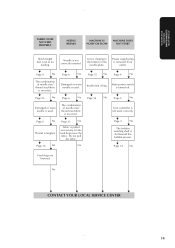
... USING ATTACHMENTS BUTTON SEWING AND APPLICATIONS MAINTENANCE INDEX 58 Power supply plug is clinging to the bottom of the needle plate. w Page 5 No w Foot controller is incorrect. Lint is removed from outlet. w Page 16 No w w Page 6 No w Damaged or Worn needle is turned off....fabric. Needle is used. w Page 23 No w Damaged or Worn needle is not correctly inserted. w Page 6 No w Thread is slid toward the bobbin presser. w Page 5 No w The bobbin winding shaft is tangled. w Page 14 No Feed dogs are lowered. No w Page 55 No w Insufficient oiling....
... USING ATTACHMENTS BUTTON SEWING AND APPLICATIONS MAINTENANCE INDEX 58 Power supply plug is clinging to the bottom of the needle plate. w Page 5 No w Foot controller is incorrect. Lint is removed from outlet. w Page 16 No w w Page 6 No w Damaged or Worn needle is turned off....fabric. Needle is used. w Page 23 No w Damaged or Worn needle is not correctly inserted. w Page 6 No w Thread is slid toward the bobbin presser. w Page 5 No w The bobbin winding shaft is tangled. w Page 14 No Feed dogs are lowered. No w Page 55 No w Insufficient oiling....
Users Manual - English
Page 76
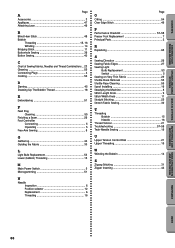
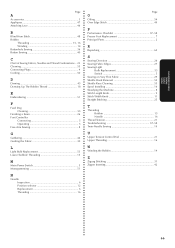
... 15 M Main Power Switch 5 Monogramming 51 N Needle Inspection 6 Position selector 12 Replacement 6 Threading 16 Page O Oiling 54 Over Edge Stitch 49 P Performance Checklist 57-58 Presser Foot Replacement 7 Principal Parts 2 R Repacking 65 S Sewing Direction 26 Sewing Fabric Edges 27 Sewing Light Bulb Replacement 53 Switch 5 Sewing on Very Thin Fabric 29 Shuttle...
... 15 M Main Power Switch 5 Monogramming 51 N Needle Inspection 6 Position selector 12 Replacement 6 Threading 16 Page O Oiling 54 Over Edge Stitch 49 P Performance Checklist 57-58 Presser Foot Replacement 7 Principal Parts 2 R Repacking 65 S Sewing Direction 26 Sewing Fabric Edges 27 Sewing Light Bulb Replacement 53 Switch 5 Sewing on Very Thin Fabric 29 Shuttle...
User Manual - French
Page 2
... it has a damaged cord or plug, if it is used by pulling on the cord. Keep the ventilation openings of the sewing machine and foot controller free from the accumulation of burns, fire, electric shock, or injury to break. 14. Do not use ." To disconnect, turn the...: "Read all moving parts. Never operate this manual. Do not use as threading the needle, changing the needle, threading the bobbin, or changing the presser foot. 15. Always unplug this instruction manual. 16. Use this machine where aerosol (spray) products are being administered. 8. Do not unplug by or near ...
... it has a damaged cord or plug, if it is used by pulling on the cord. Keep the ventilation openings of the sewing machine and foot controller free from the accumulation of burns, fire, electric shock, or injury to break. 14. Do not use ." To disconnect, turn the...: "Read all moving parts. Never operate this manual. Do not use as threading the needle, changing the needle, threading the bobbin, or changing the presser foot. 15. Always unplug this instruction manual. 16. Use this machine where aerosol (spray) products are being administered. 8. Do not unplug by or near ...
User Manual - French
Page 7
CONTENTS KNOWING YOUR SEWING MACHINE PRINCIPAL PARTS 2 ACCESSORIES 3 OPERATING YOUR SEWING MACHINE 4 Connecting Plugs 4 Main Power and Sewing Light Switches 5 Foot Controller 5 Inserting the Needle 6 Checking the Needle 6 Changing the Presser Foot 7 Converting to Free-Arm Style 8 Steadying the Machine 8 VARIOUS CONTROLS 9 Stitch Length Knob 9 Reverse Sewing Lever 10 Stitch Width Knob 11 Needle...
CONTENTS KNOWING YOUR SEWING MACHINE PRINCIPAL PARTS 2 ACCESSORIES 3 OPERATING YOUR SEWING MACHINE 4 Connecting Plugs 4 Main Power and Sewing Light Switches 5 Foot Controller 5 Inserting the Needle 6 Checking the Needle 6 Changing the Presser Foot 7 Converting to Free-Arm Style 8 Steadying the Machine 8 VARIOUS CONTROLS 9 Stitch Length Knob 9 Reverse Sewing Lever 10 Stitch Width Knob 11 Needle...
User Manual - French
Page 68
...is removed from outlet. Do not pull the fabric. M Page 9 No M The combination of the needle plate. M Page 54 M No Page 5 No M Foot controller is used correctly. Power supply plug is tangled. Let the feed dogs move the fabric. Main power switch is set at no feeding. MAINTENANCE... NOT START Stitch length dial is turned off. Lint is clinging to the bottom of needle size/ thread size/fabric is slid toward the bobbin presser. M Page 23 No M Damaged or worn needle is incorrect. M Page 6 No M The combination of needle size/ thread size/fabric is used....
...is removed from outlet. Do not pull the fabric. M Page 9 No M The combination of the needle plate. M Page 54 M No Page 5 No M Foot controller is used correctly. Power supply plug is tangled. Let the feed dogs move the fabric. Main power switch is set at no feeding. MAINTENANCE... NOT START Stitch length dial is turned off. Lint is clinging to the bottom of needle size/ thread size/fabric is slid toward the bobbin presser. M Page 23 No M Damaged or worn needle is incorrect. M Page 6 No M The combination of needle size/ thread size/fabric is used....
User Manual - French
Page 76
... 15 M Main Power Switch 5 Monogramming 51 N Needle Inspection 6 Position selector 12 Replacement 6 Threading 16 Page O Oiling 54 Over Edge Stitch 49 P Performance Checklist 57-58 Presser Foot Replacement 7 Principal Parts 2 R Repacking 65 S Sewing Direction 26 Sewing Fabric Edges 27 Sewing Light Bulb Replacement 53 Switch 5 Sewing on Very Thin Fabric 29 Shuttle...
... 15 M Main Power Switch 5 Monogramming 51 N Needle Inspection 6 Position selector 12 Replacement 6 Threading 16 Page O Oiling 54 Over Edge Stitch 49 P Performance Checklist 57-58 Presser Foot Replacement 7 Principal Parts 2 R Repacking 65 S Sewing Direction 26 Sewing Fabric Edges 27 Sewing Light Bulb Replacement 53 Switch 5 Sewing on Very Thin Fabric 29 Shuttle...


