Users Manual - English and Spanish
Page 3
... the machine while pressing down the foot controller. If the problem persists, please consult your local authorized Brother dealer. For additional product information, visit our web site at www.brother.com SAVE THESE INSTRUCTIONS This machine is damaged, it to inspect and adjust the machine yourself. Never... could cause the needle to break. • Do not push or pull the fabric when sewing, and follow careful instruction when freehand stitching so that you do not play with the appliance. Use this machine, avoid direct sunlight and high humidity locations. The contents of this...
... the machine while pressing down the foot controller. If the problem persists, please consult your local authorized Brother dealer. For additional product information, visit our web site at www.brother.com SAVE THESE INSTRUCTIONS This machine is damaged, it to inspect and adjust the machine yourself. Never... could cause the needle to break. • Do not push or pull the fabric when sewing, and follow careful instruction when freehand stitching so that you do not play with the appliance. Use this machine, avoid direct sunlight and high humidity locations. The contents of this...
Users Manual - English and Spanish
Page 4
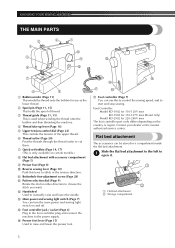
...AND APPLICATIONS 29 Zipper insertion 29 Gathering 30 Appliqués 30 USING OPTIONAL ACCESSORIES 31 Sewing buttons 31 Darning 32 Using the blind stitch foot 33 6. Never use a fuse approved by ASTA to obtain the correct lead. KNOWING YOUR SEWING MACHINE 4 ACCESSORIES 4 Optional... controller 7 Checking the needle 7 Replacing the needle 7 Changing the presser foot 8 THE CONTROLS 9 Pattern selection dial 9 Patterns and stitch names 9 Reverse sewing lever 10 THREADING THE MACHINE 11 Winding the bobbin 11 Lower threading 13 Lower threading (for the plug supplied with...
...AND APPLICATIONS 29 Zipper insertion 29 Gathering 30 Appliqués 30 USING OPTIONAL ACCESSORIES 31 Sewing buttons 31 Darning 32 Using the blind stitch foot 33 6. Never use a fuse approved by ASTA to obtain the correct lead. KNOWING YOUR SEWING MACHINE 4 ACCESSORIES 4 Optional... controller 7 Checking the needle 7 Replacing the needle 7 Changing the presser foot 8 THE CONTROLS 9 Pattern selection dial 9 Patterns and stitch names 9 Reverse sewing lever 10 THREADING THE MACHINE 11 Winding the bobbin 11 Lower threading 13 Lower threading (for the plug supplied with...
Users Manual - English and Spanish
Page 5
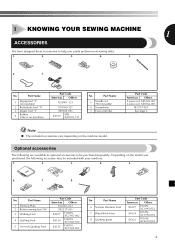
... Americas Others XC6063-021 XE2137-001 SA107 F034N: XC2165-002 SA129 F005N: XC1948-052 SA125 F001N: XC1944-052 No. Part Name 6 Narrow Hemmer Foot 7 Blind Stitch Foot 8 Quilting guide Part Code Americas Others SA127 F003N: XC1945-052 SA134 F018N: XC1976-052 SA132 F016N: XC2215-052 4 No. Depending on the model you...
... Americas Others XC6063-021 XE2137-001 SA107 F034N: XC2165-002 SA129 F005N: XC1948-052 SA125 F001N: XC1944-052 No. Part Name 6 Narrow Hemmer Foot 7 Blind Stitch Foot 8 Quilting guide Part Code Americas Others SA127 F003N: XC1945-052 SA134 F018N: XC1976-052 SA132 F016N: XC2215-052 4 No. Depending on the model you...
Users Manual - English and Spanish
Page 6
... in the foot controller plug and connect the machine to manually raise and lower the needle. F Presser foot lever (Page 15) Used to choose the stitch you want. F D G E G Foot controller (Page 7) You can be stored in the reverse direction. Foot Controller: Model KD-1902 for 110-120V area KD-1902 for... to cut them. 7 Quick-set bobbin (Page 14, 17) (This is only available on and off. Slide the flat bed attachment to the left to stitch in a compartment inside the flat bed attachment. D Main power and sewing light switch (Page 7) You can turn the main power and sewing light switch on...
... in the foot controller plug and connect the machine to manually raise and lower the needle. F Presser foot lever (Page 15) Used to choose the stitch you want. F D G E G Foot controller (Page 7) You can be stored in the reverse direction. Foot Controller: Model KD-1902 for 110-120V area KD-1902 for... to cut them. 7 Quick-set bobbin (Page 14, 17) (This is only available on and off. Slide the flat bed attachment to the left to stitch in a compartment inside the flat bed attachment. D Main power and sewing light switch (Page 7) You can turn the main power and sewing light switch on...
Users Manual - English and Spanish
Page 9
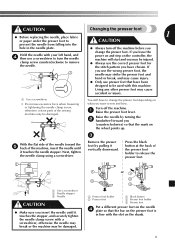
... foot, the needle may strike the presser foot and bend or break, and may be injured. ● Always use the correct presser foot for the stitch pattern you Hold the needle with your left hand, and 4 then use presser feet that the bar on the presser foot is in the needle...
... foot, the needle may strike the presser foot and bend or break, and may be injured. ● Always use the correct presser foot for the stitch pattern you Hold the needle with your left hand, and 4 then use presser feet that the bar on the presser foot is in the needle...
Users Manual - English and Spanish
Page 10
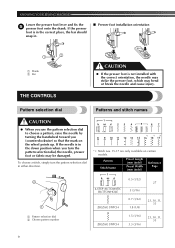
...installed with the correct orientation, the needle may strike the presser foot, which may be damaged. Pattern selection dial Patterns and stitch names CAUTION ● When you use the pattern selection dial to choose a pattern, raise the needle by turning the handwheel ... Width (mm (inch)) Reference Page 1 0.5 (1/32) 27 4-STEP AUTOMATIC BUTTONHOLE 2 ZIGZAG STITCH 5 (3/16) 0.7 (1/32) 1.8 (1/8) 23, 30, 31, 33 3 ZIGZAG STITCH 1.5 (1/16) 3.3 (3/16) 23, 30, 31, 33 9 To choose a stitch, simply turn the pattern selection dial, the needle, presser foot or fabric may bend or break...
...installed with the correct orientation, the needle may strike the presser foot, which may be damaged. Pattern selection dial Patterns and stitch names CAUTION ● When you use the pattern selection dial to choose a pattern, raise the needle by turning the handwheel ... Width (mm (inch)) Reference Page 1 0.5 (1/32) 27 4-STEP AUTOMATIC BUTTONHOLE 2 ZIGZAG STITCH 5 (3/16) 0.7 (1/32) 1.8 (1/8) 23, 30, 31, 33 3 ZIGZAG STITCH 1.5 (1/16) 3.3 (3/16) 23, 30, 31, 33 9 To choose a stitch, simply turn the pattern selection dial, the needle, presser foot or fabric may bend or break...
Users Manual - English and Spanish
Page 11
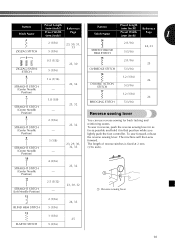
... sewing lever 12 2 (1/16) 24, 33 BLIND HEM STITCH 5 (3/16) 13 1 (1/16) 25 ELASTIC STITCH 5 (3/16) 10 The length of reverse stitches is fixed at 2 mm (1/16 inch). 10 4 (3/16) 23, 32 STRAIGHT STITCH (Center Needle - Pattern Stitch Name Preset Length (mm (inch)) Preset Width (mm (... - 2 (1/16) - 3 (1/8) - 23, 32 23, 32 23, 32 23, 29, 30, 32, 33 OVEREDGE STITCH 5 (3/16) 16 1.2 (1/16) 26 DOUBLE ACTION STITCH 5 (3/16) 17 1.2 (1/16) 26 BRIDGING STITCH 5 (3/16) Reverse sewing lever You can use reverse sewing for back tacking and reinforcing seams. To sew in reverse, push the...
... sewing lever 12 2 (1/16) 24, 33 BLIND HEM STITCH 5 (3/16) 13 1 (1/16) 25 ELASTIC STITCH 5 (3/16) 10 The length of reverse stitches is fixed at 2 mm (1/16 inch). 10 4 (3/16) 23, 32 STRAIGHT STITCH (Center Needle - Pattern Stitch Name Preset Length (mm (inch)) Preset Width (mm (... - 2 (1/16) - 3 (1/8) - 23, 32 23, 32 23, 32 23, 29, 30, 32, 33 OVEREDGE STITCH 5 (3/16) 16 1.2 (1/16) 26 DOUBLE ACTION STITCH 5 (3/16) 17 1.2 (1/16) 26 BRIDGING STITCH 5 (3/16) Reverse sewing lever You can use reverse sewing for back tacking and reinforcing seams. To sew in reverse, push the...
Users Manual - English and Spanish
Page 19
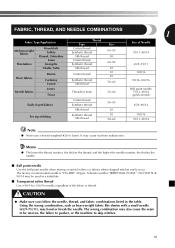
... point needle 75/11-90/14 (gold colored) Easily frayed fabrics Cotton thread Synthetic thread 50-90 65/9-90/14 Silk thread 50 For top-stitching Synthetic thread Silk thread 30 50-60 100/16 75/11-90/14 Note ● Never use a thread weighted #20 or lower. Memo &#...thread; It may bend or break the needle. Using the wrong combination, such as a substitute. ■ Transparent nylon thread Use a 90/14 to skip stitches. 18 CAUTION ● Make sure you follow the needle, thread, and fabric combinations listed in the table. and the higher the needle number, the thicker...
... point needle 75/11-90/14 (gold colored) Easily frayed fabrics Cotton thread Synthetic thread 50-90 65/9-90/14 Silk thread 50 For top-stitching Synthetic thread Silk thread 30 50-60 100/16 75/11-90/14 Note ● Never use a thread weighted #20 or lower. Memo &#...thread; It may bend or break the needle. Using the wrong combination, such as a substitute. ■ Transparent nylon thread Use a 90/14 to skip stitches. 18 CAUTION ● Make sure you follow the needle, thread, and fabric combinations listed in the table. and the higher the needle number, the thicker...
Users Manual - English and Spanish
Page 20
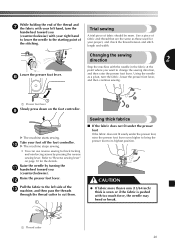
... and bend or break and you (counterclockwise) so that the needle does not hit basting pins or other way may cause the thread to select a 3 stitch (see page 8). 4 1 Presser foot lever Place the fabric under the presser foot, 6 pass the thread under the presser foot, otherwise the presser foot may be...
... and bend or break and you (counterclockwise) so that the needle does not hit basting pins or other way may cause the thread to select a 3 stitch (see page 8). 4 1 Presser foot lever Place the fabric under the presser foot, 6 pass the thread under the presser foot, otherwise the presser foot may be...
Users Manual - English and Spanish
Page 21
...your foot off the foot controller. 0 X The machine stops sewing. • You can use reverse sewing for your project, and check the thread tension and stitch length and width. While holding the end of the thread and 7 the fabric with your left side of the c machine, and then pass the threads... not fit easily under the presser foot, raise the presser foot lever even higher to bring the presser foot to the starting point of the stitching. Using the needle as those used for back tacking and reinforcing seams by turning the a handwheel toward you (counterclockwise) with your right hand to ...
...your foot off the foot controller. 0 X The machine stops sewing. • You can use reverse sewing for your project, and check the thread tension and stitch length and width. While holding the end of the thread and 7 the fabric with your left side of the c machine, and then pass the threads... not fit easily under the presser foot, raise the presser foot lever even higher to bring the presser foot to the starting point of the stitching. Using the needle as those used for back tacking and reinforcing seams by turning the a handwheel toward you (counterclockwise) with your right hand to ...
Users Manual - English and Spanish
Page 22
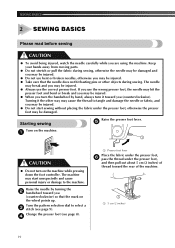
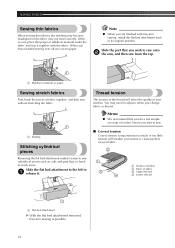
... in its original position. Note ● When you change fabric or thread. SEWING BASICS Sewing thin fabrics When sewing thin fabrics, the stitching may become misaligned or the fabric may need to sew cylindrical pieces such as too much or too little tension will affect the quality of... fabric together, and then sew without stretching the fabric. 1 1 Basting Stitching cylindrical pieces Removing the flat bed attachment makes it easier to adjust it when you are finished with the fabric. Memo ● We recommend that...
... in its original position. Note ● When you change fabric or thread. SEWING BASICS Sewing thin fabrics When sewing thin fabrics, the stitching may become misaligned or the fabric may need to sew cylindrical pieces such as too much or too little tension will affect the quality of... fabric together, and then sew without stretching the fabric. 1 1 Basting Stitching cylindrical pieces Removing the flat bed attachment makes it easier to adjust it when you are finished with the fabric. Memo ● We recommend that...
Users Manual - English and Spanish
Page 24
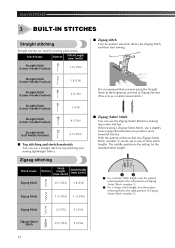
...-thread tension to one of Zigzag Stitches. (This acts as a reinforcement stitch.) ■ Zigzag (Satin) Stitch You can be set to produce more beautiful stitches. BUILT-IN STITCHES 3 BUILT-IN STITCHES Straight stitching Straight stitches are used for sewing plain seams. Stitch Name Pattern Stitch Length [mm (inch)] Straight Stitch 6 (Center Needle Position) 1.6 (1/16) ■ Zigzag stitch Turn the pattern selection dial...
...-thread tension to one of Zigzag Stitches. (This acts as a reinforcement stitch.) ■ Zigzag (Satin) Stitch You can be set to produce more beautiful stitches. BUILT-IN STITCHES 3 BUILT-IN STITCHES Straight stitching Straight stitches are used for sewing plain seams. Stitch Name Pattern Stitch Length [mm (inch)] Straight Stitch 6 (Center Needle Position) 1.6 (1/16) ■ Zigzag stitch Turn the pattern selection dial...
Users Manual - English and Spanish
Page 25
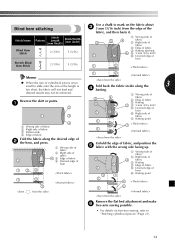
...details on free-arm sewing, refer to "Stitching cylindrical pieces" (Page 21). 24 desired results may not be achieved. Blind hem stitching Stitch Name Blind Hem Stitch Pattern Stitch Length [mm (inch)] Stitch Width [mm (inch)] 12 2 (1/16) 5 (3/16) Stretch Blind 14 Hem Stitch 2 (1/16) 5 (3/16) Use a...the edge of the fabric, and then baste it. 3 1 5 2 1 Wrong side of 4 fabric 2 Right side of fabric 3 Edge of fabric 4 Basting stitching 6 5 5 mm (3/16 inch) 6 Desired edge of hem 1 2 1 2 Memo ● When the size of cylindrical pieces is too small to slide onto...
...details on free-arm sewing, refer to "Stitching cylindrical pieces" (Page 21). 24 desired results may not be achieved. Blind hem stitching Stitch Name Blind Hem Stitch Pattern Stitch Length [mm (inch)] Stitch Width [mm (inch)] 12 2 (1/16) 5 (3/16) Stretch Blind 14 Hem Stitch 2 (1/16) 5 (3/16) Use a...the edge of the fabric, and then baste it. 3 1 5 2 1 Wrong side of 4 fabric 2 Right side of fabric 3 Edge of fabric 4 Basting stitching 6 5 5 mm (3/16 inch) 6 Desired edge of hem 1 2 1 2 Memo ● When the size of cylindrical pieces is too small to slide onto...
Users Manual - English and Spanish
Page 26
... the presser foot so 1 that the fabric feeds correctly, and then start sewing. 1 Overedge stitching Stitch Name Pattern Stitch Length [mm (inch)] Stitch Width [mm (inch)] 15 Overedge Stitch 2 (1/16) 5 (3/16) 1 Arm After selecting a stitch, slowly turn the b fabric right side up. * Stitch no. 15 is approximately 3 mm (1/8 inch) to the left of the center of fabric...
... the presser foot so 1 that the fabric feeds correctly, and then start sewing. 1 Overedge stitching Stitch Name Pattern Stitch Length [mm (inch)] Stitch Width [mm (inch)] 15 Overedge Stitch 2 (1/16) 5 (3/16) 1 Arm After selecting a stitch, slowly turn the b fabric right side up. * Stitch no. 15 is approximately 3 mm (1/8 inch) to the left of the center of fabric...
Users Manual - English and Spanish
Page 27
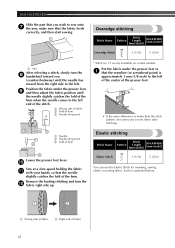
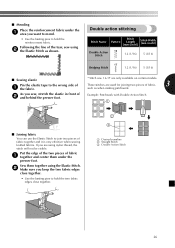
...making patchwork. ■ Mending Place the reinforcement fabric under the presser foot. Double action stitching Stitch Name Pattern Stitch Length [mm (inch)] Stitch Width [mm (inch)] Double Action 16 Stitch 1.2 (1/16) 5 (3/16) 17 Bridging Stitch 1.2 (1/16) 5 (3/16) ■ Sewing elastic Pin the elastic tape to join... As you keep the two fabric edges close together. 2 3 1 Desired seamline 2 Straight Stitch 3 Double Action Stitch 26 Following the line of fabric, 3 such as shown. These stitches are used for joining two pieces of the tear, sew using nylon thread, the...
...making patchwork. ■ Mending Place the reinforcement fabric under the presser foot. Double action stitching Stitch Name Pattern Stitch Length [mm (inch)] Stitch Width [mm (inch)] Double Action 16 Stitch 1.2 (1/16) 5 (3/16) 17 Bridging Stitch 1.2 (1/16) 5 (3/16) ■ Sewing elastic Pin the elastic tape to join... As you keep the two fabric edges close together. 2 3 1 Desired seamline 2 Straight Stitch 3 Double Action Stitch 26 Following the line of fabric, 3 such as shown. These stitches are used for joining two pieces of the tear, sew using nylon thread, the...
Users Manual - English and Spanish
Page 28
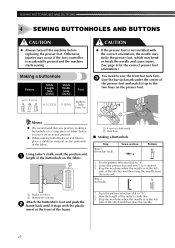
Stop the machine when the needle is not installed with the plastic insert at the front of the stitch and then raise the needle. 27 Sew the length of the fabric. Using tailor's chalk, mark the position and 1 length of the buttonhole... the presser foot. Lower the presser foot and sew 5 to "b". 2. Turn the pattern selection dial to 6 stitches. 3. Stop the machine when the needle is accidentally pressed and the machine starts sewing. Making a buttonhole Pattern 1 Stitch Stitch Length [mm Width [mm Foot (inch)] (inch)] 0.5 (1/32) Button5 (3/16) hole Foot "A" Memo ●...
Stop the machine when the needle is not installed with the plastic insert at the front of the stitch and then raise the needle. 27 Sew the length of the fabric. Using tailor's chalk, mark the position and 1 length of the buttonhole... the presser foot. Lower the presser foot and sew 5 to "b". 2. Turn the pattern selection dial to 6 stitches. 3. Stop the machine when the needle is accidentally pressed and the machine starts sewing. Making a buttonhole Pattern 1 Stitch Stitch Length [mm Width [mm Foot (inch)] (inch)] 0.5 (1/32) Button5 (3/16) hole Foot "A" Memo ●...
Users Manual - English and Spanish
Page 29
...are the same. 28 Sew 5 to "d". 2. Cut an opening in the "+" direction. • This adjustment ensures both ends of the 1 buttonhole, stitch the right side and observe the feeding. 1 1. If the left side is too open or tight 2 compared with the right side, adjust the buttonhole ...to "c" (same position as described in step 1). 2. Be careful not to cut . Step Step 3 (Back bar tack) Sewn section Pattern 1. straight stitches to open , turn the buttonhole fine-adjustment screw with a large screwdriver in the middle of the 3 buttonhole with a large screwdriver in the path of ...
...are the same. 28 Sew 5 to "d". 2. Cut an opening in the "+" direction. • This adjustment ensures both ends of the 1 buttonhole, stitch the right side and observe the feeding. 1 1. If the left side is too open or tight 2 compared with the right side, adjust the buttonhole ...to "c" (same position as described in step 1). 2. Be careful not to cut . Step Step 3 (Back bar tack) Sewn section Pattern 1. straight stitches to open , turn the buttonhole fine-adjustment screw with a large screwdriver in the middle of the 3 buttonhole with a large screwdriver in the path of ...
Users Manual - English and Spanish
Page 30
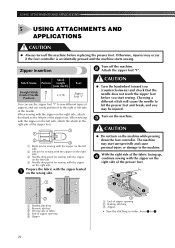
... can easily position it to 3. 29 The machine may occur if the foot controller is accidentally pressed and the machine starts sewing. Stitch Stitch Name Pattern Length Foot [mm (inch)] Straight Stitch 9 (Center Needle Position) 3 (1/8) Zipper Foot "I" You can use the zipper foot "I 4 1 Right pin for sewing with...zipper on the right side 3 Needle drop point for sewing with the zipper on the left side of zipper opening 2 Basting stitching 3 Zipper • Sew the stitching in order, from 1 to the right or left side 4 Needle drop point for sewing with the zipper on the right...
... can easily position it to 3. 29 The machine may occur if the foot controller is accidentally pressed and the machine starts sewing. Stitch Stitch Name Pattern Length Foot [mm (inch)] Straight Stitch 9 (Center Needle Position) 3 (1/8) Zipper Foot "I" You can use the zipper foot "I 4 1 Right pin for sewing with...zipper on the right side 3 Needle drop point for sewing with the zipper on the left side of zipper opening 2 Basting stitching 3 Zipper • Sew the stitching in order, from 1 to the right or left side 4 Needle drop point for sewing with the zipper on the right...
Users Manual - English and Spanish
Page 31
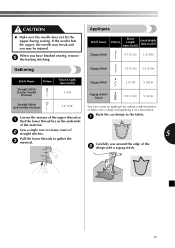
...zipper, the needle may be injured. You can create an appliqué by cutting a different piece of 2 straight stitches. 5 Pull the lower threads to the fabric. 1 Sew a single row (or many rows) of fabric into...és Stitch Name Pattern Stitch Length [mm (inch)] Stitch Width [mm (inch)] 2 Zigzag Stitch 0.7 (1/32) 1.8 (1/8) 3 Zigzag Stitch 1.5 (1/16) 3.3 (3/16) Stitch Name Pattern Stitch Length [mm (inch)] 4 Zigzag Stitch 2 (1/16) 5 (3/16) Straight Stitch 9 (Center Needle Position) 3 (1/8) Zigzag (Satin) 5 Stitch 0.5 (1/32) 5 (3/16) Straight Stitch 11 (...
...zipper, the needle may be injured. You can create an appliqué by cutting a different piece of 2 straight stitches. 5 Pull the lower threads to the fabric. 1 Sew a single row (or many rows) of fabric into...és Stitch Name Pattern Stitch Length [mm (inch)] Stitch Width [mm (inch)] 2 Zigzag Stitch 0.7 (1/32) 1.8 (1/8) 3 Zigzag Stitch 1.5 (1/16) 3.3 (3/16) Stitch Name Pattern Stitch Length [mm (inch)] 4 Zigzag Stitch 2 (1/16) 5 (3/16) Straight Stitch 9 (Center Needle Position) 3 (1/8) Zigzag (Satin) 5 Stitch 0.5 (1/32) 5 (3/16) Straight Stitch 11 (...
Users Manual - English and Spanish
Page 32
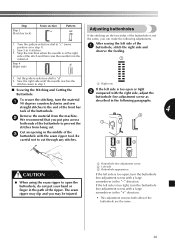
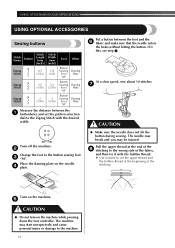
...; Do not turn on the needle 4 plate. The needle may break and you may start unexpectedly and cause personal injury or damage to the Zigzag Stitch with the bobbin thread. The machine may be injured. Pull the upper thread at the beginning of the fabric, and then tie it hits, see... selection dial to the machine. 31 Place the darning plate on the machine while pressing down the foot controller. At a slow speed, sew about 10 stitches. 7 CAUTION ● Make sure the needle does not hit the button during sewing. X Use scissors to cut the upper thread and the bobbin thread at...
...; Do not turn on the needle 4 plate. The needle may break and you may start unexpectedly and cause personal injury or damage to the Zigzag Stitch with the bobbin thread. The machine may be injured. Pull the upper thread at the beginning of the fabric, and then tie it hits, see... selection dial to the machine. 31 Place the darning plate on the machine while pressing down the foot controller. At a slow speed, sew about 10 stitches. 7 CAUTION ● Make sure the needle does not hit the button during sewing. X Use scissors to cut the upper thread and the bobbin thread at...


