Users Manual - English and Spanish
Page 2
... or injury to persons. 2 Always unplug the machine from the electrical outlet when making any sudden or careless movements, otherwise you are being used or where oxygen is being sewn may fall, resulting in injuries. 5 Special care is required when sewing: • Always pay close attention to the ...needle. Plug the machine directly into the electrical outlet. • Never drop or insert any object into the electrical outlet. Do ...
... or injury to persons. 2 Always unplug the machine from the electrical outlet when making any sudden or careless movements, otherwise you are being used or where oxygen is being sewn may fall, resulting in injuries. 5 Special care is required when sewing: • Always pay close attention to the ...needle. Plug the machine directly into the electrical outlet. • Never drop or insert any object into the electrical outlet. Do ...
Users Manual - English and Spanish
Page 3
... persists, please consult your local authorized Brother dealer. The machine may start unexpectedly and cause personal injury or damage to the machine. • Switch the machine to the symbol "O" position to turn on the machine while pressing down the foot controller. ...sewing, and follow the troubleshooting table in a safe way and understand the hazards involved. Children should never be replaced by or near a space heater, iron, halogen lamp, or other parts to clean the case. Use accessories recommended by children without notice. Special care is required around the machine...
... persists, please consult your local authorized Brother dealer. The machine may start unexpectedly and cause personal injury or damage to the machine. • Switch the machine to the symbol "O" position to turn on the machine while pressing down the foot controller. ...sewing, and follow the troubleshooting table in a safe way and understand the hazards involved. Children should never be replaced by or near a space heater, iron, halogen lamp, or other parts to clean the case. Use accessories recommended by children without notice. Special care is required around the machine...
Users Manual - English and Spanish
Page 4
... blind stitch foot 33 6. carrying the mark, rating as marked on storing the machine 34 Cleaning 34 TROUBLESHOOTING 36 INDEX 39 3 KNOWING YOUR SEWING MACHINE 4 ACCESSORIES 4 Optional accessories 4 THE MAIN PARTS 5 Flat bed attachment 5 USING YOUR SEWING MACHINE 6 Connecting plugs 6 Main power and sewing light switch 7 Foot controller 7 Checking the needle 7 Replacing the needle 7 Changing the...
... blind stitch foot 33 6. carrying the mark, rating as marked on storing the machine 34 Cleaning 34 TROUBLESHOOTING 36 INDEX 39 3 KNOWING YOUR SEWING MACHINE 4 ACCESSORIES 4 Optional accessories 4 THE MAIN PARTS 5 Flat bed attachment 5 USING YOUR SEWING MACHINE 6 Connecting plugs 6 Main power and sewing light switch 7 Foot controller 7 Checking the needle 7 Replacing the needle 7 Changing the...
Users Manual - English and Spanish
Page 5
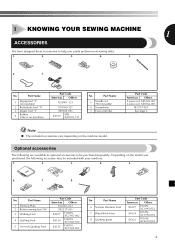
... foot "I" 4 Bobbin (One is on the machine model. Part Name 1 Darning Plate 2 Button sewing foot "M" 3 Walking Foot 4 Quilting Foot 5 1/4-inch Quilting Foot Part Code Americas Others XC6063-021 XE2137-001 SA107 F034N: XC2165-002 SA129 F005N: XC1948-052 SA125 F001N: XC1944-052 No. 1 KNOWING YOUR SEWING MACHINE 1 ACCESSORIES We have designed these accessories to...
... foot "I" 4 Bobbin (One is on the machine model. Part Name 1 Darning Plate 2 Button sewing foot "M" 3 Walking Foot 4 Quilting Foot 5 1/4-inch Quilting Foot Part Code Americas Others XC6063-021 XE2137-001 SA107 F034N: XC2165-002 SA129 F005N: XC1948-052 SA125 F001N: XC1944-052 No. 1 KNOWING YOUR SEWING MACHINE 1 ACCESSORIES We have designed these accessories to...
Users Manual - English and Spanish
Page 6
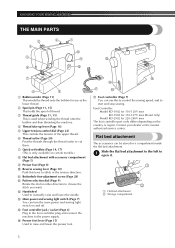
KNOWING YOUR SEWING MACHINE THE MAIN PARTS 3 2 1 4 B 5 A C 6 0 7 8 9 1 Bobbin winder (Page 11) This ... Rotate the dial in the reverse direction. Flat bed attachment The accessories can be stored in the foot controller plug and connect the machine to the power supply. E Foot controller jack / socket (Page 6) Plug in a compartment inside the flat bed attachment. F... 3 Thread guide (Page 11, 15) This is used when winding the thread onto the bobbin and then threading the machine. 4 Thread take-up lever (Page 16) 5 Upper tension-control dial (Page 22) This controls the tension of ...
KNOWING YOUR SEWING MACHINE THE MAIN PARTS 3 2 1 4 B 5 A C 6 0 7 8 9 1 Bobbin winder (Page 11) This ... Rotate the dial in the reverse direction. Flat bed attachment The accessories can be stored in the foot controller plug and connect the machine to the power supply. E Foot controller jack / socket (Page 6) Plug in a compartment inside the flat bed attachment. F... 3 Thread guide (Page 11, 15) This is used when winding the thread onto the bobbin and then threading the machine. 4 Thread take-up lever (Page 16) 5 Upper tension-control dial (Page 22) This controls the tension of ...
Users Manual - English and Spanish
Page 7
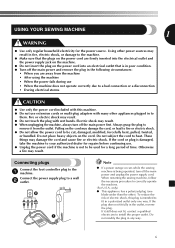
... If the plug does not fit fully in any way. 6 b a Note ● If a power outage occurs while the sewing machine is damaged, take the machine to your authorized dealer for the power source. If the cord or plug is being operated, turn off the main power first. USING... YOUR SEWING MACHINE 1 WARNING ● Use only regular household electricity for repairs before continuing use • When the machine does not operate correctly due to a bad connection or a disconnection • During electrical storms...
... If the plug does not fit fully in any way. 6 b a Note ● If a power outage occurs while the sewing machine is damaged, take the machine to your authorized dealer for the power source. If the cord or plug is being operated, turn off the main power first. USING... YOUR SEWING MACHINE 1 WARNING ● Use only regular household electricity for repairs before continuing use • When the machine does not operate correctly due to a bad connection or a disconnection • During electrical storms...
Users Manual - English and Spanish
Page 8
... and the sides. Lower the presser foot lever. 3 1 1 Presser foot lever 7 KNOWING YOUR SEWING MACHINE Main power and sewing light switch This switch turns the main power and sewing light on the foot controller. Doing so could cause a fire or an electric shock. Foot controller...: Model KD-1902 This foot controller can be straight and sharp for home use sewing machine needles for smooth sewing. 1 2 1 Turn on a flat surface. The product code is accidentally pressed and the machine starts sewing. ● Only use . Otherwise, injuries may occur if the foot controller is...
... and the sides. Lower the presser foot lever. 3 1 1 Presser foot lever 7 KNOWING YOUR SEWING MACHINE Main power and sewing light switch This switch turns the main power and sewing light on the foot controller. Doing so could cause a fire or an electric shock. Foot controller...: Model KD-1902 This foot controller can be straight and sharp for home use sewing machine needles for smooth sewing. 1 2 1 Turn on a flat surface. The product code is accidentally pressed and the machine starts sewing. ● Only use . Otherwise, injuries may occur if the foot controller is...
Users Manual - English and Spanish
Page 9
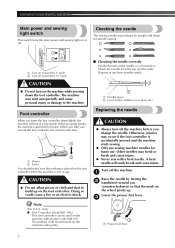
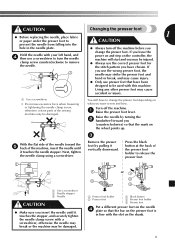
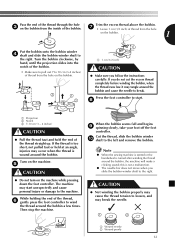
... 4 plate so that the bar on what you have chosen. Raise the needle by pulling it | button at the back of the sewing machine may be injured. ● Always use presser feet that the mark on the wheel points up. change the presser foot depending on the... the needle clamp using a screwdriver. 2 3 1 1 Use a screwdriver 2 Needle stopper 3 Needle CAUTION ● Make sure you use a screwdriver to turn off the machine. 1 Raise the presser foot lever. You will start and you may be damaged. 3 Remove the presser | Press the black foot by turning the 2 handwheel toward...
... 4 plate so that the bar on what you have chosen. Raise the needle by pulling it | button at the back of the sewing machine may be injured. ● Always use presser feet that the mark on the wheel points up. change the presser foot depending on the... the needle clamp using a screwdriver. 2 3 1 1 Use a screwdriver 2 Needle stopper 3 Needle CAUTION ● Make sure you use a screwdriver to turn off the machine. 1 Raise the presser foot lever. You will start and you may be damaged. 3 Remove the presser | Press the black foot by turning the 2 handwheel toward...
Users Manual - English and Spanish
Page 10
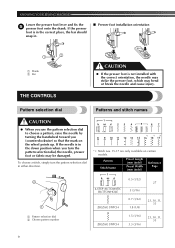
If the needle is in the down position when you (counterclockwise) so that the mark on certain models. KNOWING YOUR SEWING MACHINE Lower the presser foot lever and fix the 5 presser foot onto the shank. To choose a stitch, simply turn the pattern selection dial, the needle, presser ...
If the needle is in the down position when you (counterclockwise) so that the mark on certain models. KNOWING YOUR SEWING MACHINE Lower the presser foot lever and fix the 5 presser foot onto the shank. To choose a stitch, simply turn the pattern selection dial, the needle, presser ...
Users Manual - English and Spanish
Page 11
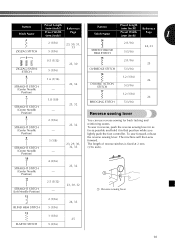
...inch). 10 4 (3/16) 23, 32 STRAIGHT STITCH (Center Needle - Position) 1 11 STRAIGHT STITCH (Left Needle Position) 2.5 (3/32) - 23, 30, 32 1 Reverse sewing lever 12 2 (1/16) 24, 33 BLIND HEM STITCH 5 (3/16) 13 1 (1/16) 25 ELASTIC STITCH 5 (3/16) 10 Pattern Stitch Name Preset Length (mm (inch...16) Reverse sewing lever You can use reverse sewing for back tacking and reinforcing seams. To sew in reverse, push the reverse sewing lever in as far as possible and hold it in that position while you lightly push the foot controller. The machine will then sew forward. To sew forward, ...
...inch). 10 4 (3/16) 23, 32 STRAIGHT STITCH (Center Needle - Position) 1 11 STRAIGHT STITCH (Left Needle Position) 2.5 (3/32) - 23, 30, 32 1 Reverse sewing lever 12 2 (1/16) 24, 33 BLIND HEM STITCH 5 (3/16) 13 1 (1/16) 25 ELASTIC STITCH 5 (3/16) 10 Pattern Stitch Name Preset Length (mm (inch...16) Reverse sewing lever You can use reverse sewing for back tacking and reinforcing seams. To sew in reverse, push the reverse sewing lever in as far as possible and hold it in that position while you lightly push the foot controller. The machine will then sew forward. To sew forward, ...
Users Manual - English and Spanish
Page 12
... disk and pull the thread in completely. 11 CAUTION ● If the spool of thread is set incorrectly, the thread may cause damage to the machine. Actual size 11.5 mm (7/16 inch) This model Other models 1 1 Pull the thread in completely. 2 3 1 Pre-tension disk 2 Bobbin...with your right hand, pass the thread toward you use the bobbin that comes with this machine. KNOWING YOUR SEWING MACHINE THREADING THE MACHINE Winding the bobbin CAUTION ● We designed the bobbin that comes with this machine or bobbins of the same type (part code: SA156, SFB: XA5539-151). If ...
... disk and pull the thread in completely. 11 CAUTION ● If the spool of thread is set incorrectly, the thread may cause damage to the machine. Actual size 11.5 mm (7/16 inch) This model Other models 1 1 Pull the thread in completely. 2 3 1 Pre-tension disk 2 Bobbin...with your right hand, pass the thread toward you use the bobbin that comes with this machine. KNOWING YOUR SEWING MACHINE THREADING THE MACHINE Winding the bobbin CAUTION ● We designed the bobbin that comes with this machine or bobbins of the same type (part code: SA156, SFB: XA5539-151). If ...
Users Manual - English and Spanish
Page 13
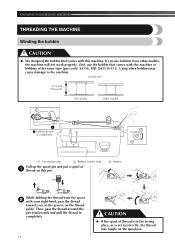
..., 6 gently press the foot controller to break. Cut the thread, slide the bobbin winder 0 shaft to the right. Note ● When the sewing machine is started or the handwheel is not a malfunction. ● The needle bar does not move when you follow the instructions carefully. If the thread ...is wound around the bobbin, the machine will make a clicking sound; Turn on the machine. 5 CAUTION ● Do not turn on the bobbin. 1 Put the bobbin onto the bobbin winder 4 shaft and slide ...
..., 6 gently press the foot controller to break. Cut the thread, slide the bobbin winder 0 shaft to the right. Note ● When the sewing machine is started or the handwheel is not a malfunction. ● The needle bar does not move when you follow the instructions carefully. If the thread ...is wound around the bobbin, the machine will make a clicking sound; Turn on the machine. 5 CAUTION ● Do not turn on the bobbin. 1 Put the bobbin onto the bobbin winder 4 shaft and slide ...
Users Manual - English and Spanish
Page 14
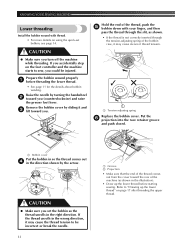
Refer to "Drawing up the lower thread before threading the lower thread. • See page 11 for the details about bobbin winding. KNOWING YOUR SEWING MACHINE Lower threading Install the bobbin wound with your finger, and then pass the thread through the slit, as shown. • If the thread is not...cover Put the bobbin in so the thread comes out 4 in the illustration). • Draw up the lower thread" on the foot controller and the machine starts to sew, you accidentally step on page 17 after threading the upper thread. CAUTION ● Make sure you . 1 Hold the end of the...
Refer to "Drawing up the lower thread before threading the lower thread. • See page 11 for the details about bobbin winding. KNOWING YOUR SEWING MACHINE Lower threading Install the bobbin wound with your finger, and then pass the thread through the slit, as shown. • If the thread is not...cover Put the bobbin in so the thread comes out 4 in the illustration). • Draw up the lower thread" on the foot controller and the machine starts to sew, you accidentally step on page 17 after threading the upper thread. CAUTION ● Make sure you . 1 Hold the end of the...
Users Manual - English and Spanish
Page 16
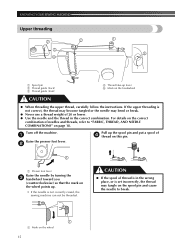
Turn off the machine. 1 Raise the presser foot lever. 2 Pull up the spool pin and put a spool of 4 thread on this pin. 1 1 Presser ... or the needle may tangle on the spool pin and cause the needle to "FABRIC, THREAD, AND NEEDLE COMBINATIONS" on the wheel 15 KNOWING YOUR SEWING MACHINE Upper threading 2 2 3 4 1 5 1 Spool pin 2 Thread guide (back) 3 Thread guide (front) 4 Thread take-up . • If the needle is set incorrectly... of 20 or lower. ● Use the needle and the thread in the wrong place, or is not correctly raised, the sewing machine can not be threaded.
Turn off the machine. 1 Raise the presser foot lever. 2 Pull up the spool pin and put a spool of 4 thread on this pin. 1 1 Presser ... or the needle may tangle on the spool pin and cause the needle to "FABRIC, THREAD, AND NEEDLE COMBINATIONS" on the wheel 15 KNOWING YOUR SEWING MACHINE Upper threading 2 2 3 4 1 5 1 Spool pin 2 Thread guide (back) 3 Thread guide (front) 4 Thread take-up . • If the needle is set incorrectly... of 20 or lower. ● Use the needle and the thread in the wrong place, or is not correctly raised, the sewing machine can not be threaded.
Users Manual - English and Spanish
Page 18
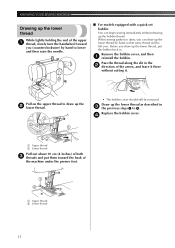
...needle. ■ For models equipped with a quick-set bobbin You can begin sewing immediately without cutting it. Pull on the upper thread to draw up the lower thread as described in . KNOWING YOUR SEWING MACHINE Drawing up the lower thread While lightly holding the end of the upper 1 thread..., slowly turn the handwheel toward the back of the machine under the presser foot. 1 2 1 Upper thread 2 Lower thread 17 Draw...
...needle. ■ For models equipped with a quick-set bobbin You can begin sewing immediately without cutting it. Pull on the upper thread to draw up the lower thread as described in . KNOWING YOUR SEWING MACHINE Drawing up the lower thread While lightly holding the end of the upper 1 thread..., slowly turn the handwheel toward the back of the machine under the presser foot. 1 2 1 Upper thread 2 Lower thread 17 Draw...
Users Manual - English and Spanish
Page 19
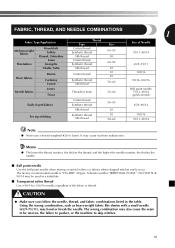
.... Schmetz needles "JERSEY BALL POINT" 130/705H SUK 90/14 may cause machine malfunction. and the higher the needle number, the thicker the needle. ■ Ball point needle Use the ball point needle when sewing on stretch fabrics or fabrics where skipped stitches easily occur. Using the wrong ...combination, such as a substitute. ■ Transparent nylon thread Use a 90/14 to skip stitches. 18 It may be uneven, the fabric to pucker, or the machine to 100/16 needle,...
.... Schmetz needles "JERSEY BALL POINT" 130/705H SUK 90/14 may cause machine malfunction. and the higher the needle number, the thicker the needle. ■ Ball point needle Use the ball point needle when sewing on stretch fabrics or fabrics where skipped stitches easily occur. Using the wrong ...combination, such as a substitute. ■ Transparent nylon thread Use a 90/14 to skip stitches. 18 It may be uneven, the fabric to pucker, or the machine to 100/16 needle,...
Users Manual - English and Spanish
Page 20
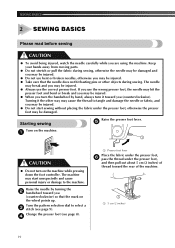
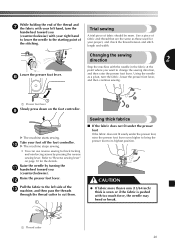
... by turning the 2 handwheel toward the rear of the machine. 1 1 5 cm (2 inches) 19 Starting sewing Raise the presser foot lever. 5 Turn on the machine. 1 1 CAUTION ● Do not turn it the other objects during sewing. Raise the needle by hand, always turn on the machine while pressing down the foot controller. Change the presser foot...
... by turning the 2 handwheel toward the rear of the machine. 1 1 5 cm (2 inches) 19 Starting sewing Raise the presser foot lever. 5 Turn on the machine. 1 1 CAUTION ● Do not turn it the other objects during sewing. Raise the needle by hand, always turn on the machine while pressing down the foot controller. Change the presser foot...
Users Manual - English and Spanish
Page 21
... be sewn. While holding the end of the thread and 7 the fabric with your left side of the c machine, and then pass the threads through the thread cutter to cut them. . 1 Sewing thick fabrics ■ If the fabric does not fit under the presser foot If the fabric does not fit...the presser foot lever even higher to bring the presser foot to its highest position. Take your foot off the foot controller. 0 X The machine stops sewing. • You can use reverse sewing for the details. b Pull the fabric to the left hand, turn the fabric, lower the presser foot lever, and then continue...
... be sewn. While holding the end of the thread and 7 the fabric with your left side of the c machine, and then pass the threads through the thread cutter to cut them. . 1 Sewing thick fabrics ■ If the fabric does not fit under the presser foot If the fabric does not fit...the presser foot lever even higher to bring the presser foot to its highest position. Take your foot off the foot controller. 0 X The machine stops sewing. • You can use reverse sewing for the details. b Pull the fabric to the left hand, turn the fabric, lower the presser foot lever, and then continue...
Users Manual - English and Spanish
Page 28
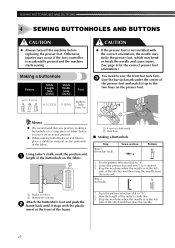
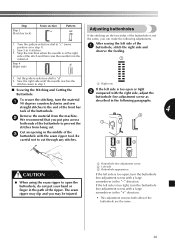
...foot, which may occur if the foot controller is at the front of the frame. 1. Stop the machine when the needle is accidentally pressed and the machine starts sewing. Sew the length of the tailor's chalk line. 3. Set the pattern selection dial to 6 stitches. 3. ... 2 Red lines ■ Making a Buttonhole Step Step 1 (Front bar tack) Sewn section Pattern 1. SEWING BUTTONHOLES AND BUTTONS 4 SEWING BUTTONHOLES AND BUTTONS CAUTION ● Always turn off the machine before you practice making buttonholes on soft fabrics, place a stabilizer material on the underside of the fabric....
...foot, which may occur if the foot controller is at the front of the frame. 1. Stop the machine when the needle is accidentally pressed and the machine starts sewing. Sew the length of the tailor's chalk line. 3. Set the pattern selection dial to 6 stitches. 3. ... 2 Red lines ■ Making a Buttonhole Step Step 1 (Front bar tack) Sewn section Pattern 1. SEWING BUTTONHOLES AND BUTTONS 4 SEWING BUTTONHOLES AND BUTTONS CAUTION ● Always turn off the machine before you practice making buttonholes on soft fabrics, place a stabilizer material on the underside of the fabric....
Users Manual - English and Spanish
Page 29
... buttonhole, stitch the right side and observe the feeding. 1 1. Stop the machine when the needle is too open or tight 2 compared with a large screwdriver in step 1). 2. Set the pattern selection dial to 6 stitches. 3. After sewing the left side is at the right side of the stitch and then raise... straight stitches to cut . Be careful not to the end of the front bar tack of the buttonhole. 4 Remove the material from the machine. 2 2 We recommend that you can make the following paragraphs. If the left side is too tight, turn the buttonhole fine-adjustment screw with...
... buttonhole, stitch the right side and observe the feeding. 1 1. Stop the machine when the needle is too open or tight 2 compared with a large screwdriver in step 1). 2. Set the pattern selection dial to 6 stitches. 3. After sewing the left side is at the right side of the stitch and then raise... straight stitches to cut . Be careful not to the end of the front bar tack of the buttonhole. 4 Remove the material from the machine. 2 2 We recommend that you can make the following paragraphs. If the left side is too tight, turn the buttonhole fine-adjustment screw with...


