Users Manual - English and Spanish
Page 2
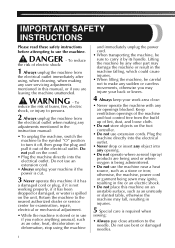
... it by any other part may damage the machine or result in the instruction manual: • To unplug the machine, switch the machine to the symbol "O" position to turn it off, then grasp the plug and pull it has been dropped or damaged, or water is required when sewing: • Always pay... close attention to the needle. Keep ventilation openings of the machine and foot control free from the electrical outlet when making any air openings blocked. otherwise, the...
... it by any other part may damage the machine or result in the instruction manual: • To unplug the machine, switch the machine to the symbol "O" position to turn it off, then grasp the plug and pull it has been dropped or damaged, or water is required when sewing: • Always pay... close attention to the needle. Keep ventilation openings of the machine and foot control free from the electrical outlet when making any air openings blocked. otherwise, the...
Users Manual - English and Spanish
Page 3
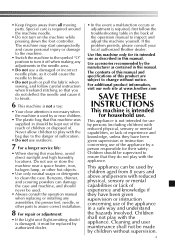
...a person responsible for household use as it could cause the needle to break. • Do not push or pull the fabric when sewing, and follow the troubleshooting table in a safe way and understand the hazards involved. Cleaning and user maintenance shall not be used by ...is intended for their safety. Use accessories recommended by children aged from all moving parts. For additional product information, visit our web site at www.brother.com SAVE THESE INSTRUCTIONS This machine is required around the machine needle. • Do not turn it off when making any assemblies, the...
...a person responsible for household use as it could cause the needle to break. • Do not push or pull the fabric when sewing, and follow the troubleshooting table in a safe way and understand the hazards involved. Cleaning and user maintenance shall not be used by ...is intended for their safety. Use accessories recommended by children aged from all moving parts. For additional product information, visit our web site at www.brother.com SAVE THESE INSTRUCTIONS This machine is required around the machine needle. • Do not turn it off when making any assemblies, the...
Users Manual - English and Spanish
Page 4
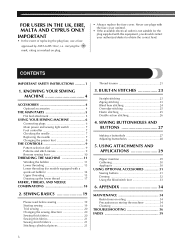
... INSTRUCTIONS 1 1. KNOWING YOUR SEWING MACHINE 4 ACCESSORIES 4 Optional accessories 4 THE MAIN PARTS 5 Flat bed attachment 5 USING YOUR SEWING MACHINE 6 Connecting plugs 6 Main power and sewing light switch 7 Foot controller 7 Checking the needle 7 Replacing the needle 7 Changing the presser foot 8 THE CONTROLS 9 Pattern selection dial 9 Patterns and stitch names 9 Reverse sewing lever 10 THREADING THE MACHINE 11 Winding the bobbin...
... INSTRUCTIONS 1 1. KNOWING YOUR SEWING MACHINE 4 ACCESSORIES 4 Optional accessories 4 THE MAIN PARTS 5 Flat bed attachment 5 USING YOUR SEWING MACHINE 6 Connecting plugs 6 Main power and sewing light switch 7 Foot controller 7 Checking the needle 7 Replacing the needle 7 Changing the presser foot 8 THE CONTROLS 9 Pattern selection dial 9 Patterns and stitch names 9 Reverse sewing lever 10 THREADING THE MACHINE 11 Winding the bobbin...
Users Manual - English and Spanish
Page 5
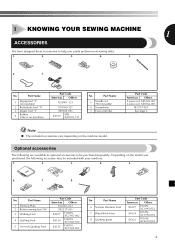
... on machine) Part Code Americas Others XC4901-121 X59369-321 XE9369-001 SA156 SFB: XA5539-151 No. Part Name 6 Narrow Hemmer Foot 7 Blind Stitch Foot 8 Quilting guide Part Code Americas Others SA127 F003N: XC1945-052 SA134 F018N: XC1976-052 SA132 F016N: XC2215-052 4 No. Depending on the model you easily perform most sewing tasks. 1. 2. 3. 4. 5. 6. 7. Part Name...
... on machine) Part Code Americas Others XC4901-121 X59369-321 XE9369-001 SA156 SFB: XA5539-151 No. Part Name 6 Narrow Hemmer Foot 7 Blind Stitch Foot 8 Quilting guide Part Code Americas Others SA127 F003N: XC1945-052 SA134 F018N: XC1976-052 SA132 F016N: XC2215-052 4 No. Depending on the model you easily perform most sewing tasks. 1. 2. 3. 4. 5. 6. 7. Part Name...
Users Manual - English and Spanish
Page 6
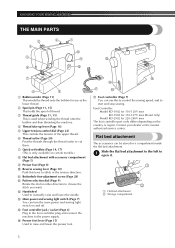
... E Foot controller jack / socket (Page 6) Plug in the reverse direction. D Main power and sewing light switch (Page 7) You can be stored in either direction to start and stop sewing. KNOWING YOUR SEWING MACHINE THE MAIN PARTS 3 2 1 4 B 5 A C 6 0 7 8 9 1 Bobbin winder (Page 11)... This winds the thread onto the bobbin for 220-240V area The foot controller part code differs depending on and off. A Buttonhole...
... E Foot controller jack / socket (Page 6) Plug in the reverse direction. D Main power and sewing light switch (Page 7) You can be stored in either direction to start and stop sewing. KNOWING YOUR SEWING MACHINE THE MAIN PARTS 3 2 1 4 B 5 A C 6 0 7 8 9 1 Bobbin winder (Page 11)... This winds the thread onto the bobbin for 220-240V area The foot controller part code differs depending on and off. A Buttonhole...
Users Manual - English and Spanish
Page 9
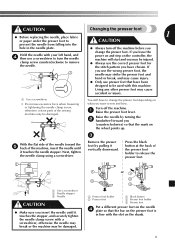
... needle clamp screw with a screwdriver, otherwise the needle may break or the machine may cause injury. ● Only use excessive force when loosening or tightening the needle clamp screw, otherwise certain parts of the sewing machine may be damaged. 3 Remove the presser | Press the black foot by... turning the 2 handwheel toward the 5 back of the machine, insert the needle until it | button at the back of the...
... needle clamp screw with a screwdriver, otherwise the needle may break or the machine may cause injury. ● Only use excessive force when loosening or tightening the needle clamp screw, otherwise certain parts of the sewing machine may be damaged. 3 Remove the presser | Press the black foot by... turning the 2 handwheel toward the 5 back of the machine, insert the needle until it | button at the back of the...
Users Manual - English and Spanish
Page 12
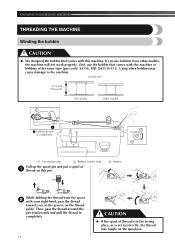
... the pre-tension disk and pull the thread in completely. 11 CAUTION ● If the spool of the same type (part code: SA156, SFB: XA5539-151). KNOWING YOUR SEWING MACHINE THREADING THE MACHINE Winding the bobbin CAUTION ● We designed the bobbin that comes with your right hand, pass the thread toward you use...
... the pre-tension disk and pull the thread in completely. 11 CAUTION ● If the spool of the same type (part code: SA156, SFB: XA5539-151). KNOWING YOUR SEWING MACHINE THREADING THE MACHINE Winding the bobbin CAUTION ● We designed the bobbin that comes with your right hand, pass the thread toward you use...
Users Manual - English and Spanish
Page 20
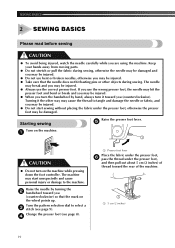
... injured. ● Do not use the correct presser foot. Turn the pattern selection dial to the machine. Keep your hands away from moving parts. ● Do not stretch or pull the fabric during sewing. SEWING BASICS 2 SEWING BASICS Please read before sewing CAUTION ● To avoid being injured, watch the needle carefully while you may start...
... injured. ● Do not use the correct presser foot. Turn the pattern selection dial to the machine. Keep your hands away from moving parts. ● Do not stretch or pull the fabric during sewing. SEWING BASICS 2 SEWING BASICS Please read before sewing CAUTION ● To avoid being injured, watch the needle carefully while you may start...
Users Manual - English and Spanish
Page 36
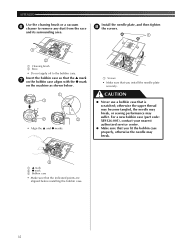
...Insert the bobbin case so that the ▲ mark 7 on the bobbin case aligns with the ● mark on the machine as shown below. 1 1 2 2 • Align the ▲ and ● marks. 1 Screws • ...case that the indicated points are aligned before installing the bobbin case. 35 For a new bobbin case (part code: XE9326-001), contact your nearest authorized service center. ● Make sure that you fit the bobbin...upper thread may become tangled, the needle may break, or sewing performance may break. 3 1 ▲ mark 2 ● mark 3 Bobbin case • Make sure that is...
...Insert the bobbin case so that the ▲ mark 7 on the bobbin case aligns with the ● mark on the machine as shown below. 1 1 2 2 • Align the ▲ and ● marks. 1 Screws • ...case that the indicated points are aligned before installing the bobbin case. 35 For a new bobbin case (part code: XE9326-001), contact your nearest authorized service center. ● Make sure that you fit the bobbin...upper thread may become tangled, the needle may break, or sewing performance may break. 3 1 ▲ mark 2 ● mark 3 Bobbin case • Make sure that is...


