Users Manual - English and Spanish
Page 3
...brother.com SAVE THESE INSTRUCTIONS This machine is required around the machine needle. • Do not turn it to break. 6 This machine is not a toy: • Your close attention is necessary when the machine .... • Do not use of the appliance in this machine, avoid direct sunlight and high humidity locations. Use accessories recommended by children aged from all moving parts. This appliance ... could cause the needle to break. • Do not push or pull the fabric when sewing, and follow the troubleshooting table in should be made by authorized dealer. • In the...
...brother.com SAVE THESE INSTRUCTIONS This machine is required around the machine needle. • Do not turn it to break. 6 This machine is not a toy: • Your close attention is necessary when the machine .... • Do not use of the appliance in this machine, avoid direct sunlight and high humidity locations. Use accessories recommended by children aged from all moving parts. This appliance ... could cause the needle to break. • Do not push or pull the fabric when sewing, and follow the troubleshooting table in should be made by authorized dealer. • In the...
Users Manual - English and Spanish
Page 4
... to obtain the correct lead. carrying the mark, rating as marked on storing the machine 34 Cleaning 34 TROUBLESHOOTING 36 INDEX 39 3 KNOWING YOUR SEWING MACHINE 4 ACCESSORIES 4 Optional accessories 4 THE MAIN PARTS 5 Flat bed attachment 5 USING YOUR SEWING MACHINE 6 Connecting plugs 6 Main power and sewing light switch 7 Foot controller 7 Checking the needle 7 Replacing the needle 7 Changing the presser...
... to obtain the correct lead. carrying the mark, rating as marked on storing the machine 34 Cleaning 34 TROUBLESHOOTING 36 INDEX 39 3 KNOWING YOUR SEWING MACHINE 4 ACCESSORIES 4 Optional accessories 4 THE MAIN PARTS 5 Flat bed attachment 5 USING YOUR SEWING MACHINE 6 Connecting plugs 6 Main power and sewing light switch 7 Foot controller 7 Checking the needle 7 Replacing the needle 7 Changing the presser...
Users Manual - English and Spanish
Page 5
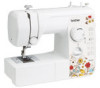
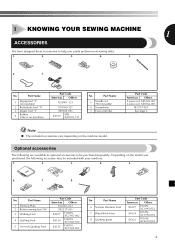
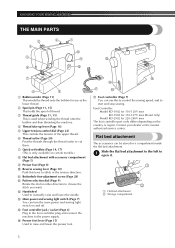
... SA132 F016N: XC2215-052 4 1 KNOWING YOUR SEWING MACHINE 1 ACCESSORIES We have designed these accessories to help you purchased, the following are available as optional accessories to be included with your machine. 1. 2. 3. 4. 5. 6. 7. 8. Part Name 1 Zigzag foot "J" (on machine) 2 Buttonhole foot "A" 3 Zipper foot "I" 4 Bobbin (One is on the machine model. Part Name 1 Darning Plate 2 Button sewing foot "M" 3 Walking Foot 4 Quilting Foot...
... SA132 F016N: XC2215-052 4 1 KNOWING YOUR SEWING MACHINE 1 ACCESSORIES We have designed these accessories to help you purchased, the following are available as optional accessories to be included with your machine. 1. 2. 3. 4. 5. 6. 7. 8. Part Name 1 Zigzag foot "J" (on machine) 2 Buttonhole foot "A" 3 Zipper foot "I" 4 Bobbin (One is on the machine model. Part Name 1 Darning Plate 2 Button sewing foot "M" 3 Walking Foot 4 Quilting Foot...
Users Manual - English and Spanish
Page 6
...only available on certain models.) 8 Flat bed attachment with accessory compartment (Page 5) 9 Presser foot (Page 8) 0 Reverse sewing lever (Page 10) Push this to control the sewing speed, and to start and stop sewing. Foot Controller: Model KD-1902 for 110-120V area...accessories can be stored in the reverse direction. Contact your dealer or the nearest authorized service center. Slide the flat bed attachment to the left to raise and lower the presser foot. F D G E G Foot controller (Page 7) You can turn the main power and sewing light switch on and off. KNOWING YOUR SEWING MACHINE...
...only available on certain models.) 8 Flat bed attachment with accessory compartment (Page 5) 9 Presser foot (Page 8) 0 Reverse sewing lever (Page 10) Push this to control the sewing speed, and to start and stop sewing. Foot Controller: Model KD-1902 for 110-120V area...accessories can be stored in the reverse direction. Contact your dealer or the nearest authorized service center. Slide the flat bed attachment to the left to raise and lower the presser foot. F D G E G Foot controller (Page 7) You can turn the main power and sewing light switch on and off. KNOWING YOUR SEWING MACHINE...
Users Manual - English and Spanish
Page 32
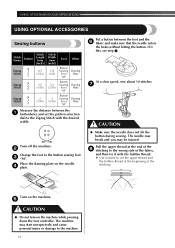
...Put a button between the 1 buttonholes and set the pattern selection dial to the machine. 31 At a slow speed, sew about 10 stitches. 7 CAUTION ● Make sure the needle does not hit the button during sewing. Turn on the machine. 5 CAUTION ● Do not turn on the needle 4 plate. The needle... thread at the end of the fabric, and then tie it hits, see step 1. USING ATTACHMENTS AND APPLICATIONS USING OPTIONAL ACCESSORIES L Sewing buttons Stitch Name Pattern Stitch Length [mm (inch)] Stitch Width [mm (inch)] Foot Other Zigzag 2 Stitch 0.7 (1/32) 1.8 (1/8) Button...
...Put a button between the 1 buttonholes and set the pattern selection dial to the machine. 31 At a slow speed, sew about 10 stitches. 7 CAUTION ● Make sure the needle does not hit the button during sewing. Turn on the machine. 5 CAUTION ● Do not turn on the needle 4 plate. The needle... thread at the end of the fabric, and then tie it hits, see step 1. USING ATTACHMENTS AND APPLICATIONS USING OPTIONAL ACCESSORIES L Sewing buttons Stitch Name Pattern Stitch Length [mm (inch)] Stitch Width [mm (inch)] Foot Other Zigzag 2 Stitch 0.7 (1/32) 1.8 (1/8) Button...


