
Users Manual - English
Page 6
..., alteration or repairs performed by anyone other than a Brother Authorized Service Representative. (7) NOT COVERED UNDER WARRANTY ARE: Consumable items, for example (including, but not limited to): ribbons, ink or toner cartridges, toner drum units, print heads, cleaning and/or instances where no defects... in this product. BROTHER ONE YEAR LIMITED WARRANTY and EXCHANGE SERVICE (For USA Only) This warranty gives you certain ...
..., alteration or repairs performed by anyone other than a Brother Authorized Service Representative. (7) NOT COVERED UNDER WARRANTY ARE: Consumable items, for example (including, but not limited to): ribbons, ink or toner cartridges, toner drum units, print heads, cleaning and/or instances where no defects... in this product. BROTHER ONE YEAR LIMITED WARRANTY and EXCHANGE SERVICE (For USA Only) This warranty gives you certain ...
Users Manual - English
Page 8
...(For Canada Only) Pursuant to this limited warranty of 1 year from the date of purchase for labour and parts, Brother International Corporation (Canada) Ltd. ("Brother"), or its Authorized Service Centers, Distributors, Dealers, Agents or employees, shall create another warranty or modify this warranty. In...MFC/Facsimile machine shall be the sole liability of supplies or consumable items that are non-Brother products. For laser products: Failure to remove the Toner Cartridge (and Toner Drum Unit on applicable models) during shipping will cause severe damage to the MFC/Facsimile and will...
...(For Canada Only) Pursuant to this limited warranty of 1 year from the date of purchase for labour and parts, Brother International Corporation (Canada) Ltd. ("Brother"), or its Authorized Service Centers, Distributors, Dealers, Agents or employees, shall create another warranty or modify this warranty. In...MFC/Facsimile machine shall be the sole liability of supplies or consumable items that are non-Brother products. For laser products: Failure to remove the Toner Cartridge (and Toner Drum Unit on applicable models) during shipping will cause severe damage to the MFC/Facsimile and will...
Users Manual - English
Page 13
...1-1 Conventions Used in this Manual 1-1 Test Sheet Procedure and Product Registration (For USA Only) ....1-2 To Complete Your FAX-4100, FAX-4750e or FAX-5750e Registration On-Line (For USA Only) ....... 1-2 Control Panel Overview 1-3 About Fax Machines 1-5...2 Assembly and Connections 2-1 Packing List 2-1 Choosing a Location 2-2 Assembly 2-3 Installing the Drum Unit Assembly (with Toner Cartridge) .....2-3 Attaching the Trays 2-4 Connecting Paper Cassette #2 (Option for FAX-4100 and FAX-4750e 2-4 Manual Feed Slot 2-5 Paper 2-6 Acceptable Paper 2-6 Paper Capacity of ...
...1-1 Conventions Used in this Manual 1-1 Test Sheet Procedure and Product Registration (For USA Only) ....1-2 To Complete Your FAX-4100, FAX-4750e or FAX-5750e Registration On-Line (For USA Only) ....... 1-2 Control Panel Overview 1-3 About Fax Machines 1-5...2 Assembly and Connections 2-1 Packing List 2-1 Choosing a Location 2-2 Assembly 2-3 Installing the Drum Unit Assembly (with Toner Cartridge) .....2-3 Attaching the Trays 2-4 Connecting Paper Cassette #2 (Option for FAX-4100 and FAX-4750e 2-4 Manual Feed Slot 2-5 Paper 2-6 Acceptable Paper 2-6 Paper Capacity of ...
Users Manual - English
Page 18
... the Drum Unit 13-23 Checking the Drum Life 13-24 14 Important Information 14-1 Standard Telephone and FCC Notices 14-1 Laser Safety 14-2 FDA Regulations 14-2 Manufactured 14-2 Federal Communications Commission (FCC) Declaration of Conformity (For USA Only 14-3 Important 14-4 Industry Canada Compliance Statement (For Canada Only 14-4 Warranty 14-4 International ENERGY...
... the Drum Unit 13-23 Checking the Drum Life 13-24 14 Important Information 14-1 Standard Telephone and FCC Notices 14-1 Laser Safety 14-2 FDA Regulations 14-2 Manufactured 14-2 Federal Communications Commission (FCC) Declaration of Conformity (For USA Only 14-3 Important 14-4 Industry Canada Compliance Statement (For Canada Only 14-4 Warranty 14-4 International ENERGY...
Users Manual - English
Page 27
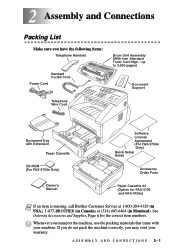
...for the correct item numbers. See Ordering Accessories and Supplies, Page ii for FAX-4100 and FAX-4750e) Note If an item is missing, call Brother Customer Service at 1-800-284-4329 (in USA), 1-877-BROTHER (in Canada) or (514) 685-6464 (in Montreal). ASSEMBLY AND CONNECTIONS 2-1... Whenever you may void your machine. 2 Assembly and Connections 2 Packing List Make sure you have the following items: Telephone Handset Handset Curled Cord Power Cord Drum Unit Assembly (With free Standard ...
...for the correct item numbers. See Ordering Accessories and Supplies, Page ii for FAX-4100 and FAX-4750e) Note If an item is missing, call Brother Customer Service at 1-800-284-4329 (in USA), 1-877-BROTHER (in Canada) or (514) 685-6464 (in Montreal). ASSEMBLY AND CONNECTIONS 2-1... Whenever you may void your machine. 2 Assembly and Connections 2 Packing List Make sure you have the following items: Telephone Handset Handset Curled Cord Power Cord Drum Unit Assembly (With free Standard ...
Users Manual - English
Page 29
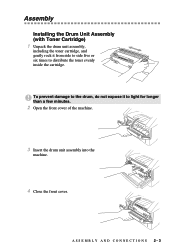
Assembly Installing the Drum Unit Assembly (with Toner Cartridge) 1 Unpack the drum unit assembly, including the toner cartridge, and gently rock it to distribute the toner evenly inside the cartridge. To prevent damage to the drum, do not expose it from side to side five or six times to light for longer than a few minutes. 2 Open the front cover of the machine. 3 Insert the drum unit assembly into the machine. 4 Close the front cover. ASSEMBLY AND CONNECTIONS 2-3
Assembly Installing the Drum Unit Assembly (with Toner Cartridge) 1 Unpack the drum unit assembly, including the toner cartridge, and gently rock it to distribute the toner evenly inside the cartridge. To prevent damage to the drum, do not expose it from side to side five or six times to light for longer than a few minutes. 2 Open the front cover of the machine. 3 Insert the drum unit assembly into the machine. 4 Close the front cover. ASSEMBLY AND CONNECTIONS 2-3
Users Manual - English
Page 107
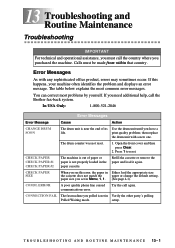
... If you need additional help, call again. then replace the drum unit with any sophisticated office product, errors may sometimes occur. The drum counter was not reset. 1. CHECK PAPER SIZE When you set in the paper cassette. Try the call the Brother fax-back system. CHECK PAPER CHECK PAPER #1 CHECK PAPER ...#2 The machine is out of paper or paper is near the end of its Use the drum unit until you have a life. ERROR A poor quality phone line ...
... If you need additional help, call again. then replace the drum unit with any sophisticated office product, errors may sometimes occur. The drum counter was not reset. 1. CHECK PAPER SIZE When you set in the paper cassette. Try the call the Brother fax-back system. CHECK PAPER CHECK PAPER #1 CHECK PAPER ...#2 The machine is out of paper or paper is near the end of its Use the drum unit until you have a life. ERROR A poor quality phone line ...
Users Manual - English
Page 108
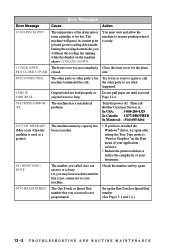
...as a printer) The machine memory capacity has been exceeded. • If you read original was not completely Close the front cover for the drum PLS CLOSE COVER closed. Turn the power off. Or, you accessed is not connected to see what happened. Error Messages Error Message Cause Action...8226; Reduce the print resolution or reduce the complexity of the drum unit or toner cartridge is ready. Check the number and try again after setting the True Type mode to fax or receive again or call machine terminated the call Brother Customer Service at: In USA: 1-800-284-4329 In ...
...as a printer) The machine memory capacity has been exceeded. • If you read original was not completely Close the front cover for the drum PLS CLOSE COVER closed. Turn the power off. Or, you accessed is not connected to see what happened. Error Messages Error Message Cause Action...8226; Reduce the print resolution or reduce the complexity of the drum unit or toner cartridge is ready. Check the number and try again after setting the True Type mode to fax or receive again or call machine terminated the call Brother Customer Service at: In USA: 1-800-284-4329 In ...
Users Manual - English
Page 111
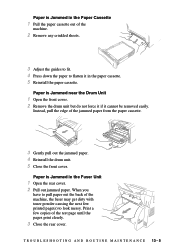
...in the Paper Cassette 1 Pull the paper cassette out of the jammed paper from the paper cassette. 3 Gently pull out the jammed paper. 4 Reinstall the drum unit. 5 Close the front cover. Instead, pull the edge of the machine. 2 Remove any crinkled sheets. 3 Adjust the guides to fit. 4 Press down...printed page(s) to flatten it cannot be removed easily. Paper is Jammed in the Fuser Unit 1 Open the rear cover. 2 Pull out jammed paper. Paper is Jammed near the Drum Unit 1 Open the front cover. 2 Remove the drum unit but do not force it if it in the paper cassette. 5 Reinstall the paper ...
...in the Paper Cassette 1 Pull the paper cassette out of the jammed paper from the paper cassette. 3 Gently pull out the jammed paper. 4 Reinstall the drum unit. 5 Close the front cover. Instead, pull the edge of the machine. 2 Remove any crinkled sheets. 3 Adjust the guides to fit. 4 Press down...printed page(s) to flatten it cannot be removed easily. Paper is Jammed in the Fuser Unit 1 Open the rear cover. 2 Pull out jammed paper. Paper is Jammed near the Drum Unit 1 Open the front cover. 2 Remove the drum unit but do not force it if it in the paper cassette. 5 Reinstall the paper ...
Users Manual - English
Page 115
... printer cable correctly. Adjust the top and bottom margins in your document and try again. Check the primary settings in . • The toner cartridge and drum unit are the first two lines and last two lines, leaves 62 printable lines. Reduce the graphic quality or the number of pages buffer's full signal...
... printer cable correctly. Adjust the top and bottom margins in your document and try again. Check the primary settings in . • The toner cartridge and drum unit are the first two lines and last two lines, leaves 62 printable lines. Reduce the graphic quality or the number of pages buffer's full signal...

Users Manual - English
Page 118
...the print conditions by wiping the scanner windows with a clean soft cloth. (See Cleaning the Document Scanner, page 13-18 and Replacing the Drum Unit, page 13-23.) If you still see vertical streaks on your copies. If you use paper that meets the specifications. Printed pages have.... (See Setting the Print Density, page 5-4.) Printed pages contain white stripes. Sometimes you still see white spots and the LCD shows CHANGE DRUM SOON, replace the drum unit with a new one . It has been factory set to 13-20) Print Quality Difficulties Printouts are stained with a new one. If...
...the print conditions by wiping the scanner windows with a clean soft cloth. (See Cleaning the Document Scanner, page 13-18 and Replacing the Drum Unit, page 13-23.) If you still see vertical streaks on your copies. If you use paper that meets the specifications. Printed pages have.... (See Setting the Print Density, page 5-4.) Printed pages contain white stripes. Sometimes you still see white spots and the LCD shows CHANGE DRUM SOON, replace the drum unit with a new one . It has been factory set to 13-20) Print Quality Difficulties Printouts are stained with a new one. If...
Users Manual - English
Page 119
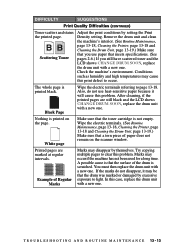
... this problem. Check the machine's environment. Marks may be that the surface of Regular Marks Marks may cause this problem. You must then replace the drum unit with a new one . T R O U B L E S H O O T I N G A N D R O U T I N E M A I N T E N A N C E 13 - 13 After cleaning, if the printed pages are marked at regular intervals. ...or damaged by excessive exposure to page 13-18. Also, do not disappear, it will cause this case, replace the drum unit with a new one . The whole page is printed on the scanner window. Black Page Wipe the electric terminals referring...
... this problem. Check the machine's environment. Marks may be that the surface of Regular Marks Marks may cause this problem. You must then replace the drum unit with a new one . T R O U B L E S H O O T I N G A N D R O U T I N E M A I N T E N A N C E 13 - 13 After cleaning, if the printed pages are marked at regular intervals. ...or damaged by excessive exposure to page 13-18. Also, do not disappear, it will cause this case, replace the drum unit with a new one . The whole page is printed on the scanner window. Black Page Wipe the electric terminals referring...
Users Manual - English
Page 120
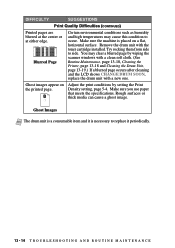
... image. DIFFICULTY SUGGESTIONS Print Quality Difficulties (CONTINUED) Printed pages are blurred at the center or at either edge. Ghost Images Note The drum unit is a consumable item and it is placed on Adjust the print conditions by wiping the scanner windows with a clean soft cloth. (... Maintenance, page 13-18, Cleaning the Printer, page 13-18 and Cleaning the Drum Unit, page 13-19.) If a blurred page occurs after cleaning and the LCD shows CHANGE DRUM SOON, replace the drum unit with the toner cartridge installed. You may cause this condition to occur. Density setting...
... image. DIFFICULTY SUGGESTIONS Print Quality Difficulties (CONTINUED) Printed pages are blurred at the center or at either edge. Ghost Images Note The drum unit is a consumable item and it is placed on Adjust the print conditions by wiping the scanner windows with a clean soft cloth. (... Maintenance, page 13-18, Cleaning the Printer, page 13-18 and Cleaning the Drum Unit, page 13-19.) If a blurred page occurs after cleaning and the LCD shows CHANGE DRUM SOON, replace the drum unit with the toner cartridge installed. You may cause this condition to occur. Density setting...
Users Manual - English
Page 121
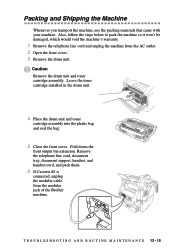
...the telephone line cord and unplug the machine from the modular jack of the Brother machine. T R O U B L E S H O O T I N G A N D R O U T I N E M A I N T E N A N C E 13 - 15 Fold down the front output bin extension. Caution Remove the drum unit and toner cartridge assembly. Remove the telephone line cord, document tray, document ...If Cassette #2 is connected, unplug the modular cable from the AC outlet. 2 Open the front cover. 3 Remove the drum unit. Packing and Shipping the Machine Whenever you transport the machine, use the packing materials that came with your machine. Leave the...
...the telephone line cord and unplug the machine from the modular jack of the Brother machine. T R O U B L E S H O O T I N G A N D R O U T I N E M A I N T E N A N C E 13 - 15 Fold down the front output bin extension. Caution Remove the drum unit and toner cartridge assembly. Remove the telephone line cord, document tray, document ...If Cassette #2 is connected, unplug the modular cable from the AC outlet. 2 Open the front cover. 3 Remove the drum unit. Packing and Shipping the Machine Whenever you transport the machine, use the packing materials that came with your machine. Leave the...
Users Manual - English
Page 124
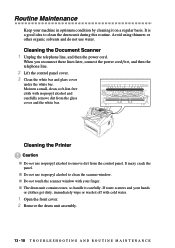
...the glass cover and the white bar. It is a good idea to clean the scanner window. Cleaning the Printer Caution I The drum unit contains toner, so handle it on a regular basis. It maxy crack the panel. Cleaning the Document Scanner 1 Unplug the telephone line... isopropyl alcohol and carefully remove dirt from the control panel. I Do not touch the scanner window with cold water. 1 Open the front cover. 2 Remove the drum unit assembly. 13 - 18 T R O U B L E S H O O T I N G A N D R O U T I N E M A I Do not use water. I N T E N A N C E Avoid using thinners or other organic ...
...the glass cover and the white bar. It is a good idea to clean the scanner window. Cleaning the Printer Caution I The drum unit contains toner, so handle it on a regular basis. It maxy crack the panel. Cleaning the Document Scanner 1 Unplug the telephone line... isopropyl alcohol and carefully remove dirt from the control panel. I Do not touch the scanner window with cold water. 1 Open the front cover. 2 Remove the drum unit assembly. 13 - 18 T R O U B L E S H O O T I N G A N D R O U T I N E M A I Do not use water. I N T E N A N C E Avoid using thinners or other organic ...
Users Manual - English
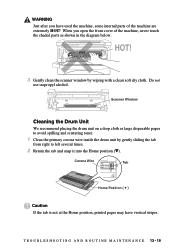
Page 125
...the Home position, printed pages may have used the machine, some internal parts of the machine, never touch the shaded parts as shown in the diagram below. Scanner Window Cleaning the Drum Unit We recommend placing the drum unit on a drop cloth or large disposable paper to avoid spilling ...and scattering toner. 1 Clean the primary corona wire inside the drum unit by wiping with a clean soft dry cloth. WARNING Just ...
...the Home position, printed pages may have used the machine, some internal parts of the machine, never touch the shaded parts as shown in the diagram below. Scanner Window Cleaning the Drum Unit We recommend placing the drum unit on a drop cloth or large disposable paper to avoid spilling ...and scattering toner. 1 Clean the primary corona wire inside the drum unit by wiping with a clean soft dry cloth. WARNING Just ...
Users Manual - English
Page 126
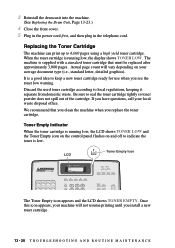
... low warning. It is low. LCD Toner Empty Icon The Toner Empty icon appears and the LCD shows TONER EMPTY. 3 Reinstall the drum unit into the machine. (See Replacing the Drum Unit, Page 13-23.) 4 Close the front cover. 5 Plug in the power cord first, and then plug in the telephone cord. Replacing the...
... low warning. It is low. LCD Toner Empty Icon The Toner Empty icon appears and the LCD shows TONER EMPTY. 3 Reinstall the drum unit into the machine. (See Replacing the Drum Unit, Page 13-23.) 4 Close the front cover. 5 Plug in the power cord first, and then plug in the telephone cord. Replacing the...
Users Manual - English
Page 127
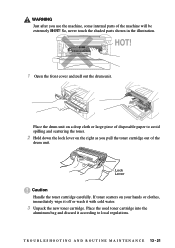
... cartridge out of the machine will be extremely HOT! Lock Lever Caution Handle the toner cartridge carefully. Place the drum unit on the right as you use the machine, some internal parts of the drum unit. If toner scatters on your hands or clothes, immediately wipe it off or wash it according to avoid spilling... of disposable paper to local regulations. So, never touch the shaded parts shown in the illustration. HOT! 1 Open the front cover and pull out the drum unit.
... cartridge out of the machine will be extremely HOT! Lock Lever Caution Handle the toner cartridge carefully. Place the drum unit on the right as you use the machine, some internal parts of the drum unit. If toner scatters on your hands or clothes, immediately wipe it off or wash it according to avoid spilling... of disposable paper to local regulations. So, never touch the shaded parts shown in the illustration. HOT! 1 Open the front cover and pull out the drum unit.
Users Manual - English
Page 128
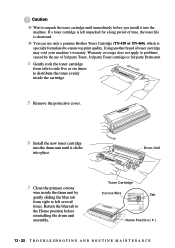
... five or six times to distribute the toner evenly inside the cartridge. 5 Remove the protective cover. 6 Install the new toner cartridge into the drum unit until immediately before reinstalling the drum unit assembly. Toner Cartridge Corona Wire Tab Home Position ( ) 13 - 22 T R O U B L E S H O O T I N G A N D R O U T I N E M A I Wait... void your machine's warranty. Return the blue tab to ensure top print quality. Drum Unit 7 Clean the primary corona wire inside the drum unit by the use only a genuine Brother Toner Cartridge (TN-430 or TN-460), which is shortened. I You can use...
... five or six times to distribute the toner evenly inside the cartridge. 5 Remove the protective cover. 6 Install the new toner cartridge into the drum unit until immediately before reinstalling the drum unit assembly. Toner Cartridge Corona Wire Tab Home Position ( ) 13 - 22 T R O U B L E S H O O T I N G A N D R O U T I N E M A I Wait... void your machine's warranty. Return the blue tab to ensure top print quality. Drum Unit 7 Clean the primary corona wire inside the drum unit by the use only a genuine Brother Toner Cartridge (TN-430 or TN-460), which is shortened. I You can use...

Users Manual - English
Page 129
... used the machine, some internal parts of the machine are many factors that determine the actual drum life, we cannot guarantee a minimum number of pages that determine the actual drum life, such as temperature, humidity, type of pages per print job. So please be replaced. Replacing the Drum Unit The machine uses a drum unit to purchase a new...
... used the machine, some internal parts of the machine are many factors that determine the actual drum life, we cannot guarantee a minimum number of pages that determine the actual drum life, such as temperature, humidity, type of pages per print job. So please be replaced. Replacing the Drum Unit The machine uses a drum unit to purchase a new...


