
Users Manual - English
Page 8
For laser products: Failure to remove the Toner Cartridge (and Toner Drum Unit on applicable models) during shipping. No oral or written information, advice or representation provided by the end user/purchaser to a "Brother" Authorized Service Center, together with the Serial Number or Rating Label ...This Limited Warranty gives you specific legal rights and you may not apply to you. Internet support: support@brother.ca or browse Brother's Web Site: www.brother.com Brother International Corporation (Canada) Ltd. 1 Rue Hôtel de Ville Dollard-Des-Ormeaux, QC H9B 3H6 We're ...
For laser products: Failure to remove the Toner Cartridge (and Toner Drum Unit on applicable models) during shipping. No oral or written information, advice or representation provided by the end user/purchaser to a "Brother" Authorized Service Center, together with the Serial Number or Rating Label ...This Limited Warranty gives you specific legal rights and you may not apply to you. Internet support: support@brother.ca or browse Brother's Web Site: www.brother.com Brother International Corporation (Canada) Ltd. 1 Rue Hôtel de Ville Dollard-Des-Ormeaux, QC H9B 3H6 We're ...
Users Manual - English
Page 13
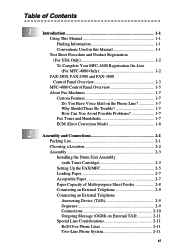
...and Product Registration (For USA Only 1-2 To Complete Your MFC-4800 Registration On-Line (For MFC-4800 Only 1-2 FAX-2800, FAX-2900 and FAX-3800 Control Panel Overview 1-3 MFC-4800 Control Panel Overview 1-5 About Fax Machines 1-7 Custom Features... Tones and Handshake 1-7 ECM (Error Correction Mode 1-8 2 Assembly and Connections 2-1 Packing List 2-1 Choosing a Location 2-2 Assembly 2-3 Installing the Drum Unit Assembly (with Toner Cartridge 2-3 Setting Up the FAX/MFC 2-5 Loading Paper 2-7 Acceptable Paper 2-7 Paper Capacity of Multi-purpose Sheet Feeder 2-8 ...
...and Product Registration (For USA Only 1-2 To Complete Your MFC-4800 Registration On-Line (For MFC-4800 Only 1-2 FAX-2800, FAX-2900 and FAX-3800 Control Panel Overview 1-3 MFC-4800 Control Panel Overview 1-5 About Fax Machines 1-7 Custom Features... Tones and Handshake 1-7 ECM (Error Correction Mode 1-8 2 Assembly and Connections 2-1 Packing List 2-1 Choosing a Location 2-2 Assembly 2-3 Installing the Drum Unit Assembly (with Toner Cartridge 2-3 Setting Up the FAX/MFC 2-5 Loading Paper 2-7 Acceptable Paper 2-7 Paper Capacity of Multi-purpose Sheet Feeder 2-8 ...
Users Manual - English
Page 18
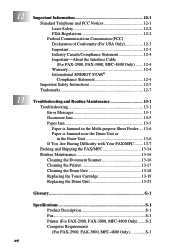
... 12-4 International ENERGY STAR® Compliance Statement 12-4 Important Safety Instructions 12-5 Trademarks 12-7 Troubleshooting and Routine Maintenance 13-1 Troubleshooting 13-1 Error Messages 13-1 Document Jam 13-5 Paper Jam 13-5 Paper is Jammed in the Multi-purpose Sheet Feeder.... 13-6 Paper is Jammed near the Drum Unit or in... the Fuser Unit 13-6 If You Are Having Difficulty with Your FAX/MFC ........ 13-7 Packing and Shipping the FAX/MFC 13-14 Routine ...
... 12-4 International ENERGY STAR® Compliance Statement 12-4 Important Safety Instructions 12-5 Trademarks 12-7 Troubleshooting and Routine Maintenance 13-1 Troubleshooting 13-1 Error Messages 13-1 Document Jam 13-5 Paper Jam 13-5 Paper is Jammed in the Multi-purpose Sheet Feeder.... 13-6 Paper is Jammed near the Drum Unit or in... the Fuser Unit 13-6 If You Are Having Difficulty with Your FAX/MFC ........ 13-7 Packing and Shipping the FAX/MFC 13-14 Routine ...
Users Manual - English
Page 29
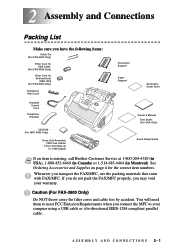
...(For FAX-3800 Only) Telephone Wire Cord Document Support Paper Support Accessory Order Form Handset Curled Cord Telephone Handset CD-ROM (For MFC 4800 Only) Drum Unit Assembly (With free Starter Toner Cartridge-up to your warranty. You will need them to meet FCC Emission Requirements when you connect the MFC to... 1,000 pages) Owner's Manual Test Sheet (For USA Only) Quick Setup Guide If an item is missing, call Brother Customer Service at 1-800-284-4329 (in Note USA), 1-800-853-6660 (in Canada) or 1-514-685-6464 (in Montreal). If you do not ...
...(For FAX-3800 Only) Telephone Wire Cord Document Support Paper Support Accessory Order Form Handset Curled Cord Telephone Handset CD-ROM (For MFC 4800 Only) Drum Unit Assembly (With free Starter Toner Cartridge-up to your warranty. You will need them to meet FCC Emission Requirements when you connect the MFC to... 1,000 pages) Owner's Manual Test Sheet (For USA Only) Quick Setup Guide If an item is missing, call Brother Customer Service at 1-800-284-4329 (in Note USA), 1-800-853-6660 (in Canada) or 1-514-685-6464 (in Montreal). If you do not ...

Users Manual - English
Page 31
Do NOT remove the starter sheet-this will be ejected while the FAX/MFC is warming up. To prevent damage to the drum, do NOT expose it from side to side five or six times to light for longer than a few minutes. Assembly Installing the Drum Unit Assembly (with Toner Cartridge) 1 Unpack the drum unit assembly, including the toner cartridge, and gently rock it to distribute the toner evenly inside the cartridge. Starter Sheet ASSEMBLY AND CONNECTIONS 2-3
Do NOT remove the starter sheet-this will be ejected while the FAX/MFC is warming up. To prevent damage to the drum, do NOT expose it from side to side five or six times to light for longer than a few minutes. Assembly Installing the Drum Unit Assembly (with Toner Cartridge) 1 Unpack the drum unit assembly, including the toner cartridge, and gently rock it to distribute the toner evenly inside the cartridge. Starter Sheet ASSEMBLY AND CONNECTIONS 2-3
Users Manual - English
Page 32
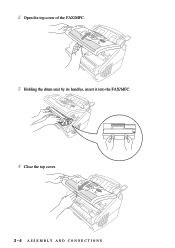
2 Open the top cover of the FAX/MFC. 3 Holding the drum unit by its handles, insert it into the FAX/MFC. 4 Close the top cover. 2-4 ASSEMBLY AND CONNECTIONS
2 Open the top cover of the FAX/MFC. 3 Holding the drum unit by its handles, insert it into the FAX/MFC. 4 Close the top cover. 2-4 ASSEMBLY AND CONNECTIONS
Users Manual - English
Page 109
... help, call the Brother fax-back system at In USA: 1-800-521-2846 In Canada: 1-800-681-9838 1-514-685-5381 (in the load it again and then multi-purpose sheet feeder. Try the call the country where you purchased the printer. press Fax Start. Use the drum unit until you have a print... out of Refill the paper or paper or paper is not remove the paper and properly loaded in Montreal) ERROR MESSAGE CAUSE ACTION CHANGE DRUM SOON The drum unit is not in Polled Waiting mode. Error Messages You may not be made from within that is near the end of its life. Change...
... help, call the Brother fax-back system at In USA: 1-800-521-2846 In Canada: 1-800-681-9838 1-514-685-5381 (in the load it again and then multi-purpose sheet feeder. Try the call the country where you purchased the printer. press Fax Start. Use the drum unit until you have a print... out of Refill the paper or paper or paper is not remove the paper and properly loaded in Montreal) ERROR MESSAGE CAUSE ACTION CHANGE DRUM SOON The drum unit is not in Polled Waiting mode. Error Messages You may not be made from within that is near the end of its life. Change...
Users Manual - English
Page 110
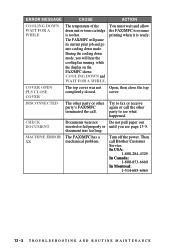
...you see what happened. ERROR MESSAGE CAUSE ACTION COOLING DOWN WAIT FOR A WHILE The temperature of the You must wait and allow drum unit or toner cartridge the FAX/MFC to see page 13-5. DISCONNECTED The other party or other party to resume is ready. MACHINE ... FAX/MFC shows COOLING DOWN and WAIT FOR A WHILE. Try to fax or receive again or call the other party's FAX/MFC terminated the call Brother Customer Service: In USA: 1-800-284-4329 In Canada: 1-800-853-6660 In Montreal: 1-514-685-6464 13 - 2 T R O U B L E S H O O T I N G A N D R O U T I N E M A I N T E N A N C...
...you see what happened. ERROR MESSAGE CAUSE ACTION COOLING DOWN WAIT FOR A WHILE The temperature of the You must wait and allow drum unit or toner cartridge the FAX/MFC to see page 13-5. DISCONNECTED The other party or other party to resume is ready. MACHINE ... FAX/MFC shows COOLING DOWN and WAIT FOR A WHILE. Try to fax or receive again or call the other party's FAX/MFC terminated the call Brother Customer Service: In USA: 1-800-284-4329 In Canada: 1-800-853-6660 In Montreal: 1-514-685-6464 13 - 2 T R O U B L E S H O O T I N G A N D R O U T I N E M A I N T E N A N C...
Users Manual - English
Page 112
... itself and return to the date and time prompt, it out, then close the top cover again. Reinstall the drum unit. Order a new toner cartridge now. 13 - 4 T R O U B L E S H O O T I N G A N D R O U T I N E M A I N T E N A N C E until you can still print. Please call Brother Customer Service and tell them the Machine Error number at: In USA: 1-800-284-4329 In Canada: 1-800...
... itself and return to the date and time prompt, it out, then close the top cover again. Reinstall the drum unit. Order a new toner cartridge now. 13 - 4 T R O U B L E S H O O T I N G A N D R O U T I N E M A I N T E N A N C E until you can still print. Please call Brother Customer Service and tell them the Machine Error number at: In USA: 1-800-284-4329 In Canada: 1-800...
Users Manual - English
Page 114
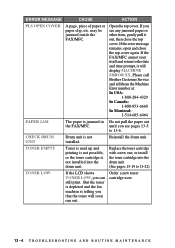
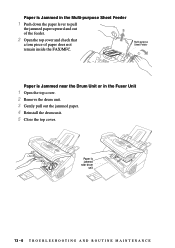
Paper is jammed near the Drum Unit or in the Multi-purpose Sheet Feeder 1 Push down the paper lever to pull the jammed paper upward and out of the feeder. 2 Open the top cover and check that a torn piece of paper does not remain inside the FAX/MFC. Multi-purpose Sheet Feeder Paper is Jammed in the Fuser Unit 1 Open the top cover. 2 Remove the drum unit. 3 Gently pull out the jammed paper. 4 Reinstall the drum unit. 5 Close the top cover. Paper is Jammed near drum unit 13 - 6 T R O U B L E S H O O T I N G A N D R O U T I N E M A I N T E N A N C E
Paper is jammed near the Drum Unit or in the Multi-purpose Sheet Feeder 1 Push down the paper lever to pull the jammed paper upward and out of the feeder. 2 Open the top cover and check that a torn piece of paper does not remain inside the FAX/MFC. Multi-purpose Sheet Feeder Paper is Jammed in the Fuser Unit 1 Open the top cover. 2 Remove the drum unit. 3 Gently pull out the jammed paper. 4 Reinstall the drum unit. 5 Close the top cover. Paper is Jammed near drum unit 13 - 6 T R O U B L E S H O O T I N G A N D R O U T I N E M A I N T E N A N C E

Users Manual - English
Page 118
... it prints application software to make sure to 13-4) The MFC prints Reset the MFC. Check the primary settings in . • The toner cartridge and drum unit are the first two lines and last two lines, leaves 62 printable lines. Reduce the complexity of font sizes within your PC and you have... occurs. Reduce the graphic quality or the number of your MFC. Please make sure it off by deselect the AutoLoad PopUp check box in the Brother Control Center chapter. (See How to Turn Off AutoLoad, page 14-2, in your document to your application software. The MFC cannot print full pages ...
... it prints application software to make sure to 13-4) The MFC prints Reset the MFC. Check the primary settings in . • The toner cartridge and drum unit are the first two lines and last two lines, leaves 62 printable lines. Reduce the complexity of font sizes within your PC and you have... occurs. Reduce the graphic quality or the number of your MFC. Please make sure it off by deselect the AutoLoad PopUp check box in the Brother Control Center chapter. (See How to Turn Off AutoLoad, page 14-2, in your document to your application software. The MFC cannot print full pages ...

Users Manual - English
Page 120
...Printouts are stained with a new one . Printed pages have scattered toner and the LCD shows CHANGE DRUM SOON, replace the drum unit with a new one . 13 - 12 T R O U B L E S H O O T I N G A N D R O U T I N E M A I N T E N A N C E Remove the drum unit and clean the FAX/MFC's interior. (See Routine Maintenance, page 13-16, Cleaning the Printer,...MFC's interior and the primary corona wire of the toner cartridge. (See Routine Maintenance, page 13-16 and Cleaning the Drum Unit, page 13-18.) Make sure that meets specifications. (See pages 27.) If you still see dark stripes or toner stains...
...Printouts are stained with a new one . Printed pages have scattered toner and the LCD shows CHANGE DRUM SOON, replace the drum unit with a new one . 13 - 12 T R O U B L E S H O O T I N G A N D R O U T I N E M A I N T E N A N C E Remove the drum unit and clean the FAX/MFC's interior. (See Routine Maintenance, page 13-16, Cleaning the Printer,...MFC's interior and the primary corona wire of the toner cartridge. (See Routine Maintenance, page 13-16 and Cleaning the Drum Unit, page 13-18.) Make sure that meets specifications. (See pages 27.) If you still see dark stripes or toner stains...

Users Manual - English
Page 121
...center or at regular intervals. Blurred Page Certain environmental conditions such as it periodically. Ghost images appear on the page. Ghost Images Note The drum unit is a consumable item and it may be that the toner cartridge is placed on the scanner window. White page Make sure that the... electric terminals referring to side. Wipe the electric terminals. (See Routine Maintenance, page 13-16, Cleaning the Printer, page 13-17 and Cleaning the Drum Unit, page 13-18.) Make sure that the surface of Regular Marks Marks may occur if the FAX/MFC has not been used for a long time...
...center or at regular intervals. Blurred Page Certain environmental conditions such as it periodically. Ghost images appear on the page. Ghost Images Note The drum unit is a consumable item and it may be that the toner cartridge is placed on the scanner window. White page Make sure that the... electric terminals referring to side. Wipe the electric terminals. (See Routine Maintenance, page 13-16, Cleaning the Printer, page 13-17 and Cleaning the Drum Unit, page 13-18.) Make sure that the surface of Regular Marks Marks may occur if the FAX/MFC has not been used for a long time...
Users Manual - English
Page 122
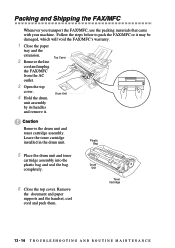
...toner cartridge assembly into the plastic bag and seal the bag completely. 6 Close the top cover. Top Cover 3 Open the top cover. 4 Hold the drum unit assembly by its handles and remove it may be damaged, which will void the FAX/MFC's warranty. 1 Close the paper tray and the extension. 2 ...the line cord and unplug the FAX/MFC from the AC outlet. Follow the steps below to pack the FAX/MFC or it . Drum Unit Caution Remove the drum unit and toner cartridge assembly. Packing and Shipping the FAX/MFC Whenever you transport the FAX/MFC, use the packing materials that came with ...
...toner cartridge assembly into the plastic bag and seal the bag completely. 6 Close the top cover. Top Cover 3 Open the top cover. 4 Hold the drum unit assembly by its handles and remove it may be damaged, which will void the FAX/MFC's warranty. 1 Close the paper tray and the extension. 2 ...the line cord and unplug the FAX/MFC from the AC outlet. Follow the steps below to pack the FAX/MFC or it . Drum Unit Caution Remove the drum unit and toner cartridge assembly. Packing and Shipping the FAX/MFC Whenever you transport the FAX/MFC, use the packing materials that came with ...

Users Manual - English
Page 123
7 Wrap the FAX/MFC in the plastic bag and place it shut. Keep all separate parts to Brother as shown below: (FAX-3800 Only) Note If you are returning the FAX/MFC to use with your "Exchange" machine. 9 Close the carton and tape it in the original carton with the original packing material. 8 Pack the drum unit, toner cartridge assembly and printed materials into the original carton as part of the Exchange Service, pack only the FAX/MFC. T R O U B L E S H O O T I N G A N D R O U T I N E M A I N T E N A N C E 13 - 15
7 Wrap the FAX/MFC in the plastic bag and place it shut. Keep all separate parts to Brother as shown below: (FAX-3800 Only) Note If you are returning the FAX/MFC to use with your "Exchange" machine. 9 Close the carton and tape it in the original carton with the original packing material. 8 Pack the drum unit, toner cartridge assembly and printed materials into the original carton as part of the Exchange Service, pack only the FAX/MFC. T R O U B L E S H O O T I N G A N D R O U T I N E M A I N T E N A N C E 13 - 15
Users Manual - English
Page 124
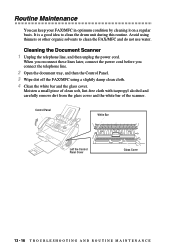
... line. 2 Open the document tray, and then the Control Panel. 3 Wipe dirt off the FAX/MFC using thinners or other organic solvents to clean the drum unit during this routine. Avoid using a slightly damp clean cloth. 4 Clean the white bar and the glass cover. Routine Maintenance You can keep your FAX/MFC...
... line. 2 Open the document tray, and then the Control Panel. 3 Wipe dirt off the FAX/MFC using thinners or other organic solvents to clean the drum unit during this routine. Avoid using a slightly damp clean cloth. 4 Clean the white bar and the glass cover. Routine Maintenance You can keep your FAX/MFC...
Users Manual - English
Page 125
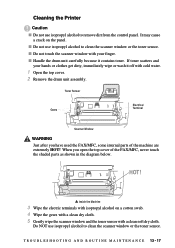
... I Do not use isopropyl alcohol to clean the scanner window or the toner sensor. I Handle the drum unit carefully because it off with cold water. 1 Open the top cover. 2 Remove the drum unit assembly. I N T E N A N C E 13 - 17 HOT! Inside the Machine 3... Wipe the electric terminals with isopropyl alcohol on the panel. T R O U B L E S H O O T I N G A N D R O U T I N E M A I Do not use isopropyl alcohol to clean the scanner window or the toner sensor. When you have used the FAX/MFC, some internal...
... I Do not use isopropyl alcohol to clean the scanner window or the toner sensor. I Handle the drum unit carefully because it off with cold water. 1 Open the top cover. 2 Remove the drum unit assembly. I N T E N A N C E 13 - 17 HOT! Inside the Machine 3... Wipe the electric terminals with isopropyl alcohol on the panel. T R O U B L E S H O O T I N G A N D R O U T I N E M A I Do not use isopropyl alcohol to clean the scanner window or the toner sensor. When you have used the FAX/MFC, some internal...
Users Manual - English
Page 126
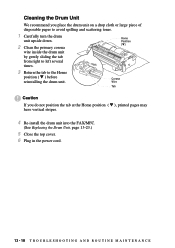
...avoid spilling and scattering toner. 1 Carefully turn the drum unit upside down. 2 Clean the primary corona wire inside the drum unit by gently sliding the tab from right to the Home position ( M ) before reinstalling the drum unit. Cleaning the Drum Unit We recommend you do not position the tab at ...the Home position ( M ), printed pages may have vertical stripes. 4 Re-install the drum unit into the FAX/MFC. (See Replacing the Drum Unit, page 13-23.) 5 Close the top...
...avoid spilling and scattering toner. 1 Carefully turn the drum unit upside down. 2 Clean the primary corona wire inside the drum unit by gently sliding the tab from right to the Home position ( M ) before reinstalling the drum unit. Cleaning the Drum Unit We recommend you do not position the tab at ...the Home position ( M ), printed pages may have vertical stripes. 4 Re-install the drum unit into the FAX/MFC. (See Replacing the Drum Unit, page 13-23.) 5 Close the top...

Users Manual - English
Page 128
... 20 T R O U B L E S H O O T I N G A N D R O U T I N E M A I N T E N A N C E Drum Unit 3 Gently turn the Toner lever on a drop cloth or large piece of the drum by gently pulling it stops. 1 Open the top cover. Top Cover 2 Remove the drum unit by holding each side of disposable paper to the front. 4 Remove the used toner... cartridge from the drum unit by its handles and gently lift the drum forward toward you. Make sure the top cover is closed by Unit turning the lever completely to avoid spilling and scattering the toner. ...
... 20 T R O U B L E S H O O T I N G A N D R O U T I N E M A I N T E N A N C E Drum Unit 3 Gently turn the Toner lever on a drop cloth or large piece of the drum by gently pulling it stops. 1 Open the top cover. Top Cover 2 Remove the drum unit by holding each side of disposable paper to the front. 4 Remove the used toner... cartridge from the drum unit by its handles and gently lift the drum forward toward you. Make sure the top cover is closed by Unit turning the lever completely to avoid spilling and scattering the toner. ...
Users Manual - English
Page 129
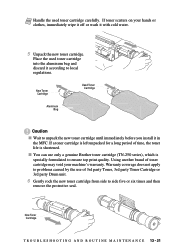
Warranty coverage does not apply to problems caused by the use only a genuine Brother toner cartridge (TN-250 series), which is shortened. New Toner Cartridge T R O U B L E S H O O T I N G A N D R O U T I N E M A I Wait to unpack the new toner cartridge until immediately before you install it ...or wash it with cold water. 5 Unpack the new toner cartridge. Using another brand of 3rd party Toner, 3rd party Toner Cartridge or 3rd party Drum unit. 6 Gently rock the new toner cartridge from side to side five or six times and then remove the protective seal. Note Handle the used toner...
Warranty coverage does not apply to problems caused by the use only a genuine Brother toner cartridge (TN-250 series), which is shortened. New Toner Cartridge T R O U B L E S H O O T I N G A N D R O U T I N E M A I Wait to unpack the new toner cartridge until immediately before you install it ...or wash it with cold water. 5 Unpack the new toner cartridge. Using another brand of 3rd party Toner, 3rd party Toner Cartridge or 3rd party Drum unit. 6 Gently rock the new toner cartridge from side to side five or six times and then remove the protective seal. Note Handle the used toner...


